Boot Mac from USB Flash Drives [All You Need to Know]
Why Need to Boot Mac from USB
To boot a Mac from a USB, start by creating a bootable USB drive using a tool like Disk Utility or a third-party software like TransMac. Then, insert the USB drive into the Mac and restart it while holding the Option (⌥) key. This will bring up the Startup Disk selection menu, where you can choose the USB drive as the startup disk. Alternatively, you can reset the System Management Controller (SMC) and Power Management Unit (PMU) by pressing the power button for 10 seconds, then releasing it for 10 seconds, and repeating this process 10 times.
A fresh macOS installation can lead to an error-free experience in more than one way. Not only will it fix issues with apps that aren't working, but it will also resolve other problems that may have been plaguing your system. By starting from scratch, you can ensure a clean and stable operating system, free from the errors and bugs that can accumulate over time. This can lead to a smoother and more enjoyable user experience, making it a great option if you're looking to get the most out of your Mac.
To avoid any errors or issues with apps
- To dual boot macOS Ventura and Monterey
- To make your mac device run faster and smoother
- To run apps that aren't compatible with your current macOS
- To install a new version without upgrading—hence, testing it first
Users may choose to boot their Mac from a USB drive for various reasons, such as wanting to install a fresh copy of macOS, troubleshoot issues, or run a specific operating system. However, in some cases, a fresh installation is unavoidable, often due to system crashes, malware infections, or hardware failures that render the existing operating system unusable. In such situations, booting from a USB drive is a necessary step to restore the Mac to its original state and ensure a smooth, functioning system.
- Corrupted OS files
- To find a quick solution
- macOS is not booting at all
- Access internal drives if the main boot drive isn't booting
Booting a Mac from a USB drive can save you the hassle of taking your device to a shop, and also allows you to test out multiple macOS versions before settling on the one you prefer.
No Mac devices support disk drives anymore, making mac USB the only option left for booting.
Necessary Preparations Before Boot Mac from USB
Before starting the process, it's essential to get the necessary precautions right. To prepare, you need to tend to the necessary preparations before booting Mac from USB, as we'll discuss two main methods.
Here are the two steps to create the necessary preparations for booting your Mac from USB:
1. How to Prepare and Format a USB Drive on Mac
Here's how to format your USB drive for the task:
Step 1. Open Finder from your mac desktop.
Step 2. Then head into Applications.
Step 3. Then select "Utilities."
Step 4. Under Utilities, find and click on the "Disk Utility" option.
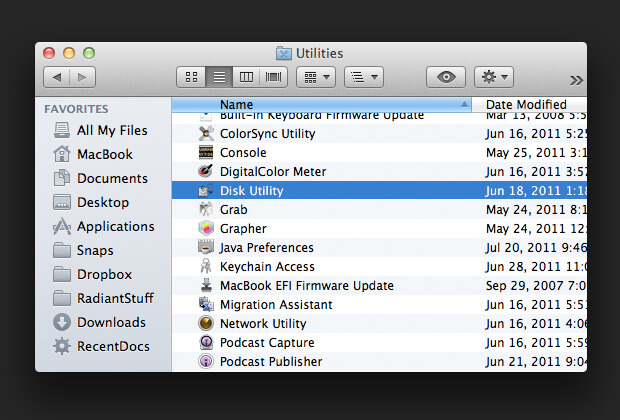
Step 5. Inside Disk Utility, pick your USB drive.
Step 6. Once the USB drive is selected, click "Erase" in the top bar to initiate the process.
Step 7. I'll rename the USB device to "Portable Storage".
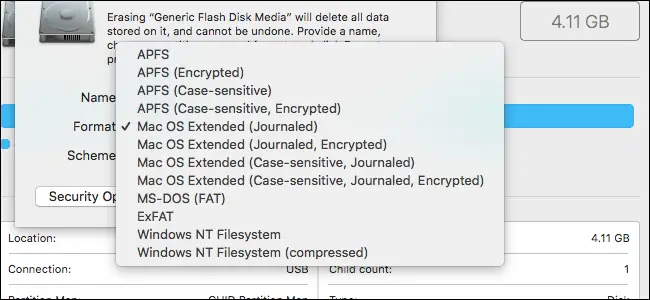
Step 8. And pick the "APFS format" to make it bootable.
Step 9. Press Done to begin formatting.
Step 10. Press Done when complete.
To format your USB drive into APFS, first, plug it into your Mac. Then, open Disk Utility, which is located in Applications/Utilities. Select your USB drive from the left-hand list, then click the "Erase" button.
2. How to Create a Bootable USB Drive with Terminal on Mac
To create a macOS Ventura bootable USB with a Mac Terminal, plug in the formatted USB and use the Terminal on your Mac device. You'll need to use the Terminal to create the bootable USB.
Step 1. Open Terminal from Other apps.
Step 2. Open the folder where your macOS Ventura is downloaded.
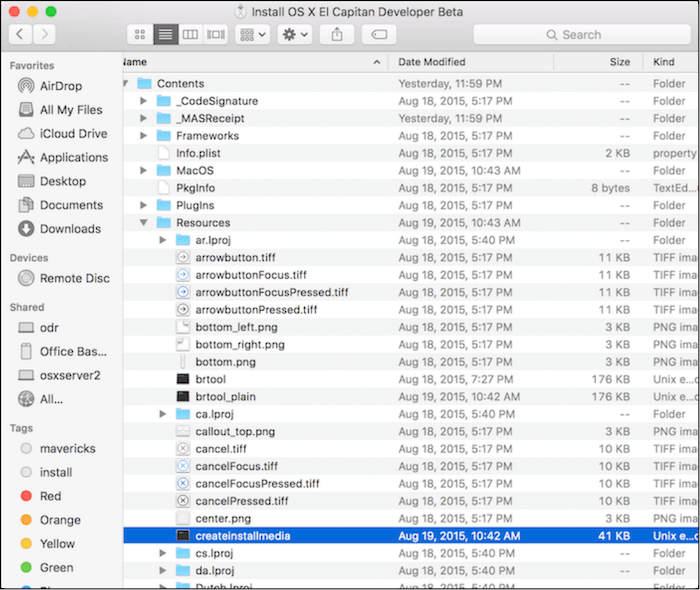
Step 3. Right-click on the "macOS package" and click on "Show Package Contents."
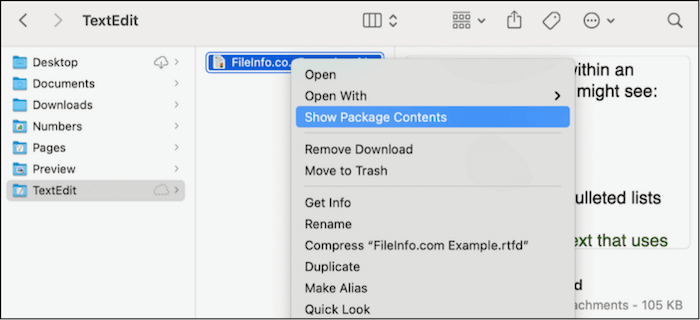
Step 4. Inside the package, find and select the "createinstallmedia" file.
Step 5. You can't give space after "Sudo" in Terminal. Instead, you can type "cd" followed by a space, then the name of the folder you want to switch to.
Step 6. To create a bootable installer for macOS, click on the createinstallmedia file and then drag and drop it into the Terminal window. This will allow you to run the command in the Terminal without having to type it out manually.
Step 7. Let the Terminal detect it, then type "—volume".
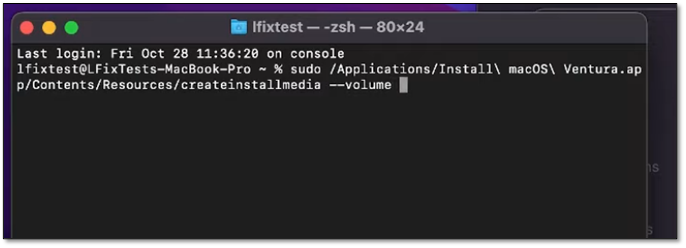
Step 8. Open the Terminal app on your Mac, then drag and drop the macOS Ventura/Monterey file from your desktop into the Terminal. The file path will automatically be inserted into the Terminal.
Step 9. Press Enter/Return and enter your password if prompted.
Step 10. When the "Ready to start" prompt appears, press Y and Return.
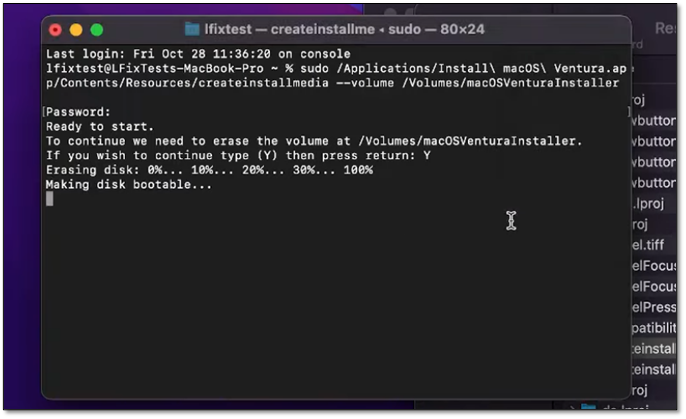
Step 11. Wait for it to finish making your disk bootable.
This tool will transform your USB device into a bootable disk, and since it's in APFS format, it'll be ready for Mac device boot once you restart your Mac. Let's proceed.
How to Boot Mac from USB Installer
Now that you've created a bootable USB for Mac, turn off your device to proceed with the installation. Before doing so, back up any important data as the installation will wipe everything from your primary drive.
Once you're ready, here's what you'll do:
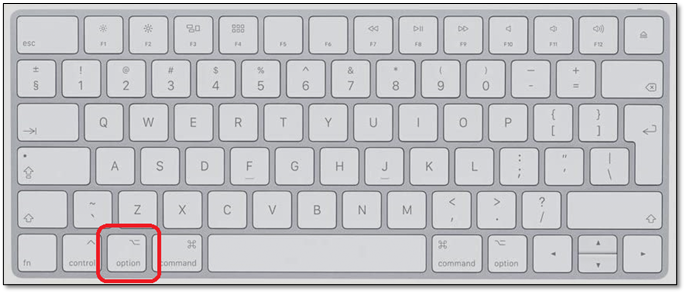
Step 1. Press the Power button on your Mac and press and hold the Option button on your keyboard immediately.
Step 2. Wait for the options to pop up.
Step 3. Select "Install macOS Ventura/Monterey" in the bootable options.
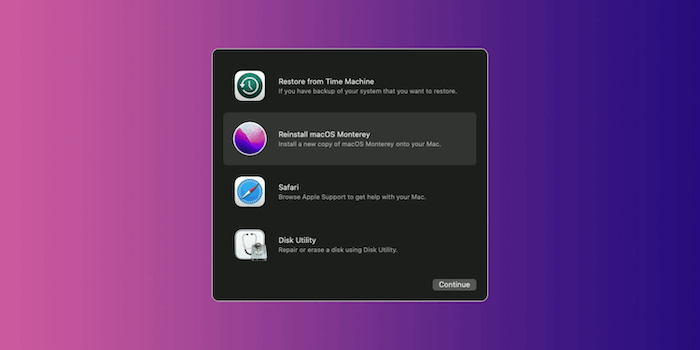
Step 4. Pick "macOS Ventura" again in the following menu.
To begin the installation of macOS Ventura or Monterey on your device, note that if you're looking for a fresh installation, head into options and select "Disk Utility" to erase your primary boot drive before proceeding with the installation.
Rescue Data from an Unbootable Mac with Software
To recover lost data on a newly installed macOS, you can try using the Time Machine backups, if available, to restore your files. If not, you can also use third-party data recovery software to scan the formatted drive and potentially recover lost data. This is especially useful if you've recently installed macOS and are experiencing issues with data loss. Additionally, if you're experiencing boot issues, you can try booting from a recovery mode or a bootable USB drive to access your data and potentially recover it.
If you're looking to rescue data from an unbootable Mac device, you will need a professional tool like Deep Data Recovery.
You can use a bootable USB drive with a compatible operating system, such as macOS or Linux, to access and recover data from an unbootable Mac device. This method allows you to bypass the device's boot issues and access the data stored on it.
- It's trusted by thousands of mac users around the globe.
- It can recover data from damaged hard drives or Mac formatted partitions.
- It can restore data lost in formatting or virus attacks.
- If you've mistakenly restored macOS or had a failed installation of macOS Ventura, the Recovery Mode can help restore data by booting from the Recovery Mode and then running a Terminal command to restore the system. This process can be initiated by restarting your Mac and immediately holding down the power button, then releasing it and pressing the power button again to boot from the Recovery Mode.
- The system will restore data lost in a system crash or operation error, ensuring that no information is lost.
This software is the best choice for recovering data from an unbootable Mac, allowing you to rescue your data and prevent it from being lost forever.
Step 1. Install and run Deep Data Recovery for Mac on another Mac computer, and select "Unbootable Mac > Start" to recover data from a Mac that won't boot.
Step 2. To create a bootable disc using a prepared USB drive, select the USB drive from the list and click "Next" to begin the bootable disk creation process.
- Warning
- The creator will prompt to erase the drive to reallocate the space, then write the bootable files to this drive, so please back up all USB files before processing "Eraser".
Step 3. The program creates a 2GB space on the USB, saving the boot files, and leaves the remaining space available for storage.
Step 4. To resolve the issue with your Mac, follow the guide to create a bootable disc, then boot the corrupted Mac from it and start the recovery process. It's recommended to restore the data to an external hard drive once the recovery is complete.
Step 5. After booting the Mac, launch Deep Data Recovery for Mac. Select the disk location (an internal HDD/SSD or a removable storage device) where you lost data and files, and the recovery tool will automatically scan for lost files.
Note: Before attempting to recover data, it's recommended to create a backup of your Mac to prevent further data loss. Once the backup is in place, data recovery software can be used to retrieve data from the Mac backup, allowing you to overwrite the recovered data with new information.

Conclusion
To boot your Mac from a USB flash drive, note that this method works on any macOS, including Big Sur, so ensure you download the file without upgrading it before inserting the USB.
If you've lost files on your Mac, don't panic! Instead, try using a professional recovery tool like Deep Data Recovery for Mac to restore your files. This will save you a lot of hassle and ensure that your important data can be recovered easily and swiftly.
Boot Mac from USB FAQs
The following are some common questions and answers about the topic:
Can I install macOS Ventura from USB?
To prevent macOS Ventura from automatically upgrading, you'll need to download the macOS Ventura file from the Apple Store, but don't start the installation process. Quit the installation after downloading the file, and you won't be prompted to upgrade.
How do I boot a Mac from a USB drive?
When starting your Mac, insert the bootable USB and press Option until the boot menu appears. You can then access Disk Utility to erase everything, or proceed directly with the installation if you prefer.
How to create a macOS bootable USB?
To proceed, you'll need a bootable file for your desired macOS. Once you have it, insert your USB and format it in the APFS format. Next, open Terminal and type "sudo" followed by dragging and dropping the createinstallmedia file from your macOS file into the Terminal.
Once done, type --volume, then drag the formatted USB drive into Terminal so the correct path is added automatically.
How do I start my Mac in boot mode?
When you press the power button, immediately hold the Option key on your keyboard and wait 4-5 seconds for the Mac to boot into Boot mode.
Related Articles
- Computer Keeps Crashing When Playing Games - How to Fix?
- First Aid Found Corruption That Needs to Be Repaired, What Should I Do
- How Long Does It Take to Factory Reset A PC
- How to Format USB to exFAT on Mac [Ultimate Guide]