How to Format USB to exFAT on Mac [Ultimate Guide]
To use a USB drive on both Mac and Windows, it's sometimes necessary to format it to a compatible file system. On Mac, the USB drive needs to be formatted to exFAT, which is a format that is compatible with both Mac and Windows systems. To do this, you can connect the USB drive to your Mac, go to Disk Utility, select the USB drive, and click on the "Erase" button. Then, select the exFAT format from the options and click on "Erase" again.
Does the exFAT Format Work on Mac?
Mac supports the exFAT file system format for USB drives, allowing for writing and reading on Mac devices. exFAT is a widely used format for external and USB drives, offering a larger file size limit compared to FAT32, which has a 4GB limit. This article provides solutions for formatting a USB drive to exFAT on a Mac, and also offers guidance on formatting a USB flash drive to FAT32 on Mac.
If you're interested in learning how to format a USB on Windows, you can click the link below for more information.

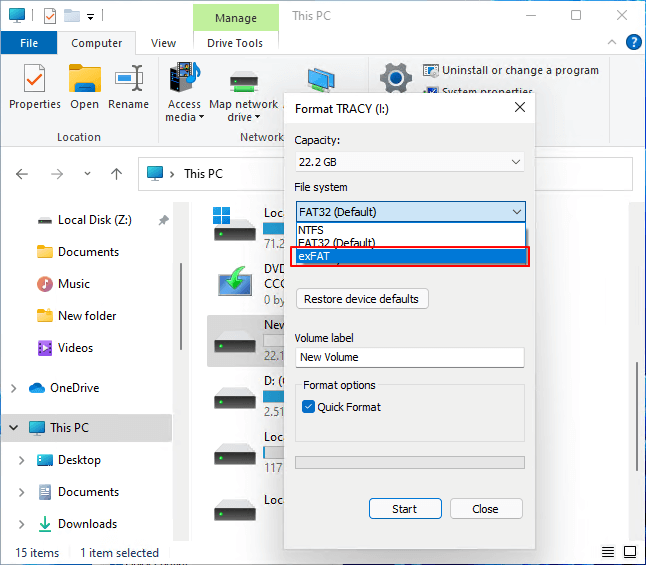
Format USB External Hard Drive to exFAT [Windows & Mac]
Formatting a USB or external hard drive to exFAT in Windows or macOS is a straightforward process that can be done independently. To format your storage device to exFAT, you can follow the steps outlined on this page, which will guide you through the process and help you achieve the desired file system configuration.
Next are the steps on how to format USB on Mac.
Method 1. How to Format USB to exFAT on Mac - Using Disk Utility
Disk Utility is a simple built-in tool on Mac that can format various types of drives, including SD cards and hard disks, making them compatible with Mac. It's an excellent option for formatting a USB drive, and the steps for formatting a USB to exFAT can be found in the detailed instructions that follow.
Step 1. Insert the USB into your Mac.
Step 2. To open Disk Utility, hold down the "Command + Space" keys to access Spotlight, then type "Disk Utility" and press enter. Alternatively, navigate to the "Finder", click "Applications", and select "Disk Utility".

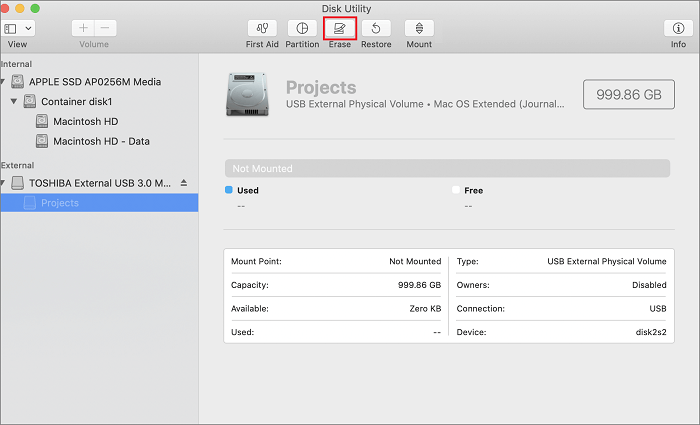
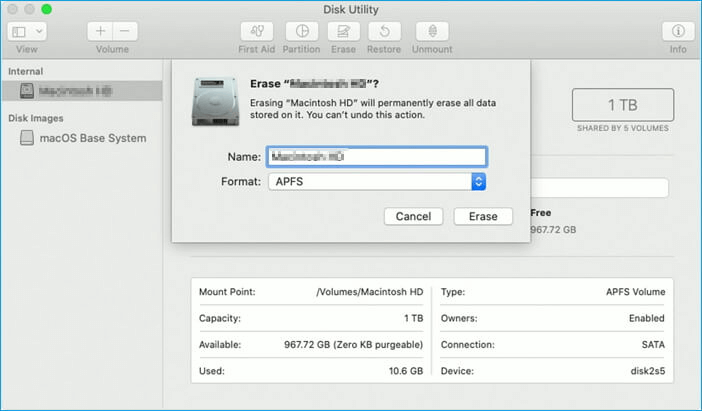
Step 3. Select the USB drive on the left side and click on "Erase" at the top.
Step 4. Give the drive a name, such as "Backup Drive", and select the "exFAT" format, which is a file system that allows for large file sizes and is compatible with both Windows and macOS.
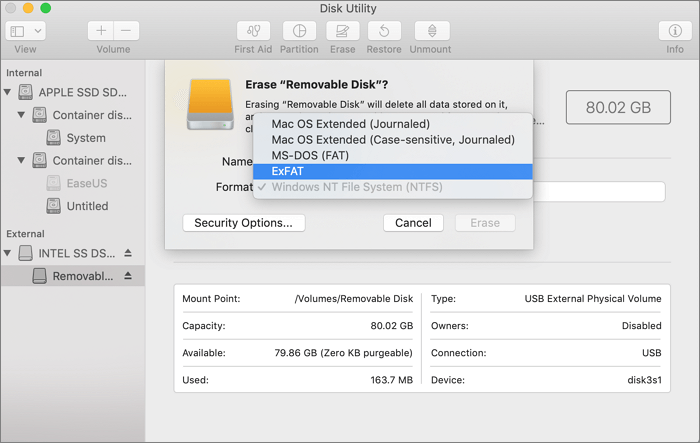
Step 5. Click "Erase" to finish formatting USB to exFAT on Mac.
Method 2. How to Format USB to exFAT on Mac - Using Terminal Command
Navigating and performing specific tasks in a Mac environment can be simplified with terminal commands. However, the execution process can be complicated and demanding. Fortunately, almost everything that can be done with the graphical user interface (GUI) can also be completed in Terminal. This section will explain how to format a USB drive using Terminal commands, making it a convenient alternative to the GUI method.
Step 1. Plug the USB into your Mac.
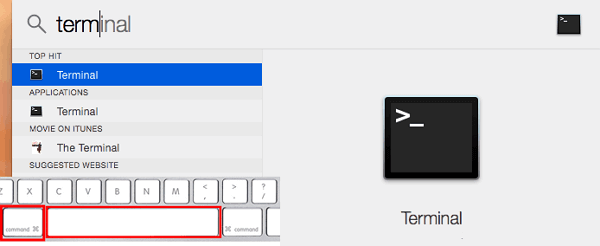
Step 2. To open the Terminal on a Mac, press "Command + Space" simultaneously and search for "Terminal." Alternatively, navigate to "Finder," go to "Utilities," and open "Terminal."
Step 3. Type "diskutil list" to find all available devices.
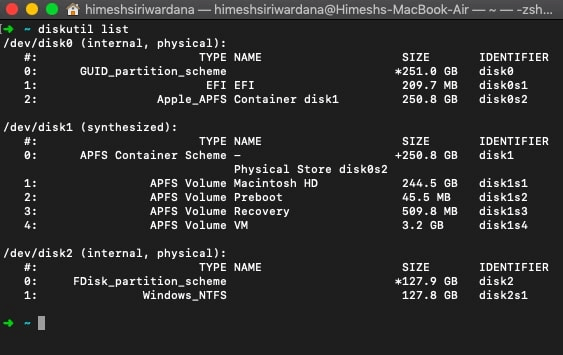
Step 4. Format the selected USB drive using the following command: `sudo umount /dev/sdb1 && sudo mkfs.ext4 /dev/sdb1 && sudo e2label /dev/sdb1 "USB"` (replace `/dev/sdb1` with the actual device path of the USB drive).
diskutil erasedisk exFAT MyDisk DISK_IDENTIFIER
- Tip
- You can choose to format a USB drive named "MyDisk" using the exFAT file system format, or another format of your choice, by using the command "diskutil eraseDisk -type exFAT DISK_IDENTIFIER" where DISK_IDENTIFIER is the output of the command "diskutil list".
Bonus Tip: Which Formats Can Be Used to Format USB on Mac?
Five file system formats are often used: NTFS, exFAT, FAT32, HFS+, and APFS. NTFS, used by Windows, is read-only on Mac, while the other four support macOS, but with some differences at the time. The table below provides information on file system format for different users.
| File System Format | Suitable Users |
|---|---|
| APFS |
|
| Mac OS X Extended |
|
| exFAT |
|
| FAT32 |
|
The format used depends on the device type, with APFS and Mac OS X Extended being the default for Macs, and more differences between them can be found by clicking the link below.
To determine the best file system for your system, it's helpful to understand the differences between APFS and Mac OS Extended. APFS, or Apple File System, is a newer file system designed for modern Macs, offering improved performance, security, and compatibility. In contrast, Mac OS Extended is an older file system that's still supported by older Macs, but it may not provide the same level of performance and security as APFS. By understanding these differences, you can make an informed decision about which file system is best for your system.
Conclusion
Formatting a USB drive to exFAT on a Mac can be achieved in two ways: using Disk Utility or a Terminal command. The Disk Utility method is simpler, while the Terminal command is more complex. If you need to use the USB drive on both a Mac and a Windows system, exFAT or FAT32 are suitable formats, as they are compatible with both operating systems. Mac systems typically use APFS or Mac OS X Extended as their default formats.
FAQs About How to Format USB to exFAT on Mac
Formatting a USB drive to exFAT on a Mac can be done in two ways. Additionally, here are some common questions about formatting on a Mac.
1. How do I change from FAT32 to exFAT on Mac?
To change a FAT32 formatted drive to exFAT on a Mac, you can use either Disk Utility or Terminal commands. If you prefer the graphical interface, you can follow these steps below in Disk Utility. Alternatively, you can use Terminal commands to make the change.
Step 1. Go to "Applications" and find "Disk Utility."
Step 2. Pick the drive you want to change and click "Erase."
Step 3. Select "exFAT" from the menu list.
2. Why does exFAT not work on Mac?
exFAT not working on Mac could be due to OS and USB incompatibility or a missing driver. You can refer to the specific solution for fixing the issue.
3. Can FAT32 be read by Mac?
Mac can read various file systems, including FAT32, HFS+, NTFS, exFAT, and ext2, but not all of them can be written to. To use a drive with a different file system, you can format it using Disk Utility, allowing you to write to it.
Related Articles
- 5 Ways to Fix a Corrupted User Profile in Windows 10/8/7
- Solved: What Is Taking Up Space on My Hard Drive in Windows 10/8/7
- How to Fix Desktop Refers to A Location That Is Unavailable Error
- Fix System Restore Failed and Did Not Complete Successfully Error in Windows 10
- How to Find Steam CD Key or Game Product Key on Your Own - Qiling
If you're looking for a Steam CD key or game serial key, this guide provides two practical solutions to help you locate it. If the CD key doesn't appear, Qiling Disk Master can resolve the issue for you. - How to Find VMware License Key: View Reliable Ways to Locate VMware Workstation
Finding a VMware license key can be a challenge, especially when reinstalling or installing software on a new computer. However, activation is a necessary step for VMware users, and this article provides some useful methods to help you find the software.