How to Change the Administrator on Windows 10 [Step-by-Step Guide]
To change the administrator on Windows 10, follow these steps:
| Workable Solutions | Step-by-step Troubleshooting |
|---|---|
| 1. Using Windows Settings | To change the administrator account via Windows Settings, follow these steps: go to the Start menu and click on the "Settings" icon, then click on "Accounts", followed by "Family & other people" or "Other people" depending on your Windows version, and finally click on "Add someone else to this PC" to add a new user account with administrator privileges. You can also edit the existing administrator account by clicking on it and selecting "Change account type" to change its privileges. Be sure to enter the correct password for the administrator account to make changes.Full steps |
| 2. Using Command Prompt | To quickly change the role of an account to standard, you can use the method of... (please continue the sentence).Full steps |
| 3. PowerShell/Windows Terminal | Right-To open the Windows Terminal (admin), click on the Windows button on your keyboard, then click on "Windows Terminal" from the menu, and select "Admin" from the dropdown options. This will open the Windows Terminal with administrator privileges, allowing you to run commands and perform actions that require elevated permissions.Full steps |
Introduction
Windows OS Microsoft Windows has a hierarchical structure of users, with the administrator being the highest position, granting access to all features and allowing modifications to the operating system. This position enables the user to control and customize Windows to their liking, much like a business hierarchy where different roles have varying levels of authority and responsibility.
Selecting the administrator is critical and significant, as it can also help prevent a regular user from making modifications that could negatively impact performance and security.
To change an administrator account to a standard account, go to Settings, then Accounts, then Family & other people, then select the account you want to change, then click on the "Change account type" button, then select "Standard account" from the dropdown menu. This will change the administrator account to a standard account, removing its administrative privileges. Alternatively, you can also use the built-in Windows tool, "lusrmgr.msc" (Local Users and Groups), to change the account type.
Prerequisites
When changing the administrator account, remember to update the password, ensure the new account has the correct permissions, and verify that the old account is disabled or deleted to prevent unauthorized access. Additionally, make sure to test the new account to ensure it functions correctly and has the necessary access to perform tasks.
- To access the Settings app in Windows 10, you should log in as an administrator yourself or have access to an administrator account.
- Should be aware of the current administrator account name.
Step-By-Step Instructions
To change the administrator on a Windows 10 computer, you can use one of three methods. You can create a new user account and make it an administrator, add an existing user account as an administrator, or remove the current administrator and add a new one. In the first method, go to Settings, then Accounts, and click on "Family & other people" to create a new user account.
- Fix 1. Using Windows Settings
- Fix 2. Using Command Prompt
- Fix 3. Using PowerShell or Windows Terminal
Fix 1. Using Windows Settings

This is how you change the administrator account via Windows Settings:
Step 1. Press the Windows key + I to open Settings.
Step 2. Click on "Accounts" on the left pane.
Step 3. Click on "Family & other users" from the right side.
Step 4. After selecting the account owner's name under Family & other users, choose Change account type. You should see Local account underneath the name.
Step 5. Switch to the standard account, and apply the changes.
If you want to copy some files but don't have the necessary permissions, there's a solution to help you copy and backup files without needing admin rights.
If you find this post helpful, it's nice to share it with others who may have the same issue.
Fix 2. Using Command Prompt
To quickly change the role of an account to standard using Command Prompt, follow these steps: Open Command Prompt as an administrator. Type the command "net localgroup administrators username" and press Enter.
Step 1. To open the Run Prompt with admin privileges, press Win + R, type "cmd", and then press Shift + Enter. This will open the Command Prompt with administrator permissions.
Step 2. Type the following command, and press the Enter key.
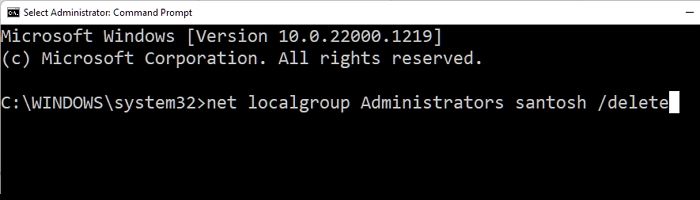
net localgroup Administrators "NAME"/delete
Note: The user account name can be checked by going to the Users account folder, where the actual user account name is displayed.
Step 3. The role of the user changed as expected when checked with the Windows interface.
Fix 3. Using PowerShell or Windows Terminal
Step 1. Right-click on the Windows button, and click on Windows Terminal (admin) to open the Windows Terminal with administrator privileges.
Step 2. Since Windows Terminal supports PowerShell commands, you can execute the command `Get-ChildItem -Path "C:\Program Files\Microsoft Office" | Select-Object -ExpandProperty "Name"` to list the names of all files in the specified directory.
Remove-LocalGroupMember -Group "Administrators" -Member "NAME"
Step 3. Cross-check if the role has changed.
Tips and Considerations
It's a good idea to have a backup administrator account in case you need to make changes or troubleshoot issues in the future. This way, you won't be left without access to your accounts. Keep the username and password for this account private, so only you know them, and no one else can access your account. This will ensure you have control over your accounts and can make any necessary changes or fixes.
- Be selective. Please don't give the admin role to everyone who asks for it. Carefully consider the responsibilities and duties of the role and only assign it to users who need it. This ensures that the admin role is used appropriately and efficiently, and helps maintain the overall health and stability of the system.
- Use group policies to control access. Group policies can be used to control access to system features and resources, helping to manage and secure the system more effectively.
Conclusion
An administrator account allows for changes to other user accounts, hardware and software installation, access to all files, and security settings modification. However, it cannot be used if the password is lost or access is restricted, or if admin credentials were revoked unintentionally.
To change a user account from Admin to Standard in Windows, go to Account settings, select the user account, and change the role from Admin to Standard user. This requires an admin account to make the change.
Be cautious when granting administrator privileges to other users, as they can change anything on your PC, including sensitive data.
Related Articles
- How to Fix "the Archive Is Either in Unknown Format Or Damaged" [100% Working Solution]
- Fixes for "An Error Occurred While PowerPoint Was Saving the File" in 2023
- Fix macOS 10.13/10.13.4 High Sierra Update Failure/Stuck/Installation Error
- How to Fix Checking File System on C Error on Windows 7/8/10/11 Startup
- SanDisk Extreme Pro Portable SSD Not Detected: Troubleshooting and Data Recovery
The SanDisk Extreme Pro Portable SSD not being detected or recognized by a PC or Mac is a common issue. This problem can be caused by a faulty USB port, a corrupted driver, or a failing SSD. To resolve the issue, try using a different USB port, updating the driver, or restarting the device. - Frustration and Loss: The Sandisk Extreme Pro Portable SSD Not Working
Fix SanDisk Extreme Pro Portable SSD not working, not detected, or not showing up. Learn troubleshooting steps and how to recover important data.