Create macOS Sonoma Bootable USB Installer [Create macOS 14 Installer]
macOS 14, codenamed Sonoma, is the latest version of the macOS base system, with a predicted public release by October or November 2023. This version comes with a range of updates, including new desktop widgets, Game Mode, and improvements to Safari, along with numerous minor enhancements.
To create a macOS Sonoma bootable USB, start by formatting a 16 GB or larger USB drive to APFS using the Disk Utility app. Then, download the macOS Sonoma installer from the App Store and create a bootable installer by running the command `createinstallmedia --volume /Volumes/Install\ macOS\ Sonoma` in the Terminal app.
| Main Steps | Detailed Tutorial for Each Step |
|---|---|
| Step 1. Format USB Flash Drive for macOS Sonoma | Connect the USB flash drive to the system. Select Applications. Choose Utilities. Go to Disk Utility...Full steps |
| Step 2. Download macOS 14 Resource for Bootable USB | You can easily download macOS 14 from the App Store. Go to the App Store and search for macOS...Full steps |
| Step 3. Create macOS Sonoma Bootable USB | Open Mac Terminal. You need to follow the path: Applications > Utilities > Terminal...Full steps |
| Step 4. Install macOS 14 with Bootable Installer | Connect the bootable installer to the Mac. Turn on the system, press the power button and hold it until the Startup Disk selection screen appears, then release the button. Select the bootable installer from the Startup Disk menu and click "Continue".Full steps |
Creating a macOS Sonoma bootable USB offers several benefits. This can be useful in various situations, such as needing to install or repair macOS on a computer, or wanting to have a portable version of the operating system. Additionally, a bootable USB can be used to troubleshoot issues, run diagnostics, or even create a backup of the operating system. Having a bootable USB can provide convenience and flexibility, making it a useful tool for Mac users.
- ⭐To install macOS Sonoma on an unsupported Mac using a macOS 14 bootable USB, you will need to create a bootable USB drive from a compatible Mac, then use it to install macOS Sonoma on the unsupported Mac. This process typically involves using the built-in Disk Utility app on the compatible Mac to create a bootable USB drive, then using the Recovery Mode on the unsupported Mac to install macOS Sonoma from the bootable USB drive.
- ⭐Download and install macOS 14 without an internet connection
- ⭐If your Mac won't boot, try booting in safe mode by holding the shift key while powering on. If that doesn't work, try resetting the System Management Controller (SMC) and the Power Management Unit (PMU).
Step 1. Format USB Flash Drive for macOS Sonoma
| ❗Must-have Items: A USB with 15GB storage space minimum |
To create a macOS Sonoma bootable USB, you need a suitable USB flash drive with a minimum of 15 GB of free space, as the installer typically takes up 10-15 GB of drive space. Choose a reliable brand for the flash drive.
- Warning
- To avoid losing data, be sure to back up your USB flash drive and consider downloading Deep Data Recovery for Mac to recover deleted files.
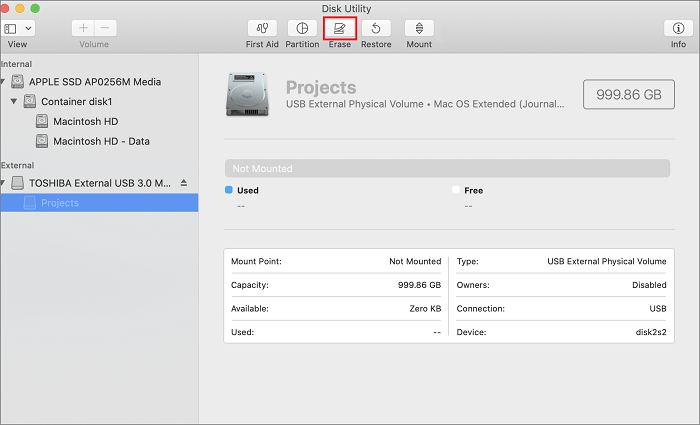
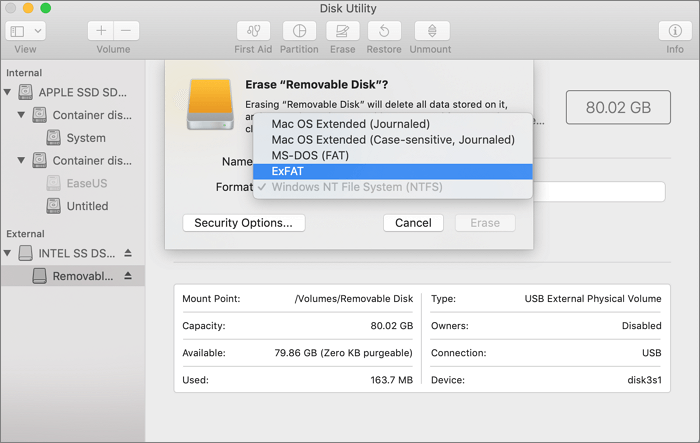
To format the USB flash drive, you can use the Mac Disk Utility. First, locate the USB drive in the Disk Utility window, then select it and click the "Erase" button. Next, choose the format type you want to use, such as "MS-DOS (FAT)" or "ExFAT", and click "Erase" again. This will erase all data on the drive and format it according to your chosen format.
Step 1. Connect the USB flash drive to the system.
Step 2. Select Applications.
Step 3. Choose Utilities.
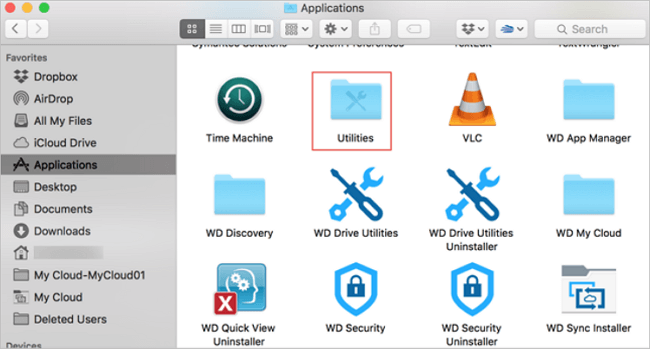
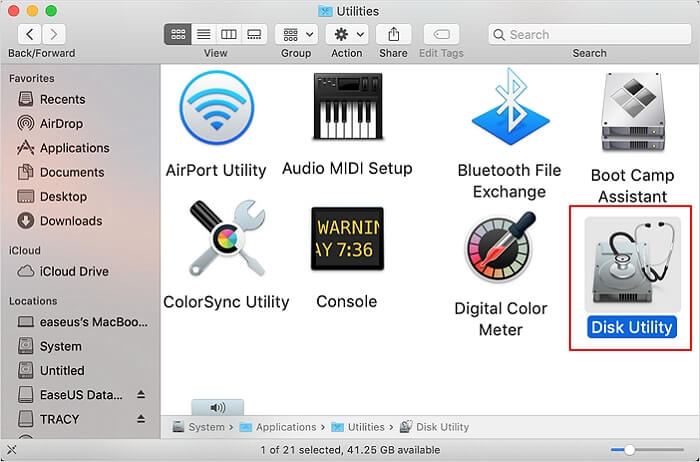
Step 4. Go to Disk Utility.
Step 5. Now, choose the flash drive from the left sidebar.
Step 6. Select Erase.
Step 7. Enter the name and format, and choose "Erase".
To create a macOS Sonoma Bootable USB, follow these steps: connect the USB flash drive to your Mac, open Disk Utility, select the USB drive from the sidebar, click the "Erase" button, choose the "Guided" tab, select "Mac OS Extended (Journaled)" as the format, and click "Erase". Once the drive is formatted, you can proceed to create the macOS Sonoma Bootable USB by following the instructions in the article linked below.
To format a USB drive to FAT32 on a Mac without losing data, you can use the Disk Utility app. First, connect the USB drive to your Mac and open Disk Utility.
For Apple Mac users, there are two ways to format a USB flash drive to FAT32: using Disk Utility or Terminal command line.
Step 2. Download macOS 14 Resource for Bootable USB
Here are the two methods to download macOS Sonoma for bootable USB in one paragraph:
Method 1. Download macOS 14 from App Store or Website
To download macOS 14, go to the App Store, search for "macOS Sonoma", and click "Get" when it appears in the results.
macOS Sonoma is currently in the developer beta phase, but users can still download it from Apple's official website.
To download macOS Sonoma, visit the website and search for it, then download the 13 GB pkg file. Once downloaded, double-click on the installer file to complete the process.
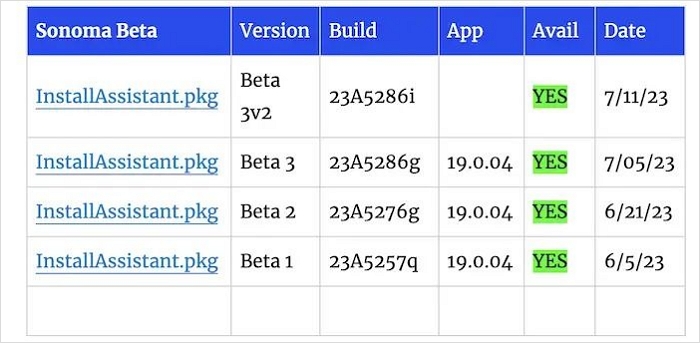
Method 2. Download macOS Sonoma from Mr. Macintosh
To download macOS Sonoma, you can visit Mr. Macintosh's website, where you'll find detailed information and links to the beta versions available. From there, you can select the desired version and proceed with the download process.
To download macOS Sonoma, follow these steps: First, ensure your Mac is compatible with the latest operating system. Then, go to the Apple Support website and click on "Software Update" to check for the available update.
Download macOS 14 Sonoma Beta on Mac, MacBook, iMac
macOS 14 Sonoma Beta was released in June, but how can you download it? To learn more about macOS Sonoma, click the link to read more.
Step 3. Create macOS Sonoma Bootable USB
To create a macOS Sonoma Bootable USB, follow these steps:
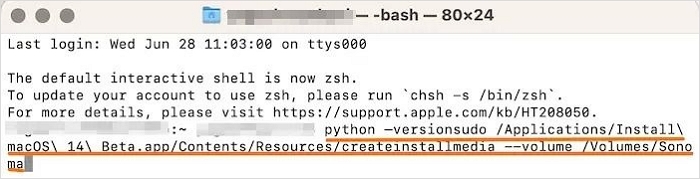
Step 1. Open the Terminal app on your Mac by navigating to Applications > Utilities > Terminal.
Step 2. To install macOS Sonoma Beta, you need to run the command `sudo /Applications/Install\ macOS\ 14\ Beta.app/Contents/Resources/createinstallmedia --volume /Volumes/Sonoma` in the Terminal app and press Enter. This will start the installation process.
Step 3. To continue, we need to erase the volume at /Volumes/Sonoma.
Step 4. Type Y and press Enter.
Step 5. If you see a pop-up saying "Terminal" and would like to access files on a removable volume, click OK. This will allow you to access the files on the removable volume.
To create a macOS bootable USB, you'll need a USB drive with at least 16GB of storage, a Mac computer, and a reliable internet connection. Insert the USB drive into your Mac and open the Disk Utility app.
Step 4. Install macOS 14 with Bootable Installer
To boot the Sonoma USB bootable installer for Intel-based and Silicon Macs, insert the USB drive into a free port on the Mac, then restart the computer. Immediately hold down the 'Option' key as the computer boots up.
For Silicon Macs:
Step 1. Connect the bootable installer to the Mac.
Step 2. Turn on the system.
Step 3. Press the power button and hold it until you see the startup options window.
Step 4. Here, you will see the bootable volumes.
Step 5. Choose the volume that has the bootable installer.
Step 6. Select Continue.
Step 7. Follow the on-screen instructions.
For Intel-based Macs:
Step 1. Connect the bootable installer to the Mac.
Step 2. Turn on the system.
Step 3. Press the Option key and hold it.
Step 4. When you come across the bootable volumes, release the key.
Step 5. Choose the volume that has the bootable installer.
Step 6. Press Return.
Step 7. If asked, choose Language.
Step 8. Choose Install macOS.
Step 9. Select Continue and follow the on-screen instructions.
You may also interest:
Clean Install macOS Sonoma: Latest Update
To learn how to clean and install macOS Sonoma, read this article that provides detailed steps.
Rescue Data from Unbootable macOS 14 Mac
If you've encountered data loss while creating the macOS Sonoma bootable USB installer, don't worry - Deep Data Recovery, a powerful data recovery software, can help you restore lost data with ease.
The user-This software offers a user-friendly interface and exciting features that make it stand out. It allows users to recover data that has been lost due to various reasons such as accidental deletion, formatting, virus attacks, and hardware failures, among others.
Qiling Sonoma Recovery Tool
- To recover deleted files on macOS Sonoma, start by stopping any ongoing backups or file operations to prevent further data loss. Then, check the Trash folder for the deleted files, as they may still be there.
- To recover data from a USB drive, perform a Mac USB recovery in simple steps. You can also recover data from a formatted USB drive using this process.
- Recover lost data from Mac with ease, even from unbootable Macs, thanks to its robust features.
If you're eager to use Deep Data Recovery, follow these steps:
Step 1. Search for lost files
To search for lost files on a Mac running macOS Sierra, High Sierra, Mojave, Catalina, Big Sur, Monterey, Ventura, or Sonoma, select the disk location to search, and then click the "Search for lost files" button.
Note: Before attempting data recovery, it's recommended to create a backup of your Mac using the "Disk Backup" feature in the software's left sidebar. This ensures that your data is safe and can be recovered if needed. Once the backup is created, the software can then recover data from the backup, allowing you to use your computer again.

Step 2. Go through the scanning results
Deep Data Recovery for Mac will immediately scan your selected disk volume and display the scanning results.

Step 3. Select the file(s) and recover
Select the files you want to recover and click the "Recover" button to restore them.

Summary
macOS Sonoma, Apple's latest operating system, is set to be released later in the year with exciting features. Creating a macOS Sonoma Bootable USB installer is a relatively straightforward process: simply download the installer file and then boot it properly after downloading.
If data loss occurs despite taking precautions, professional data recovery software can be a lifesaver. Deep Data Recovery for Mac is a powerful and user-friendly option that can help restore lost data with ease, making it an excellent choice in such situations.
Create macOS Sonoma Bootable USB FAQs
To learn more about creating a macOS Sonoma Bootable USB, check out these questions and answers.
1. Why can't I install macOS Sonoma on Mac?
You can't install macOS Sonoma on your Mac due to insufficient storage space or software incompatibility, or if you haven't registered as a developer.
2. How to create a macOS 14 bootable installer for a PC?
To create a macOS 14 bootable installer using the Terminal, follow these steps:
Step 1. Open Terminal and enter the command, and press Enter.
sudo /Applications/Install\ macOS\ 14\ Beta.app/Contents/Resources/createinstallmedia --volume /Volumes/Sonoma.
Step 2. You need to type your password and press Enter again.
Step 3. To continue, you will need to erase the volume at /Volumes/Sonoma. Type Y and press Enter, then click OK on the pop-up saying "Terminal" if you want to access files on a removable volume.
3. How to download the macOS Sonoma developer beta?
To download the macOS Sonoma developer beta, follow these steps:
Step 1. To download the macOS Sonoma developer profile, visit the Apple Developer website, navigate to the Discover tab, choose macOS, select Download, and log in with your developer account credentials if prompted. Then, proceed to select Install Profile on macOS Sonoma.
Step 2. Go to the Downloads folder. Double-click on the macOSDeveloperBetaAccessUtility.dmg file.
Step 3. Double-click on macOSDeveloperBetaAccessUtility.pkg. Follow the on-screen instructions after that.
4. macOS Ventura and Sonoma, which one is better?
Apple's Ventura and Sonoma are essentially the same, with core functionality remaining unchanged. Sonoma, being the latest release, offers additional features such as interactive widgets and screensavers. Users can choose between the two based on their specific needs.
Related Articles
- Windows 11 Update Slows Down SSD Performance? Newest Guide
- Beginner's Guide on Linux File System Types [Detailed Explanation]
- 6 Ways to Fix Windows Update Not Working Windows 11/10
- IS 75 Degrees Too Hot For a PC? Everything You Should Know
- (Top 8 Ways) How to Fix Windows 10 Black Screen with Cursor
Fix Windows 10 black screen with cursor. Learn safe repair methods for display, startup, driver, and system file issues. - Windows 10 Cumulative Update Failed to Install & Download - How to Fix?
If you're experiencing issues with Windows 10 cumulative updates failing to install, this guide is for you. It will walk you through various methods to troubleshoot and resolve this problem, ensuring your computer runs smoothly and efficiently.