How to Lock Mac Screen [7 Fast Ways to Lock Mac]
Here are practical ways to lock your Mac screen: You can lock your Mac screen by pressing the Command + Shift + Q keys, or by clicking on the Apple logo in the top left corner and selecting "Lock Screen". You can also set your Mac to lock automatically after a period of inactivity by going to System Preferences > Security & Privacy > General and adjusting the "Require password after sleep or screen saver begins" option. Additionally, you can use the "Screen Saver" feature to lock your Mac after a set period of inactivity.
| Workable Solutions | Step-by-step Troubleshooting |
|---|---|
| Method 1. Use the Apple Menu to Lock Mac Screen | Go to the Apple icon on the home page, scroll down, and click on the Lock Screen option...Full steps |
| Method 2. Use Shortcuts to Lock Mac Screen Quickly | Simultaneously press the Command + Control + Q on your Mac keyboard to lock the Mac screen...Full steps |
| Method 3. Set Up Hot Corners to Lock Mac Screen | Go to the Apple icon, choose System Preferences, and choose Desktop and Dock from the left side...Full steps |
| Method 4. Use Fast User Switching to Lock Mac | Select System Settings, and go to Control Center by selecting it on the left-hand settings...Full steps |
| Other Methods | Open Mac Terminal, type the command and then press Enter. It will force your Mac to sleep mode...Full steps |
Locking your Mac screen is essential when you're away from it, as it provides multiple benefits. By locking your Mac screen, you can ensure that your personal data and sensitive information remain secure, protecting you from potential cyber threats and unauthorized access. Additionally, locking your Mac screen can also help prevent accidental changes or deletions of important files, and can even prolong the lifespan of your device by preventing overheating and power consumption.
Consider the importance of maintaining privacy and security on your device, protecting confidential data and preventing potential damage from viruses or malware.
To protect your Mac's privacy, it's recommended to lock it to prevent unauthorized access. This will help safeguard your personal data and maintain your digital security.
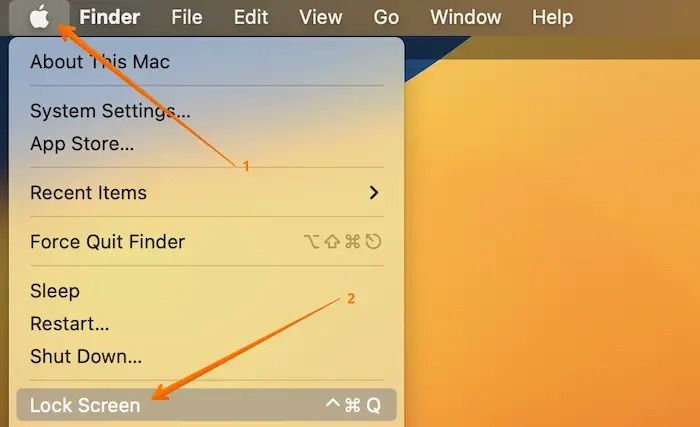
Method 1. Use the Apple Menu to Lock Mac Screen
To lock the Mac screen, go to the Apple menu, scroll down and click on the "Lock Screen" option.
Method 2. Use Shortcuts to Lock Mac Screen
To lock your Mac quickly, press the "Command + Control + Q" keys simultaneously. This will immediately lock the system.
To quickly lock your Mac screen, you can use a keyboard shortcut or a mouse gesture. Pressing the power button or Command (⌘) + Q keys will lock your Mac screen immediately.
Method 3. Set up Hot Corners to Lock Mac Screen
To lock your Mac screen using Hot Corners, you can set up a specific corner to activate the "Lock Screen" command. This allows you to quickly lock your Mac with just a simple touch of the screen corner.
For that, you need to follow these steps:
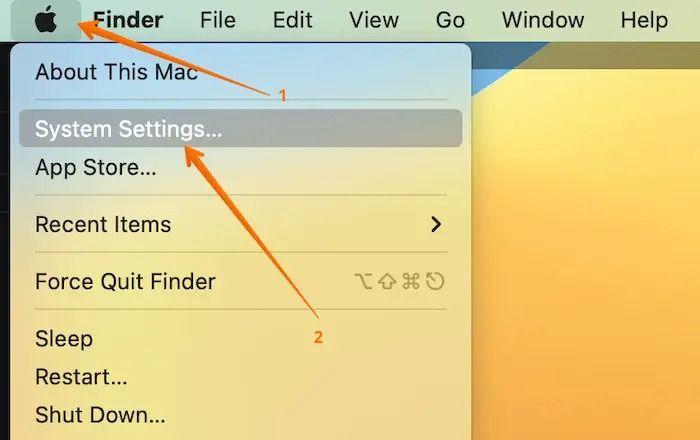
Step 1. Go to the Apple icon.
Step 2. Choose "System Preferences/System Settings".
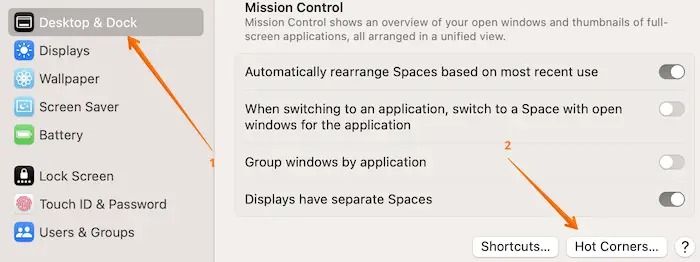
Step 3. To access the Mission Control settings, select "Desktop and Dock" from the left-hand side and "Mission Control" from the right-hand settings.
Step 4. Go to the bottom and select "Hot Corners".
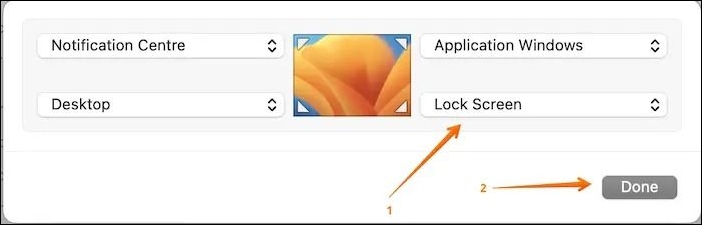
Step 5. To lock the screen corner, choose the desired corner and select "Lock Screen" from the drop-down menu.
Step 6. Click on "Done" at the end to save the changes.
Method 4. Use Fast User Switching to Lock Mac Screen
One of the most critical benefits of using Fast user switching is that it transports you to the login window. Here are the steps you need to follow:
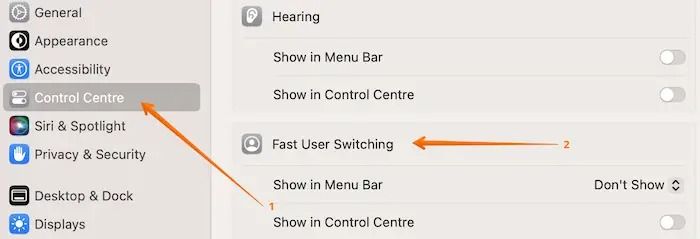
Step 1. Select "System Settings".
Step 2. Go to the "Control Center" by selecting it on the left-hand settings.
Step 3. To set up Fast User Switching, go to the "User Accounts" section in the Settings app, click on "User accounts" and then select "Fast user switching" from the left menu. In the "Fast user switching" settings, toggle the switch to turn it on.
Method 5. Use Terminal to Lock Mac Screen
To lock the Mac screen via Terminal, you can use the `osascript -e 'tell application "System Events" to keystroke "q" using {command down, control down}'` command. This will lock the screen immediately. You can also use `osascript -e 'tell application "System Events" to keystroke "q" using {command down, control down}' & sleep 1 & osascript -e 'tell application "System Events" to keystroke "q" using {command down, control down}'` to lock the screen and then wait for 1 second before locking it again. Note that you need to run these commands in the Terminal app.
Step 1. Open Mac Terminal.
Step 2. Type: pmset displaysleepnow.
Step 3. Press "Enter".
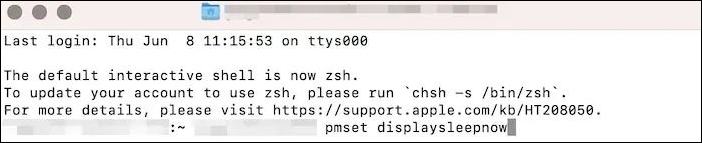
Step 4. It will force your Mac to go to sleep mode.
Note: Ensure a password to awaken the device from sleep mode.
Method 6. Use Touch Bar to lock Mac Screen
To lock your Mac screen using the Touch Bar, follow these steps:
Step 1. Go to the Apple icon.
Step 2. Choose "System Preferences/System Settings".
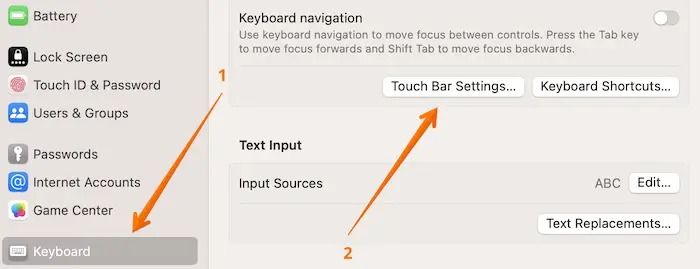
Step 3. To access the Touch Bar settings, click on "Keyboard" from the left side of the screen, followed by "Touch Bar Settings" on the right.
Step 4. A new Settings window will open; choose "Customize Control Strip".
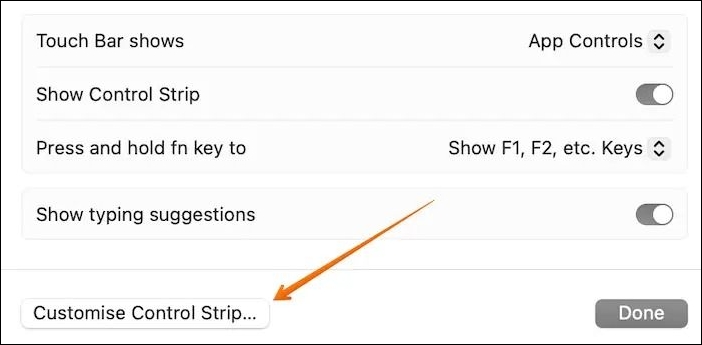
Step 5. Drag the "Screen Lock" button to the Touch Bar.
If you tap the "Screen Lock" button from the Touch Bar, your Mac will be locked.
If your MacBook Pro's Touch Bar is not working, try restarting your laptop, checking for software updates, and ensuring the Touch Bar is enabled in System Preferences. You can also try resetting the System Management Controller (SMC), disabling and re-enabling the Touch Bar, and checking for any hardware issues.
If your MacBook Pro's Touch Bar is not working, try restarting your laptop, checking for software updates, and ensuring that the Touch Bar is enabled in System Preferences. You can also try resetting the Touch Bar by pressing and holding the Command + Option + P keys simultaneously, then pressing the Power button. If none of these solutions work, you may need to visit an Apple Store or authorized service provider for further assistance.
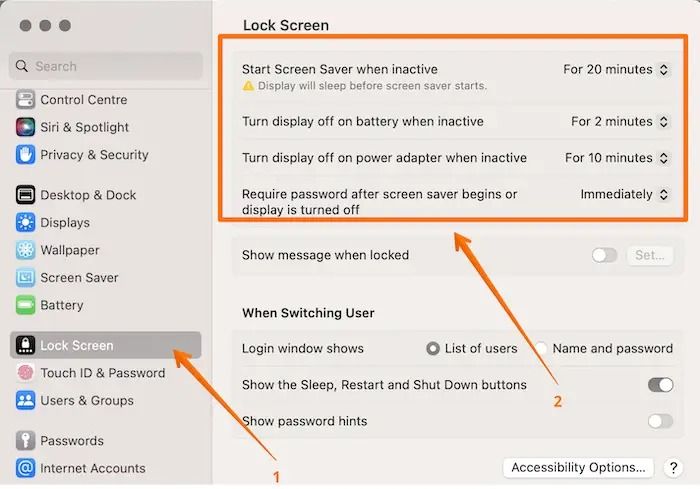
Method 7. Set Your Mac to Lock Automatically
To ensure your Mac is locked, set up locking automatically, which locks the device after a specific period passes with no activity. This way, your Mac will lock itself, providing an added layer of security.
Check out these steps:
Step 1. Go to the Apple icon.
Step 2. Choose "System Preferences/System Settings".
Step 3. To set the lock screen settings, go to the left-hand side and select "Lock Screen", then choose the timings from the right-hand side that fit your needs.
Recover Data from Locked Mac with Software
If you set up the automatic lock screen on Mac, it can interrupt the file you're editing or accidentally delete essential files using the wrong shortcuts to lock the Mac screen, leading to data loss.
If you're locked out of your MacBook Pro, try to resolve the issue first. If you've forgotten your original password, reset your Mac password to regain access to your files.
Resetting the password after being locked out of your Mac is easy, but data loss can happen during the process if you don't keep backups. If that's the case, consider using professional data recovery software like Deep Data Recovery to recover your lost data.
It is an efficient, user-Looking for a trustworthy data recovery solution? This user-friendly software is designed to recover various file types in various situations, including recovering permanently deleted files on Mac. Its powerful data recovery ability makes it a reliable choice for anyone in need of retrieving lost data.
- Unfortunately, a malware attack has resulted in the loss of all data. Fortunately, the Qiling recovery tool can be used to restore it.
- Accidental deletion of data can occur, but it can be recovered using the Qiling data recovery software.
- Software upgrades can be problematic, potentially resulting in data loss. However, the Qiling recovery software can be used to retrieve lost data.
The recovery tool is an incredible resource that can be utilized by following these simple steps. To get started, you can check out the steps listed below.
Step 1. Select the drive to be scanned
In the main Deep Data Recovery window, select the drive you need to recover lost/deleted files from and click the "Search for lost files" button.
Note: Before attempting data recovery, it's recommended to create a backup of your Mac by clicking "Disk Backup" from the left sidebar, which will prevent further data loss. Once backed up, the software can then recover data from the Mac backup, allowing your computer to write new data again.

Step 2. Select your lost data/files
Deep Data Recovery for Mac will immediately scan your selected disk volume and display the scanning results on the left pane, allowing you to sort the results to find the wanted files if needed.

Step 3. Recover lost/deleted data
After finding the desired files, preview them and then click "Recover" to initiate the recovery process for your deleted or lost Mac files.

Conclusion
To ensure your Mac's security and protect your privacy, it's crucial to lock your screen when you're away from it. This prevents unauthorized access to your data and confidential information. Fortunately, locking your Mac is a straightforward process, and you can do it in various ways. Don't worry if you're concerned about data loss - locking your Mac won't cause any issues.
Deep Data Recovery for Mac is a reliable data recovery tool that helps users restore various data types. Its simple user interface makes it easy for beginners to use, allowing them to recover lost data without hassle.
How to Lock Mac Screen FAQs
To learn more about locking Mac screens, check out the questions and answers listed here. They provide valuable information on how to secure your Mac and keep it locked when you're not using it.
1. How to unlock Mac without a password?
You can unlock a MacBook Pro without a password by using the recovery key to reset it, entering the FileVault Recovery key, and then selecting Reset Password to create a new one.
2. Can I access data from a locked Mac?
You can access data from a locked Mac, but only if the data is stored on iCloud. If the data is not synced to iCloud, it's not possible to access it.
3. How do I lock my Mac screen with the keyboard?
To lock your Mac screen using the keyboard, press the "Command + Control + Q" keys simultaneously. This will immediately lock the screen.
4. How do I lock my Mac when I walk away automatically?
You can lock your Mac when it's not in use by clicking the Apple menu and selecting "Lock Screen" or using a keyboard shortcut to quickly lock your Mac. This will lock your Mac, requiring you to enter your password to unlock it.
Step 1. Go to the Apple menu, and choose "System Settings".
Step 2. Select "Privacy & Security" and choose "Advanced".
Step 3. To enable automatic log out, go to System Preferences, select Users & Groups, click on the lock icon to unlock, and select the user account. Then, turn on "Log out automatically after inactivity" and select the desired time from the "Log out after" menu. This will set the system to log out after the chosen period of inactivity.
Related Articles
- Is Primary and Active Partition the Same [Beginner's Guide]
- How to Fix WAN Miniport Driver Issues in Windows OS [Updated 2023]
- What Is SoftThinks Agent Service and How to Fix Its High Disk and CPU Usage
- How to Delete Search Engines on Google Chrome on Windows, Mac, Android, and iPhone
- Fix: Operation Failed with Error 0x0000011b (Windows 10/11)
Operation Failed with Error 0x0000011b is caused by Microsoft security patches. And according to the root reason, this article presents three ways to address this issue. - Fix Windows 10 Stuck on Loading Screen Error
Windows 10 stuck on the loading screen with a 'Starting Windows' message can be frustrating. Fortunately, this issue can be resolved with a quick fix and three methods. The quick fix involves pressing the power button to shut down the computer, then pressing the power button again to turn it back on. If this doesn't work, you can try booting in Safe Mode, using the System Restore feature, or running a System File Checker scan to repair any corrupted system files.