How to Install macOS on External Drive [macOS Ventura/Monterey]
| Steps to Follow | Detailed Tutorial |
|---|---|
| Step 1. Format External Drive Correctly with Disk Utility | Plug the external drive into your system. Open Disk Utility. For that, you need to follow Applications...Full steps |
| Step 2. How to Download the macOS Resource on Mac | Go to the Mac App Store. Search for the macOS you want. Select the View or Get option...Full steps |
| Step 3. How to Install macOS on External Drive | Launch the finder. Choose Go from the menu and select Applications from the drop-down...Full steps |
| Step 4. How to Boot macOS from External Drive on Mac | By default, Mac starts booting from the internal startup disk. You must take extra steps to boot the system...Full steps |
| Rescue Data from Faulty Mac with Software | Have you lost data while the macOS Ventura upgrade failed? Several instances can lead to the loss...Full steps |
When Will You Install macOS on the External Drive
If you're considering upgrading to the latest macOS version or downloading macOS Ventura, you might be torn between making the upgrade and potentially messing up your perfectly functioning system. However, there is a way to install the new version without major changes, allowing you to explore the beta versions without compromising your current setup.
The solution is to install the macOS on an external drive, allowing you to delete it without affecting your system. This is the safest way to update macOS without making any changes to your Mac.
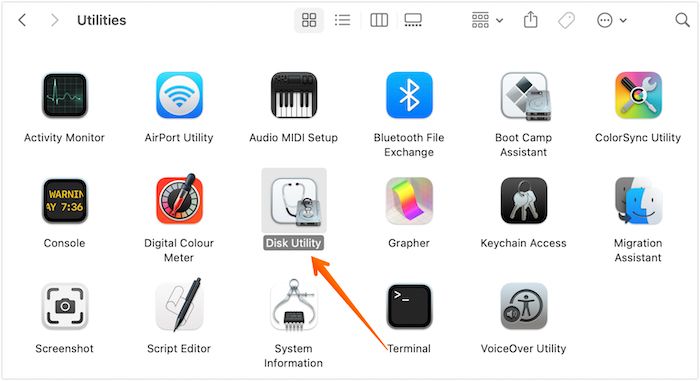
Step 1. Format External Drive Correctly with Disk Utility
To prepare the external drive for the new macOS installation, you'll need to create a macOS Ventura bootable USB. This involves formatting the external drive and then using the Terminal command `diskutil` to create a bootable USB drive. You'll need to identify the external drive's device name using the `diskutil` command, then run the `create-bootable-usb` command to create the bootable USB drive. This will prepare the external drive for the new macOS installation.
Step 1. To connect and access an external drive, plug it into your system and open Disk Utility by navigating to Applications > Utilities > Disk Utility.
Step 2. To view all devices connected to your Mac, go to the View drop-down menu and select Show All Devices.
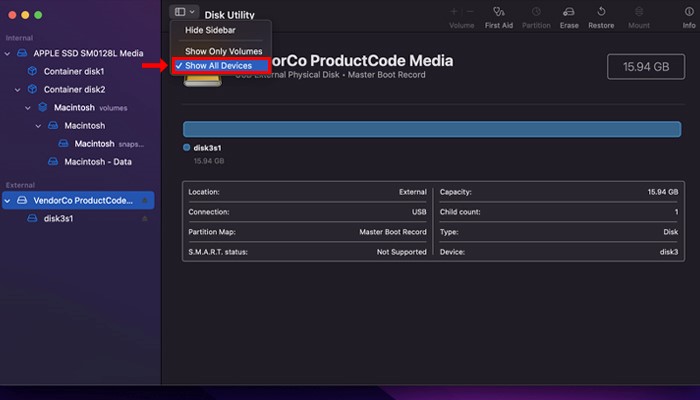
Step 3. To erase and format an external drive, go to the sidebar, select External drive, click Erase, name the drive, and choose macOS Extended in the format field.
Step 4. In the Scheme section, select GUID Partition Map. Choose Erase.
Step 5. Allow Disk Utility the time to create a partition. Select Done.
Step 2. How to Download the macOS Resource on Mac
To explore a specific macOS version, you'll need to download the one you're interested in. This can be an older version, a new one, or even a beta version. To do this, you'll typically follow these steps:
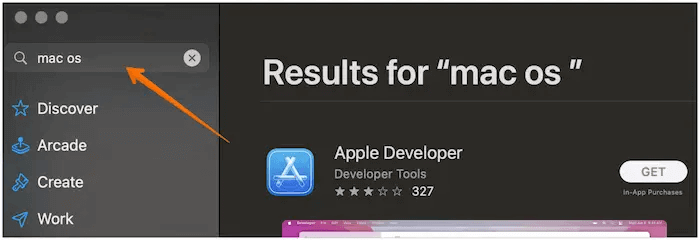
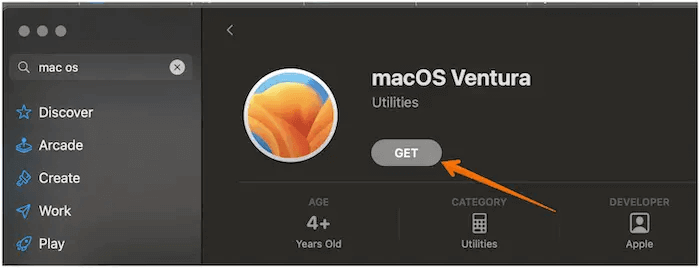
Step 1. To get the latest version of macOS, go to the Mac App Store, where you can search for the version of macOS you want.
Step 2. Select the View or Get option.
Step 3. You will be asked to confirm if you want to download the macOS. Click Download.
Step 3. How to Install macOS on External Drive
To install macOS on an external drive and dual boot macOS Ventura and Monterey on a Mac, follow the steps to install macOS on an external drive, which will help you achieve this.
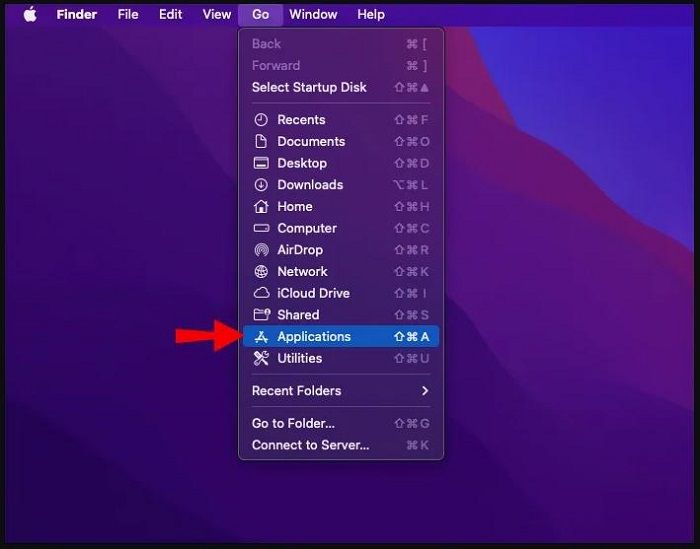
Step 1. To launch the Finder, select Go from the menu and choose Applications from the drop-down.
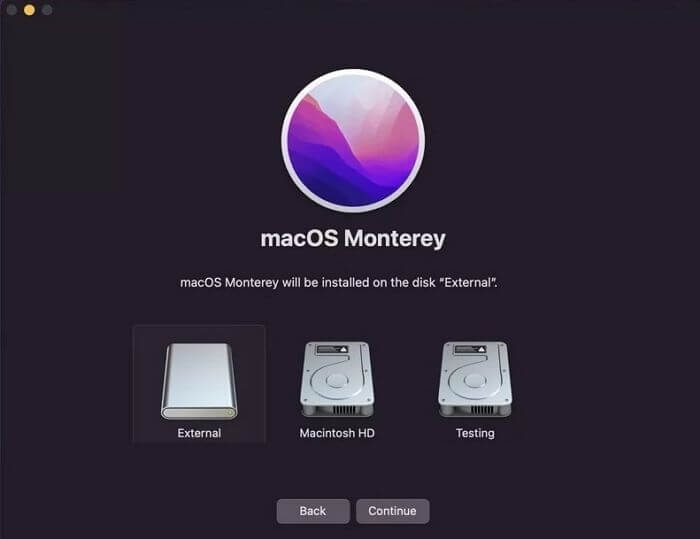
Step 2. To install macOS, locate the installer and select it, then wait for a window to open. Follow the on-screen instructions to install the desired version of macOS, clicking on Continue as prompted.
Step 3. Confirm the software license agreement, select Show All Disks, choose the external drive, and select Install.
Step 4. Once the installation is complete, restart your Mac. After the restart, you'll see the macOS installation screen.
Step 4. How to Boot macOS from External Drive on Mac
On a Mac, the system will normally boot from the internal startup disk by default, requiring additional steps to boot from an external drive.
For Apple M1 and M2 chip Macs, turn off the system, wait a few seconds, and press and hold the Power button. Let the Startup options load, then select the macOS volume for installation from the list of bootable drives.
If you use Intel-To boot from a different disk on a Mac, you need to reboot the system while holding the Option key. This will lead to the Startup menu, where you can choose the disk you want to boot from, selecting the drive with the name of the macOS you want.
Rescue Data from Faulty Mac with Software
If you've lost data due to a failed macOS Ventura upgrade or Mac startup issues, don't panic! Professional data recovery software can be the ideal solution to retrieve your critical data.
Install Deep Data Recovery for Mac to easily restore lost data, regardless of the reason for its loss. This powerful tool helps recover data from system crashes, manual errors, hardware failures, and accidental deletions without a backup, among other scenarios.
You will need a recovery product to deal with data loss or file corruption, such as Deep Data Recovery Wizard, Recuva, or Disk Drill. These products can scan your computer for lost files and recover them if possible.
- You can recover deleted files on macOS Ventura using Deep Data Recovery for Mac, which can retrieve various data types such as music files, emails, videos, photos, and more.
- Restored files from various Mac-based devices, including SSD, HDD, memory card, camera, and fusion drive, and provided Mac USB recovery support.
- If your MacBook won't turn on after updating to macOS Ventura, don't worry - you can rescue your data and fix the issue without losing any files.
- Repairing corrupted videos on a Mac can be a challenge, but software is available to help. In some cases, recovered videos may still be damaged, but this software can aid in recovering and repairing the corrupted videos.

Bottom Line
Installing macOS on an external drive can be a good idea if you want to try out a new version without affecting your computer's efficiency. This way, you can test the upgraded system without compromising your current setup.
Formatting the drive before downloading the macOS installer is a good idea. After that, you can install the macOS on the external drive and start using it. If you encounter data loss while installing new macOS versions, there's no need to worry, as professional software like Deep Data Recovery for Mac can help you recover your data.
This data recovery platform is easy to use and highly efficient, with a wide range of features that enable quick recovery of various types of data.
If you haven't tried Deep Data Recovery for Mac yet, check it out today!
How to Install macOS on External Drive FAQs
Installing macOS on an external drive is a straightforward process that involves following a few simple steps. However, for a more informed approach, it's recommended to have a deeper understanding of the process, which can be gained by reviewing the provided questions and answers. This will help ensure a smooth installation experience and allow you to take full advantage of the new version of macOS.
1. How to install macOS on an unsupported Mac?
To install macOS Ventura on an unsupported Mac, first connect the external drive to the system. Then, back up your data using Time Machine. Finally, opt for a suitable patcher.
Launch the patcher and select the macOS Installer option, then confirm the download of the most recent macOS version.
After downloading is completed, enter the admin username and password, then choose Install macOS and select the drive you connected. Wait for the process to complete, and also install the patcher app. Finally, boot the patcher and macOS.
2. Why can't you install macOS on an external drive?
Apple does not support booting macOS from an external drive on all Macs, with older versions not having the feature at all, and newer versions making it difficult to install macOS on an external drive.
3. Can I install macOS Monterey on an external drive?
To install macOS on an external drive, you can use the Disk Utility to create a bootable drive, but you'll need to select the startup disk every time you boot, by holding down the Option key to choose between the external and internal drives.
4. How to recover data from a faulty Mac that won't boot anymore?
If the SSD drive is removed from a macOS and connected to another PC, it should be detectable. If so, you can use the Qiling recovery tool to extract and recover data. Once the data is recovered, the drive can be sent for repair and potentially reused.
Related Articles
- How to Fix Installer Information on The Recovery Server Is Damaged?
- NVRAM Reset Not Working on Mac, 3 Steps to Fix!
- Why Won't My Mac Turn On and How to Solve It
- How to Turn Off Sleep Mode on Mac/MacBook Air/iMac
- League of Legends Account Recovery: How to Get Riot Account Back
How to recover League of Legends account without email? How to recover lost or old Riot account? Read this article and learn how to recover League of Legends or Riot account in full ways. Meanwhile, use Qiling data recovery software to restore the lost game replays or highlights on your local computer. - M.2 Not Recognized? See How to Make Your M.2 SSD Show Up in Windows
M.2 SSD not recognized in Windows 10/8/7? Learn 5 proven fixes for BIOS, boot drive, Disk Management, and File Explorer detection issues. Recover your M.2 drive data with step-by-step solutions.