Tutorial on PowerShell Format Disk on Windows [Easiest Way]
To format a disk using PowerShell, you can follow a detailed guide that starts by understanding what PowerShell is. Once you're familiar with PowerShell, you can use it to format a disk by running specific commands, which can be tricky. The process involves using PowerShell to identify the disk you want to format, and then running the necessary commands to erase the data and reformat the disk. If you're new to PowerShell, it's recommended to learn the basics first before attempting to format a disk. However, with practice and patience, you can master the process and use PowerShell to format a disk effectively.
What Is PowerShell?
If you've ever wanted to format your disk when checking disk space, you might find PowerShell to be a useful tool. But what exactly is PowerShell?
PowerShell is a Microsoft task automation and configuration management program that combines a command-line shell with a scripting language.
![]()
Windows operating system comes with a built-in tool called PowerShell, an advanced version of the Command Prompt, which allows users to customize the system through commands. Its main functions include.
- Enabling task automation
- Driving data accessibility
- Facilitating remote commands
- Managing "infrastructure as code"
PowerShell offers various features beyond its basic functionality, including formatting a disk drive. This article will focus on providing a step-by-step guide on how to format a disk drive using PowerShell, with detailed instructions available in the content that follows.
Tutorial for PowerShell Format Disk - Using Commands
To format a disk drive with PowerShell on Windows, you can use the `Format-Volume` cmdlet. You can format a disk and create new partitions by using the `New-Partition` and `Format-Volume` cmdlets together. For example, to format a disk and create a new partition, you can use the following PowerShell commands: `New-Partition -DriveLetter "C" -UseMaximumSize -DriveType Fixed -Force`, followed by `Format-Volume -DriveLetter "C" -FileSystem NTFS -Force`. This will format the disk and create a new partition with the NTFS file system.
This tutorial explores the use of PowerShell to format disks and create new partitions. It begins by demonstrating how to format disks using PowerShell.
Guide 1. How to Format Disks with PowerShell
To format a disk with PowerShell, you can use the `Format-Volume` cmdlet. This cmdlet allows you to format a volume, which can be a disk, partition, or other storage device. To use it, you'll need to specify the drive letter or volume path you want to format, as well as the file system type (e.g.
Step 1. Run PowerShell as administrator.
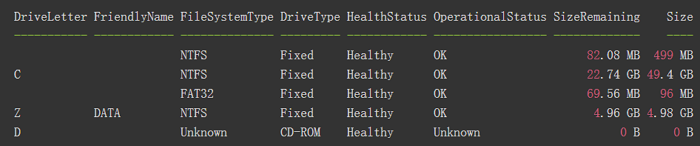
Step 2. List all volumes available by typing the following command:
Get-Volume | Format-Table -Autosize
Step 3. To format a disk, choose the disk to format and determine its file format, then type the command to format it. The command to format a disk can vary depending on the operating system and the specific disk. In general, the command to format a disk is something like `format /fs:x` where "x" is the file system format, such as FAT32, NTFS, or HFS+.
Format-Volume -DriveLetter Z -FileSystem NTFS -Full
Note: You need to change Z with the correct disk letter and change NTFS with any format you want.
Formatting a disk using PowerShell commands is possible, but what if you want to create a new partition after wiping the whole disk? To achieve this, you can use a combination of PowerShell commands to format the disk, delete any existing partitions, and then create a new partition. This process involves using the `Get-Disk`, `Get-Partition`, `Remove-Partition`, `New-Partition`, and `Format-Volume` cmdlets to wipe the disk, delete any existing partitions, create a new partition, and format the disk, respectively. This guide will walk you through the steps to accomplish this task.
Guide 2. How to Format Disk and Create New Partitions with PowerShell
Step 1. Open "Start".
Step 2. To run PowerShell as an administrator, right-click on the PowerShell icon and select the "Run as administrator" option from the context menu. This will launch PowerShell with elevated privileges, allowing you to execute commands that require administrative access.
Step 3. Type the following command and find the drive to format:
Get-Disk
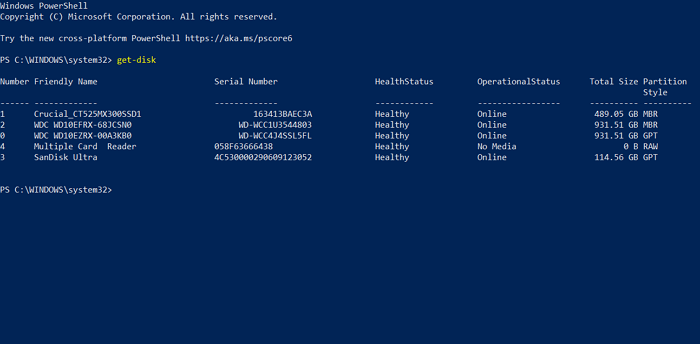
After you press "Enter", you can see all the disks available.
Step 4. To securely erase all data on a disk drive, you can use the `dd` command with the `if=/dev/zero` and `of=/dev/sdb1` arguments, where `/dev/sdb1` is the path to the disk drive you want to wipe. This command will overwrite the entire disk with zeros, effectively erasing all data.
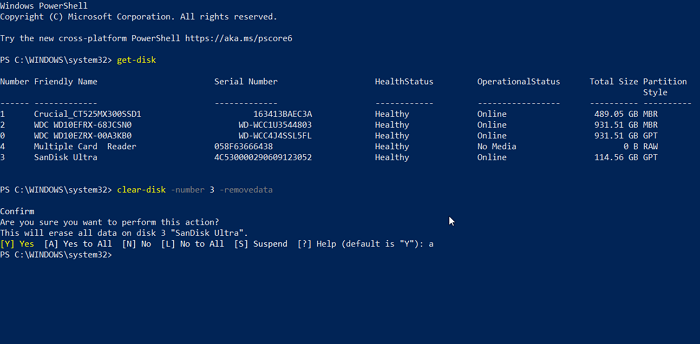
Get-Disk 1 | Clear-Disk -RemoveData
Note: To format a drive, open the Disk Management tool, select the drive you want to format (e.g. drive C:, drive D:, etc.
Step 5. Type Y to confirm that you want to format the drive, then press "Enter" to proceed with the formatting process.
Step 6. Type the command below to initialize the targeted disk:
Initialize-Disk -Number 1
Note: To format a disk in Windows, you need to use the built-in Disk Management tool. First, open the Disk Management tool by searching for it in the Start menu. In the Disk Management window, right-click on the disk you want to format and select "Format.
Step 7. Format and create a new partition by typing the following command in the terminal: `sudo fdisk /dev/sdb` (replace "/dev/sdb" with your actual disk device name). Then, follow the on-screen instructions to create a new partition.
New-Partition -DiskNumber 1 -UseMaximumSize | Format-Volume -FileSystem NTFS -NewFileSystemLabel myDrive
Note: To create a new partition on your computer, you can use the following command in the Command Prompt: `diskpart`, then `list disk`, select the disk number you want to use (e.g.
Step 8. The command to give a drive letter to the targeted disk drive is `mkfs.ext4 /dev/sdb1` followed by `mount /dev/sdb1 /mnt` and then `echo 'UUID=.
Get-Partition -DiskNumber 1 | Set-Partition -NewDriveLetter G
Note: Change 1 with the correct disk number and G with the letter you want to assign to the storage.

After this process, you can format your disk with PowerShell. It is a little tricky, isn't it? Do you want to find an easier and faster way to format your disks on Windows? There is a tool to help!
A Professional Alternative to PowerShell on Windows - Qiling Disk Master
Qiling Disk Master Free is a free format tool that allows users to complete a format process quickly and easily with simple clicks. This software is compatible with Windows 11/10/8.1/8 and Windows 7, making it a versatile option. Equipped with user-friendly features, Qiling Disk Master Free is an ideal solution for those who find format processes confusing.
To format a disk on Windows, you can use the built-in Disk Management tool. You can access it by searching for "Disk Management" in the Start menu, or by pressing the Windows key + R and typing "diskmgmt.
Step 1. Run Qiling Disk Master, right-click the hard drive partition you intend to format and choose "Format".
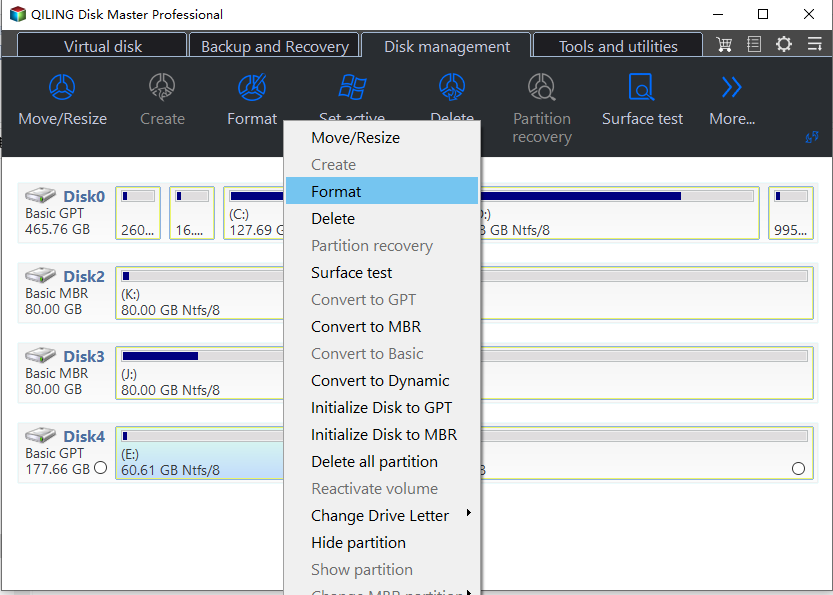
Step 2. Set the partition label, file system, and cluster size in the new window for the partition to be formatted.
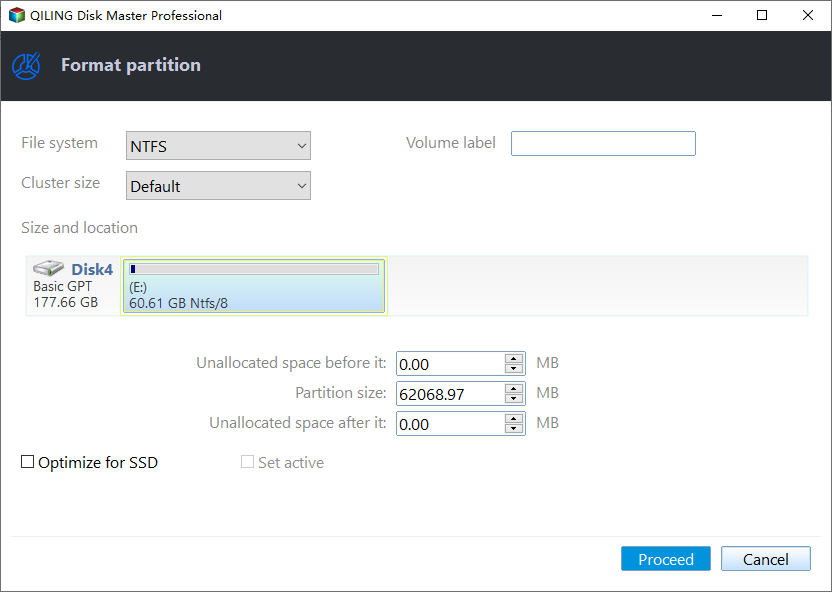
Step 3. If you're ready, click the "Proceed" button to start formatting the partition on your hard drive. This will erase all data on the selected partition, so make sure you've backed up any important files before proceeding.
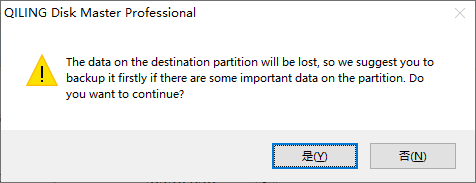
Step 4. Then you will see a warning window, click "Yes" in it to continue.
Qiling Disk Master has a built-in partition manager that allows users to create, delete, and resize partitions on their hard drives. It also supports the creation of bootable USB drives and can help users recover lost data by scanning for and restoring deleted files. Additionally, the software can be used to clone entire hard drives, making it a useful tool for backing up important data.
What Else Can Qiling Disk Master Help with?
Qiling Disk Master is far more than a formatter. It has features such as data backup, disk cloning, disk partitioning, disk wiping, and disk erasing, making it a comprehensive tool for disk management and maintenance.
- Format USB to boot
- Convert FAT32 to NTFS
- Clone systems and partitions
- Convert MBR to GPT without data loss
- Extend, shrink, move or resize partitions
- Convert Data Disk to MBR/GPT, NTFS/FAT32
This software is a disk management tool that allows users to manage and maintain their computer's partitions and disks. It provides a user-friendly interface to create, delete, resize, and merge partitions, as well as to format and recover disks. With this tool, users can easily manage their disk space, fix disk errors, and optimize their computer's performance. It's a great utility for anyone who wants to keep their computer's disk management in order.
Conclusion
If you're familiar with PowerShell commands, you can use them to format your disks on Windows. However, if you find these commands too complicated, you can also use Qiling Disk Master, a software that can assist you in formatting your disks. Alternatively, you can refer to the detailed tutorial on using PowerShell commands that we've learned.
FAQs About PowerShell Format Disk
Do you have any questions about using PowerShell to format disks? In this part, I list three questions related to today's topic. Hope it can help.
1. How do I list a disk in PowerShell?
To get a list of all disks in your system, simply run PowerShell as an administrator and type the command "Get-Disk".
You can view all the available disks on your device by looking at the list of disks that are accessible to your device. This allows you to see the disks that are connected or available for use.
2. How do I format a USB drive in PowerShell?
Step 1. Open PowerShell, and select the "Run as administrator" option.
Step 2. Type the following command to format the USB and press Enter:
Format-Volume -DriveLetter DRIVE-LETTER -FileSystem FILE-SYSTEM -NewFileSystemLabel DRIVE-NAME
Make sure you replace DRIVE-"FORMAT [C:]/[C:] -FORMAT /FS:NTFS /V:MY-DRIVE"
3. How do I completely format a disk?
Step 1. Right-click on the drive to format and select "Format".
Step 2. Enter a name for the drive in the "Volume label" and select the desired file system format type, such as NTFS or exFAT, to determine the drive's compatibility and functionality.
Step 3. Click "OK".
Note: It takes a while to delete all the files and change the format of your disk.
Related Articles
- Disk Cleanup Not Working Windows 10/8/7? Here Are the Free and Easy Fixes!
- Why Won't My Mac Turn On and How to Solve It
- What Graphics Card Do I have? Here's How to Check Graphics Card
- 5 Best Ways to Fix Windows Update Error 0x80080005
- Can't End Task Access Denied (Cuauses & Solutions)👍
Can't End Task Access Denied is a common issue that frustrates users. This problem occurs when a user tries to close a program or process, but is denied access due to various reasons, such as system file corruption, malware, or permission issues. Fortunately, fixing this issue is relatively straightforward, and users can resolve it by using built-in tools like Task Manager or by restarting their computer in Safe Mode. By following these simple steps, users can regain control over their system and close unwanted programs without encountering the “Access Denied” error. - How to Change the Administrator on Windows 10 [Step-by-Step Guide]
The highest position in Microsoft Windows is the administrator, which grants access to all Windows' features, allowing modification of the operating system's functionality.