Overall Solutions: How to Ungroup the Taskbar In Windows 11
The taskbar in Windows is a useful tool that allows you to access your programs and files quickly and easily. However, when it becomes cluttered and disorganized, ungrouping it can provide more control over the layout and organization, making it easier to access the programs and files you need.
If you're a Windows user, whether seasoned or new, ungrouping the taskbar is an essential feature. However, if you're unsure how to perform this function on Windows 11, you're in the right place to learn how to ungroup the taskbar.
Discover the best way to ungroup the taskbar in Windows 11 and learn how to customize and organize your taskbar for maximum efficiency. By following these steps, you can ungroup the taskbar and make the most of your Windows 11 experience.
Why Should We Ungroup Taskbar
Before you move to the stepwise guide to ungroup the taskbar in Windows 11, you need to understand what a taskbar is and why you need to ungroup it. The taskbar is a feature of the Microsoft Windows operating system that appears at the screen's bottom.
The taskbar provides quick access to programs, files, and system settings, displaying icons for open programs, a Start button, a search box, and notification icons, and can be customized by pinning frequently used programs or grouping similar ones together.
The taskbar is a convenient way to access frequently used programs and features, helping you stay organized and efficient on your computer. You might want to ungroup the taskbar in Windows 11 for various reasons, such as to declutter your desktop, prioritize certain apps, or customize your workflow to suit your needs.
• Improved organization: By ungrouping the taskbar, you can arrange icons in a way that makes sense to you, helping you stay organized and find programs more quickly.
• Customization: Ungrouping the taskbar gives you the flexibility to personalize the layout and appearance of your taskbar, allowing you to tailor it to your specific needs and preferences.
• More screen space: If you have a lot of icons on your taskbar, ungrouping them can free up more screen space for your other programs and windows.
• Easier access to specific icons: If you have a lot of icons on your taskbar and they're grouped, it can be frustrating to find the specific one you're looking for. However, by ungrouping the taskbar, you can spread out the icons, making it easier to locate the one you need. This simple tweak can save you time and reduce the stress of searching through a cluttered taskbar.
How to Ungroup the Taskbar In Windows 11
To ungroup a taskbar in Windows 11, follow these steps:
Step 1. Right-click on the Taskbar
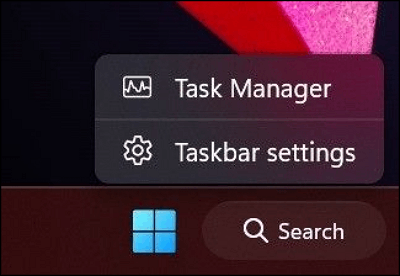
To locate the taskbar on your Windows 11, right-click on it at the bottom of your PC screen to open the context menu.
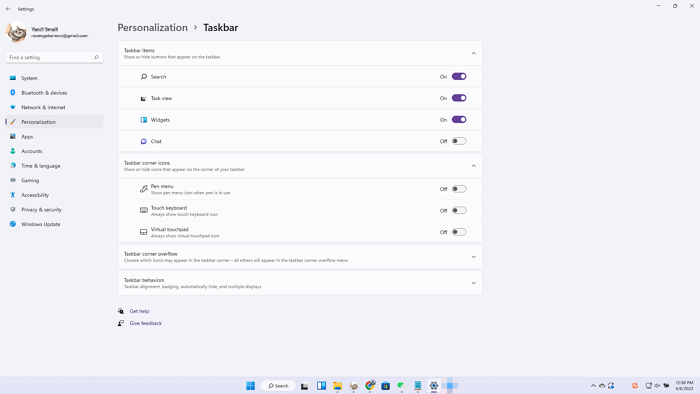
Step 2. Select "Taskbar Settings"
To access Taskbar Settings, click on the Taskbar Settings icon, which is usually found in the Start menu or by searching for it in the search bar. Alternatively, you can right-click on the Taskbar and select Taskbar settings from the context menu.
Step 3. Toggle the "Combine taskbar buttons" option
To ungroup the taskbar on Windows 11, launch the Taskbar Settings, scroll down to the Taskbar section, find the Combine taskbar buttons switch, and toggle it off. This will allow the taskbar icons to be displayed separately.
Step 4. Customize the taskbar
Now that you've ungrouped the taskbar on your Windows 11, you can customize the layout and organization of your taskbars by dragging and dropping icons. You also have the option to show the taskbar on all displays, allowing you to control which icons are displayed on which screens.
Pro Tips: More Ways to Customize the Taskbar
Here is how to customize the taskbar in Windows 11 in one paragraph: To customize the taskbar in Windows 11, you can resize it, move it to the top or left side of the screen, and even ungroup icons to create more space. You can also pin frequently used apps to the taskbar for easy access, and add or remove icons from the taskbar. Additionally, you can customize the taskbar's appearance by changing its color and transparency, and even add a clock or other widgets to it. By customizing the taskbar, you can improve your productivity and make your computer more efficient.
• Change the Location of the Taskbar: To move the taskbar to a different location on the screen, right-click on the taskbar, select Taskbar settings, and then choose the desired location from the Taskbar location on the screen dropdown menu.
• Change the Size of the Taskbar: To adjust the size of the taskbar, right-click on it, select Taskbar settings, and then use the slider under Taskbar size to adjust the size to your preference.
• Pin Programs to the Taskbar: To quickly access frequently used programs, right-click on the program's icon and select "Pin to taskbar".
• Group Similar Programs: To stay organized and quickly find the programs you need, you can group similar taskbar buttons by right-clicking one of the icons and selecting "Group similar taskbar buttons".
• Change the Appearance of the Taskbar: To customize the appearance of the taskbar, right-click on it and select Taskbar settings. Under Taskbar appearance, you can change the color and transparency of the taskbar.
Customizing the taskbar in Windows 11 allows you to tailor it to your needs and preferences. You can change its location, size, and appearance, as well as pin frequently used programs to it, giving you a personalized workspace that suits your workflow. Whether you want to make the taskbar more compact, change its position on the screen, or simply make it look more appealing, these options provide the flexibility you need to make it work for you.
Conclusion
Ungrouping the taskbar in Windows 11 allows for greater control over the layout and organization of your taskbar, making it easier to be productive and efficient. By following the steps outlined in this article, you can learn how to ungroup the taskbar and customize your desktop experience.
In Windows 11, users can customize their taskbar by changing its location, size, and appearance, as well as pinning programs to it. This allows for a tailored experience, and users can experiment with different layouts to find the one that suits them best.
Related Articles
- [5 Quick Fixes] Samsung Data Migration Not Working
- Why Does Steam Say I Have No Disk Space [Reasons & Solutions]
- Is Windows 11 Good For Gaming? Your Best Answer in 2023!
- 7 Solutions to Fix Mac Camera Not Working in 2023
- 5 Best Ways to Fix Windows Update Error 0x80080005
If your Windows update failed with error 0x80080005 and you're unable to update Windows 10 to the newest version, don't worry! There are 5 effective ways to fix this issue. Once you've resolved the problem, you can also use Qiling data recovery software to restore any lost data. - Windows Update Something Went Wrong - How to Fix?
The 'Windows update something went wrong' error message can occur due to several reasons. This issue may arise from various factors, and the article will explore some of the common causes of this problem.