How to Fix "Unable to Connect to Virtual Disk Service" Windows 10/11
The issue of "unable to connect to virtual disk service" on Windows 10 or 11, or being stuck on "connecting to the virtual disk service" or "loading disk configuration information" in Windows 7, can be resolved by running the built-in System File Checker (SFC) tool to scan and replace any corrupted system files, or by using the DISM tool to check and fix any issues with the Windows image. Additionally, disabling the virtual disk service and then re-enabling it may also resolve the issue. Furthermore, running a System Restore to a point before the issue started, or resetting Windows to its default settings, may also be helpful in resolving the problem. It's always recommended to create a system backup before making any changes to the system.
Here, we outline the steps you can take to solve this issue, as it is a Windows service that controls and makes information available on the virtual disk.
Why Unable to Connect to Virtual Disk Service
You are wondering why your Disk Management cannot connect to the virtual disk service. Here are some of the reasons why.
- The remote computer does not support VDS.
A computer won't connect to a virtual disk service if it doesn't support it, so always check compatibility before connecting.
- The connection is blocked by Windows Firewall.
The Windows Firewall may be the cause of the errors, as it monitors network traffic and determines which traffic to block or allow based on security rules.
- Other reasons, such as faulty devices.
Check external storage devices like an external hard drive, card reader, or USB drive, as they may be faulty or incompatible with Disk Management, causing the errors.
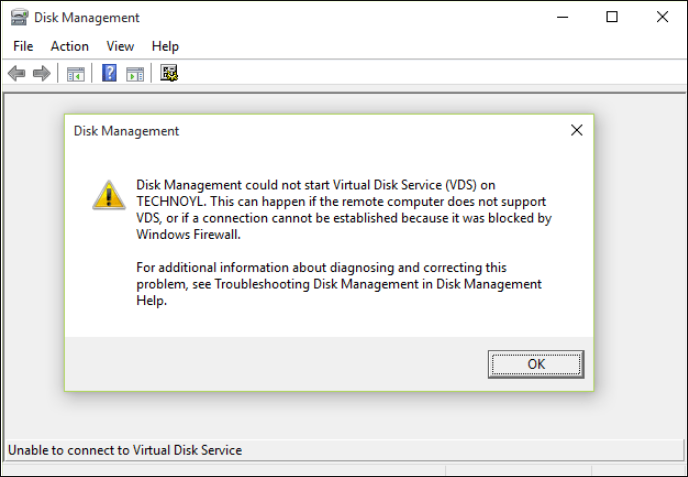
To resolve the virtual disk service error on a Windows PC or Server, check the disk management console for any issues with the virtual disk, and ensure that the virtual disk is properly configured and attached to the host machine. If the issue persists, try restarting the virtual disk service, checking for any updates to the virtual disk software, and verifying that the virtual disk is not corrupted. Additionally, ensure that the host machine has sufficient resources to support the virtual disk, and consider reinstalling the virtual disk software if none of the above steps resolve the issue.
How Do I Fix the "Unable to Connect to Virtual Disk Service" Error
Here are the possible ways to fix the "unable to connect to virtual disk service" error in one paragraph:
Fix 1. Use Alternative Software for Disk Management
Fix 2. Disable Windows Defender
Fix 3. Enable Virtual Disk Service
Fix 4. Use SFC or DISM to Fix the Error
Fix 5. Unblock Windows Firewall
Fix 6. Check All External Storage Devices
Now, let's dive into the fixes in detail, starting with the first one.
Fix 1. Use Alternative Software for Disk Management
You can use Qiling Partition Master Free as an alternative to Disk Management, which can serve the same purpose without any issues, and can completely replace disk management in all aspects.
Using a solid-state drive (SSD) is a more efficient and safer alternative to traditional disk management. It offers a range of exciting features that make it an ideal choice, providing a faster and more reliable storage solution.
- You can delete/create partitions on USB drives, SD cards, and other drives.
- This tool can resize encrypted partitions or move unallocated space to the C drive.
- Extend the system partition to utilize available or unallocated space and potentially speed up the PC by utilizing the "Extend" feature.
- With its help, it is easy to merge partitions on SSD or a USB.
- The free Qiling Partition Manager allows users to format a disk or delete a partition.
You can't wait to try it out with the features listed. Click the button below to download and experience it for yourself.
Fix 2. Disable Windows Defender
Sometimes disabling the built-in Windows Defender antivirus can prevent the error from occurring.
To disable them, follow these steps.
Step 1: To open the Local Group Policy Editor, press the "Windows + R" keys and type in "gpedit.msc".
Step 2: To access the Windows Defender Antivirus settings, go to Computer Configuration > Administrative Templates > Windows Components > Windows Defender Antivirus.
Step 3: To disable Windows Defender Antivirus, go to the Start menu, select Settings, then click on Update & Security, and finally click on the Virus & threat protection settings option. In the Virus & threat protection settings window, scroll down and toggle the switch next to "Cloud-delivered protection" and "Automatic samples" to the off position.
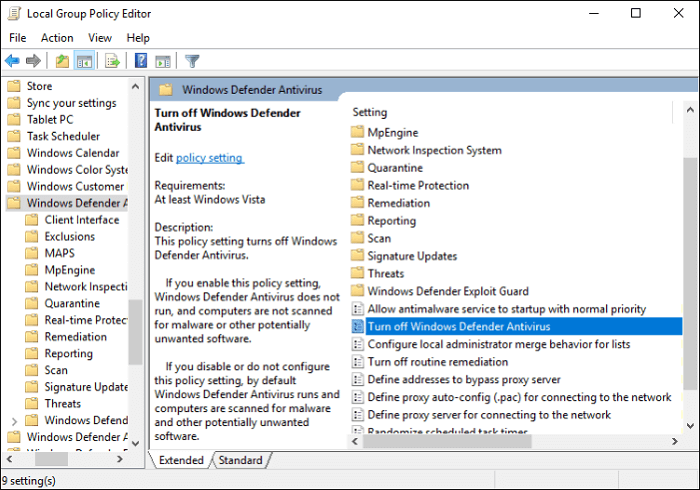
Step 4: Mark "Enabled," then "Apply," and "OK" to save the changes.
Step 5: Reboot the computer to effect the changes.
Fix 3. Enable Virtual Disk Service
If virtual disk services are not enabled, you can follow this guide to enable them.
Step 1: The "Windows + R" keys are pressed together to open the Run dialog box.
Step 2: To open Windows Services Manager, type "services.msc" in the Run box and press Enter.
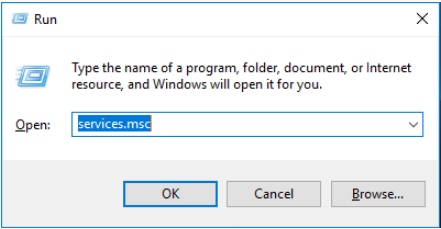
Step 3: Scroll down to find the Virtual Disk Service, then double-click it to open.
Step 4: Choose Automatic/Manual for the startup type, then click "OK" to save the changes.
Fix 4. Use SFC or DISM to Fix the Error
Step 1: To access the Command Prompt, you can search for "command prompt" in the Search bar, and then right-click on the Command Prompt icon that appears in the search results, selecting "Run as administrator" from the context menu. This will open a Command Prompt window with elevated privileges.
Step 2: Type "sfc /scannow" and press the Enter key. Then, wait until the procedure ends.
If the SFC command fails to fix the issue, you can run the DISM command to see if it can repair the corrupted system files and restore the system to a healthy state. This command will scan and repair any corrupted system files, and may resolve the issue with the system files. If the DISM command also fails, you may need to consider more advanced troubleshooting steps or seek further assistance.
The steps for running the DISM command are given below.
- Similarly, launch Command Prompt as an administrator.
- Type this:
exe /Online /Cleanup-image /Scanhealth
exe /Online /Cleanup-image /Restorehealth
- To fix the error "Error 1067: The process terminated unexpectedly", follow these steps: 1) Open the Command Prompt as an administrator, 2) Navigate to the folder where the Windows service is located, 3) Run the command "sc delete" followed by the service name to delete the service, 4) Restart the Windows service by running the command "sc start" followed by the service name, and 5) Close the Command Prompt window after the procedure ends and test whether the error is solved.
Fix 5. Unblock Windows Firewall
To unblock the Windows Firewall, follow these steps: first, go to the Control Panel, then click on System and Security, followed by Windows Defender Firewall. Next, click on Allow an app or feature through Windows Defender Firewall, and then click on Change settings. Finally, find the application you want to allow and click on the checkbox next to it to enable it.
Step 1: To access the Windows Firewall settings, go to the Start button, then select Settings, followed by Update & Security, and then Windows Security, and finally Firewall & network protection.
Step 2: Select "Windows Defender" and click "Open Windows Defender Security Center."
Step 3: To allow an app through the Windows Firewall, open the Start menu and click on "Settings," then "Update & Security," followed by "Windows Security." Click on "Firewall & network protection" and "Allow an app through firewall," then click "Change settings" and "Add a new rule." Select the type of rule and the app you want to allow, and choose whether to allow it for all profiles or just the current one.
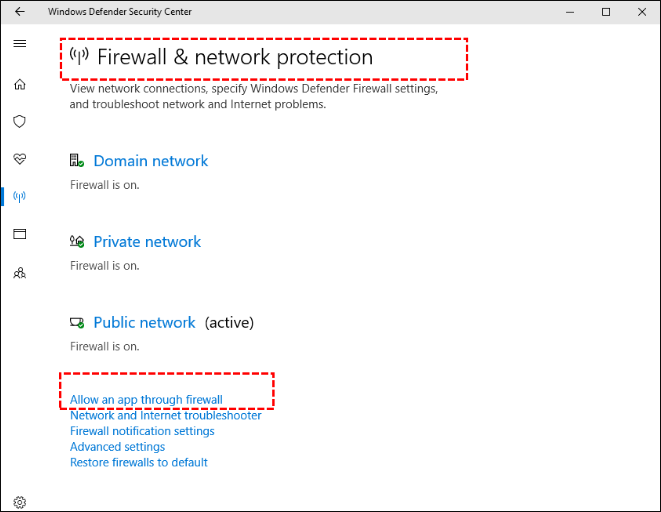
Step 4: In the new window, click "Change settings."
Step 5: To enable Remote Volume Management, go to the settings and find the option, then select both check boxes and click "OK" to save the changes.
Fix 6. Check All External Storage Devices
Troubleshooting external storage devices can sometimes fix this. Try removing all external devices one by one to determine if any are defective. This includes card readers, USB drives, and hard drives. Additionally, updating the universal serial bus drivers may also resolve the issue.
Conclusion
The virtual disk service allows for management of disks, file systems, volumes, and storage arrays, but it is prone to mistakes.
To resolve the issue, check if the remote computer is capable of using the printer, if any external storage devices are broken, or if the Windows firewall has blocked the connection. There are six ways to resolve the issue, applicable to both Windows PCs and Windows Servers.
When using Disk Management, you may encounter issues such as disk partitioning problems, disk formatting issues, or disk configuration errors. To resolve these issues, you can refer to the following links for assistance: 1. Disk Partition Issues: [link] 2.
FAQs Related to Unable to Connect to Virtual Disk Service
Some of the frequently asked questions with answers related to being unable to connect to virtual disk service are provided here.
1. What is the Virtual Disk Service?
This Microsoft Windows service performs various tasks such as querying, configuration, volume and disk management, and more, as requested by end users, scripts, and programs.
2. How do I enable virtual disk services?
This article provides information on how to enable virtual disk services.
3. Can I restart the virtual disk service?
Yes, you can. Below are a few steps to do this.
Step 1. Press the Windows key + R on the Keyboard.
Step 2. Type services.MSC and hit Enter.
Step 3. Stop the Virtual Disk service in the Services Window.
Step 4. Restart the computer, Start the Virtual Disk Service, and set it to Automatic.
Related Articles
- Why Format SD Card: Full Guide on the Main Reasons
- Guide on Format Partition in Linux [Effective & Easy Solutions]
- 4 Solutions | Fix Bootable USB Not Working in Windows 10/8/7
- Clean C Drive without Formatting in Windows 10/8/7 [Tested & Worked]
- How to Solve Windows Can't Convert MBR to GPT [2024 100% Working Solution]
This article focuses on why Windows can't convert MBR to GPT in Disk Management. And you can know the reason and solutions to convert MBR to GPT easily. - How to Fix "Can't Convert to Dynamic Disk" Error [Step-by-Step Guide]
Fix the cannot convert to dynamic disk error with four practical methods and learn why Windows may block disk conversion.
Products
Articles & Tutorials
- Data Recovery
- Data Backup
- File Recovery
- File Backup
- System Backup and Restore
- Disk and Partition Clone
- Technical articles
- Mobile articles
- Disk Master Help
- Windows Data Recovery Tutorials
- Windows Secure Delete Tutorials
- Windows Partition Management Tutorials
- Windows File Backup and Restore Tutorials
- Windows System Backup and Restore Tutorials
- Windows Disk Backup and Restore Tutorials
- Windows Clone Tutorials