How to Convert RAW to NTFS without Formatting/Losing Data
Quick Navigation:
- Why Do You Need Convert RAW to NTFS without Losing Data?
- Simple 2 Steps to Change/Convert RAW to NTFS without Data Loss
- Method 1: Get RAW Drive Data Back Now
- Method 2: Convert RAW drive to NTFS File System
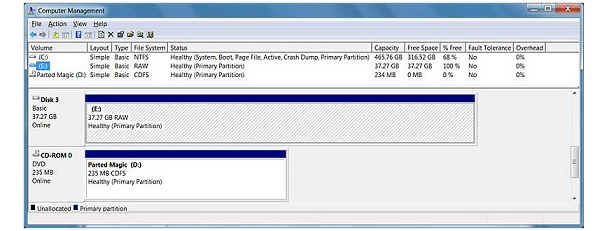
" My hard drive was partitioned into 4 volumes (C, D, E, and H), Recently E: volume suddenly changed from NTFS to RAW. I just see 0 bytes free and used space on it and can't access it before formatting. Some important data in this driver, so I don't want to format this volume unless can recover raw partition without losing data. I would like to seek help to find out the solution for how to convert RAW to NTFS without losing data or how to change RAW to NTFS without formatting. "
The RAW issue is one of the most annoying issues on the computer, however, is very common. Besides computers, it also may happen on others storage devices, such as hard disk, external hard drive, USB flash drive, SD card and more. Once the drives or partitions become RAW, it means the storage devices can't be used to store data, it is also not allowed to open data and file on them. How to convert RAW to NTFS without losing data and how to RAW drive recovery also are attracting more and more attention from computer's users. This article will detail the conversion of change/convert RAW to NTFS without data loss.
Why Do You Need Convert RAW to NTFS without Losing Data?
If your RAW drive adopted NTFS file system originally, you could convert RAW to NTFS to get access to the disk again. So, most users will format the drive or partition to change RAW to NTFS file system. However, formatted the RAW drive will deleting your all data, which will result in data loss.
A lot of the people experienced the troubled care about the data loss. How to solve this problem? Please don't worry, want to solve the question satisfactorily, there are two things we need to do: get RAW drive data back and convert RAW to NTFS file systems.
Simple 2 Steps to Change/Convert RAW to NTFS without Data Loss
Method 1: Get RAW Drive Data Back Now
Don't format the RAW drive before recovering data, even the computer pops up "Media/Drive is not formatted, would you like to format now?", or you will lose data permanently. Here, we'll use the powerful RAW drive recovery tool - Deep Data Recovery to quickly help you recover data from RAW partition or drive. It can also recover deleted files from Windows 10/8/7/Vista/XP or external removable devices, and can unformat SD card, disk/partition, USB drive etc.
Your Safe & Effective RAW Drive Recovery Tool
- It provides "Deep Scan" mode to ensure full recovery of your image, audio, video, document, archives and other files.
- It is a cost-effective solution to recover any data due to deleted, formatted, emptying recycle bin, drive/partition displays as RAW, access denied, device initialization etc.
- It completely supportted all windows (Windows 10/8/7/Vista/XP and Windows Server 2016/2012/2008/2003) and Mac OS X 10.6 and later.
Download RAW Drive recovery software to recover RAW Drive now!!!
Step 1. Launching RAW drive data recovery tool and click "Next" button to change RAW to NTFS without formatting.
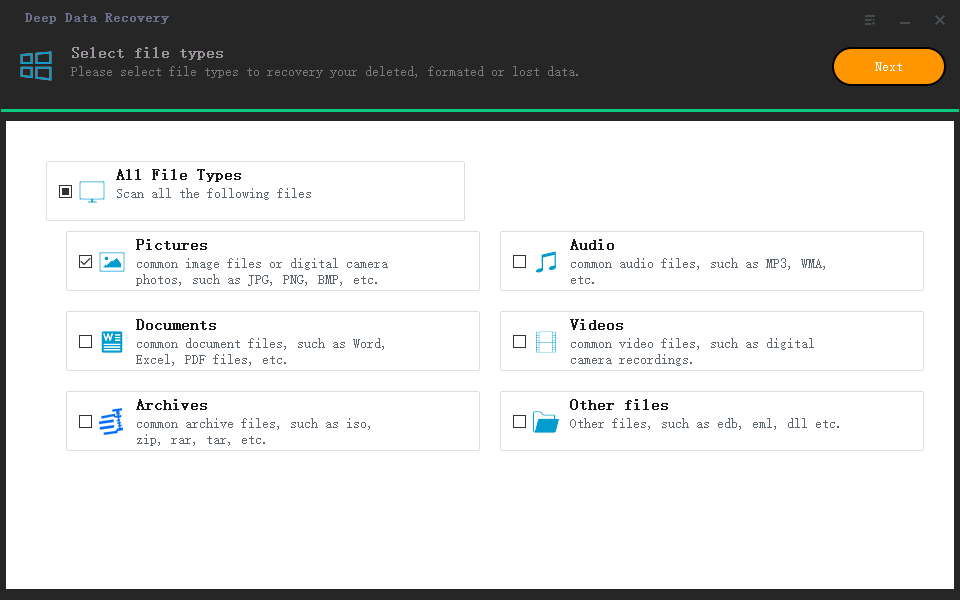
Step 2. Select your RAW partition/drives and click "Scan" button to recover data from RAW drives.

Step 3. When the scan is complete, you can see the lost RAW drive data. Select the data you need and click "Recover" button to save. If some lost files are not found or cannot be correctly opened, please click "Deep Scan" at the upper part of windows to completely scanning lost data.

Method 2: Convert RAW drive to NTFS File System
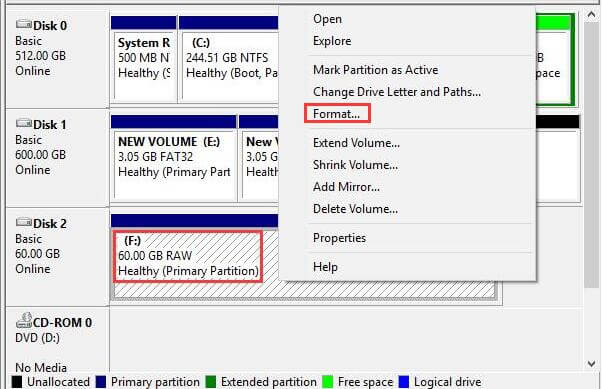
The easiest way to convert RAW to NTFS file system is to format RAW drive through Disk Management or Windows Explorer. After completing RAW drive recovery, open Disk Management, right click on the RAW drive and select "Format" feature to convert RAW to NTFS in Windows. Then you could see the correct information about RAW drive or volume in Disk Management, the computer can recognize it and you use the RAW volume to store file and data again.
Step 1. Right-click the desktop "computer" icon and click "manage".

Step 2. Select "Storage" > "Disk Management" on the left side of the screen.
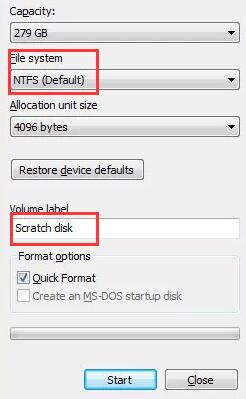
Step 3. Set the file system to NTFS, assign it a volume label, and click Start.
When the computer could list the RAW drive correctly, it means RAW issue is fixed, we can access it. So, you successfully performed convert raw to ntfs without losing data.
Related Articles
- SD Card Video Recovery - How to Recover Deleted Videos from SD Card
- How to Recover RAW Partition to NTFS without Losing Data
- How to Recover Deleted Videos on PC
- What Is Pagefile.sys? Is It OK to Delete It?
Pagefile.sys is one of the key components of computers today. This article will explore what it is, how it works, and why it's necessary. Plus, we'll address if you should delete it or remove it or how you can increase or decrease its size. - [Fixed] Pen Drive Not Showing/Detected in My Computer in Windows
Here step-by-step tutorials teach you how to fix pen drive not showing in my computer in Windows 10/8/7 is created. Try it fix your USB pen drive, flash drive, external hard drive or other external USB devices when it detected but not show in my computer. - 4 Choices of Portable Windows Product Key Finder for Your PC
You will have problems if you lose the product key of Windows or any software while reinstalling the Operating System or any other software from scratch. There are so many tools to get it back. But We shortlisted only the 4 best portable Windows Product Key Finder choices for Your PC.