How to Download iMessages from iCloud [2 Options]
Summary
iCloud can help users back up and store important data, making it convenient. However, sometimes users may accidentally delete iMessages on their iPhone, resulting in lost text messages. Fortunately, there are two ways to download iMessages from iCloud, which will be discussed in this article.
If you're struggling to transfer iMessages from iCloud to another device, don't worry - we've got you covered. In this article, we'll show you how to download iMessages from iCloud in a few easy steps. We'll also delve into the details of Apple's iCloud system, so you can understand the ins and outs of how it works. Whether you're looking to switch devices or just want to access your iMessages from a different device, we'll guide you through the process with ease.
To prevent unexpected data loss on your iPhone, use Apple's iCloud service to back up your data. This allows you to access your backed-up data from any device using your Apple ID. If you haven't already, enable iCloud on your Apple device. This will ensure your data is safely backed up and can be accessed from any device with your Apple ID.
To learn how to download iMessages from iCloud and prompt the backup option, keep reading this article. It will guide you through two different methods to achieve this. Let's get started!
How to Back Up Your Messages to iCloud
You can rest assured that your iMessages are backed up and won't be lost, as they are automatically updated across all your Apple devices through iMessages in iCloud. This feature ensures that any text shared on one device is synced with the others, and with end-to-end encryption, your messages remain private and secure. To take it a step further, you can manually backup your iMessages to iCloud, ensuring they're safely stored and easily accessible.
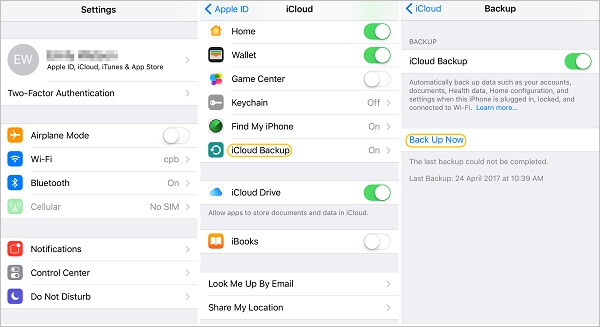
To ensure that your important conversations and memories are safely stored, it's a good idea to back up your iMessages to iCloud. This will allow you to access and view your conversations on any device that's signed in with the same Apple ID. To do this, go to Settings > [your name] > iCloud > iCloud Backup, and make sure that the toggle next to iCloud Backup is turned on.
Step 1. You need to connect your device to a Wi-Fi network.
Step 2. To access iCloud settings, go to Settings, select your name, and then choose iCloud, or if using iOS 10.2, go to Settings and select iCloud.
Step 3. To ensure your iPhone is backed up, tap on Settings, then on your name at the top, followed by iCloud, then iCloud Backup, and finally toggle the switch to turn it on. If you're using an older iOS version, tap on Settings, then on iCloud, then Backup, and then toggle the switch to turn it on. This will ensure your iPhone is backed up to iCloud.
Step 4. To initiate a backup of your iPhone, tap "Settings", then "iCloud", and select "iCloud Backup". Choose "Back up now" to start the process. Ensure your device remains connected to Wi-Fi until the backup is complete, and your iMessages will be included in the backup automatically.
How to Download iMessages from iCloud
You can download iMessages from iCloud using one of two safe methods.
- Method 1. Download iMessage with iCloud on iPhone - Traditional Way
- Method 2. Use Qiling MobiSaver to Download iMessages from iCloud
Method 1. Download iMessage with iCloud on iPhone - Traditional Way
iCloud, Apple's storage service, offers wireless backup to iOS devices, with 5GB of free storage for everyone, after which a premium pack is required for more storage. To download messages from iCloud to your iPhone, the traditional methods include.
Step 1. To backup your iPhone data, ensure you have your iCloud account set up and signed in on your iPhone settings. Go to Settings, select your name, and click on iCloud. From the iCloud page, toggle iMessage to green. This will allow you to back up your data.

Step 2. During the initial setup process, you'll be presented with three options: setting up your iPhone as a brand-new device, restoring from an iCloud backup, or using an iTunes backup.
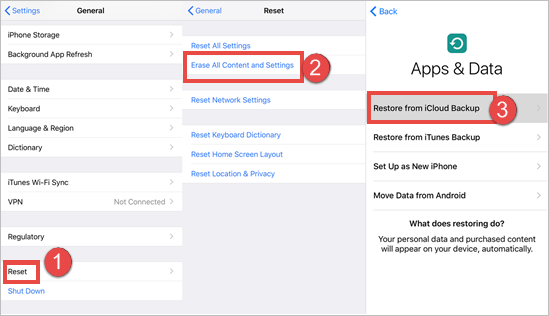
Step 3. To conclude, you need to sign in with your Apple or iCloud account, view a list of available backups, and select the most recent one. The recovery process may take anywhere from a few minutes to 2 hours, depending on the amount of data to be restored.
Method 2. Use Qiling MobiSaver to Download iMessages from iCloud
Qiling MobiSaver is the most professional and simple iOS data recovery tool, allowing you to restore iPad, iPhone, and iPod touch lost data, making it possible to retrieve unlimited iOS data lost in various situations.
If traditional methods fail to recover iMessages from iCloud, the Technician edition of Qiling Mobisaver can help recover most of the messages and data from multiple devices.
Qiling MobiSaver - Overview
Qiling MobiSaver helps retrieve lost messages and files on iOS devices, but only works if iTunes is installed on your PC. It's useful when iTunes backup fails, and can recover vital data like photos, contacts, and messages, serving as a backup to iCloud backup.
Highlights:
- You can retrieve contacts, photos, messages, videos, and other important data from your iOS devices directly from your iCloud backup, allowing you to access and restore your vital contents with ease.
- Complete support to retrieve LINE, WhatsApp, Kik chat, and attachments
- Professional iPhone data retrieval software for Mac and Windows
- It can recover data from iTunes, iCloud backup, and iOS devices
How to Recover/Download iMessages from iCloud
Recovering or downloading iMessages from iCloud is hassle-free with Qiling MobiSaver. This software allows you to retrieve deleted data on iPhone, including texts and attachments from messaging apps like Line, WhatsApp, and Kik, as well as message attachments, videos, Safari bookmarks, voice memos, app documents, and more. With Qiling MobiSaver 8.0, you can easily recover data using one of its three modes for quick recovery.
- Retrieve from the iOS Device: You can connect your iPhone to a Mac or Windows PC and use the built-in feature to scan for the eliminated data.
- Retrieve from iTunes Backup: Bring out your lost data on your iPad or iPhone from the copies you made in the iCloud.
- Recover from the iCloud Backup: You can use the "Restore from iCloud Backup" feature in the iPhone Settings app to retrieve your data from an iCloud backup. This will allow you to restore your iPhone to its previous state, including all of your data, apps, and settings, directly from the iCloud backup. This method does not require a physical connection to a computer and can be done directly on the iPhone.
Here, we will give you the full steps to recover/download iMessages from iCloud. You can follow the instructions to finish it.
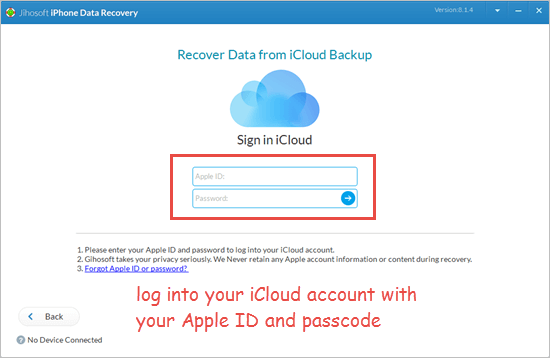
Step 1. Choose "Recover from iCloud"
Connect your iPhone to your PC, launch Qiling MobiSaver, choose the "Recover from iCloud" option, and click "Start" to begin the recovery process.
Step 2. Turn Off "Find My iPhone"
Turn off "Find My iPhone" on your iPhone/iPad/iPod to continue.
Step 3. Type Code in the Confirmation Box
To confirm your request, please type "123456" in the confirmation box and then click the "Continue" button.
Note: This step will completely erase all data and reset all settings. Please ensure you have backed up any important information before proceeding.
Step 4. Reset iPhone
To reset your iPhone, move through the setup process until you reach the reset screen. From there, select "Restore from iCloud Backup" and enter the Apple ID and password associated with the backup you want to restore. Click "Next" to proceed.
Step 5. Select the Files
The process of recovering data from a device involves selecting the type of data to be recovered, which can include all files or specific types such as documents, videos, or photos. If all files need to be restored, a "Select All" button is available to simplify the process. This initial step is crucial in determining the scope of the recovery operation.
Step 6. Analyze the iPhone
The software will analyze your phone, which may take a few minutes, and please refrain from disconnecting or using your device during this time.
Step 7. Scan Lost Data and Recover
Qiling MobiSaver will automatically scan your iCloud backup file to find the lost data, a process that may take a few minutes. Once complete, select the data you want to recover and click the "Recover" button.
Troubleshoot the Downloading Messages from iCloud Stuck
Users may encounter issues after the text app merged with iCloud, and getting stuck while downloading messages from iCloud is a common problem. This issue can often be caused by the iCloud on your device, so it's recommended to confirm this and fix the issue later. Since you already know how to download iMessages from iCloud, now is the time to get familiar with the methods to fix the iCloud sync issue.
Fix 1. Check the Available Space on iCloud
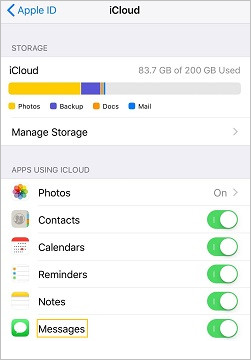
Apple provides 5 GB of free space on every iCloud account, which can easily be drained. If the downloading of texts from iCloud is stuck, it could be due to insufficient free space, making it a serious issue. To check this, go to your device's Settings, select your Apple ID option, and verify the available free space. If it's low, consider upgrading your iCloud storage to avoid future issues.
After setting up the account, you must browse the iCloud settings and verify the available free storage, toggle on syncing of messages, and consider purchasing more storage for your Apple account.
Fix 2. Reset Your iCloud Account on Linked Devices
If you haven't linked a similar iCloud account on other devices, your text might not be synced. You can check and reset your account on the connected devices to see if that resolves the issue.
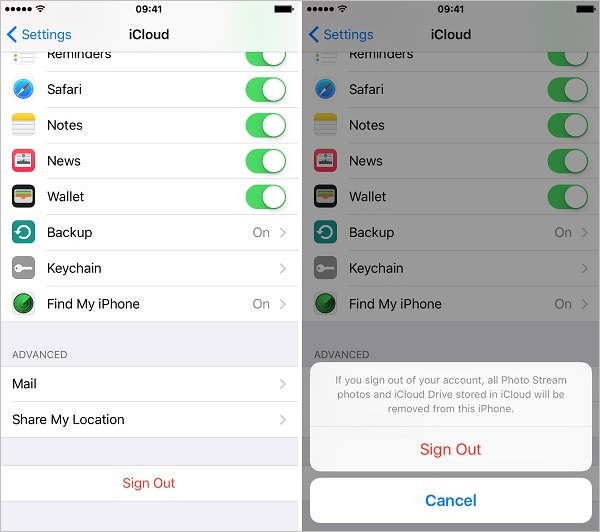
To fix the issue of downloading texts from iCloud being stuck, go to your iPhone's iCloud settings, scroll down and sign out of your account, confirm your choice, then restart your device and sign back in to reset the process.
Fix 3. Reset Your Phone's Network Settings
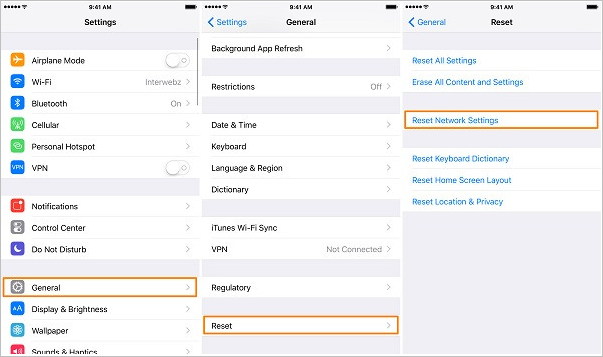
To fix the issue of getting stuck while downloading texts from iCloud, try resetting your iPhone's network settings. This will erase the Wi-Fi password and saved network settings, but it's a hassle-free solution.
To reset your device's network settings, go to Settings > General > Reset and select "Reset Network Settings". You will be prompted to enter your device's passcode to confirm. This will reset all network settings to their default values.
Summary
If you're experiencing issues with downloading messages from iCloud, don't panic - your texts and documents are still safe. Try traditional methods to retrieve your iMessages first, but if that doesn't work, you can use Qiling MobiSaver to instantly recover all your iMessages.
Related Articles
- How to Retrieve Photos from iPhone That Won't Turn on
- How to Recover Deleted Videos from iPhone
- Fix iPhone 8/8 Plus/iPhone X Stuck in Recovery Mode Error
- iPhone Keeps Asking for Apple ID Password (10 Ways)
- How to Delete a Corrupted File Windows 10? Simple Methods Here!
If you're having trouble deleting a corrupted file on Windows 10, don't worry - there are still ways to get rid of it. You can try deleting the file using an administrator account, or booting into Safe Mode to see if that makes a difference. Alternatively, you can use the Command Prompt (CMD) to delete the file, among other methods. - Find Missing Pins and Boards on Pinterest
If you've deleted or lost Pinterest pins or boards, there are four ways to try and recover them: restoring from a backup or multiple accounts, recovering from a cached copy, or using data recovery software. You can also try to retrieve missing pins and boards on Pinterest and good luck.