How to Retrieve Photos from iPhone That Won't Turn on
Summary
If your iPhone screen has stopped responding or broken, don't worry! You can still recover your precious photos. Try using Qiling MobiSaver to transfer or recover your pictures from your iPhone that won't turn on.
Before attempting to recover photos or important files from a dead iPhone, ensure it's indeed dead by trying a few things first. Try charging it for a while, as a dead battery might just need some juice to revive it. If that doesn't work, try booting it up in recovery mode or DFU mode.
- Charge your battery for half an hour to see if the charging screen appears.
- Check your cable and charger to see if it is damaged or cracked.
- Restart your iPhone to see if the slider appears.
- If your device gets physically damaged, send it for repair and ask the technician about the possibility of fixing it.
If your iPhone is dead and won't turn on, you can still recover your data, including pictures, using a computer and iTunes or iCloud. To do this, connect your iPhone to your computer and open iTunes.
- Retrieve Photos from a Dead iPhone Directly via a Recovery Tool
- Retrieve Photos from iPhone that Won't Turn on via iCloud
- Get Photos off iPhone that Won't Turn on via iTunes
The solutions vary greatly in terms of usability and data recovery capabilities. Each solution has its own unique features and limitations, and a detailed introduction of their capabilities will be provided, allowing you to choose the one that best suits your needs.
Part 1. Retrieve Photos from Dead iPhone Directly via a Recovery Tool
Using Qiling MobiSaver is the easiest solution to recover photos and other files from the iPhone. This professional and reliable iPhone data recovery tool works perfectly to retrieve various iOS data like contacts, photos, videos, messages, etc., from iPhone, iPad, and iPod, and won't cause any data loss while recovering data.
- Easy-to-use
- Highly user-friendly interface
- Advanced scanning technology and quick recovery way
- Flexible recovery modes: Recover from iTunes/iCloud, Recover without backup
- Preview is allowed before recovering
Download Qiling MobiSaver on your computer, then use it to recover photos from your unresponsive iPhone.
Step 1. Connect iPhone to Your PC
Launch Qiling MobiSaver, choose "Recover from iOS Device" on the left, and click "Start" to proceed with the recovery process.
Step 2. Scan for Lost iPhone Photos
Qiling MobiSaver will automatically scan and find pictures and lost photos on iPhones, including iPhone 13/12/11/X/XR/XS/8/7/6/5/4.
Step 3. Preview and Restore Photos
To recover photos, select the "Photos" option on the left side, view and choose the desired photos, and then select either "Recover to PC" or "Recover to Device" to initiate the recovery process.
Part 2. How to Retrieve Photos from iPhone that Won't Turn on via iCloud
You can transfer photos from a dead iPhone to another iOS device by signing in with the same iCloud account on a second iPhone or iPad, whether it's brand new or an old device that's been set up.
To restore your iPhone from iCloud backup, set up your iPhone as if it were new and select iCloud when asked if you want to restore from iCloud or iTunes backup. Enter your Apple ID and password to sign in to iCloud, choose the backup you want to restore from, and wait for the restore process to complete. If you're restoring from an iTunes backup, connect your iPhone to your computer and follow the on-screen instructions. Make sure you have a stable internet connection and enough storage space on your iCloud account to complete the restore process.
If your iOS device is a brand new one, you can immediately set up and use Face ID or Touch ID to unlock your device, and you can also set up your Apple ID and start using your device right away. This is because the setup process for Face ID or Touch ID is usually done during the initial setup of the device, and setting up your Apple ID is also part of the initial setup process.
Step 1. Set your iPhone up as the first time you did.
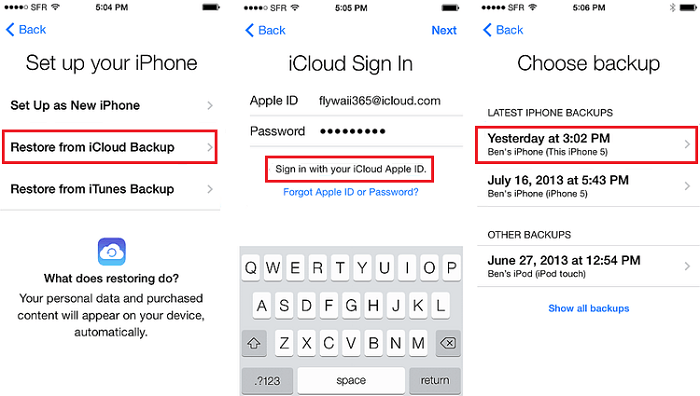
Step 2. When you reach the "App & Data" screen, tap "Restore from iCloud Backup."
Step 3. Choose the latest iCloud backup you make.
If your iOS device has been set up, you can:
Step 1. To reset your device, go to Settings, then General, then Reset, then Erase All Content and Settings, and finally Erase Now. This will erase all content and settings, returning your device to its factory settings.
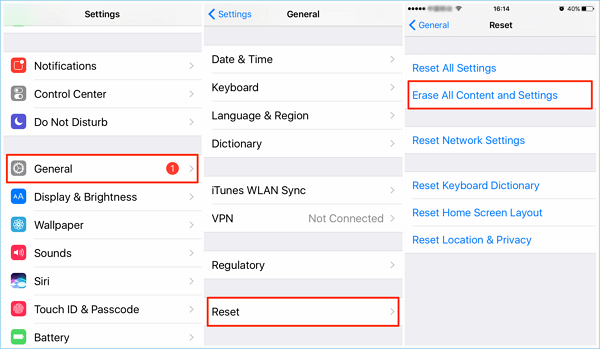
Note: Resetting your iPhone will completely erase all data, settings, and content, including photos, apps, and contacts. It's essential to consider this before proceeding, as there's no way to recover deleted information.
Step 2. After resetting your iPhone, it will restart and display the setup process. Follow the on-screen instructions to complete the setup.
Step 3. When you get to the "Apps & Data" screen, select "Restore from iCloud backup."
Step 4. Choose the backup with your photos in.
Part 3. Get Photos off iPhone that Won't Turn on via iTunes
Apart from iCloud, you can also do the same thing with iTunes if you have synced your iPhone with iTunes. This also requires you to prepare for another iOS device with enough storage space. Here are the steps.
Step 1. To connect your iOS device to your computer and launch the latest version of iTunes, simply plug your device into your computer using a USB cable, then open iTunes on your computer. Ensure that you have the most recent version of iTunes installed, as older versions may not be compatible with your device.
Step 2. To resolve the issue of iTunes failing to detect your device, click on your device icon in the upper-left corner of the iTunes screen. If iTunes still fails to detect your device, refer to the troubleshooting guide for solutions.
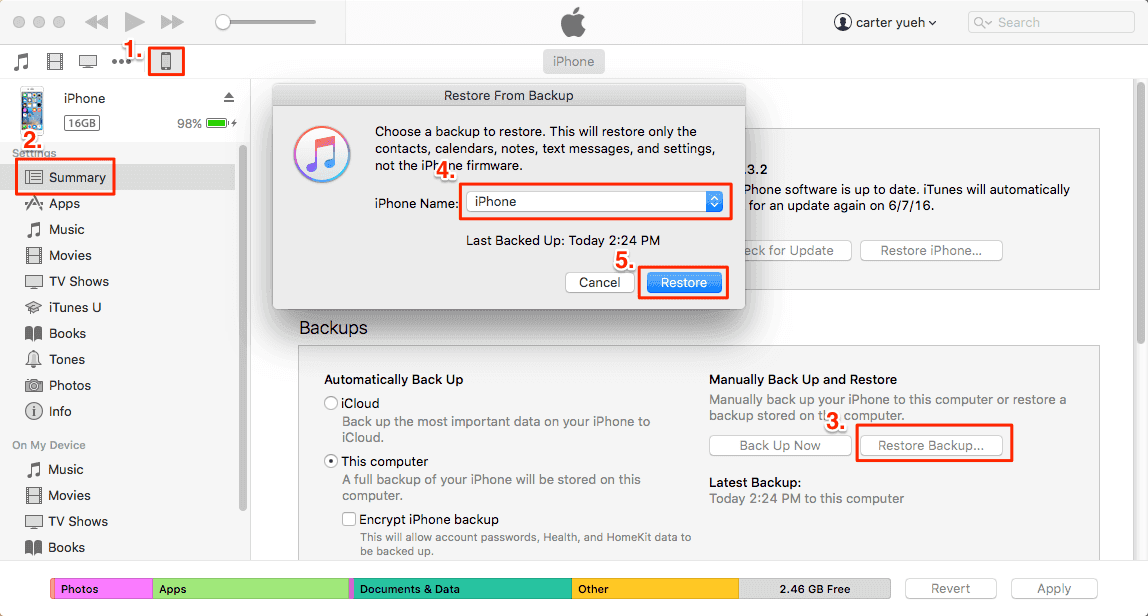
Step 3. Click the "Summary"tab in the left pane.
Step 4. In the "Backups"section, click "Restore Backup…"
Step 5. Choose the backup you wish to restore.
Bonus Tip. Recover Deleted Photos Using Finder in macOS
For Mac users, there's an additional option to restore deleted photos using Finder, which is only compatible with macOS Catalina 10.15 or later.
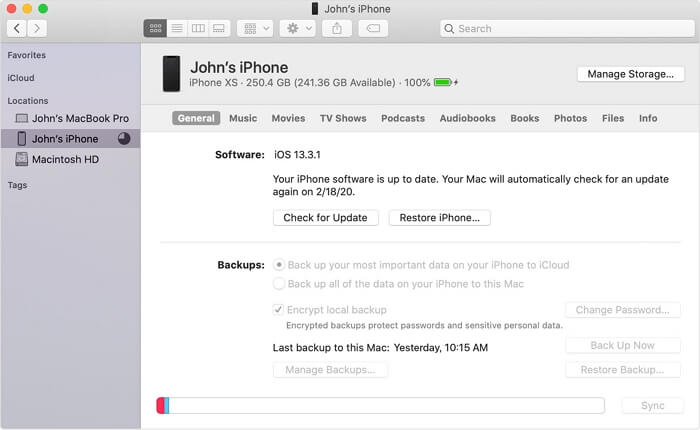
Step 1. Open Finder on your Mac.
Step 2. Connect your iOS device to your Mac computer.
Step 3. When your device appears in the left pane, click on it. This will allow you to see the list of connected devices and select the one you want to manage.
Step 4. Click "Restore Backup…"
Step 5. Select the backup you want to restore.
Step 6. Click "Restore."
The Bottom Line
If your iPhone won't turn on, you can still recover deleted photos using the solutions provided, which can also help if your screen is broken or you're experiencing other issues that prevent you from accessing your device. These methods can help you retrieve your pictures, and this guide aims to be helpful in such situations.
Related Articles
- Recover Permanently Deleted Photos from iCloud
- The Best WhatsApp Recovery Software for iPhone & Android
- Top 6 iPhone Data Recovery Software for Mac/Windows
- How to Download iCloud Backup to PC in 3 Ways
- Recover Lost Save Data in the Legend of Zelda: Tears of the Kingdom [4 Methods]
If your Legend of Zelda: Tears of the Kingdom game save and is lost, don't worry. In the Legend of Zelda: Tears of the Kingdom, this page offers four effective strategies to restore deleted Save data. The most effective tool for restoring lost save data is Deep Data Recovery. - 3 Ways to Recover Monster Hunter World/Rise Save Game Data on PC/Steam/Switch
You'll learn the three best ways to recover lost Monster Hunter game data on PC/Steam/Switch. Qiling data recovery software is the most effective method to recover Monster Hunter data and restore lost game saves on a computer and Switch hard drive.