Lenovo Legion SSD Upgrade: Clone Windows to a New Drive
Lenovo Legion gaming laptops are popular upgrade targets because many of them ship with a small SSD and an empty second M.2 slot. That makes a storage upgrade easier than on a laptop that has only one slot, and it lets you keep the original drive as a fallback.
This guide covers what to check on your model, how to use the second slot, which preparation steps prevent BitLocker and boot problems, and how to clone Windows with Qiling Disk Master. It also explains the role of Lenovo Vantage and the recovery partition.
PAGE CONTENT
- What to Check Before Upgrading a Legion
- Use the Second M.2 Slot When You Have One
- Prepare Windows, BitLocker, and the Target
- Clone with Qiling Disk Master
- Boot Order and First Start
- FAQs About Legion SSD Upgrades
- Back Up Before You Clone
What to Check Before Upgrading a Legion
- Model and slot layout. Legion 5, Legion 7, and Slim models differ. Check the product specification or the hardware maintenance manual for your exact machine.
- M.2 2280 NVMe. Most Legions use PCIe NVMe drives in the 2280 size, and some slots support PCIe 4.0 drives at full speed.
- Second slot on many models. Many Legion laptops include an empty second M.2 slot, which allows an internal clone without a USB enclosure.
- Vantage and recovery. Lenovo Vantage and the recovery partition can rebuild the boot environment, so keep the recovery partition in place.
- Heat and thermal pads. Gaming laptops run hot. The SSD sits near heat pipes and relies on its thermal pad to avoid throttling.
Open the service manual before you buy anything. It lists the slot count, the supported drive sizes, and the screw locations, which saves you from ordering a drive that does not fit or a heatsink that fouls the bottom cover.
Use the Second M.2 Slot When You Have One
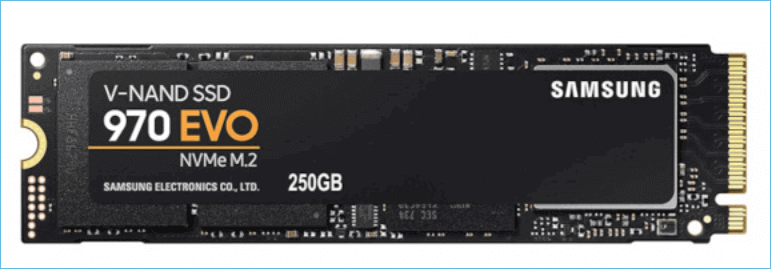
- Confirm the slot is wired. Some second slots run at PCIe 3.0 x4 or share lanes with other devices. Check the manual before you count on full speed.
- Clone internally when possible. A second internal slot is faster than USB and avoids the heat an enclosure can build up.
- Use an enclosure when there is one slot. A USB NVMe enclosure works for a single-slot machine, and it also helps when the second slot is hard to reach.
- Watch the physical clearance. Double-sided drives and tall heatsinks may not fit under the bottom cover of a thin Legion model.
- Disconnect the battery. Lenovo service practice is to disconnect the battery before you touch internal components or swap a drive.
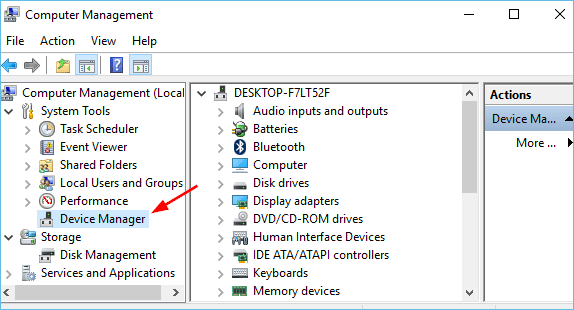
If you clone into the second slot, leave the old drive in place until the new one boots. You can wipe it later and use the space for games or a second copy of important files. Verifying the new drive in Device Manager before the clone confirms that Windows sees it correctly.
Prepare Windows, BitLocker, and the Target
- Update BIOS and Vantage. Install the latest BIOS and chipset updates so the new drive is detected at its expected link speed.
- Suspend BitLocker. Pause BitLocker on the system drive and save the recovery key. Resume protection after the new drive boots.
- Keep the recovery partition. Do not delete Lenovo recovery partitions or the EFI system partition; the clone needs them to boot.
- Match the partition style. A Legion ships with GPT and UEFI, so initialize the target as GPT and keep UEFI mode enabled.
- Free up space. Remove temporary files and unused games. A smaller used footprint makes the clone faster and the fit on the target safer.
If Windows is encrypted, the clone tool must read the decrypted volume. Suspending BitLocker is safer than disabling it, because you keep the same protector and do not have to re-encrypt the whole drive afterward.
Clone with Qiling Disk Master
Qiling Disk Master copies the complete Legion system disk, including the EFI, Windows, and recovery partitions. It aligns partitions for the SSD and can enlarge the Windows partition when the new drive has more capacity.
Watch the video tutorial below to clone the drive step by step with Qiling Disk Master.
Step 1. Open Qiling Disk Master, choose Clone, and then select Disk Clone.

Step 2. Select the source disk and click Next.

Step 3. Select the destination SSD and confirm that its data will be replaced.

Step 4. Choose the clone mode and adjust the partition size if the target is larger.

Step 5. Click Proceed, wait for the copy to finish, then shut the machine down before you remove any cable.

Boot Order and First Start
- Reconnect the battery. Refit the battery connector and close the bottom cover before you power on, so the new drive is detected normally.
- Set the boot order. Use the F12 boot menu or the BIOS setup to put the new SSD first. Keep the old drive as a later entry while you test.
- Check the storage mode. Some Legions ship with Intel Rapid Storage or RAID mode. Keep the same mode the old installation used.
- Verify partitions and capacity. Open Disk Management, confirm the EFI and recovery partitions exist, and extend Windows if space is unused.
- Check heat and firmware. Watch the SSD temperature under load and run a hardware scan in Lenovo Vantage after the first boot.
If the laptop drops to the BIOS setup or the boot menu instead of starting Windows, the new drive is present but not selected. Set the boot entry and, if needed, rebuild it from a Windows recovery drive.
FAQs About Legion SSD Upgrades
Does my Legion have a second M.2 slot?
Many Legion 5 and Legion 7 models do, but not all, and the Slim series varies. Check the product specification or the hardware maintenance manual for your exact model before buying a drive.
Can I clone to the second drive and keep both?
Yes. Clone to the new drive, set it first in the boot order, and keep the old drive as a spare or wipe it later for extra storage. Windows boot files must point to the new drive.
Do I need to disable BitLocker before cloning?
Suspend it instead of disabling it, and keep the recovery key. Suspending lets the clone read the volume and avoids a full re-encryption after the swap.
Will Lenovo Vantage complain about the new drive?
It may list the new hardware in a scan, which is normal. Windows activation stays tied to the machine, so a drive swap does not require a new license.
Why does the laptop not detect the new SSD?
Reseat the drive, confirm the slot supports NVMe, check the RAID or RST setting in BIOS, and update the BIOS if the slot is newer than the installed firmware.
Back Up Before You Clone
A clone writes over the target disk and depends on a readable source. Back up the system first so a failed job, a power loss, or a bad sector never leaves you without a working Windows installation.
Watch the video tutorial below to back up Windows and restore it if the clone fails.
Step 1. Open Qiling Disk Master and select System Backup to include the boot partitions.

Step 2. Save the image to a drive other than the target disk and start the backup.

Step 3. Click Proceed to start the system backup and wait patiently until it finishes. You can also tick Shut down the computer when the operation is completed to power off automatically.

Step 4. If the clone fails, restore the image and check the source disk before you retry.

Conclusion
A Legion upgrade is one of the easier laptop clones because many models give you a second M.2 slot. Confirm the slot and its speed, suspend BitLocker, clone the full disk, and set the new drive first in the boot order. Keep the old drive until the new installation has proven stable.
For related guides, see How to Clone a Lenovo Laptop HDD to SSD, How to Clone a BitLocker-Encrypted Drive, How to Clone the Windows Recovery Partition to a New SSD, and Clone to a Larger Drive and Merge Unallocated Space.
Related Articles
- How to Clone a Lenovo Laptop HDD to SSD
Clone a Lenovo laptop drive to an SSD, with model checks, boot settings, and recovery partition notes. - How to Clone an SSD to a Larger SSD
Move a full SSD to a larger one and expand the Windows partition so no space is wasted. - SSD Not Detected After Cloning - Fix in BIOS
Fix a missing SSD with slot checks, BIOS storage mode, boot entries, and driver issues. - How to Switch From IDE to AHCI After Cloning
Change the SATA mode safely after a clone so Windows boots and the SSD performs correctly. - Cloned Drive Won't Boot? How to Fix It
Repair boot records, EFI entries, and BIOS settings when a cloned drive refuses to start Windows.
Products
Articles & Tutorials
- Data Recovery
- Data Backup
- File Recovery
- File Backup
- System Backup and Restore
- Disk and Partition Clone
- Technical articles
- Mobile articles
- Disk Master Help
- Windows Data Recovery Tutorials
- Windows Secure Delete Tutorials
- Windows Partition Management Tutorials
- Windows File Backup and Restore Tutorials
- Windows System Backup and Restore Tutorials
- Windows Disk Backup and Restore Tutorials
- Windows Clone Tutorials