How to Partition SSD From BIOS [2024 New Guide]
The Basic Input/Output System (BIOS) manages the flow of information between the Operating System and hardware, but it doesn't support disk partitions. However, you can create partitions on your Solid-State Drive (SSD) using alternative methods that don't require booting the Windows OS. Two effective solutions are available, which will be introduced by Qiling, and a comparison table will provide more information on these options.
| 🆚Comparison | 🥇Qiling Disk Master | 🥈BIOS |
|---|---|---|
| ⏰Duration | 10 Minutes | 15 Minutes |
| 🔒Difficulty | Simple | Complicated |
| 😀Pros |
|
|
| 🤢Cons |
|
|
| 👩💻Suitable Users | All users: including beginners | Experienced users |
Keep reading and find out how to perform the two methods on Windows computers.
Best Alternative - Qiling Disk Master
You can create partitions on your SSD before booting the Windows system using Windows bootable media. Since Windows doesn't offer a built-in tool to create bootable media, we recommend using Qiling Disk Master, an efficient partition manager that can create bootable media and partition hard drives.
With its "Bootable Media" feature, you can easily create a Windows bootable media, then partition your SSD smoothly using its "Create" feature. To partition your SSD from BIOS, install the Qiling Disk Master and follow the step-by-step instructions provided.
1. Create Qiling Bootable Media
Step 1. To create a bootable disk of Qiling Disk Master, prepare a storage media such as a USB drive, flash drive, or CD/DVD disc, and connect it to your computer.
Step 2. Launch Qiling Disk Master, and find the "Bootable Media" feature on the left. Click on it.
Step 3. To start the process, select the type of storage media you prefer, either a USB or CD/DVD, when the drive is available. If not, you can save the ISO file to a local drive and burn it later. Once you've made your choice, click the "Create" button to begin the process.
- Check the Warning message and click "Yes".
Step 4. When the process finishes, a pop-up window will appear, asking if you want to restart your computer from the bootable USB.
- Reboot Now: You want to restart the current PC and enter Qiling Bootable Media to manage disk partitions without an operating system.
- Done: You want to use the bootable USB on a new PC, not restart the current PC.

Note: To use the bootable disk on a new PC, restart the target computer and press F2/F8/Del key to enter BIOS, then set the USB bootable disk as the first boot disk.
Your computer will automatically boot up from the USB bootable media and enter Qiling WinPE desktop after a short wait.
2. Partition SSD from BIOS
Step 1. Launch Qiling Disk Master to check for free space at the Partition Manager section.
- If your hard drive has unallocated space, you can skip Step 2 and proceed directly to Step 3 to create a partition.
- If there's no unallocated space on the hard drive, you can skip the process of creating a bootable USB drive or CD/DVD and instead, proceed with the next step, which is to install a new operating system, such as Windows 7 or Windows 8, or another operating system of your choice. This will allow you to start fresh and install the operating system on the hard drive, effectively replacing the existing operating system.
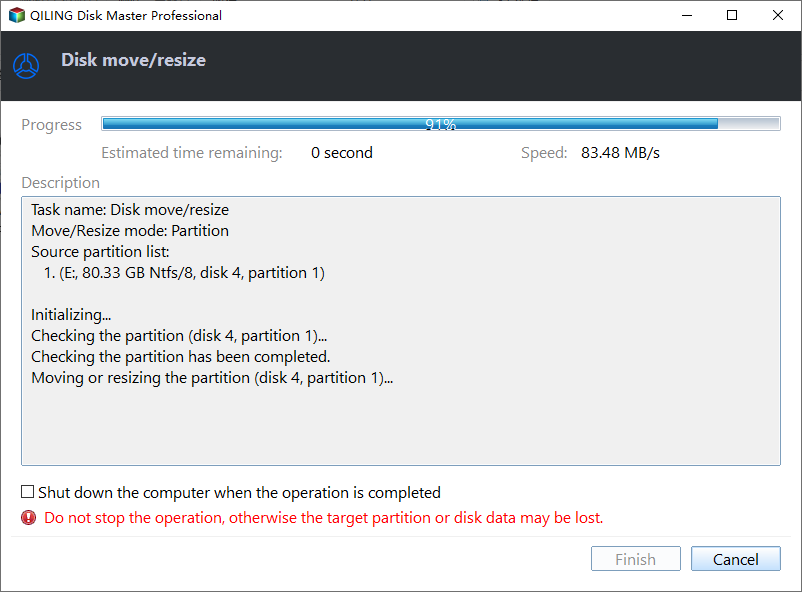
Step 2. Shrink a disk partition to create unallocated space.
Right-To resize the target drive partition, click on it with a lot of free space and select the "Resize/Move" option.

To free up space, drag either end of the partition leftwards or rightwards to reduce its size, allowing for more unallocated space. This adjustment can be monitored in the "Partition size" area, giving a clear visual of the space reduction.
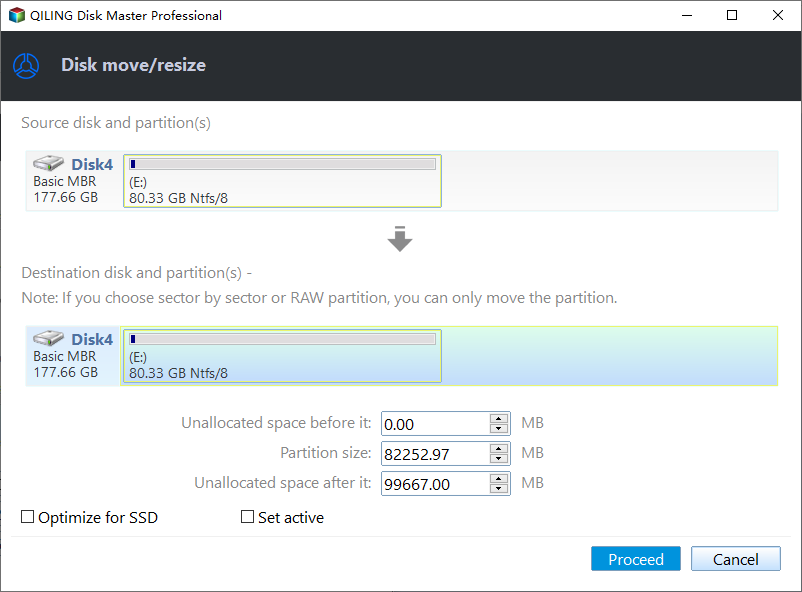
Click "Proceed" to save all the changes.
Go back to Partition Manager, there should be unallocated space appearing on the same disk, allowing you to create a new partition on your hard drive.
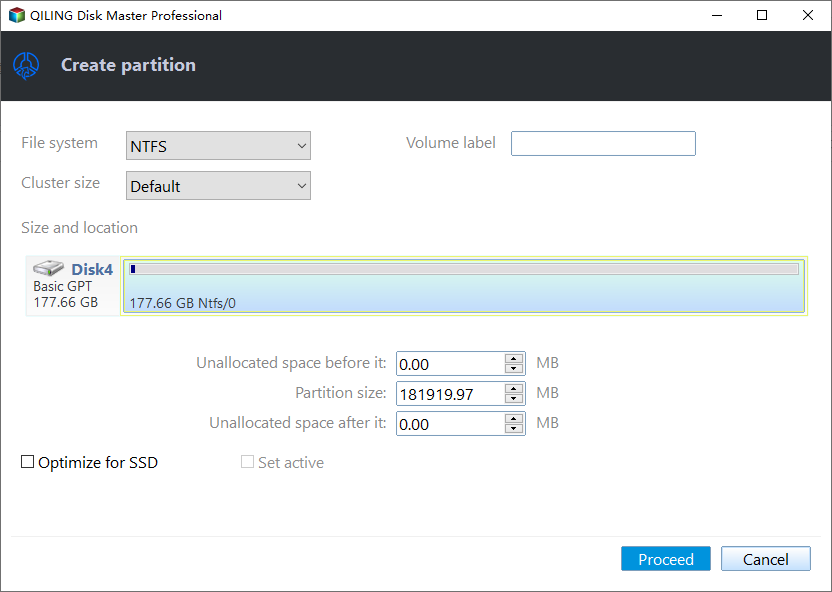
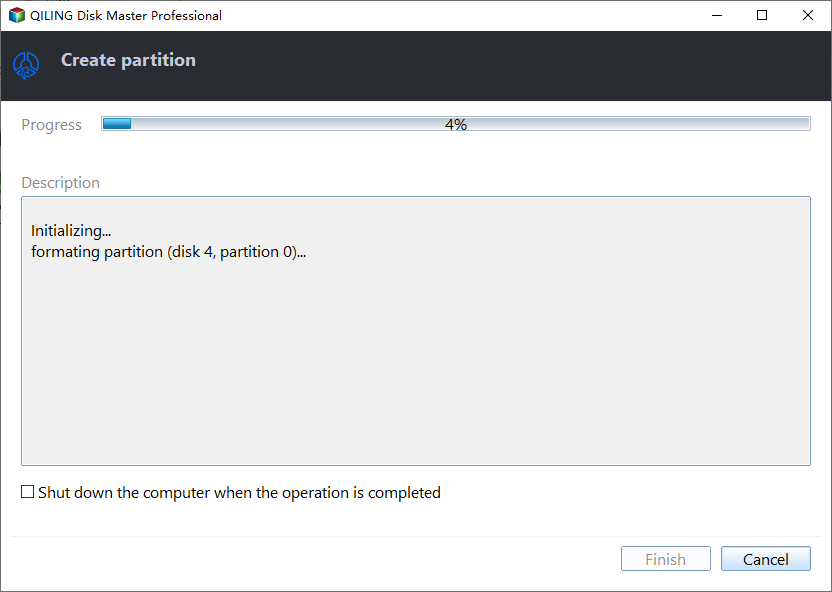
Step 3. Create a new partition with unallocated space on the target hard drive.
Right-click on the unallocated space and choose "Create".

In the advanced settings, you can customize various aspects of a partition, including its size, drive letter, label, and file system type (such as NTFS, FAT32, EXT2/3/4, or exFAT), among other options.
To create multiple partitions on a hard drive, first, open the Disk Management tool. Then, select the hard drive you want to partition and click "New" to create a new partition. Choose the unallocated space on the disk and click "Next.
Other Advantages of Qiling Disk Master
Qiling Disk Master not only enables you to create WinPE bootable media and partition your SSD, but also empowers you to perform various operations on your disk and partition without risking data loss.
- New Disk Guide: Partition a new SSD with one click.
- Resize Partition on SSD using unallocated space without losing data.
- Remove Partitions from SSD Windows 10/11
- Easily merge Partitions on SSD within three steps.
If you're interested in a tool that offers features like the features below, then you might want to give it a try. You can download it and see how it works for yourself.
How to Partition SSD From BIOS
To create a Windows 10 bootable USB drive, you can download the Windows Media Creation Tool and use command lines to partition your SSD, but this method may be challenging for non-professional users. Alternatively, you can use the Windows 10 built-in feature to create a bootable USB drive from the Settings app, which is a more straightforward and user-friendly approach. To do this, go to Settings > Update & Security > Recovery, and click on "Add a drive" to select the USB drive you want to use, then follow the prompts to create the bootable USB drive. This method is recommended for most users.
1. Create a Bootable Media
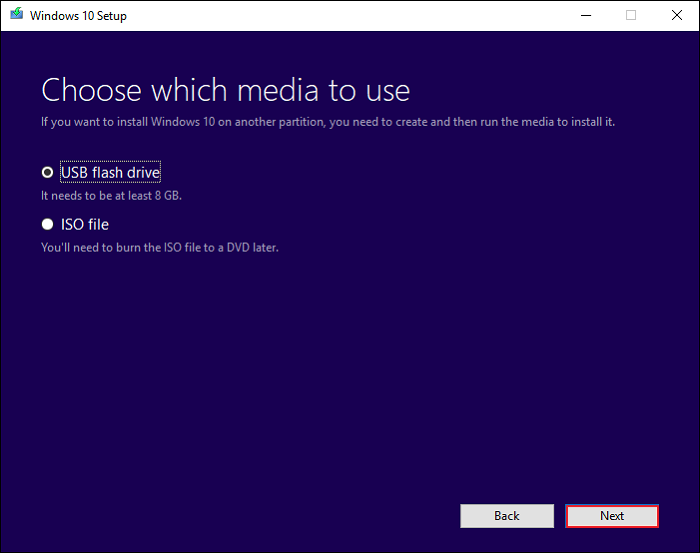
Step 1. Download and launch Media Creation Tool from Microsoft.
Step 2. Select "Create installation media" and hit "Next." Choose "USB flash drive" as the media in the next window and click "Next."
2. Set the Bootable Media as First Boot Media
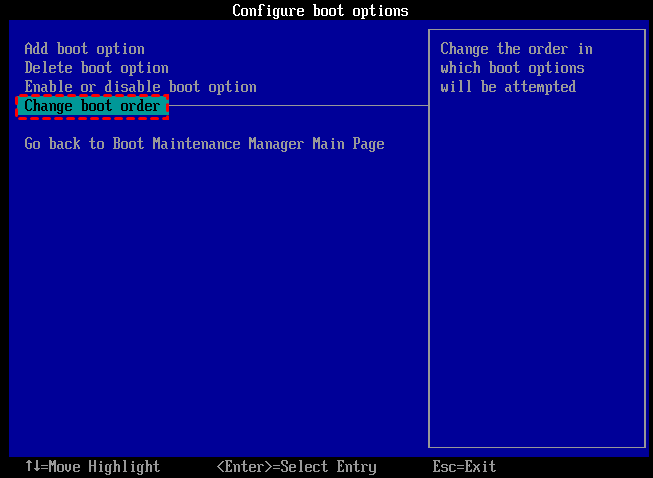
Step 1. Plug the bootable USB into your computer. Restart the PC and press F2/F8/Del key to enter BIOS settings.
Step 2. Navigate to the "Change Boot Order" and set the bootable USB as the boot device, then hit "F10" to save the change.
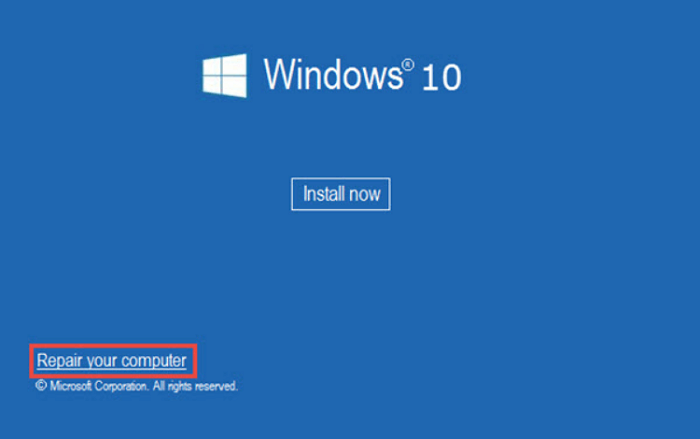
Step 3. After Windows Setup is launched, you can choose an appropriate language in "Language to install."
Step 4. To enter the command prompt, click on "Repair your computer" at the bottom and then choose "Command Prompt" under the "Troubleshoot" option.
If these methods work for you, please share them on your social media to help others in need.
3. Partition SSD via Diskpart
Step 1. Type diskpart to launch the CMD, input the below command, and hit "Enter" after each:
- list disk
- select disk
- list volume
- select volume
- shrink desired=2048 (Replace the number with the size you want to shrink.)
- create partition primary size=2048(You can replace primary and the number as the partition type and size you want.)
- assign letter P(Replace P with the new partition name.)

Step 2. Enter exit to close diskpart and reboot your computer.
Conclusion
To partition an SSD from BIOS, users cannot directly create partitions within the BIOS settings, but can access the SSD using a Windows bootable media. This allows users to create partitions on the SSD, and two methods for creating bootable media and partitioning the SSD have been tested, including Qiling Disk Master and Windows built-in tools.
Qiling Disk Master is a fantastic software with a user-friendly interface and reliable solutions for partitioning SSD and managing disk partitions, offering a range of features and capabilities that can be explored in more detail through the articles below.
FAQs about How to Partition SSD From BIOS
Do you still have additional questions about how to partition SSD from BIOS? This part includes what you may look for. The following frequently asked questions are shown along with their responses:
1. How to see my SSD from BIOS?
To confirm if your Solid-State Drives (SSDs) show up in the BIOS, you can verify the boot order by following these steps: Check your computer's BIOS settings, usually by pressing F2, F12, or Del keys during boot-up. In the BIOS settings, navigate to the Boot Order or Boot Priority section. Look for your SSDs in the list, and ensure they are set to boot first.
Step 1. To access the BIOS settings, boot up your computer and press one of the following keys: F1, F2, F10, F11, or F12, depending on your computer's manufacturer and model. This will open the BIOS settings menu, where you can make changes to your computer's boot order, configure hardware settings, and more.
Step 2. To switch to the "Startup" option, press the right arrow key on your keyboard, and then press the "Enter" key on the "Boot" option.
Step 3. In this window, you can see the devices that can boot, and your SSD should be shown here.
2. How can I split my SSD into partitions?
To partition a new SSD, try using Qiling Disk Master, which can do so in just three steps. The tool's "New Disk Guide" feature allows you to create multiple partitions at once, making it a convenient option for organizing your new SSD. You can use Qiling Disk Master to create a partition plan and then easily implement it, making it a great choice for those looking to get the most out of their new SSD.
- Download and run Qiling Disk Master, and the new SSD will be recognized, prompting the New Disk Guide window to pop up.
- To partition the disk, select the "Partition this disk" option and set the partition number. Adjust the partition size and other properties as needed, then select "Proceed" to continue the process.
3. How can I partition my SSD using CMD?
To create a logical partition on your SSD using command lines, you can use the `parted` command. Here's a basic example:
Step 1. Enter the Command Prompt by pressing "Windows + X,"
Step 2. Input the following command lines individually:
- diskpart
- list disk
- select disk N (Replace N with your SSD number)
- create partition logical size=1024 (change the number regarding the size you need)
- create partition logical
Step 3. Enter exit to close Diskpart when the process is finished.
Related Articles
- Windows 11 Shrink Partition: 3 Ways to Shrink Windows Partition
- Change Windows Password Using Command Prompt - 2 Ways
If you're having trouble changing your Windows password, you can try using the Command Prompt to do so. However, if you're looking for a more straightforward alternative, there are other options available. This page focuses on the step-by-step process of changing your Windows password using the Command Prompt. - Which Command Is Used to Format a Disk Partition as EXT4? Check and Find Answer Here
The command used to format a disk partition as EXT4 is `mkfs.ext4`. This command is used to create a file system on a disk partition, and the `ext4` option specifies the file system type as EXT4. - How to Fix Dell Laptop Won't Turn On | 2024 New💡
If your Dell laptop won't turn on, don't worry, this guide is here to help. Learn about the common issue of a Dell laptop not powering on and discover the possible causes and solutions to get your laptop up and running again. - 6 Fixes for Not Enough Space for Windows 10 Update
Does your computer tell you that it doesn't have enough space for Windows 10 update? Does the 'indows needs more space' message pop up while you are trying to installing the latest Windows 10 update? We've gathered some efficient fixes here for you to follow and fix 'not enough space for Windows update' error with simple steps. - FAT Recovery | Recover Data from FAT Hard Drive
To perform FAT recovery, you cannot miss the professional FAT recovery software - Qiling Partition Recovery. With the software, you cannot only recover deleted, formatted or lost partition from FAT disks but also retrieve files from hard drives with the exFAT, NTFS, ext2, ext3, and other supported file systems.