Guide on Converting MBR to UEFI [Safe Guide for Beginners]
Transitioning from MBR to UEFI might seem like a daunting task at first but it enhances your system's performance and compatibility. To address the hurdles that you might face on the way that's why we have prepared a detailed, step-by-step guide to assist you through the process, catering to both tech experts and non-tech-savvy users.
To convert from MBR to UEFI, it's essential to first check if your system's motherboard supports UEFI mode, a crucial step to ensure a smooth and successful transition. Once confirmed, you can proceed with the subsequent steps. Our guide aims to simplify the process, making it accessible to users with varying levels of expertise.
To transition from MBR to UEFI, you'll need to follow a specific procedure. First, you'll need to create a new UEFI boot entry for your operating system.
#1. Download MBR Disk Converter Software
Having the right tools in your hand plays a major role in the transition process from MBR to UEFI, and for Windows users, Qiling Disk Master Professional is the most reliable option, offering an easy-to-use interface and powerful features that make it the ideal companion for converting MBR to UEFI.
Qiling Disk Master's Disk Converter is designed to make the transition from one disk to another seamless, with an interactive interface that guides non-tech-savvy users through the process effortlessly.
I've shared this MBR to UEFI conversion tool online to help friends who need to switch their MBR disk drive with an OS to UEFI mode.
#2. Convert MBR to Support UEFI
Now that we've covered the basics of MBR and GPT, let's move on to the crucial step of converting your MBR disk to support UEFI. This process involves rewriting the disk's partition table and converting the boot mode from Legacy to UEFI, allowing your computer to boot in the newer UEFI mode.
- Legacy boot mode is a traditional method of booting a computer, but it's being phased out in favor of UEFI mode, which is more modern and secure. To make the transition, the MBR (Master Boot Record) disk needs to be converted to a GPT (GUID Partition Table) disk, which is the format used by UEFI. This process involves rewriting the disk's partition table and updating the boot loader to work with the new format.
- The GPT disk, fluent in the modern UEFI dialect, enables advanced functionalities and synchronizes with the latest technological advancements.
To bridge the linguistic gap and enable your system to converse effortlessly in UEFI, converting your MBR disk drive to the GPT partition style is essential. Qiling Disk Master allows you to switch MBR disk to GPT without losing any data, and you can follow the step guide here to do so.
Step 1. Download and launch Qiling Disk Master on your computer.
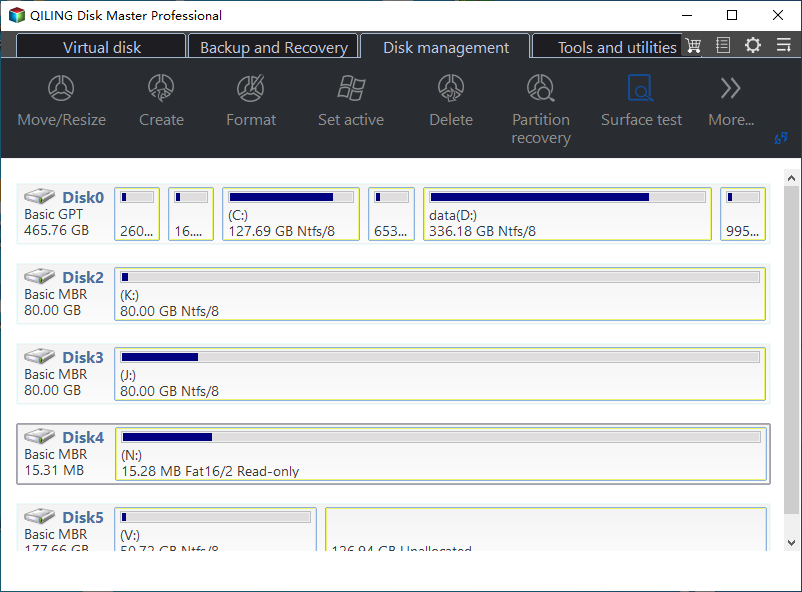
Step 2. Go to Disk Converter, select "Disk management" tab page.
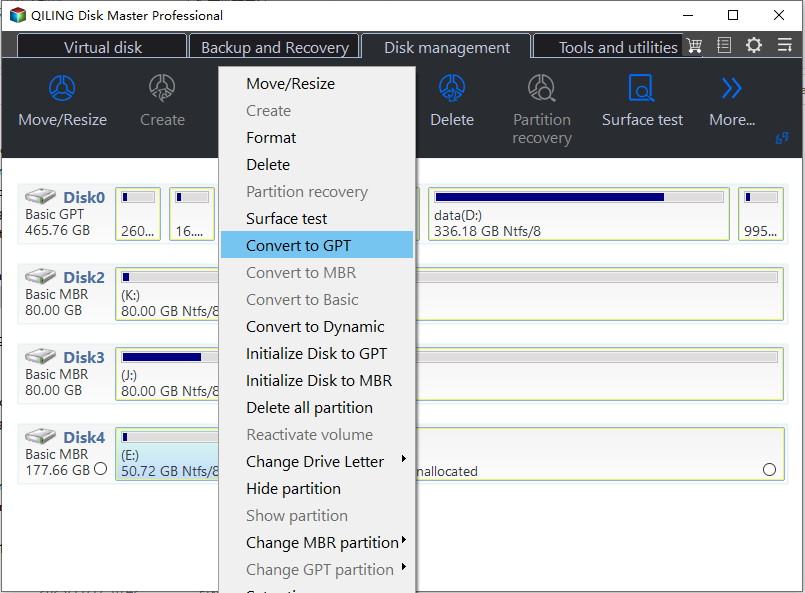
Step 3. Right-click the target MBR disk that you tend to convert to GPT, and click "Convert to GPT" to start the conversion.
As your system's passport to the UEFI realm, this transformation ensures compatibility and unlocks your system's full potential. Let's embark on this conversion journey, where your MBR disk evolves into a GPT powerhouse, ready to support UEFI mode seamlessly.
To enable UEFI mode on the source OS drive, you need to access the UEFI firmware settings. This can be done by restarting your computer and pressing the key that opens the UEFI settings, which is usually F2, F12, or Del, depending on your system. Once in the UEFI settings, navigate to the "Boot" or "Advanced Boot Options" section and look for the option to enable UEFI mode or Legacy Boot mode.
#3. Enable UEFI Mode
Now that you've successfully converted your MBR disk to the UEFI-friendly GPT partition style, the next step is to enable UEFI mode in your system, allowing it to fully utilize the benefits of the modern UEFI environment.
Step 1. Power on or restart your computer.
Step 2. To access the BIOS setup, press the designated key (such as F2, F10, F12, or DEL) during the initial boot process. This allows you to configure settings and make changes to your system's hardware configuration.
Step 3. To access the BIOS menu on your computer, navigate to the "Boot" or "Boot Options" section using the arrow keys.
Step 4. Select UEFI as the preferred boot mode.
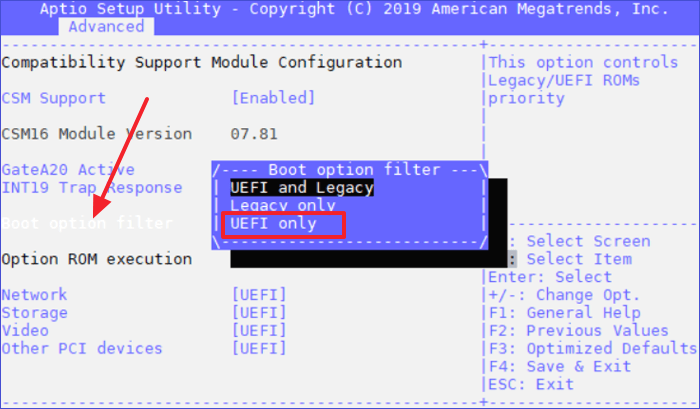
Step 5. Save your changes and exit the BIOS by navigating to the "Save & Exit" menu, usually found in the last tab of the BIOS interface.
By following these easy steps, you've enabled UEFI mode, a significant step in the conversion process that optimizes your system for better performance and compatibility with contemporary technologies, preparing your computer to utilize UEFI to the fullest extent possible.
This is the complete procedure of converting MBR to UEFI, and you love it, don't hesitate to share this tutorial page to help more of your friends online:
Conclusion
This guide has walked you through the process of converting your MBR disk to UEFI mode, transforming your system into a more advanced and efficient computing powerhouse. Qiling Disk Master, a user-friendly solution for Windows beginners, features a Disk Converter and is a reliable companion for the seamless transition from MBR to UEFI mode.
Converting an MBR disk to GPT is just the first step in switching to UEFI mode. The actual process involves enabling UEFI boot mode for the GPT disk from the BIOS settings, as shown in the provided guide.
FAQs Of Converting MBR to UEFI
To configure the MBR disk to UEFI boot mode on your PC, you'll need to disable the Secure Boot feature in your UEFI firmware settings. This can usually be done by entering your UEFI settings during boot-up, navigating to the "Security" or "Boot" tab, and toggling the Secure Boot switch to the "Off" position.
1. Can MBR run UEFI?
MBR and UEFI are two distinct boot modes that are incompatible with each other, with MBR being associated with Legacy boot mode and GPT required for UEFI, making a conversion from MBR to UEFI necessary to utilize UEFI's benefits.
2. Can I convert MBR to UEFI without losing data?
Converting MBR to UEFI without losing data is possible, but it requires caution and reliable partition management software like Qiling Disk Master, which can perform the conversion while preserving data. A backup should always be made before initiating any major disk conversion to mitigate potential risks.
3. Can I convert a VM to UEFI?
To convert a virtual machine (VM) to UEFI, power it off, access its settings, change the boot mode to UEFI, and ensure the disk uses the GPT partition style, then save changes and start the VM. The specific steps may vary depending on the virtualization platform being used, so it's best to consult the software's documentation. It's also recommended to back up the VM before making significant changes to prevent potential data loss.
Related Articles
- How to Partition SSD Safely in 2024 | Complete Guide
- How to Tell If a Hard Drive Is Corrupted (with Pictures)
- How to Fix "Local Disk D Almost Full" in Windows 11/10/8/7 [Step-by-Step Guide]
Your local disk D is almost full, but don't worry, there are efficient fixes to free up more space on your D drive. This issue can be caused by a variety of factors, including a large number of temporary files, a full recycle bin, or a bunch of unnecessary system files. - M.2 Temperature Monitor | How to Check M.2 Temperature [Step-by-Step]
Normal M.2 temperatures vary, but most M.2 drives operate within a safe range of 40°C to 60°C (104°F to 140°F). To check M.2 temperature, you can use software like SpeedFan, HWMonitor, or AIDA64, which can monitor temperatures for your M.2 drives. - Extend Volume with Disk Management Tutorial with Pictures
You can extend a volume on your hard drive using disk management, but it's not always the best solution. If the volume is out of space, it's likely because the partition is not large enough, and simply extending it may not solve the problem. - External SSD Slow Write Speed? Here are 4 Efficient Fixes
If your external SSD is experiencing slow write speeds, don't worry - there are solutions. This article addresses the issue and offers four efficient fixes to help you overcome the problem and get the most out of your external SSD.