MSI Stuck on MSI Screen Windows 10/11? How to Fix?
MSI laptop and desktop users often face the frustrating issue of their device getting stuck on the startup screen, particularly on Windows 10 and Windows 11. When you turn on your MSI device, it freezes on the startup screen, causing concern and disrupting your workflow if you rely on it for work. This situation can be both perplexing and annoying, making it essential to resolve the issue quickly.
If your MSI system gets stuck on the MSI screen, don't worry - there are ways to troubleshoot and resolve the issue. To start, try pressing the power button for 30 seconds to discharge any residual power, then press it again to turn it back on. If that doesn't work, try pressing F2 or Del to access the BIOS settings, and from there, try resetting the BIOS to its default settings.
Automatically Fix MSI Stuck on MSI Screen Error
If your MSI device freezes on the startup screen, there's a reliable solution available. The Qiling Disk Master is a powerful tool that can efficiently resolve boot-related issues, making it a viable option to consider.
Qiling Disk Master is a partition management tool that also features a powerful boot repair tool, allowing users to resolve boot-related issues on Windows 10 and Windows 11, including the MSI screen stuck error.
Boot repair is a procedure that resolves issues with a computer's boot sequence, often caused by problems with boot files, settings, or other issues, which can get stuck on the MSI logo screen.
You can use the following steps to fix MSI stuck on the MSI screen using Qiling Disk Master:
Step 1. To create a bootable drive using Qiling Disk Master, connect the external drive or USB to your computer, then launch Qiling Disk Master and navigate to the "Bootable Media" section. From there, click on the "Create bootable media" option to initiate the process.

Step 2. To create a bootable Windows installation media, select an available USB drive or CD/DVD and click "Create." Alternatively, you can burn the Windows ISO file to the chosen storage media.

Step 3. Connect a bootable drive to a new computer, reboot by pressing F2/Del to enter the BIOS, set the bootable drive as the boot disk, and exit the BIOS by pressing F10.
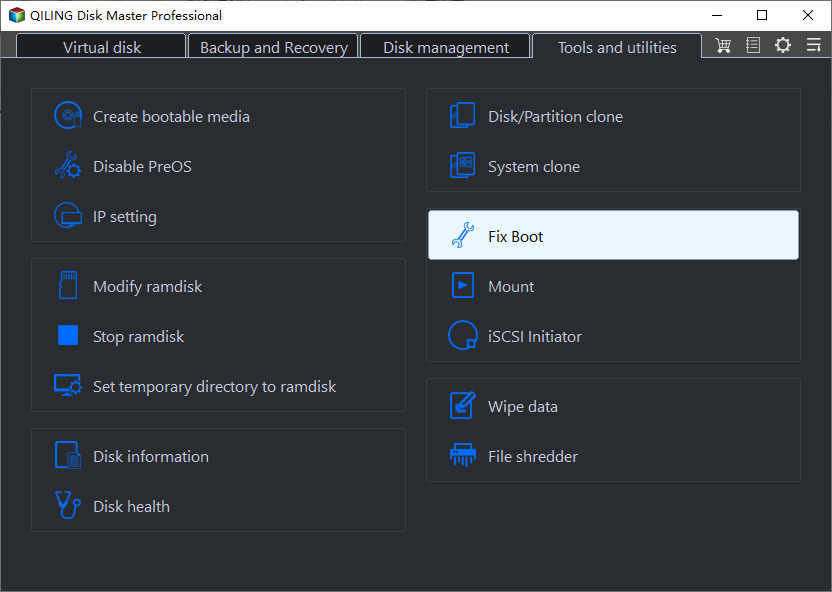
Step 4. Boot the computer again and enter the WinPE interface. Then, open Qiling Disk Master, click "Boot Repair" under the "Toolkit" option.
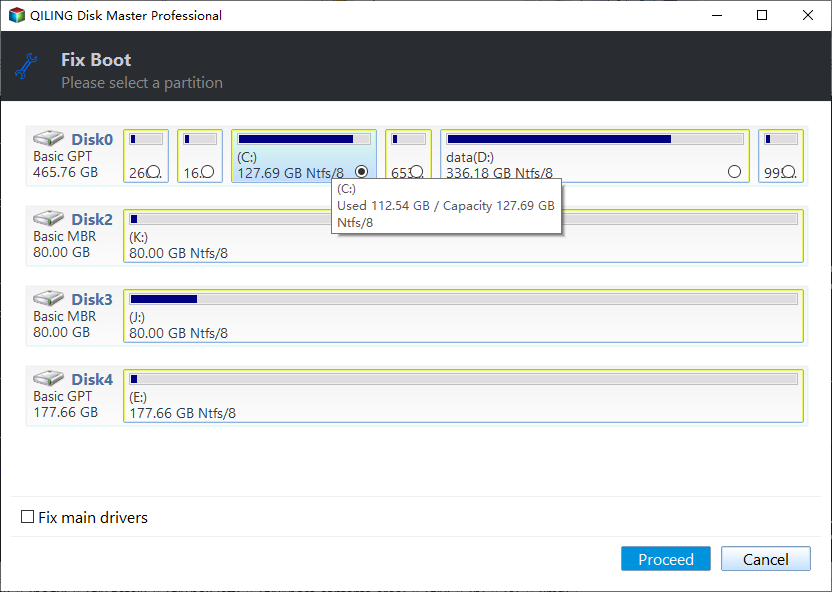
Step 5: Select the system you want to repair and click "Repair."
Step 6. The system has been successfully repaired. Click "OK" to complete the boot repair process.
🎯Support Center
If you're seeking more information, our dedicated experts is here to provide answers:
Qiling experts are available 24/7 to provide one-on-one manual services to fix Windows boot errors, BSOD, and computer boot loops. They offer free evaluation services and use their experience to diagnose and resolve system boot failures, Windows stop codes, and OS lagging issues.
- 1. To fix a Blue/Black Screen of Death (BSOD) error caused by a Windows update or other reasons, try restarting your computer in Safe Mode, which can help you identify if the issue is update-related. If that doesn't work, try booting in Last Known Good Configuration, which can revert your system to a previous working state.
- 2. To resolve Windows boot errors like "no bootable device found" or BCD file corruption, start by booting from a Windows installation media or a USB drive. From there, navigate to the Troubleshoot menu, then select Advanced Options, and choose Command Prompt.
- 3. 0X000_error codes on Windows system or OS boot loop issues can be resolved by running a System File Checker, checking for malware, running a disk check, and updating drivers. Additionally, disabling unnecessary startup programs, running a System Restore, and resetting the Windows Update components can also help.
Qiling Disk Master's Boot Repair feature is highly effective due to its advanced algorithm, which allows it to identify and fix a wide range of Windows 10 boot issues, including the MSI screen stuck problem and other common boot errors.
How to Fix MSI Stuck on MSI Screen Windows 10/11 Manually
Many users seek help on Reddit and Microsoft forums, prompting us to investigate and provide solutions for the issue of an MSI computer getting stuck on the MSI screen. To resolve this problem, various methods can be employed, ranging from simple battery checks to more drastic measures like factory resetting the computer. Among the top 7 fixes for this issue are simple solutions that can be attempted before resorting to more complex troubleshooting, making it easier for users to get their MSI computer up and running again.
Fix 1: Remove Peripherals
Many peripheral devices like USB drives, external hard disks, and even printers can cause conflicts during the boot process, which may cause the laptop to get stuck on the MSI screen.
Carefully unplug or disconnect any external devices connected to your MSI computer, including USB drives, printers, scanners, and other peripherals, to manually fix the issue.

If your MSI laptop is displaying a black screen, don't worry - there are 7 fixes you can try to resolve the issue. First, try pressing the power button for 30 seconds to discharge any residual power.
If your MSI laptop is stuck on a black screen, don't worry - this guide is here to help you resolve the issue. From troubleshooting to potential fixes, we've can help. Learn how to get your laptop up and running again with our comprehensive guide, and dive into the solution now.
Fix 2: Check the Battery
If your MSI laptop is stuck on the Windows MSI screen, try plugging it in and letting it charge. If that doesn't work, try restarting it. If you have an older MSI device with battery issues, it might be time for a battery replacement.
Fix 3: Check the RAM
Random Access Memory (RAM) is crucial for your Windows 10/11 computer's smooth operation, especially during startup and regular use. Issues with RAM can cause your MSI device to get stuck on the MSI screen. To resolve this, follow these steps and share this article with others experiencing similar RAM-related problems.
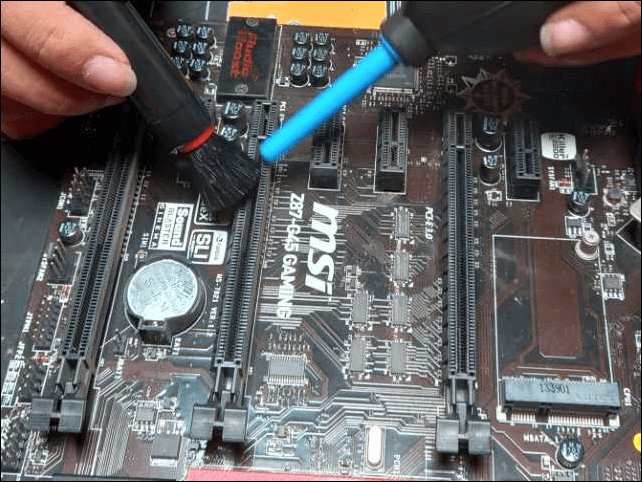
Step 1: To upgrade or replace the RAM in your MSI device, power down the computer completely, then open the case to access the motherboard. Locate the RAM modules on the motherboard and carefully remove them from their slots.
Step 2: To resolve the issue of your computer not turning on, try removing the power cord and pressing the power button for 15 seconds to discharge any residual power. Then, move on to cleaning the RAM modules by removing them one at a time and attempting to boot your device with only one RAM module in place. This will help identify if the issue is with the RAM or not.
Step 3: If one or more RAM modules are found to be faulty, replacing them with new ones may be necessary to resolve the issue.
If you've found the solution helpful, we recommend sharing the guide with your fellow Windows MSI device users facing similar issues. This can help them overcome technical problems and keep their devices operational.
You May Also Like:
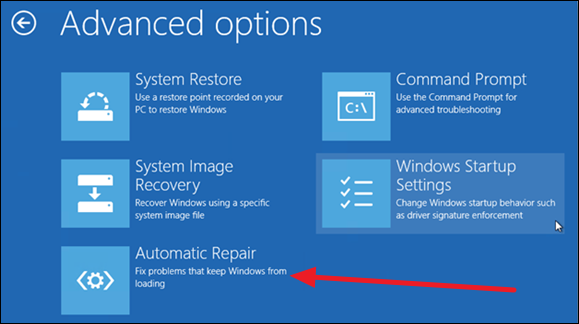
Fix 4: Perform Automatic Repair
Windows' built-If your MSI device is stuck on the MSI screen, you can try initiating the Automatic Repair feature to help diagnose and resolve the issue. To do this, you can manually initiate the process by pressing the power button on your device for 10-15 seconds to force a shutdown, then press the power button again to turn it back on. Once your device is on, you can enter the BIOS settings and look for the Automatic Repair option, which may be listed under a section such as "Boot" or "Troubleshooting".
Step 1: Press F3 or F11 repeatedly until you see the Windows Recovery Environment on your screen after rebooting your computer.
Step 2: Go to Troubleshoot > Click Advanced options > Automatic/Startup Repair.
Step 3. Choose your account, enter the password, and then click Continue to start the automatic repair process.
Fix 5: Boot MSI into Safe Mode
If you're still experiencing the "MSI Stuck on MSI Screen" issue after trying previous fixes, booting your MSI device into Safe Mode can help diagnose and potentially resolve the problem. To do this, manually boot your MSI device into Safe Mode by restarting your device and immediately starting to tap the F8 key repeatedly. This will bring up the Advanced Boot Options menu, where you can select Safe Mode. If your device is stuck on the MSI screen, try pressing the F2 key to enter the BIOS settings, and then change the boot order to prioritize the operating system drive.
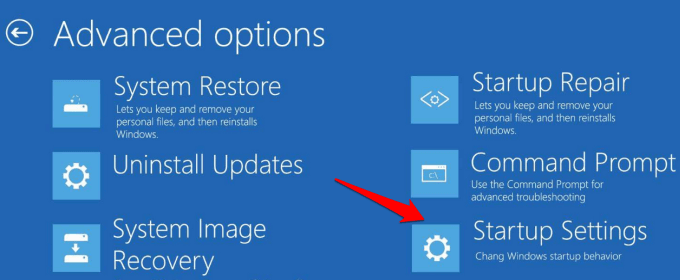
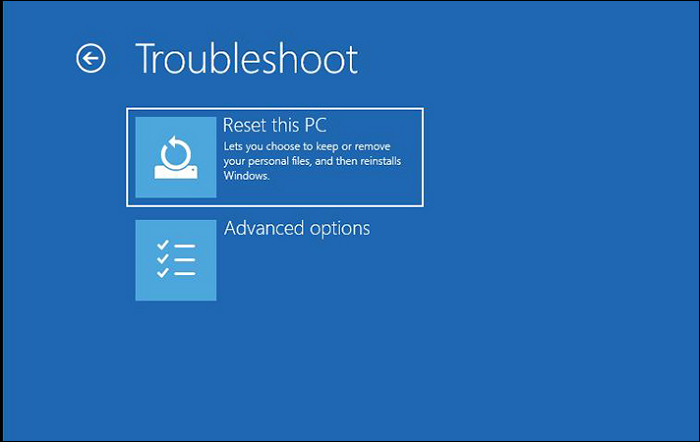
Step 1: To access the Windows Recovery Environment, navigate to the "Advanced Options" section. From there, select "Troubleshoot" and proceed to the "Advanced Options" again.
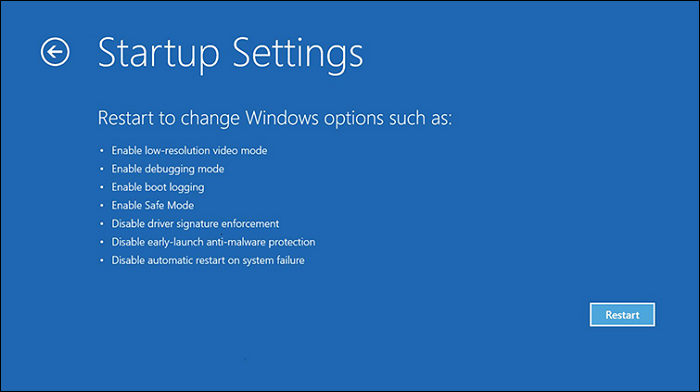
Step 2: Here, select "Startup Settings" and press F4 to initiate Safe Mode on your MSI computer. Now, test and remove the suspicious third-party programs to help resolve the issue.
This method also works on the following issues, such as:
Fix 6: Reset BIOS to Default
If your MSI device is stuck on the MSI screen, you might need to reset the Windows 10 BIOS settings to their default values. This could be due to incorrect BIOS configurations, which can cause boot problems. Altering BIOS settings can significantly impact your computer's performance.
To manually restore your BIOS settings to their default configuration, exercise caution and carefully follow the provided instructions. Start by entering the BIOS settings by pressing the designated key (usually F2, F12, or Del) as the system boots up. Navigate to the "Save & Exit" or "Exit" tab and select the option to "Load Optimized Defaults" or "Reset to Default Settings.
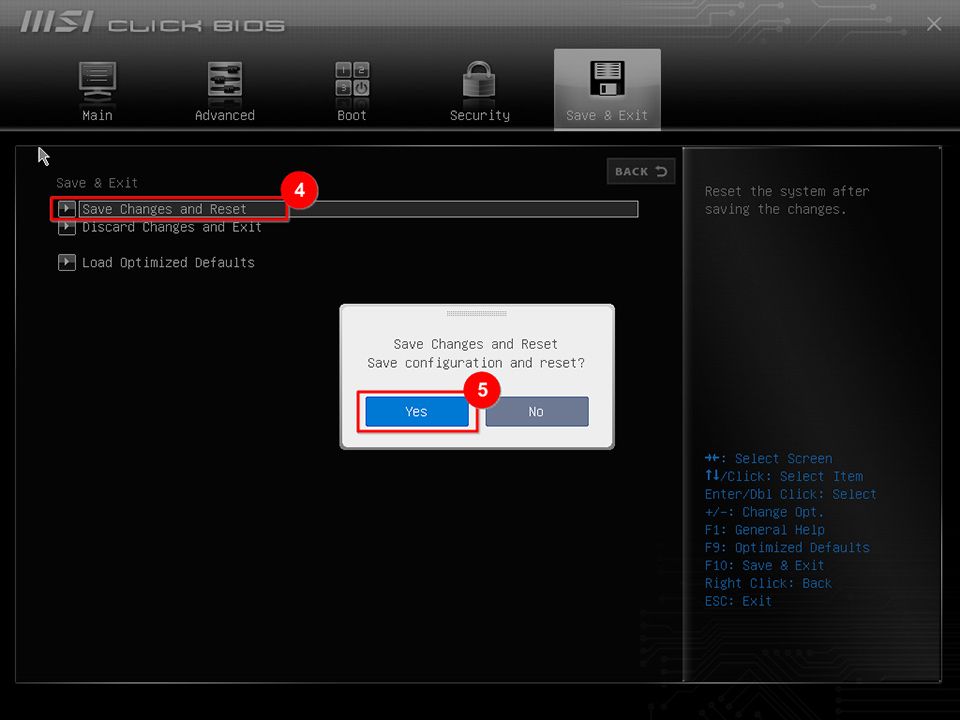
Step 1: To access the BIOS settings on an MSI computer, restart the computer and immediately press the "Del" key. Then, navigate to the "Save & Exit" tab using the arrow keys and select "Load Optimized Defaults".
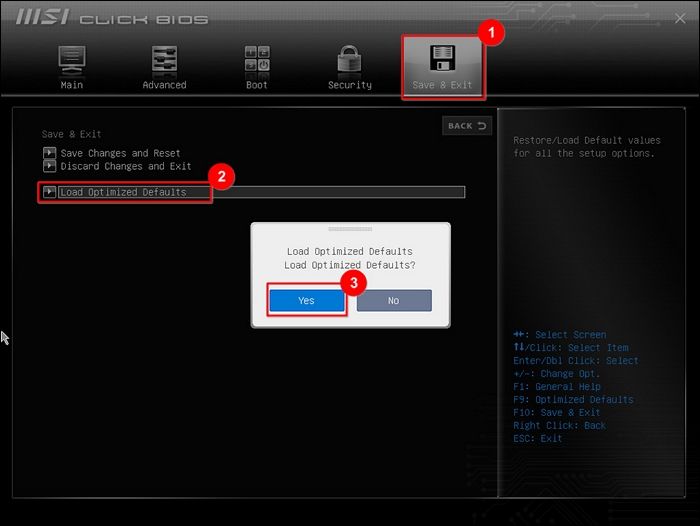
Step 2: Confirm your choice by selecting "Yes" and then choose "Save changes and Reset." Next, select "Yes" and reboot your computer for the changes to take effect.
Fix 7: Factory Reset Your MSI
If all previous fixes have failed to resolve the "MSI Stuck on Windows screen" issue, a more drastic but effective solution is to perform a factory reset, which involves restoring your MSI device to its initial factory state, effectively reinstalling the operating system and erasing all data and installed applications.
Step 1: After connecting your MSI device to a power source, reboot it. Once the MSI logo appears, repeatedly press the F3 key to enter the system recovery screen.
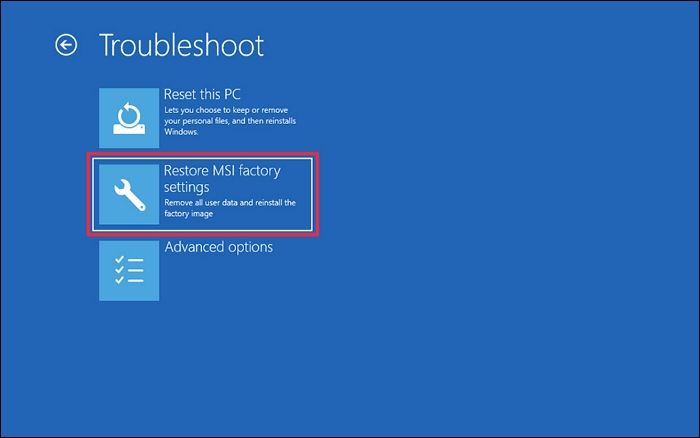
Step 2: From the "Choose an Option" screen, select "Troubleshoot" and then "Restore MSI factory settings." Next, choose "System Partition Recovery" from the following screen.
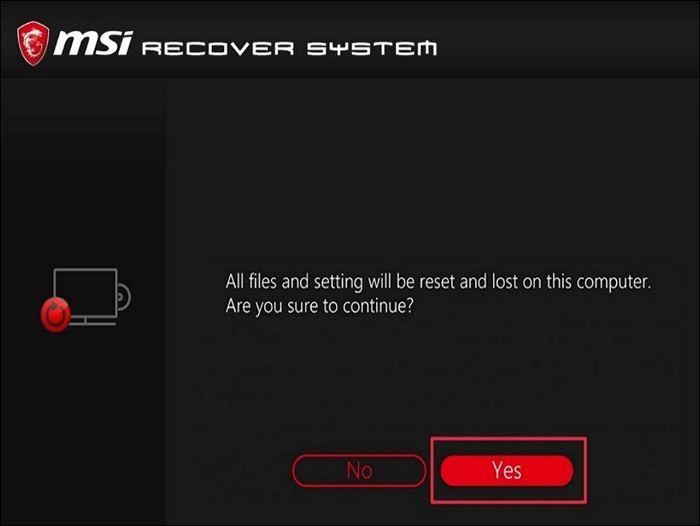
Step 3: Proceed with the "Yes" option and confirm with "Yes" again when the prompt reappears.
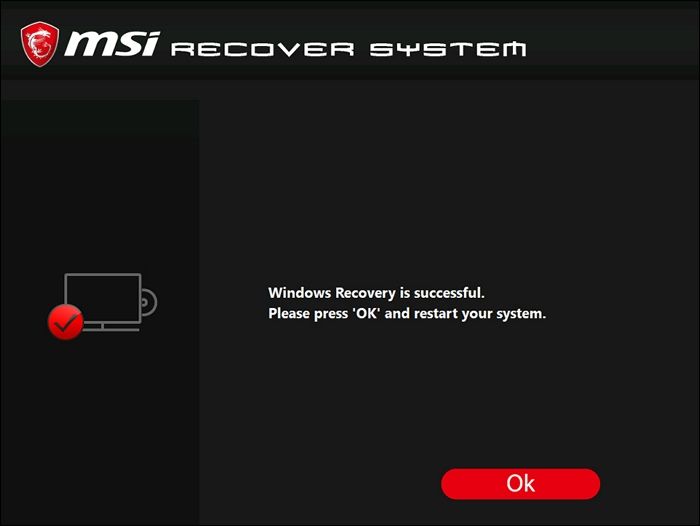
Step 4: After the system update, wait for the system to undergo recovery, click "OK" when it is over, then choose "Continue" on the "Choose an Option" screen to restart your computer. After the reboot, your system will be restored to its default factory settings.
If you've found this guide helpful and think it might be useful to others with a similar problem, share it with fellow MSI device users to help them overcome frustrating technical issues and keep their devices running smoothly.
Conclusion
Encountering the "MSI Stuck on MSI Screen on Windows 10/11" error can be a frustrating experience, but with the right knowledge and tools, you can resolve it. This guide has explored a range of solutions, from automatic fixes using tools like the Qiling Disk Master's Boot Repair feature to manual troubleshooting steps, providing a comprehensive approach to resolving this issue and getting your MSI device running smoothly again.
We've covered various methods to address the MSI screen stuck issue, including checking peripherals, battery, and RAM, as well as performing a factory reset and resetting the BIOS to default settings. These methods cater to both novice and experienced users, providing a comprehensive toolkit to tackle this problem.
MSI Stuck on MSI Screen FAQs
If your MSI device is stuck on the Windows MSI screen, you're not alone. Many users face this issue, and it's often caused by a software glitch or a hardware problem. To troubleshoot, try restarting your device, checking for BIOS updates, and running a system file checker.
1. How do I unfreeze my MSI?
If your MSI device is frozen or unresponsive, try pressing the power button for 10-15 seconds to force a shutdown, then wait 30 seconds and press it again to turn it back on. If this doesn't work, try pressing the Windows key + X and selecting the "Power" option to shut down the device.
Step 1: To reset a device, start by disconnecting the power source, either by unplugging it or removing the battery if possible. Then, hold down the power button for 15-20 seconds to discharge any remaining power.
Step 2: Reconnect the power source, turn the device on, and check if the issue is resolved.
2. How do I fix my MSI laptop stuck on the MSI logo?
If your MSI laptop is stuck on the MSI logo during boot, try the following steps: boot in safe mode, disable fast startup, update BIOS, run a system file checker, and reset or reinstall Windows if necessary. If the issue persists, consider resetting the laptop to its default settings or seeking professional help.
Step 1. To access the Windows 10 Recovery Environment, shut down your computer/laptop, then reboot it. As soon as you see the MSI logo on the screen, press F3 or F11 repeatedly until you're prompted to enter the Recovery Environment.
Step 2. Navigate to Troubleshoot > Advanced options > Automatic/Startup Repair.
3. How do I get out of the MSI BIOS loop?
If your MSI is stuck in the MSI BIOS loop, try pressing the F2 key repeatedly during boot to enter the BIOS settings, then save and exit. If that doesn't work, try pressing the F7 key to reset the BIOS.
Step 1: To restart your MSI computer and access the BIOS settings, press the "Del" key as soon as the computer boots up. Once in the BIOS settings, navigate to the "Save & Exit" section and select "Load Optimized Defaults".
Step 2: Confirm with "Yes," select "Save changes and Reset," and restart your computer for the changes to take effect.
Related Articles
- How to Check USB Speed on Windows [100% Working Solution]
- Top 5 Best Disk Formatter Software Free Download [Benefits Listed]
- How to Clone Only Used Space [Step-by-Step Guide]
- How to Check If Disk Is Healthy on Windows [Step-by-Step Guide]
- 5 Free Ways to Remove Write Protection from USB/Pen Drive
This tutorial will guide you through the process of removing write protection from a USB/Pen drive in Windows 11, 10, 8, 7, providing a step-by-step solution to restore write functionality to your device. - How to Remove Write Protection on Micro SD Card Samsung Easily?
This tutorial demonstrates how to remove write protection on micro SD card Samsung easily and analyzes the reasons for Samsung micro SD card write protected.