Tutorial: Surface Pro 8 SSD Upgrade [Step-by-Step Guide]
| ⚙️Complex Level | Low, Beginners |
| ⏱️Duration | 5-10 minutes |
| 💻Applies to | Surface Pro 8 SSD Upgrade |
| ✏️Stages |
To upgrade the Surface Pro 8's SSD, first, you'll need to transfer all your data to the new SSD. This involves connecting the new SSD to the Surface Pro 8 via a USB-C port, then using the Windows operating system's built-in tools to clone the existing drive to the new one. This process will ensure that all your files, programs, and settings are preserved and transferred to the new SSD. To upgrade the Surface Pro 8's SSD, start by turning off the device. Remove the kickstand and the Type Cover. Use a Pentalobe P2 screwdriver to take out the 5 screws that hold the bottom panel in place. Install the new cloned SSD into the Surface Pro 8, making sure it's securely fastened and the screws are tightened. Connect the power cord and any other necessary cables, and turn on the device. If everything is set up correctly, the Surface Pro 8 should now be booting from the new SSD, and you should see the familiar Windows desktop. |
If your Surface Pro 8 has low storage space, you can increase the storage by upgrading the SSD. Before doing so, back up all your data to an external storage device and have the necessary tools, such as a disk management program, ready to use.
Upgrading an SSD on a Surface Pro 8 can be challenging due to its compact design and limited accessibility. Users often struggle to find a suitable replacement SSD that fits the device's specifications, and even when they do, the process of physically installing the new SSD can be tricky. The device's design, which includes a unique SSD mounting system, adds to the complexity of the upgrade process.
Before upgrading, make sure you're well-prepared by reviewing the guide and taking necessary steps to ensure a smooth transition.
🚩1. Buy a reliable SSD and initialize the SSD for usage.
🚩2. Upgrading the SSD on your Surface Pro 8 can be a straightforward process, and our go-to tool for the job is Qiling Disk Master. This reliable data transfer tool allows you to back up your data, clone your OS, and more, making the upgrade process straightforward. To learn more about how to upgrade your Surface Pro 8's SSD and why we prefer Qiling Disk Master over other disk management programs, continue reading this article.
🚩To prepare for the task, you'll need a SIM card or SSD removal tool. This tool will be used to safely remove and install SSDs, making the process easier and more efficient.
To get started, we need to transfer or clone all the original data from the old SSD to the new one, ensuring a seamless transition and preserving all the important files and information.
Stage 1. Surface Pro 8 SSD Upgrade - Transfer Data to the New SSD
Before upgrading your SSD, back up or move your data to a new backup drive using a reliable tool like Qiling Disk Master, to ensure you don't lose any data from your old SSD.
The software has features that allow you to clone or transfer the entire operating system from your old SSD to a new one, creating an exact replica of your old drive on a backup drive, which can then be moved to the new SSD after installation on the Surface Pro 8.
Qiling Disk Master allows for fast cloning of the operating system, as well as quick backup and data transfer to another SSD/HDD. To use this tool to transfer all data to your new SSD, you can follow these steps.
Step 1. Select the source disk.
- To clone a disk, click the "Clone" option from the left menu, then select "Clone OS Disk" or "Clone Data Disk" depending on your needs, and proceed by clicking "Next".
- Choose the source disk and click "Next".
Step 2. Select the target disk.
- Select the desired hard drive or solid-state drive as the destination and click "Next" to proceed.
- Read Warning message and confirm "Yes" button.
Step 3. To view the disk layout and edit the target disk partition size, you can use the "Disk Layout" or "Partition Editor" feature in your operating system or a dedicated disk management software. This allows you to visualize and modify the partition table, including adjusting the size of the target disk partition.
To prepare for the installation of Windows 10, you'll need to back up any important data on the target disk and then wipe out all data on that disk by clicking "Continue" when the program warns you of the impending data loss. This will ensure a clean slate for the new operating system. If you have valuable data on the target disk, make sure to back it up in advance to avoid losing it. Once you've completed this step, you'll be ready to proceed with the installation process.
You can choose to automatically adjust the disk size, clone the disk as the source, or edit the disk layout to customize your disk setup, with the last option being ideal if you want to leave more space for the C drive.
Step 4. Click "Start" to start the disk cloning process.
Here are some of the key features of Qiling Disk Master:
- Clone OS disk
- Clone Windows to a new drive
- Rebuild MBR
- Unlock Surface without a password
- 4K Align SSD to improve performance
- Write zero to hard drive
Try Qiling Disk Master today to experience its power and usefulness firsthand. Download this tool to upgrade your Surface Pro 8 SSD and discover its capabilities.
Stage 2. Surface Pro 8 SSD Upgrade - Take Out the Original SSD
To upgrade the Surface Pro's SSD, start by powering off the device, then remove the keyboard and the screws from the bottom of the device. Next, use a plastic spudger to pry open the casing and locate the SSD, which is held in place by screws. Remove the screws and gently pull out the old SSD.
Step 1. Turn off your Surface Pro 8 and disconnect any external devices like your keyboard, mouse, and others.
Step 2. Open the back of the Surface Pro 8, where the Microsoft logo is located.
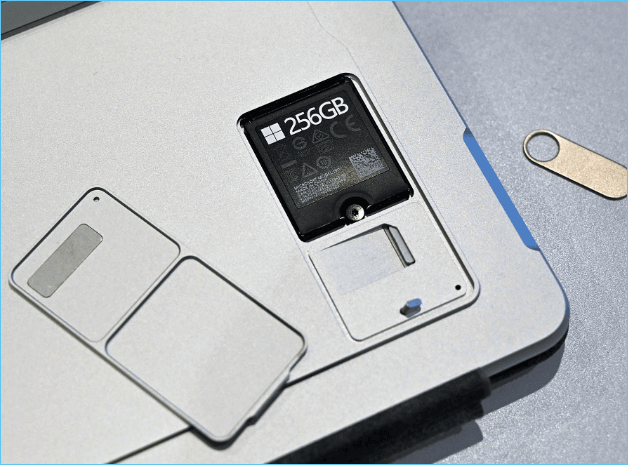
Step 3. To remove the cover of the SSD, insert a SIM ejector or any other pointed tool into the small hole on the cover, and gently pry it open. Once removed, set the cover aside to prevent losing it.
Step 4. Remove the screw holding the SSD in place to take it out.
Step 5. Remove the original SSD.
If you want to keep the original SSD for backup or other purposes, store it in an anti-static bag to protect it from damage. This completes the removal of the original SSD from your Surface Pro 8.
Stage 3. Surface Pro 8 SSD Upgrade - Install the New Cloned SSD
Once you're done with the data transfer and ripping the back case open, it's time to upgrade the SSD on your Surface Pro 8.
Here's a step-by-step guide on how to do that:
Step 1. To upgrade the storage on your Surface Pro 8, you'll need to purchase a new SSD (solid-state drive) that's compatible with your device. The recommended storage size is 512GB or larger.
Step 2. Gently open the back case of your Surface Pro 8.
Step 3. Carefully Install the SSD.
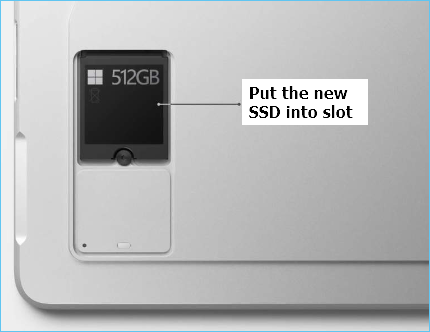
Step 4. Carefully secure your new SSD in its slot by screwing in the screw.
Step 5. To close your Surface Pro 8, put the cover back on your device and give it a gentle press. This will secure the cover in place and ensure that your device is protected.
Congratulations on upgrading your Surface Pro 8's SSD! This guide has been helpful in achieving this task, and it's great that you're willing to share it with others. By doing so, you're contributing to the community and helping others who might be facing similar issues. Your generosity and willingness to help others is truly appreciated!
Conclusion
Upgrading the storage on a Surface Pro 8 after purchase is more cost-effective than customizing it on Microsoft's website, with a 1TB SSD upgrade available for significantly less on e-commerce platforms.
Microsoft has made it easy to upgrade the SSD in the Surface Pro 8, but backing up data can be a challenge. Fortunately, using Qiling Disk Master can simplify the process of upgrading the SSD without losing any data.
You can quickly back up all of your data from the previous drive, create a clone of it, and move it to the new drive, ensuring you don't lose data or your PC settings. This allows you to seamlessly start back up from where you left off after upgrading the SSD.
Surface Pro 8 SSD Upgrade FAQs
To upgrade the SSD in your Surface Pro 8, you'll need to purchase a compatible SSD, remove the existing SSD, and install the new one. The Surface Pro 8 supports M.2 NVMe SSDs, so you'll need to choose one that is compatible with your device.
1. Can I upgrade my Surface Pro 8 SSD?
You can upgrade the SSD in your Surface Pro 8, but only with an M.2 2230 PCIe SSD, and only to replace the existing one, not to add a new one. This means you can swap the existing SSD with a higher-storage SSD of the same type.
2. Is 256 SSD enough for Surface Pro 8?
For most users, 256GB of storage on the Surface Pro 8 is sufficient, but for those who need more, it can be upgraded.
3. What are the best SSDs for Surface Pro 8?
Any M.2 2230 PCIe SSD from a reputable brand is the best choice for the Surface Pro 8, as it is specifically designed to fit and work with the device.
Related Articles
- Failed to Create a New Partition on the Selected Unused Space? Fix Now!
- How to Fix "No Audio Output Device is Installed" Windows 11
- Beginner's Guide - Install A New Hard Drive/SSD in Windows 10/8/7
- Convert to GPT Greyed Out in Windows 10? Fix It Instantly
- How to Remove Write Protection for 3DS SD Card
Have you met a situation in that your computer shows that your 3DS SD card is write-protected?; this guide will help you to know how to remove the write protection for 3DS SD card. - How to Remove Write Protection for a 16GB USB Flash Drive
You may meet a situation where you cannot format the flash drive.. This article will help you remove write protection for a 16GB USB flash drive, and then you can format your USB flash drive that displays disk write-protected. You can read on.