How to Upgrade EMMC to SSD [Tutorial with Pictures]
"I have a laptop, but its performance is poor. Could I switch from my 32GB eMMC to a quick 64GB SSD? Increasing both storage and speed can make new opportunities possible. I am looking for assistance to upgrade eMMC to SSD!"
Qiling's guide on upgrading eMMC to SSD is divided into four stages, providing extensive information to make the process easier.
Upgrading the EMMC to an SSD involves several steps. First, you'll need to purchase a compatible SSD and a USB adapter to connect it to your device.
| 💡Duration | 10-20 Minutes |
| 💻Applies to | Upgrade eMMC to SSD in Windows |
| 🔎Stages |
Stage 1: Connect SSD to Laptop Stage 2: Clone eMMC to the SSD |
| 🔨Tools |
|
| 🚩Software Required | Qiling Disk Master |
How to Upgrade EMMC to SSD
To replace EMMC with SSD, you'll need to follow a four-stage process. This involves preparing the necessary tools and materials, removing the EMMC module, installing the new SSD, and finally, updating the system to recognize the new SSD. The detailed steps for each stage will be provided in the subsequent sections.
Stage 1. Connect SSD to Laptop
Connect your new SSD to your laptop via a compatible interface, such as a USB port, and initialize it after a successful connection.
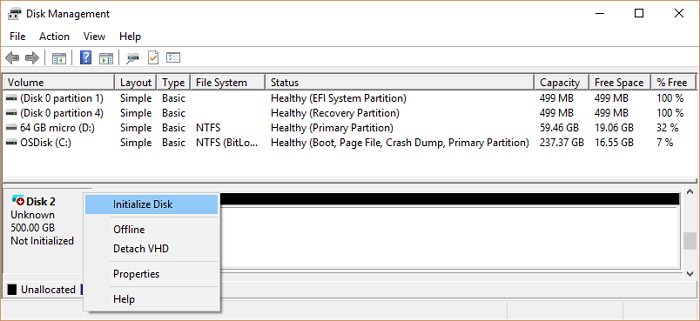
Step 1: To create and format a new hard disk partition, open the Windows search bar and type "Disk Management," then select the option "Create and format hard disk partitions" from the search results.
Step 2: Navigate the new SSD listed as "Unallocated."
Step 3: To initialize an SSD, right-click it, select "Initialize Disk" and follow the on-screen instructions to create new partitions and formatting.
Stage 2. Clone EMMC to the SSD
The second stage involves cloning the data from the eMMC storage to the SSD, which can be done using Qiling Disk Master, a tool that allows users to create a carbon copy of the original data without complex cloning procedures. This cloning process enables users to migrate their data from the source eMMC storage to the new SSD while keeping the data in its original layout and order.
This cloning tool allows for effortless and secure data transfer, including the operating system, and features a user-friendly interface that's easy to operate, making it suitable for any Windows user.
Step 1. Select the source disk.
- To clone your disk, click the "Clone" option from the left menu, select the "Clone OS Disk" or "Clone Data Disk" option, and then click "Next" to proceed with the cloning process.
- Choose the source disk and click "Next".
Step 2. Select the target disk.
- Choose the wanted HDD/SSD as your destination and click "Next" to proceed.
- Read Warning message and confirm "Yes" button.
Step 3. View the disk layout and edit the target disk partition size.
To start, you'll need to boot from the installation media and select the target disk to wipe. Be careful, as this will erase all data on the disk. When prompted, click "Continue" to confirm the action, despite the warning that it will delete all data on the target disk. If you have important files on the target disk, make sure to back them up beforehand.
To customize your disk layout, select "Autofit the disk", "Clone as the source", or "Edit disk layout". The last option is recommended if you want to leave more space for the C drive.
Step 4. Click "Start" to start the disk cloning process.
Qiling Disk Master can also assist with EMMC and SSD issues, helping you deal with these problems.
- Format EMMC drive
- Clone EMMC to SSD
- Upgrade EMMC to M.2 SSD
- 4K align SSD
- And more
Don't miss out on this easy-to-use tool that effectively manages EMMC drives and SSDs.
Stage 3. Replace EMMC with SSD
Replacing eMMC with SSD can be a time-consuming and delicate process that requires attention to detail to avoid damage. It's essential to have compatible tools and confidence in your technical abilities before starting. The process involves a series of steps that must be carefully followed to ensure a successful replacement. If you're not comfortable with the process, it's recommended to seek professional help to avoid any potential issues.
Step 1: To properly shut down your laptop, follow these steps:
Step 2: Press and hold the "Power button" for 5-8 seconds to discharge the remaining charge from the system.
Step 3: To remove the laptop's backup panel, place the laptop upside down and carefully unscrew the screws that hold it in place. Apply gentle force to avoid stripping the screws.
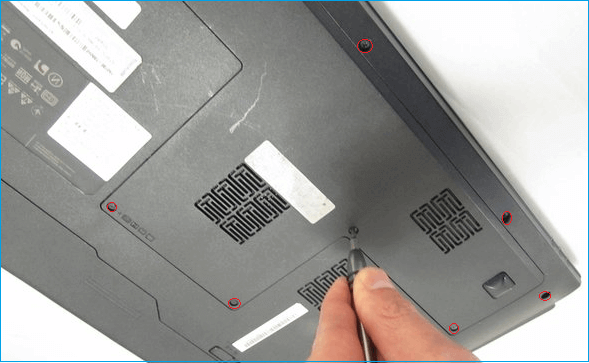
Note: Check the laptop manual for specific instructions on how to safely remove the plugs and cables.
Step 4: Locate the eMMC connected to the laptop, and insert the SSD into its designated slot, if available, to add an additional disk.
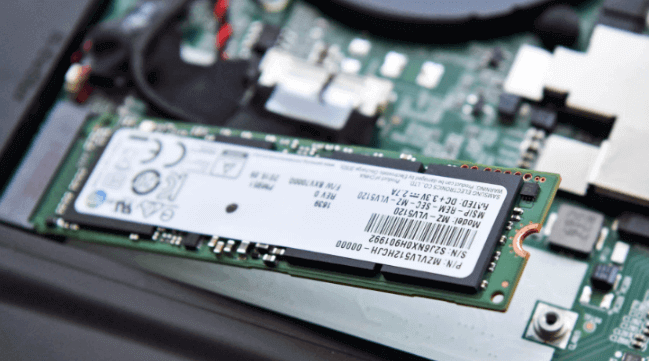
Step 5: Ensure that the new SSD is properly connected and gently assemble the backup panel.
Step 6: Turn on the laptop and see if it runs the SSD as the first boot. If it does, then the SSD has been successfully installed and recognized by the laptop. If it doesn't, you may need to go into the BIOS settings and set the SSD as the primary boot drive.
💡Note: If the cloned SSD doesn't boot, go through the next stage to change the boot order.
Stage 4. Change Boot Order
To run the SSD as the first boot, you can change the boot settings in your laptop. Typically, you'll need to enter your laptop's BIOS settings by pressing a key such as F2, F12, or Del during startup, depending on your laptop model.
Before making any changes to the BIOS settings, search the internet using the laptop model to find the correct BIOS key, which can be any Fn key from F2 - F12 or Del. key.
Step 1: To access the BIOS setup, restart your laptop and press the specific key (usually F2, F12, Del, or Esc) that corresponds to your laptop model. This will allow you to enter the BIOS settings and make any necessary changes.
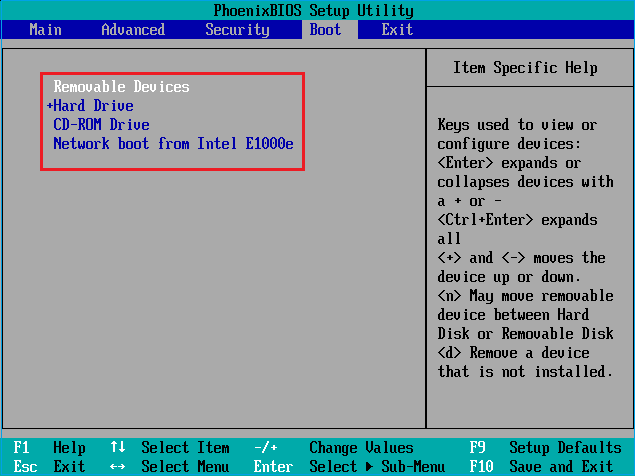
Step 2: To navigate the "Boot Order" or "Boot" option, use the arrow keys.
Step 3: If you're looking to see if your SSD is listed, you can check the list and use the "+" and "-" keys to move it to the top. This will allow you to quickly identify if your SSD is included in the list.
Step 4: Once you're done with the update, select the "Save and Exit" option, and your laptop will restart automatically.
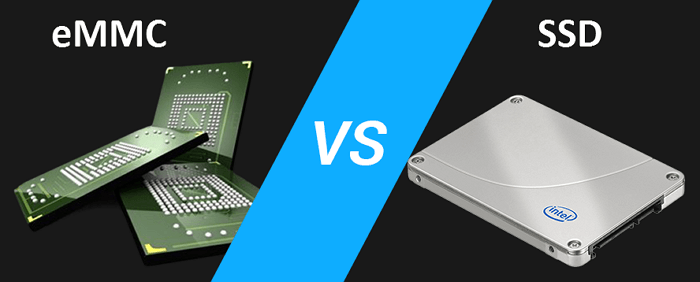
EMMC VS SSD, Which Is Better
The comparison between eMMC and SSD storage is clear, with SSDs far outperforming eMMC in modern scenarios. This section aims to help you understand the key differences between the two, specifically addressing the eMMC vs SSD debate.
What Is EMMC
eMMC storage, or embedded MultiMediaCard, is a type of storage card that's commonly used in smartphones, tablets, and entry-level laptops. It's a compact integration of flash memory and a controller, allowing users to store and manage data in a single chip. eMMC storage uses NAND flash memory, the same type found in USB drives, SD cards, and solid-state drives (SSDs), and has the benefit of storing data without requiring power, making it suitable for portable devices.
What Is SSD
A Solid State Drive (SSD) is a cutting-edge storage technology that enhances computer performance by reducing access times. It relies on NAND flash memory and integrated circuits, eliminating the need for spinning magnetic disks, to store data.
SSDs (Solid-State Drives) offer a practical solution to enhance computer performance and responsiveness. In contrast, eMMC (Embedded MultiMediaCard) is a more budget-friendly option, but it lags behind SSDs in terms of speed, with slower boot times, read/write speeds, and application loading.
Conclusion
Upgrading eMMC to SSD offers several advantages, including improved performance and storage capacity. To achieve this, one can physically replace the eMMC disk with an SSD, but a more straightforward approach is to clone the eMMC's data and operating system using software like Qiling. This cloning process ensures a seamless transition to the new SSD, preserving all data and settings, and serves as an effective Windows backup solution.
If you're using an EMMC-based laptop and want to upgrade to a faster SSD, you can consider replacing the EMMC chip with a new SSD. This process, however, requires technical expertise and specialized tools, making it a complex task.
FAQs About How to Upgrade EMMC to SSD
Do you know how can you upgrade EMMC to SSD for your laptop now? Please follow this FAQs section if you have further questions about how to upgrade eMMC to SSD.
1. Can I upgrade EMMC to SSD?
Upgrading EMMC storage to an SSD is possible, but it depends on the compatibility and specifications of the motherboard, varying by computer device.
2. Is SSD better than EMMC?
SSDs (Solid-State Drives) outperform eMMC (Embedded MultiMediaCard) in terms of system speed and responsiveness. With advanced algorithms, SSDs deliver excellent read/write speeds, performance, and durability, making them a better choice for overall system efficiency.
3. What is EMMC?
EMMC, or Embedded MultiMediaCard, is a type of flash storage commonly used in budget laptops and tablets. It combines a controller and flash memory onto a single chip, providing a cost-efficient and space-saving storage solution.
Related Articles
- SanDisk Format Solution: Format SanDisk to The Best Performance on Your Own
- Failed to Create a New Partition on the Selected Unused Space? Fix Now!
- [Solved] Secure Boot Violation Invalid Signature Detected
- Can't Shrink the 3 TB USB Drive, How to Fix?
If you have encountered the 'Can't shrink the 3 TB USB drive' problem, this post may be able to help as it contains an effective method of shrinking a 3 TB USB drive. - How to Clone Hard Drive to Samsung SSD | Get Your Answer
With the rise in popularity of SSDs, many users are upgrading or replacing their HDD/SSD with Samsung SSDs to improve drive performance, gain more storage space, and resolve failing hard drive issues. - 2 Ways to Clone Seagate HDD to SSD | Try Seagate Disk Clone Software
You can clone a Seagate HDD to an SSD using the Seagate DiscWizard software that comes with the drive, which features cloning the entire disk to another. However, there are also some drawbacks to using this software, so another option is also available, Qiling Partition Wizard.