How to Create Partitions on USB Drive in Windows 10/11 [Full Guide]
If you're looking to manage your USB drive effectively, consider creating partitions on it. This page offers three ways to do so, allowing you to organize your USB drive efficiently. By partitioning your USB drive, you can benefit from improved data management and organization, making it easier to find and access specific files and folders.
Can I Create Partitions on USB Drive
Starting from Windows 10 version 1703, Windows supports multiple partitions on removable media like USB drives, allowing us to make the most of them by creating separate partitions for different purposes.
Mixed OS Environment Available:
If you have a USB with an exFAT format that works on Windows 10 but not on Linux, you can solve the issue by formatting the USB to EXT4 instead, which is compatible with Linux.
Better Management:
Creating multiple partitions on your computer is beneficial for organizing your files and improving access times, as it allows you to categorize and separate files by type, making it easier to locate and access the ones you need quickly, and also helps to avoid limitations imposed by different file system types.
You can learn three ways to partition your USB drive, including a professional USB partition tool, in the next part to create partitions on a USB drive.
How Do I Create Partitions on USB Drive
If you're new to USB partitioning, it's easier than you think. In this tutorial, we'll break it down step by step, making it easy to follow. There are three ways to partition a USB drive, and we'll cover each one in detail. Just stick with us and we'll guide you through the process.
To create partitions on a USB drive using Qiling Partition Master, follow these steps:
Way 2. Create Partitions on USB Drive via Disk Management
Way 3. Create Partitions on USB Drive via Diskpart Commands
If you're struggling to choose a suitable method, We've prepared a table to help. Qiling Partition Master Free stands out as the best option, allowing you to complete the process in just four simple steps.
| Features | Qiling Partition Master | Disk Management | Diskpart |
|---|---|---|---|
| Operation Difficulty | Easy | Medium | Difficult |
| Suitable Users | All users | Beginners | Experienced users |
| Steps | 3 | At least 6 | At least 6 commands |
To create a partition on a USB drive, you can use the built-in Disk Management tool in Windows or the Terminal in macOS. For Windows, go to the Start menu, type "Disk Management," and open it.
Way 1. Create Partitions on USB Drive via Qiling Partition Master
Qiling Partition Master is a free disk manager for all Windows users, supporting all Windows versions. Its clear interface makes it easy to use, and you can create partitions on a USB drive in a few simple steps. Download the tool and follow the guide to try it.
Step 1. Launch Qiling Partition Master. On the main window, right-click on the unallocated space on your hard drive or external storage device and select "Create" to create a new partition.
Step 2. Adjust the partition size, file system, label, etc. for the new partition and click "Proceed" to create a new partition.
Learn how to create a partition in NTFS, FAT, or EXT file system by watching this video tutorial. The tutorial will guide you through the process of creating a partition in these different file systems.
Qiling Partition Master offers a range of features beyond partitioning, including disk formatting, disk wiping, and disk checking for errors, allowing users to manage and maintain their USB drives and other storage devices efficiently.
Other features of Qiling Partition Master:
- Format USB to boot
- Merge partitions on USB drive
- Fix USB has two partitions error
- Copy OS and data to another HDD/SSD
- Resize, delete, move, and extend partitions
Now, click the button below and download this tool to quickly solve your disk partition problems.
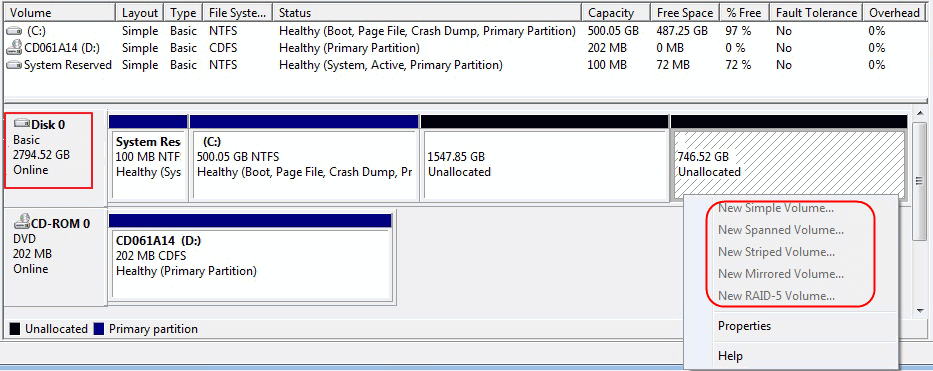
Way 2. Create Partitions on USB Drive via Disk Management
Disk Management is a built-in utility tool in Windows that helps manage disk partitions, and it can be used to create partitions on USB drives.
- Notice:
- To connect your USB drive to a Windows PC, simply insert the drive into a vacant USB port on your computer. The drive should be recognized by the computer and a window will pop up asking what you want to do with the drive.
Step 1. To open Disk Management, you need to type "Create and format hard disk partitions" in the search bar.
Step 2. Right-click on the unallocated space on the targeted USB drive and select "New Simple Volume."
Step 3. To determine the volume size, follow the New Simple Volume Wizard. This wizard will guide you through the process of creating a new volume, allowing you to select the desired size for your volume.
Step 4. Assign a Drive letter to your new partition.
Step 5. Determine the file system format you want and click "Next."
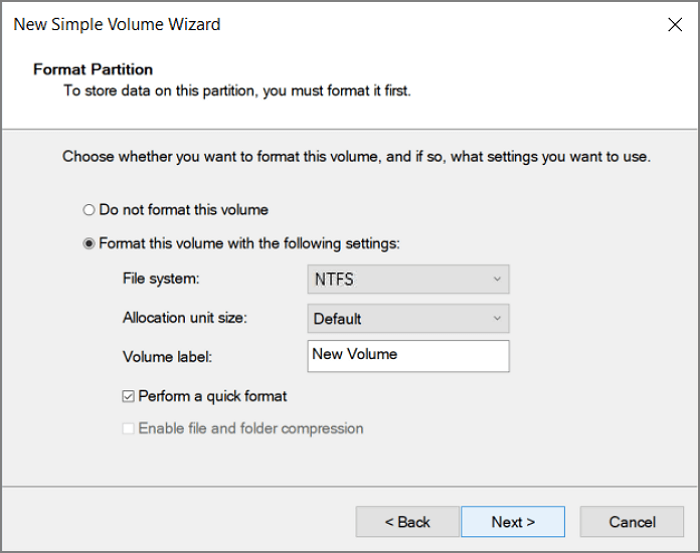
Step 6. Click "Next", then "Finish" to finish this process.
If you find your "New Simple Volume" grayed out during the process, there is a help link available to assist you.

To fix the "New Simple Volume Greyed Out" error in Windows Disk Management, first, ensure the disk is not in use by other programs or services. Next, check if the disk is a dynamic disk, as simple volumes can only be created on basic disks.
Sometimes, you might encounter an issue where the "New Simple Volume" option is not available in Disk Management when trying to create a new partition. This could be due to various reasons, such as the disk being in a dynamic configuration, a previous failed attempt to create a partition, or the presence of a system reserved partition. In such cases, you might need to take alternative steps to create a new partition, such as converting the disk to basic, deleting any existing system reserved partitions, or using third-party software to create a new partition.
Way 3. Create Partitions on USB Drive via Diskpart Commands
You can use Diskpart commands to create partitions on a USB drive, which is also a good tool to manage your disk partition using commands. However, you need to be careful when typing the commands as an error may cause severe data loss.
Step 1. To access the Command Prompt, right-click the Windows icon and select "Run". Then, type "cmd" and press Enter.
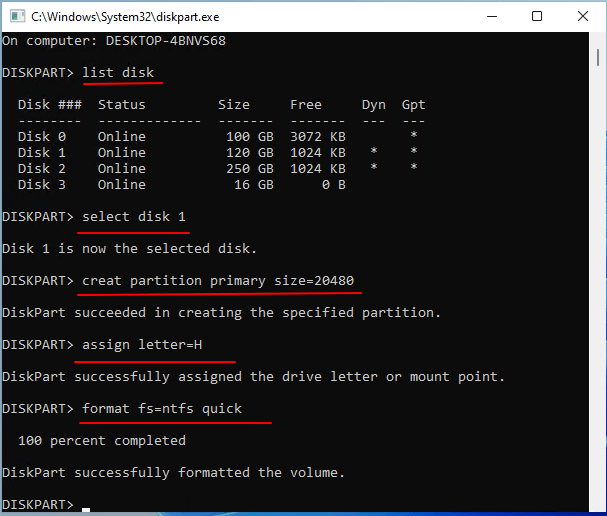
Step 2. Type "diskpart" to launch Diskpart.exe.
Step 3. Hit "Enter" every time you finish typing a command below:
- list disk
- select disk 1
- create partition primary size=20480
- assign letter=H
- format fs=ntfs
- exit
- Notice:
- To create a new partition, open the Disk Management console, right-click on disk 1, and select "New Partition". Choose the letter "H" for the new drive letter, and select the file system format "ntfs" or another format you prefer.
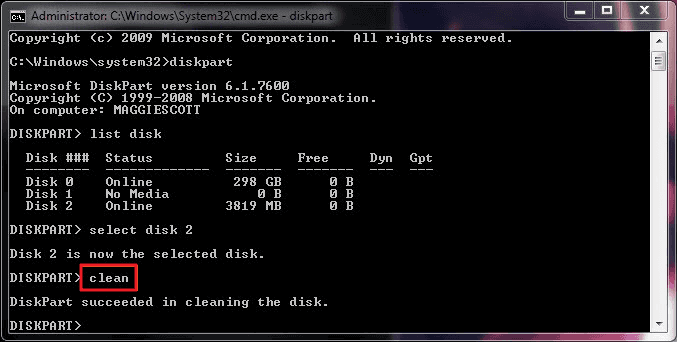
To delete a partition using diskpart, start by opening Command Prompt as an administrator. Then, type "diskpart" and press Enter.
To delete all partitions in Windows using DiskPart, start by opening Command Prompt as an administrator, then type "diskpart" and press Enter. Next, type "list disk" and press Enter to display a list of all disks, including removable media and RAM disks. Identify the disk you want to delete all partitions from and note its number.
There are two commands in DiskPart that can be used to delete all partitions on a Windows computer. The "clean" command is used to delete all partitions on a disk, while the "clean all" command is used to delete all partitions on all disks. Each command is designed for different purposes and can be used to achieve specific results.
Conclusion
If you're looking to create multiple partitions on a USB drive, there are three methods to consider. For those new to computers or unfamiliar with computer operations, Qiling Partition Master is a user-friendly option that's easy to use. Alternatively, you can use a command-line interface or a graphical user interface (GUI) to create partitions, but these methods may be more suitable for users with some computer experience. Each approach has its own benefits, so it's worth considering which one is best for your needs.
The study found that the new treatment was effective in reducing symptoms of depression in patients with chronic pain. The researchers used a randomized controlled trial to evaluate the treatment's efficacy, comparing outcomes between patients who received the treatment and those who did not.
You may also like:
FAQs About How to Create Partitions on USB Drive
It may be difficult to create a partition on a USB drive if you are new to computing. Hence, we list three other questions and hope they can help you.
1. How do I create multiple partitions on a flash drive?
Creating multiple partitions on a USB flash drive can be achieved in three ways. For those who are tech-savvy, using Disk Management or Diskpart can be effective options. However, for non-computing professionals, a more user-friendly solution is to utilize Qiling Partition Master, which can assist in the process.
2. Can I have two partitions on a USB?
You can partition your USB drive to create separate sections for different types of data, such as documents, pictures, and videos. This allows you to organize your files and keep them separate from one another, making it easier to find what you need. To do this, you'll need to use a tool like the built-in disk management utility on your computer or a third-party program like Qiling Partition Master.
3. How do I partition a USB drive in Windows 10?
To partition your USB drive using Diskpart, follow these steps: Open Command Prompt as an administrator, type "diskpart" and press Enter, then type "list disk" and press Enter to list all available disks, type "select disk X" (replace X with the number of your USB drive) and press Enter, type "clean" and press Enter to clear the drive, type "convert gpt" and press Enter to convert the drive to GPT partition style, type "create partition primary" and press Enter to create a primary partition, type "format fs=fat32" and press Enter to format the drive with the FAT32 file system, and finally type "exit" and press Enter to exit Diskpart.
- list disk
- select disk G
- create partition primary size=10240
- assign letter=N
- format fs=ntfs
- exit
You can replace "G, 10240, N, and ntfs" with the correct letter, volume, and file system format you want. For example, you might want to change "G" to "H", "10240" to "20480", "N" to "M", and "ntfs" to "ext4".
Related Articles
- Don't Miss Best FAT32 Formatter: How to Choose A Free FAT32 Format Tool
- Partition recovery from unallocated space with Qiling Partition Master
- Partition Clone Guide | Clone EXT4/EXT3/EXT2 Partitions in Windows 10
- How to Delete Unallocated Space Windows 10 [Three Efficient Ways]
- Full Guide to Upgrade PS4 to SSD [Quick & Easy]
Are you looking for a way to improve your PS4 performance? Here is a detailed guide to upgrading PS4 to SSD to make your experience more seamless. - How to Upgrade Xbox One X to SSD - Guide with Pictures
Are you looking to upgrade your Xbox One X to SSD to improve and optimize your gaming experience? This article will provide you with a detailed guide to this process.