How to Upgrade Windows 10 to Windows 11 without Losing Programs
Upgrading Windows 10 to Windows 11 lets you use newer features while keeping installed programs when the process is handled correctly. Before upgrading, check compatibility, back up important data, and choose a suitable upgrade method to reduce the risk of app or file loss.
View the Necessary Information to Upgrade Windows 10 to Windows 11:
| ⏱️Duration | 5-10 minutes |
| 🧑💻Difficulty | Medium |
| ⚒️Tool | Qiling Disk Master Tech, Windows 11 Installation Assistant |
| 👣Steps |
1️⃣Stage 1. Check Whether Your PC Supports Windows 11 Before upgrading to Windows 11, back up your programs and data to an external drive or cloud storage. You can use File History, Windows Backup, or Qiling Disk Master to protect files, settings, and applications before the upgrade. To upgrade Windows 10 to Windows 11 without losing programs, first confirm that your PC meets Windows 11 requirements. Then choose Windows Update, the Windows 11 ISO file, or Windows 11 Installation Assistant to complete the upgrade. |
Does Upgrade Windows 10 to Windows 11 Delete Programs?
Upgrading from Windows 10 to 11 won't delete anything, but it's recommended to back up your files to avoid potential risks, such as inadvertently losing or deleting data.
Before upgrading Windows 10 to Windows 11, back up your programs and data first. This helps you enjoy Windows 11 features while keeping a recovery option if the upgrade does not go as expected.
How to Upgrade Windows 10 to Windows 11 without Losing Programs?
Upgrading to Windows 11 from Windows 10 involves several stages. To start, ensure your system meets the minimum requirements, including a compatible processor, RAM, and storage.
Stage 1. Check Whether Your PC Supports Windows 11
Before upgrading from Windows 10 to Windows 11, back up installed programs, settings, and data to avoid unexpected loss. You can create a system image, use Backup and Restore, or use Qiling Disk Master to protect programs and files.
Windows 11 includes improvements over Windows 10 and supports in-place upgrade on compatible PCs. With the right method, you can move to the new operating system without reinstalling your favorite apps or games.
Let's look at the step-by-step guide:
Stage 1. Check Whether Your PC Supports Windows 11
Before upgrading to Windows 11, it's essential to check your PC's compatibility to ensure it meets the necessary specifications. Your computer should meet the requirements for Windows 11, which includes specific hardware and software criteria. Don't worry, we'll guide you through a step-by-step process to easily check your PC's compatibility and determine whether it's ready for the upgrade.
Let's first look at the specifications for Windows 11:
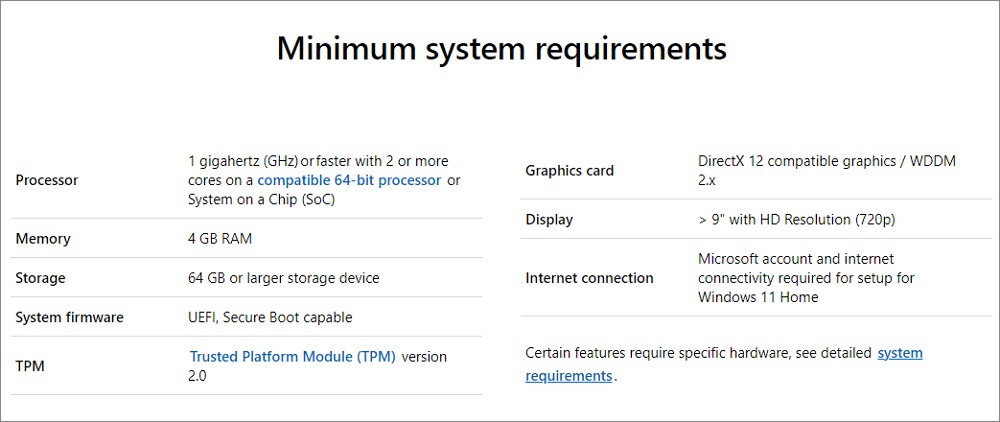
To check if your PC is compatible with Windows 11, you can use a PC health checker, which can be installed on your PC to assess its capability. If it's not already installed, you can download and install it to see if your PC meets the system requirements for Windows 11.
Here's how:
Step 1. You can download and install Microsoft's PC health checker by visiting the official Microsoft website.
Step 2. The app's home page shows "PC health at a glance" and has a box at the top that introduces Windows 11, prompting users to click "Check now" to see if their PC is compatible.
To check if your Windows 10 meets the requirements to upgrade to Windows 11, you can go to the Windows 10 settings, click on "Update & Security," and check the top right corner for any notifications that indicate your system doesn't meet the requirements.
Stage 2. Backup Programs Before Windows 10 to Windows 11 Upgrade
When updating from Windows 10 to 11, it's essential to back up your data and files before proceeding to ensure their safety and prevent any potential loss, and we have a tool that can help with that.
Qiling Disk Master Tech allows you to back up your Windows 10 programs, settings, and data for free, enabling you to restore them anytime after upgrading to Windows 11, preserving your existing programs during the update process.
You May Also Like:
Stage 3. Upgrade Windows 10 to Windows 11 without Losing Programs
To upgrade from Windows 10 to Windows 11 without losing programs or data, there are three methods to consider. Before proceeding, it's essential to have created a backup of your programs and data to avoid potential loss or disaster. Once you're ready, you can follow the complete instructional steps for each method to ensure a smooth transition. We'll present each option in detail to guide you through the process.
Here are three methods to update our Windows:
Method 1. Upgrade to Windows 11 via Windows Update
Method 2. Download Windows 11 ISO File
Method 3. Use Windows 11 Installation Assistant
Read each method carefully and choose the one that fits your situation. A proper backup and the right upgrade path can help prevent program or data loss.
Method 1. Upgrade to Windows 11 via Windows Update
To update your Windows 10 to Windows 11, follow these simple steps. From your Windows 10, you can easily get the latest update by following the instructional steps provided. This method is easy and straightforward, allowing you to upgrade to the new Windows 11 operating system.
Step 1. To open the "Settings" app on your Windows computer, press the Windows key and the "I" key at the same time. This will quickly open the Settings app, where you can make various adjustments to your computer's settings.
Step 2. Click "Update & Security."
Step 3. Click "Check for updates" and wait a few moments until it completes the search.
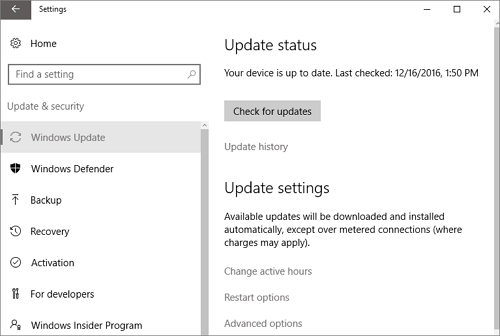
Step 4. You'll see all available updates and find Windows 11 updates.
Step 5. To download and install the software, simply click on the download link and follow the installation prompts, which may include a system restart.
Step 6. When prompted about preserving your files, make sure to select the option to retain them as part of the procedure. This is an important step to ensure your files are saved.
Note: Be prepared for a potentially lengthy installation process and multiple PC/Laptop reboots, and let Windows complete the installation without interruptions.
Method 2. Download Windows 11 ISO File
You can upgrade your Windows 10 to Windows 11 by downloading the Windows 11 ISO files from the official Microsoft website, then creating a bootable USB using a tool like Qiling Disk Master, which can simplify the process, and finally burning the ISO to the USB.
Here are the instructional steps:
Step 1. Visit Microsoft's official website and Windows 11 download page.
Step 2. Select the "Windows 11 (multi-edition ISO for x64 devices)" option under the "Download Windows 11 Disk Image (ISO) for x64 devices" section.
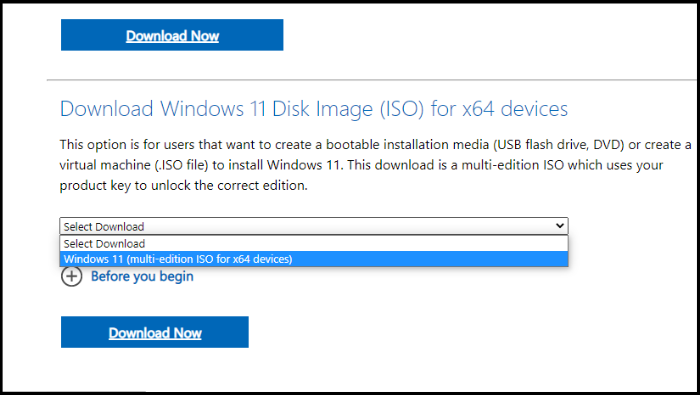
Step 3. Click "Download Now," choose the language, and click "Confirm."
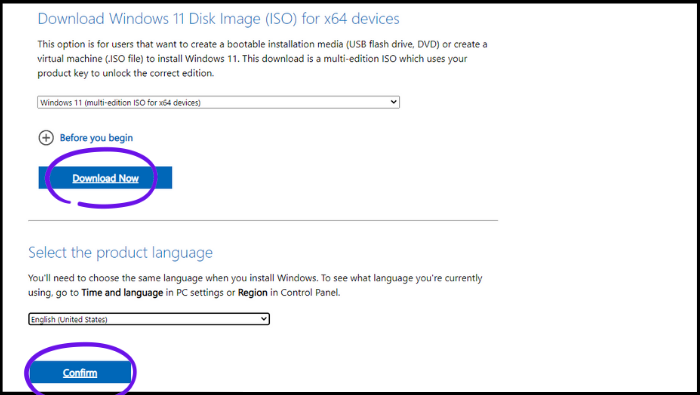
Step 4. Once you receive the download link, click on the "64-bit Download" button to get the Windows 11 ISO.
Step 5. To create a bootable USB, you can use the Qiling Disk Master or locate the downloaded Windows 11 ISO file. Right-click on the ISO file, select "Show more options," click "Burn disc image," and follow the on-screen instructions.
Step 6. After making a bootable USB, you can install Windows 11 using it.
Note: To create a bootable USB for Windows 11 installation, connect your USB to your PC/Laptop. During the installation process, you will encounter prompts asking if you want to preserve your files. It's essential to choose the option to keep your files at this point.
Method 3. Use Windows 11 Installation Assistant
The Windows 11 Installation Assistant makes it easy to upgrade from Windows 10 to Windows 11 or perform a clean installation, providing a convenient way to install the new operating system.
Step 1. Visit the Windows 11 Downloads page and click the "Download now" button beneath the Windows 11 Installation Assistant.
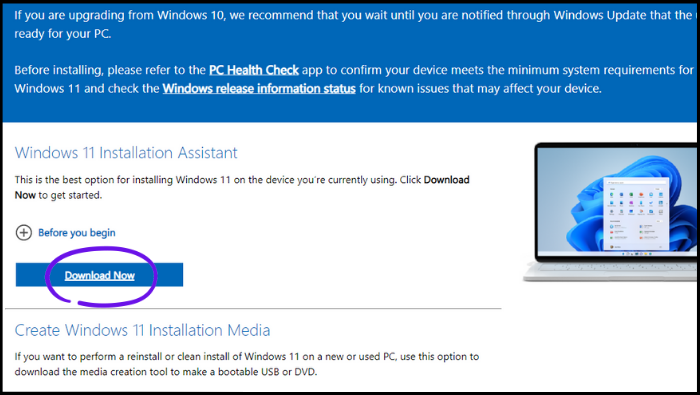
Step 2. After downloading the executable file, run it to start the installation process. Read the agreement, then choose "Accept and install" to proceed.
Step 3. Windows 11 will start downloading and installing. Please wait patiently until the process is finished. Follow the on-screen instructions to complete the installation.
Why Upgrade Windows 10 to Windows 11?
Upgrading from Windows 10 to Windows 11 offers several benefits and exciting features, making the transition a compelling reason to upgrade.
Reasons to upgrade to Windows 11:
- Game Experience: Windows 11 offers improved gaming features, including Auto HDR, DirectStorage, and Xbox Game Pass compatibility, enhancing gaming with stunning visuals and faster loading times.
- Android Apps: With Windows 11, you can access a vast library of Android apps through the Microsoft Store, making it possible to enjoy your favorite mobile apps directly on your desktop.
- Widgets: Windows 11 offers personalized, glanceable information like weather updates, calendar events, news, and more, accessible from your desktop through its widgets feature.
- Multi Desktop: Windows 11 allows you to create multiple virtual desktops, helping you separate work and personal tasks and stay organized, which can improve productivity and reduce clutter.
- Microsoft Teams Integration: Windows 11 has Microsoft Teams integrated directly into the taskbar, allowing for effortless communication and collaboration with others.
- Snap Layouts: Snap layouts allow you to organize multiple windows into simplified layouts, making multitasking easier by allowing you to quickly switch between applications.
Windows 11's features and enhancements, such as improved gaming performance, expanded app availability, enhanced productivity, and customizable desktop options, provide a more immersive gaming experience, broader app selection, increased productivity, and tailored desktop settings.
Conclusion
Upgrading from Windows 10 to Windows 11 can be completed through Windows Update, an ISO file, or Windows 11 Installation Assistant. To keep programs and data safe, check compatibility and back up your system with Qiling Disk Master Tech before starting.
With the methods above, you can upgrade to Windows 11 more confidently while keeping your programs and data protected.
FAQs About Upgrade Windows 10 to Windows 11 without Losing Programs
If you have any questions or want to learn more about upgrading from Windows 10 to Windows 11 without losing programs, check out the frequently asked questions below.
1. Will I lose my Windows 10 license when I upgrade to Windows 11?
Upgrading to Windows 11 from Windows 10 will not invalidate your Windows 10 license, and your existing license will transfer for free to the new operating system, but it's recommended to back up your important files and data beforehand.
2. How to refresh Windows 11 without losing programs?
To refresh your Windows 11 without losing programs, you can easily do it by using the "Reset this PC" method.
Here are the simple steps:
Step 1. If your computer functions normally, you can access the settings by pressing Win+I, then go to System > Recovery > Reset this PC.
Step 2. If your computer won't boot, create a recovery drive and boot from it. Choose your language and preferences, click Next, then select "Repair your computer" > "Troubleshoot" > "Reset this PC".
Step 3. Select "Keep my files" in the pop-up window.
3. What will I lose if I upgrade to Windows 11?
Upgrading to Windows 11 may cause some older software to be incompatible, require updated device drivers, and change features and interface, but it's unlikely to result in data loss. It's still a good idea to back up important files, though.
Related Articles
- How to Connect Two Computers In Multiple Ways| Step-by-Step
- How Do I Transfer CCleaner to New Computer?
- Windows Profile Migration Tool Free Download with How-to Guide 2024
- How to Free Up C Drive Space in the Windows Server?
- How Do I Transfer Office from Windows 10 to Windows 11 with Product Key - Qiling
Follow this guide to transfer Office from Windows 10 to Windows 11 easily. Also, know how to find and save your Product Keys. - Transfer MS Office from the Old Computer to the New Computer
Qiling Disk Master can assist in transferring MS Office (2007, 2010, etc.) to a new computer for PC replacement, OS upgrade, etc. by moving the application from the old computer to the new one.
Products
Articles & Tutorials
- Data Recovery
- Data Backup
- File Recovery
- File Backup
- System Backup and Restore
- Disk and Partition Clone
- Technical articles
- Mobile articles
- Disk Master Help
- Windows Data Recovery Tutorials
- Windows Secure Delete Tutorials
- Windows Partition Management Tutorials
- Windows File Backup and Restore Tutorials
- Windows System Backup and Restore Tutorials
- Windows Disk Backup and Restore Tutorials
- Windows Clone Tutorials