How to Fix Computer Turns on But No Display - Solutions Are Here!
You can click the quick navigation below to help you solve the issue:
| Workable Solutions | Step-by-step Troubleshooting |
|---|---|
| Fix 1. Force Restart Computer | If you see a black screen after hitting the power button, try holding the power button for 10-15 seconds to force a restart. This can sometimes resolve issues with your device not turning on. If this doesn't work, try charging your device for at least 30 minutes to see if it can power on. If it still doesn't turn on, you may need to contact a professional for further assistance.Full steps |
| Fix 2. Check Monitor | If your computer starts, but the screen remains blank, you can also...Full steps |
| Fix 3. Reconnect Monitor to Computer | Another potential source of the "PC turns on but no display" issue could be...Full steps |
| Fix 4. Disconnect Peripherals | Sometimes, peripherals like a mouse, printer, or scanner can be the culprit behind a computer's issues.Full steps |
| Fix 5. Reinstall RAM | A bad connection between your motherboard and RAM can also lead...Full steps |
| Fix 6. Reset BIOS Settings to Default | Your computer may boot with a black screen due to incorrect BIOS settings, which can be caused by a faulty or outdated BIOS, incorrect boot order, or a malfunctioning graphics card. To resolve this issue, try accessing the BIOS settings by pressing the designated key (usually F2, F12, or Del) during boot-up and adjusting the settings accordingly. If the issue persists, consider updating the BIOS to the latest version or seeking professional assistance to diagnose and repair any hardware issues. Additionally, you can try booting in safe mode or using a bootable USB drive to troubleshoot the problem.Full steps |
| Fix 7. Roll Back or Update Display Adapter Driver | An outdated, damaged, or incompatible device driver may also result in...Full steps |
Laptops are experiencing a growing issue where the screen remains dark after powering up, with the laptop turning on but the monitor either being off or displaying nothing.
When your PC won't display anything when turning on, it's often due to frayed or damaged cables. However, other potential causes include an incorrectly configured display, a malfunctioning graphics card (GPU) or RAM, a wrongly set BIOS, faulty peripheral devices, or a problematic Power Supply Unit.
If your computer turns on but has no display, don't worry, as this issue can be resolved. This article will guide you through the necessary steps to fix the problem. We'll explore the details together, so let's get started.
How to Fix Computer Turns on But No Display
If your computer starts but there's no display, don't worry, there are many potential solutions. You can try any of the following methods to see if they can help resolve the issue: check the monitor cable, ensure the monitor is turned on, and try using a different monitor or display. Additionally, you can also check the graphics card, update the graphics drivers, and ensure the display settings are correct.
Fix 1. Force Restart Computer
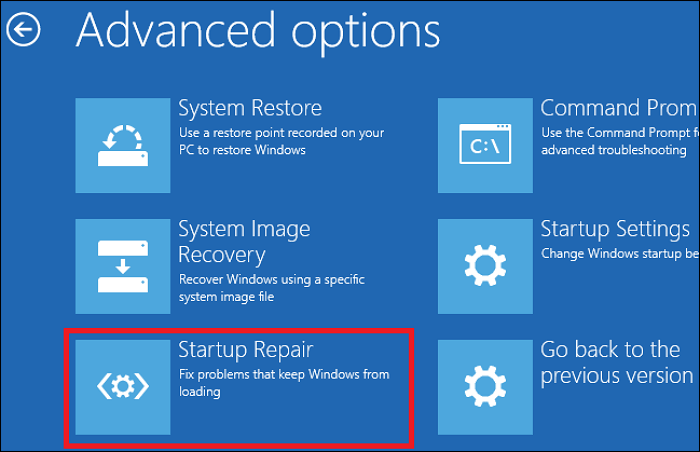
If your computer shows a black screen after turning it on, try holding the power button for 10 seconds to force a shutdown, then turn it back on. Repeat this process three times, and the Windows Startup Repair should run automatically.
Fix 2. Check Monitor
If your computer starts, but the screen remains blank, you can also check whether your monitor works properly.
Check the monitor's power light to see if it's turned on.
If your monitor won't turn on, try unplugging its power adapter, waiting a few seconds, and then plugging it back in. If this doesn't resolve the issue, consider taking it to a repair shop.
Fix 3. Reconnect Monitor to Computer
Reconnecting your computer and monitor may resolve the "PC turns on but no display" issue if the connection between the two devices is poor. To reconnect, simply unplug the monitor's power cord and HDMI or VGA cable from your computer, and then plug them back in securely. This simple step can often resolve the problem, allowing you to see your PC's display on the monitor again.
Step 1. Hold down the power button until your computer shuts down.
Step 2. To disconnect the video cord, you will need to locate the video cord that connects your computer to your monitor. This cord is usually a thin cable with a connector on each end, one end going into the computer and the other end going into the monitor.
Step 3. Check the monitor's and computer's port connectors.

Step 4. Check your video cord for damage, and if it's fine, reconnect your computer to your monitor. If you have another cable, try using that instead.
Step 5. Turn on your PC to check whether it can boot normally. If it can boot normally, it indicates that the issue is not with the PC itself but possibly with the USB drive or the installation process.
Fix 4. Disconnect Peripherals
If your computer starts but there's no display, try unplugging all peripherals like a mouse, printer, or scanner to see if they're the cause. This can help you troubleshoot the issue and get your computer up and running again.
- Hold down the power button until your computer shuts down.
- Unplug all peripherals (your printer, scanner, mouse, etc.).
- Try restarting your computer.
If your computer boots without any issues, try removing each peripheral one by one and see if the problem persists. If the computer boots with a specific peripheral removed, that peripheral is likely the cause of the problem. You can then reinstall each peripheral one by one to determine which one is causing the issue.
Fix 5. Reinstall RAM
A bad connection between your motherboard and RAM can also cause this issue, but reinstalling your RAM can help solve it. To do this, you'll need to follow these steps:
Step 1. Hold down the power button until your computer shuts down.
Step 2. Unplug the AC power cord from the power source and open your PC case.
Step 3. Remove your RAM from the memory slot on your motherboard.
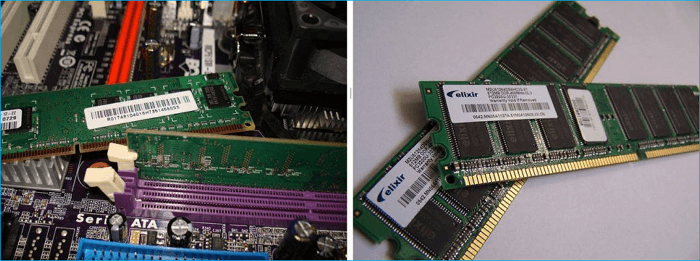
Step 4. Put your RAM stick back into the slot.
Step 5. To set up a computer, plug the AC power cord into the power supply and turn on your PC. This will allow the computer to receive power and boot up.
Fix 6. Reset BIOS Settings to Default
To reset your BIOS to default settings, turn off your computer, unplug the power cord, and press the power button for 30 seconds to discharge any residual power. Then, plug in the power cord and press the power button again. Immediately press and hold the BIOS reset button (usually F2, F12, or Del) as you press the power button. Release the reset button when the BIOS settings screen appears.
Step 1. Hold down the power button until your computer shuts down.
Step 2. Unplug the AC power cord from the power source and open your PC case.
Step 3. To safely remove the CMOS battery from your motherboard, use a non-conductive screwdriver or your fingernail to carefully pry it out. This approach avoids the risk of static electricity damage to the surrounding components.
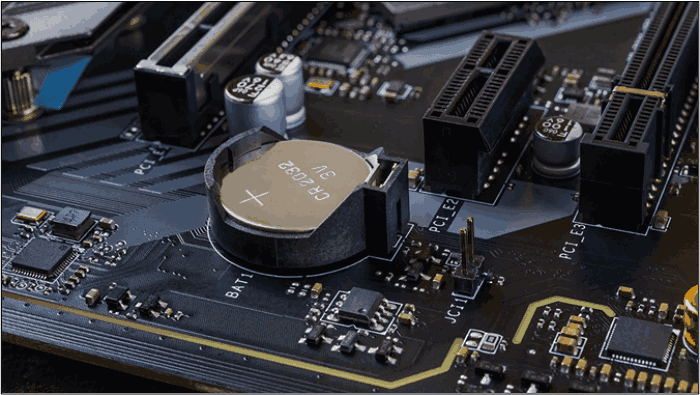
Step 4. Reinstall your CMOS battery after waiting about 5 minutes.
Step 5. To troubleshoot the issue, turn on your computer after connecting the AC power cord to the power supply to see if your problem still persists.
Fix 7. Roll Back or Update Display Adapter Driver
An outdated, damaged, or incompatible device driver may also result in no display when booting a PC. To fix this, you can boot your computer into Safe Mode and roll back or update the drivers.
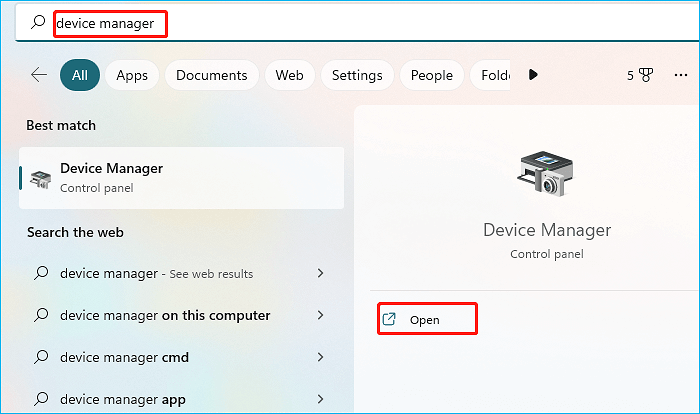
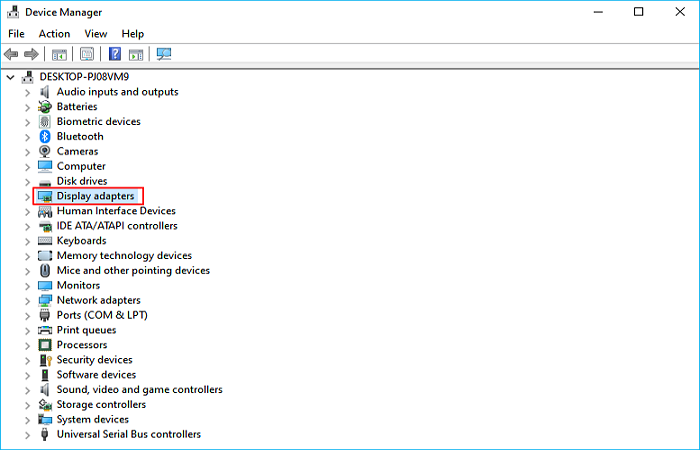
Step 1. Type "Device Manager" in your Windows search box and launch it.
Step 2. Expand the Display adapter.
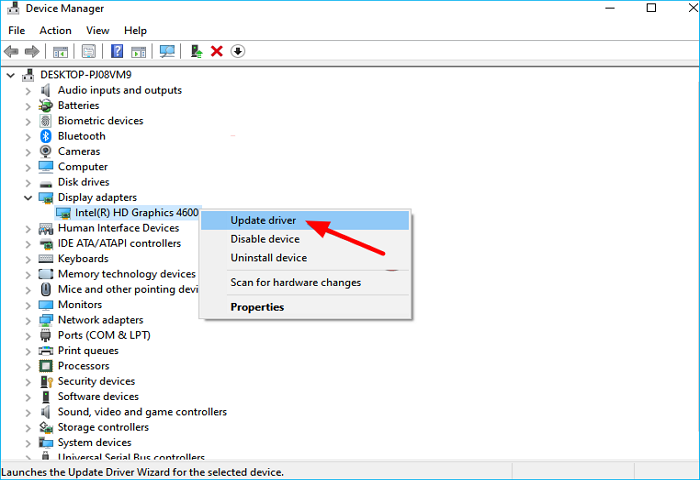
Step 3. Right-click on the device and select Update driver.
Step 4. Click Search automatically for updated driver software.
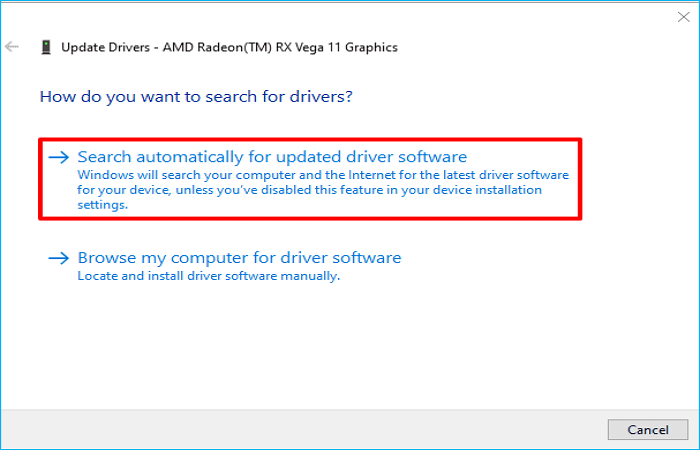
Step 5. Windows will search for an update and download it.
Once done, you can check whether you have fixed the issue.
Bonus Tip: How to Protect your Computer After Fixing the Issue
The computer screen works fine most of the time, but sometimes Windows won't load, potentially resulting in data loss. To prevent this, creating a system image of your computer regularly can be a helpful approach.
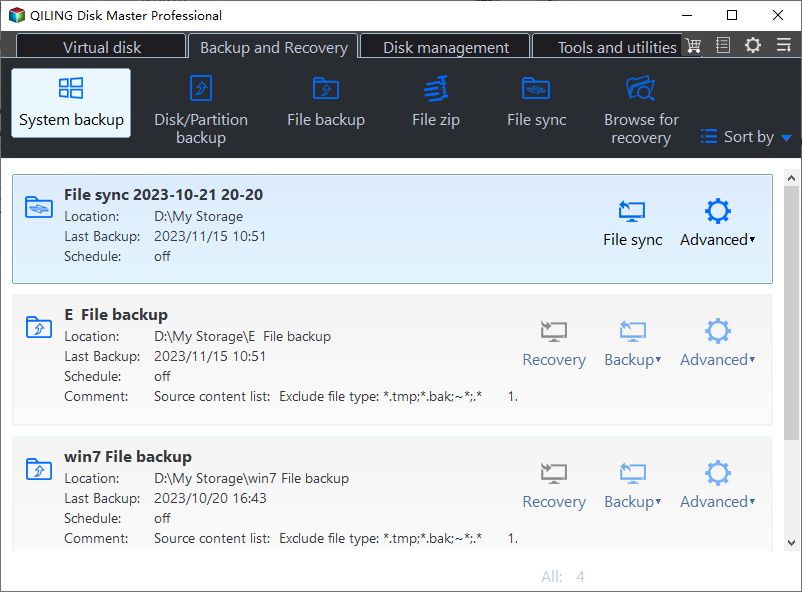
To protect your data on a computer, use professional backup software like Qiling Disk Master Pro, which can meet your needs.
Qiling Disk Master Pro is a professional backup and recovery tool that allows you to back up files, systems, disks, and partitions, and create different types of backups, such as full, differential, and incremental backups, which can be stored in various locations. Additionally, it enables you to create an image of an SD card and an iso image of your operating system, and offers a free Security Zone and 250G cloud storage.
Here is how to back up your computer:
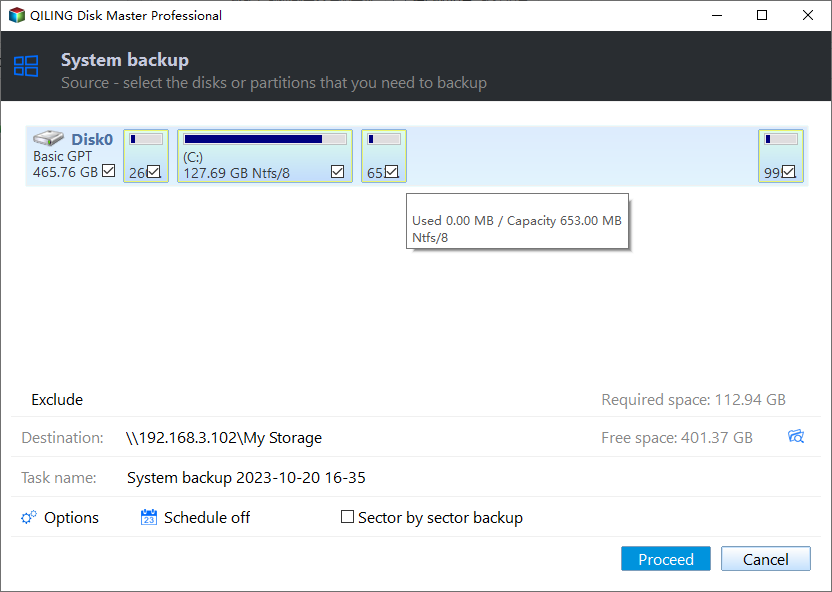
Step 1. On the main page, click "Select backup contents".

Step 2. Among the four available categories, click System backup.
Step 3. Qiling Disk Master will automatically select your system partition, requiring only the selection of a backup destination.

Step 4. You can save the backup file to either your local drive or a network-attached storage (NAS) device.
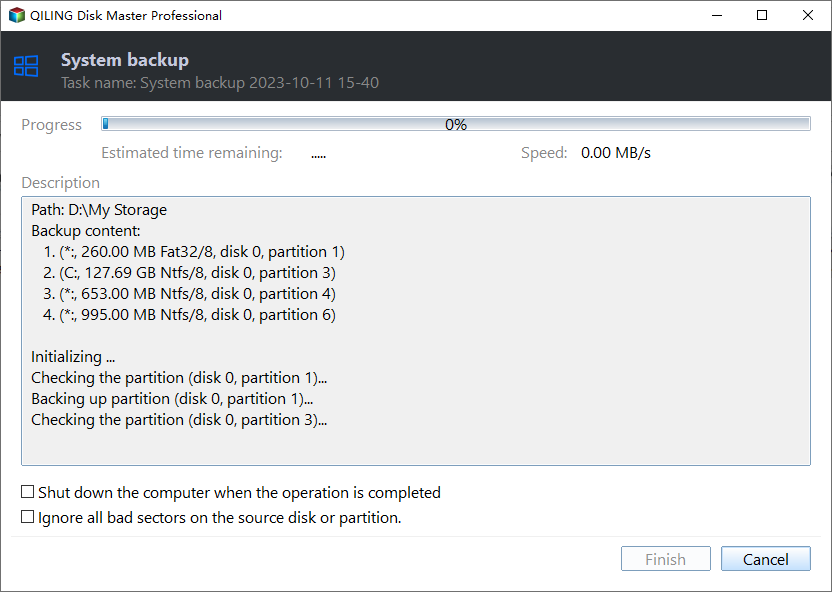
Step 5. After completing the backup process, you can check the backup status, recover, open, or delete the backup by right-clicking the backup task on the left.
The Bottom Line
If your computer turns on but has no display, you can try resetting the BIOS, checking the display cable, using the built-in display, or using an external monitor. If none of these methods work, you can try using a USB-to-VGA adapter or a USB-to-HDMI adapter to connect your computer to a monitor. If you're still having trouble, it's possible that the issue is with the computer's graphics card or motherboard, and you may need to seek further assistance from a professional.
After fixing the issue, create a computer backup to ensure your data is safe and can be easily restored. Consider using Qiling Disk Master Pro to make the process smooth and hassle-free.
FAQs
1. Can RAM cause no display?
If your computer won't start up and has a blank screen, it's possible that it's due to a lack of RAM. Try replacing the RAM or resetting it if you suspect this is the cause of the issue.
2. Why is my PC not turning on but motherboard has power?
If your computer won't turn on, but the motherboard light is on, it could be due to a faulty power button on the case or a wiring issue connecting it to the motherboard. Check your motherboard to see if it has an inbuilt power button, which might be the culprit.
Related Articles
- How to Erase All Content and Settings on Mac [macOS Ventura/Monterey]
- How to Solve the Mac Error Code 100006 [ 8 Proven Ways]
- How to Connect HP Printer to WiFi? Follow A Full Guide
- Fix macOS Could Not Be Installed on Your Computer (8 Ways)
- Universal Control Not Working? How to Fix on Mac/iPad
Consider this article to learn about the Universal Control not working error on the macOS and iPadOS. If you're wondering how to fix Universal Control not working on macOS, it shows the top 6 ways to eliminate the error. - [100% Working] 3 Easiest and Successful Ways to Unprotect Excel
If you've forgotten the password for your Excel sheet, don't worry - there are ways to unprotect it. You can try one of three methods to regain access to your file, and it's a good idea to make a backup of the original file in case you need it.