Universal Control Not Working? How to Fix on Mac/iPad
If you're experiencing issues with Universal Control not working on your Mac or iPad, try restarting both devices, ensuring they're on the same Wi-Fi network, and checking for software updates. You can also try disabling and re-enabling Universal Control, and if the problem persists, you may need to reset the Universal Control settings. Additionally, ensure that your Mac and iPad are running the latest versions of macOS and iPadOS, respectively.
| Workable Solutions | Step-by-step Troubleshooting |
|---|---|
| 1. Enable Universal Control on macOS/iPadOS | Visit Settings to make sure Universal Control is enabled. After that, select General. Toggle on the cursor...Full steps |
| 2. Turn on Bluetooth, WiFi, and Handoff on Apple Devices | Hit the Wi-Fi symbol located on the upper menu bar. Switch on the Wi-Fi. Visit the Apple menu...Full steps |
| 3. Adjust Firewall Settings on Mac to Fix Universal Control | Head over to System Settings. Choose Network. Select Firewall. Generally, a firewall is a credible...Full steps |
| 4. Turn Off Antivirus Software and VPN to Troubleshoot | Go to System Settings. Choose Network. Select VPN, and toggle it off. Visit Settings...Full steps |
| Other Solutions | Select the Apple menu. Hit the System Settings. Hit the Display icon in the sidebar. Tap the pop-up...Full steps |
Why Universal Control Not Working on macOS, iPadOS
Apple Universal Control is a feature that allows seamless communication and multitasking between an iPad and a Mac, making it easy to work with multiple Apple devices.
If you're experiencing issues with Universal Control not working between macOS and iPad, there are several potential reasons. These include issues with Wi-Fi connectivity, Bluetooth pairing problems, or software updates not being applied correctly. Additionally, there might be conflicts with other devices or apps on your system. To resolve the issue, try restarting your devices, checking your Wi-Fi and Bluetooth connections, and ensuring that all software is up to date.
1. Your devices aren't using a similar Apple ID. Apple devices are often logged into separate accounts, allowing multiple users to have their own unique experience and settings on the same device. This is a common practice, especially in shared living spaces or work environments, to maintain individual preferences and data privacy.
2. The devices have a bug in the software. Universal Control may not work properly due to software glitches.
3. The Apple devices aren't consistent with Universal Control. It implies you might be using an outdated iPad or macOS. On the other hand, you haven't updated the OS. Also, Universal Control isn't compatible with all Mac devices, which might lead to a "Universal Control not working" error. It needs iPadOS 15.4 and macOS Monterey 12.3 to function properly. However, these are the supported devices: iPad Pro (2020 or later), iPad Air (4th generation), iPad (6th generation or later), and Macs with M1, M1 Pro, M1 Max, or M1 Ultra chip.
- MacBook Air (2018 and later)
- MacBook Pro (2016 & later)
- MacBook (2016 & later)
- iMac Pro
- iMac (2017 & later)
- Mac Mini (2018 & the recent versions)
Now that you understand why Universal Control isn't working, it's time to learn how to fix the issue on macOS and iPadOS. Let's get started!
How to Fix Universal Control Not Working Issue [6 Methods]
If Universal Control is working slowly on your macOS, you can try fixing it by going through these solutions below.
Method 1. How to Enable Universal Control on macOS/iPadOS
To enable Universal Control on iPad OS and macOS, go through the setup process on each device you want to access it from, and you'll be able to use it hassle-free.
How to enable Universal Control on iPadOS:
Step 1. Visit Settings to make sure Universal Control is enabled.
Step 2. After that, select General.
Step 3. Toggle on the cursor and keyboard.
How to enable Universal Control on macOS:
Step 1. On macOS, head over to the Apple menu.
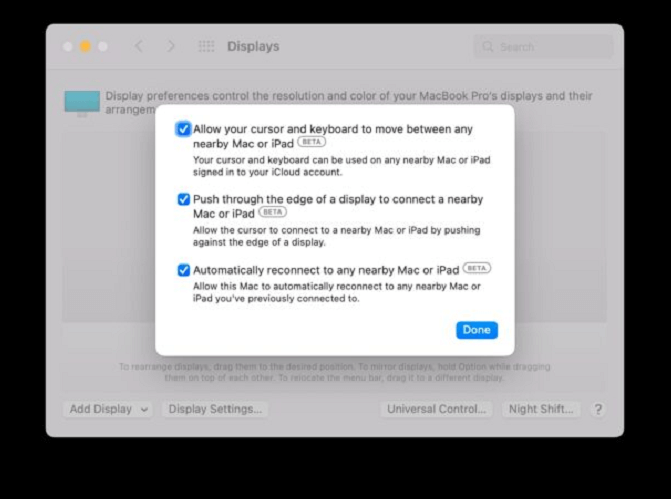
Step 2. To enable Universal Control, go to Settings (Ventura) or System Preferences (Monterey) > Displays > Advanced/Universal Control and check the boxes to turn it on.
Step 3. To set up the iPad and Mac displays, organize them on the Mac and in the Displays preference panel, mirroring your physical workstation setup.
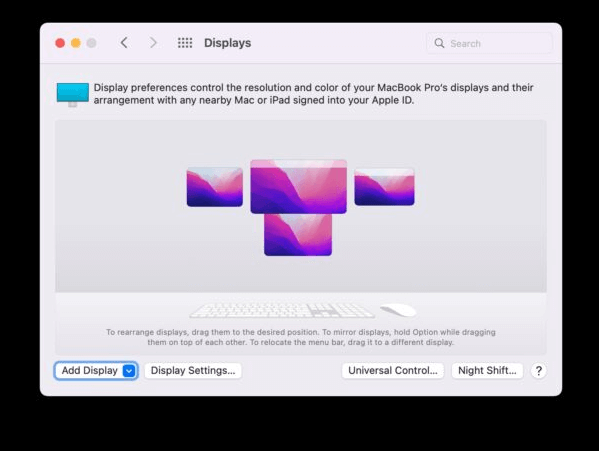
Step 4. To add devices to this Universal Control, go to the bottom left of the Mac display system preference panel, pull down the menu, and select "Add Display".
Step 5. To insert an additional iPad or Mac to link a keyboard and mouse, select the device you want to link from the list of available devices, then click the "Add" button to add it to the list. This will allow you to connect a keyboard and mouse to the additional device, enabling you to use it as a separate workstation.
Step 6. With Universal Control enabled, you can extend your Mac cursor to other devices by dragging it to the screen's corner and keeping it extended until it appears on the iPad or Mac's display.
To enable Universal Control on Mac, follow these steps: 1) Ensure both Macs are running macOS 12.3 or later, and they're on the same Wi-Fi network. 2) Go to System Settings > Displays > Arrangement.
2. Turn on Bluetooth, WiFi, and Handoff on Apple Devices
To fix Universal Control not working error, enable Universal Control on your device, then turn on Wi-Fi, Bluetooth, and Handoff on your Mac and iPad. To do this, follow the steps below:
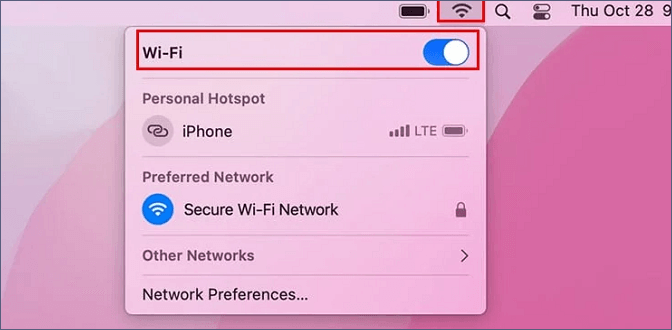
How to turn on Wi-Fi on Mac:
Step 1. Hit the Wi-Fi symbol located on the upper menu bar.
Step 2. Switch on the Wi-Fi.
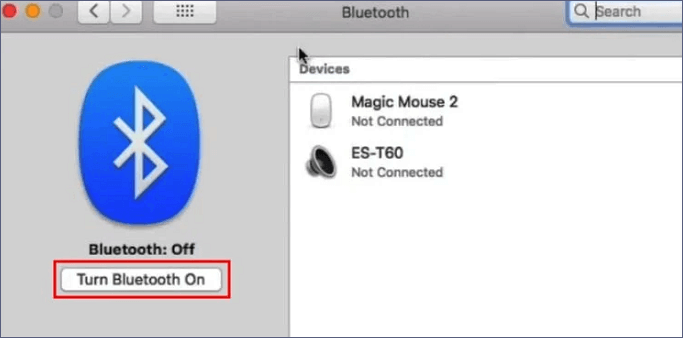
How to turn on Bluetooth on Mac:
Step 1. Visit the Apple menu.
Step 2. Hit "System Preferences".
Step 3. Opt for Bluetooth.
Step 4. If Bluetooth shows as Off in the left panel, click the Bluetooth turn-on button to turn it on.
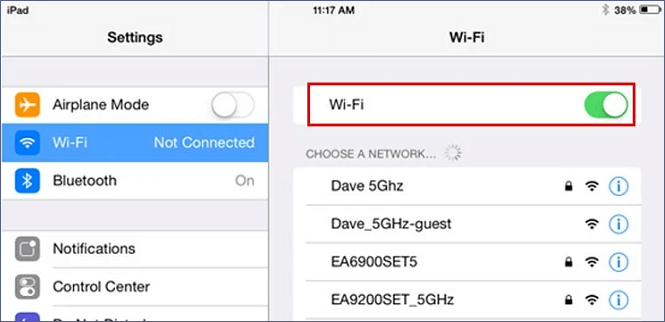
How to turn on Wi-Fi on iPad:
Step 1. Visit Settings.
Step 2. Hit the Wi-Fi button.
Step 3. Toggle Wi-Fi on.
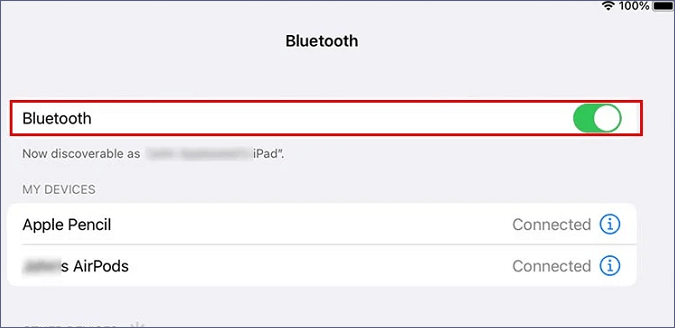
How to turn on Bluetooth on iPad:
Step 1. Open Settings.
Step 2. Head over to Bluetooth.
Step 3. Switch Bluetooth on.
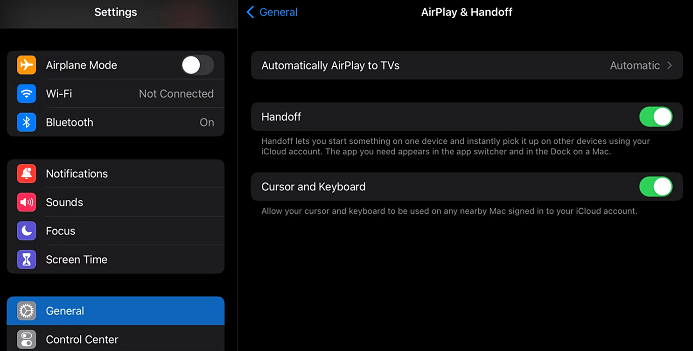
How to turn on Handoff on iPad/Mac:
To enable Handoff on your iPad and Mac, open the Settings app on your iPad and go to General > Handoff, then toggle it on. On your Mac, go to System Preferences > General and make sure the toggle next to Allow Handoff between this Mac and your iCloud account is turned on.
Step 1. Go to Settings on your iPad.
Step 2. Select General.
Step 3. Hit Airplay & Handoff.
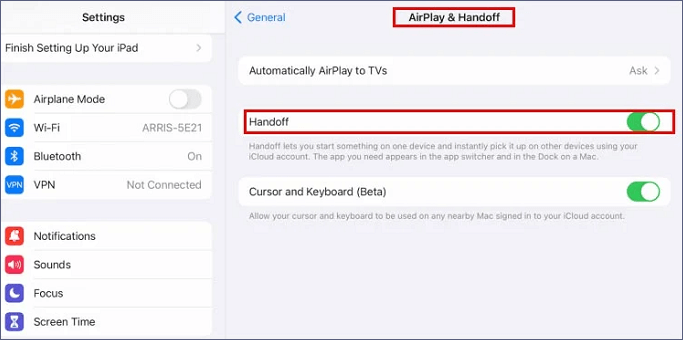
Step 4. Turn the cursor and keyboard off.
Step 5. Switch it on again.
3. Adjust Firewall Settings on Mac to Fix Universal Control
To troubleshoot the Universal Control not working error, check if the firewall is turned on and blocking the iPad's Universal Control. If the firewall is enabled, try adding an exception for Universal Control to allow incoming connections. You can do this by going to your firewall settings and adding the necessary permissions. This should resolve the issue and allow Universal Control to work properly.
Step 1. Head over to System Settings.
Step 2. Choose Network.
Step 3. Select Firewall.
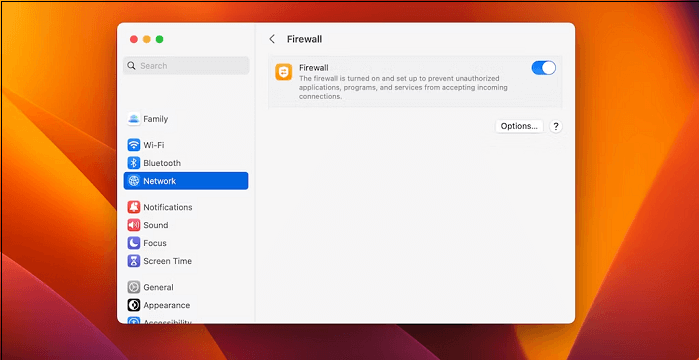
A firewall is a reliable security feature that should be enabled unless it causes problems with the features or applications you use.
4. Turn Off Antivirus Software and VPN to Troubleshoot
In order to resolve the issue with Universal Control not working properly, you should check the network settings on your MacBook Pro. If you have modified your Wi-Fi and Bluetooth settings, this may be the cause of the problem. Additionally, ensure that your VPN is turned off, as this can also interfere with Universal Control. To disable your VPN, follow the steps below:
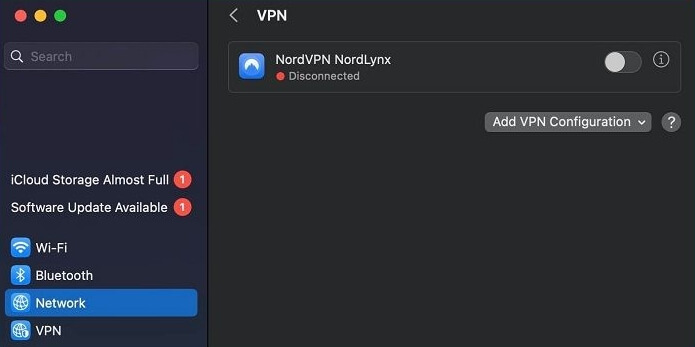
Step 1. Go to System Settings.
Step 2. Choose Network.
Step 3. Select VPN, and toggle it off.
How to turn off VPN On iPad:
Step 1. Visit Settings.
Step 2. Select VPN, and disable it.
How to turn off antivirus on Mac:
Step 1. Access the Spotlight search box with the Mac Spotlight shortcut.
Step 2. Type the antivirus name.
Step 3. Hit the antivirus symbol, and it will quickly pop up.
Step 4. To disable the interface, tap the disable button once the interface is on the screen.
Step 5. Tap on it, and confirm your preference by hitting OK.
5. Add a Display Manually on Mac When Universal Control Not Working
To manually incorporate a Display on Mac or wirelessly connect the Mac to other devices, such as specific Smart TVs or another MacBook, and utilize those as displays, follow these steps:
Step 1. Select the Apple menu.
Step 2. Hit the System Settings.
Step 3. Hit the Display icon in the sidebar.
Step 4. The user needs to tap the pop-up icon on the right side underneath the Mac's name.
Step 5. Finally, opt for "add display".
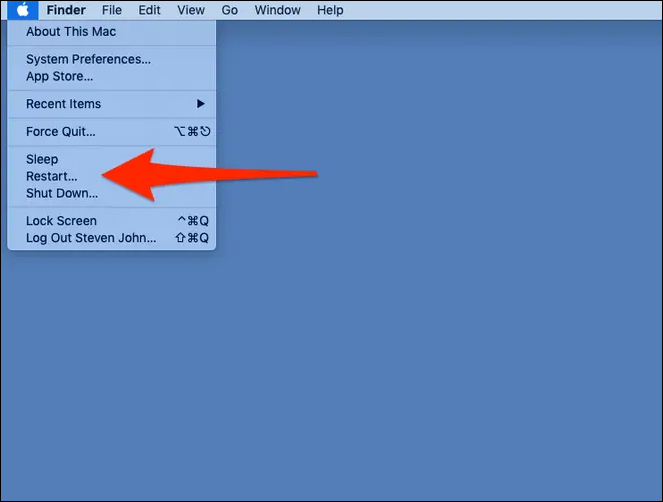
6. Restart Your Mac Devices to Fix Universal Control
To revive your sluggish MacBook, restart it by pressing the Power button for 10 seconds or holding down the Command (⌘) + Option (⌥) + Power buttons. This will force your Mac to shut down and restart. If your MacBook is unresponsive, you can also try pressing the Power button for 10 seconds to force a shutdown. If you're using an iPad, press and hold the Sleep/Wake button for at least 10 seconds to force a shutdown.
How to restart a Mac device:
Step 1. Restart your MacBook Pro/Air normally.
Step 2. Hold down the Shift button.
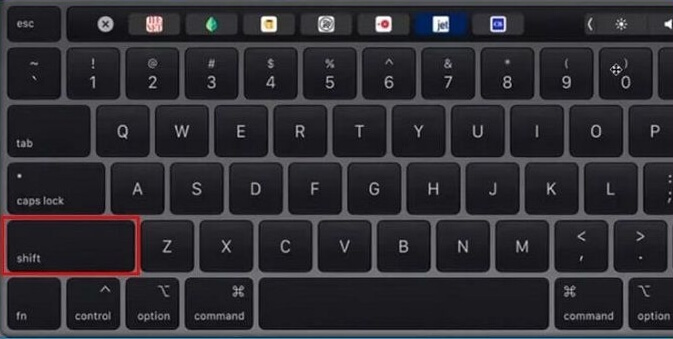
Step 3. Release this button upon the login window pops up.
Step 4. Login to your device.
Step 5. In case you're asked to log in again, do that.
How to restart an iPad:
Step 1. Keep pressing the volume and power button together.
Step 2. Release the keys until you see the Apple logo.
Step 3. The iPad must restart now.
How to Recover Data Lost on Mac Because of Universal Control
After following the steps to fix the Universal Control not working error, you should have resolved the issue. However, if you experienced data loss during the process, a professional data recovery tool can help you recover your data quickly.
Deep Data Recovery for Mac is a tool that can recover all types of lost data, including files deleted accidentally, from the emptied Trash Bin, and more.
The standard data loss scenarios are the following, which prompted the need for a professional tool. These scenarios include the inability to recover data due to hardware failure, software corruption, or human error, resulting in data loss or corruption.
- Recover the unmounted hard drive on Mac.
- Retrieve lost data when you encounter an operation error.
- To recover data from a formatted hard drive on a Mac, you can use the Disk Utility tool or third-party software like Disk Drill or Deep Data Recovery Wizard. These tools can scan the drive for recoverable files and allow you to select and save them.
- Restore lost files and folders after a repartition.
- Recover lost data if you accidentally restore the macOS Ventura/Monterey
You can recover photo, video, and backup files using this Mac file recovery system. To get started, simply download Deep Data Recovery for Mac and follow the steps to recover your lost data.
Step 1. Select the location to scan
Launch Deep Data Recovery for Mac, select the storage device where data was lost, and click "Search for lost files" to initiate the scanning process.
Note: Before attempting data recovery, it's recommended to create a backup of your Mac by clicking "Disk Backup" from the left sidebar to avoid further data loss. After backing up, the software can recover data from the Mac backup, allowing your computer to write new data again.

Step 2. Filter lost Mac data
The software automatically scans for lost data on MacBook/iMac, and once the scan is complete, you can filter the found data by type and path using the provided buttons.

Step 3. Recover lost data or files
Double-Click a file to preview it, then click "Recover" to restore lost data to another location.

Summary
Apple aims to make users' lives simple and convenient by offering features like Universal Control, which allows for seamless interaction between Apple devices. This feature enables users to control multiple devices with a single mouse, keyboard, or trackpad, making their daily routine more efficient and hassle-free.
Working with these cutting-Edge features can be thrilling when they work as intended, but sometimes technological issues arise. However, these issues are often fixable with the right troubleshooting steps, such as restarting the device, checking for software updates, and ensuring proper internet connectivity. By following these simple fixes, users can often resolve the problem and get back to enjoying the benefits of edge features.
Most of the time, the only thing needed is a fundamental understanding of the most frequent issues and what solutions to try while resolving them. However, if data has been lost during this process, it's recommended to download Deep Data Recovery for Mac.
Universal Control Not Working FAQs
Consider the below-Universal Control is not working due to issues with the connection between your Mac and your Apple device. This can be caused by a variety of factors, including software glitches, hardware incompatibility, or incorrect setup.
1. Can I factory reset Mac to make Universal Control work again?
A factory reset on a Mac will erase all content and settings, including files, settings, apps, profiles, and other details, which can resolve the Universal Control Not Working error.
2. Why is Universal Control not working on macOS?
The main reason Universal Control isn't working on macOS is due to an outdated OS version. To use Universal Control, the OS version must be compatible with it. Unfortunately, older OS versions aren't suitable for Universal Control, so updating to the latest version is necessary.
3. Does macOS 12.3 add Universal Control?
Apple's new Universal Control feature allows users to control up to three Apple devices with a single mouse and keyboard, effectively turning them into one large computer. This feature was introduced in iPadOS 15.4 and macOS Monterey 12.3. Users can now transfer files between devices and use them as a single, expanded computer.
4. How to fix Universal Control not working on iPad?
You may turn on Bluetooth, Wi-To troubleshoot Universal Control not working issue on your iPad, go to Settings > General > Reset and tap on "Reset all settings". Then, go to Settings > General > Transfer or Reset iPad and tap on "Reset iPad".
Related Articles
- How to Fix SanDisk SSD Slow Error [2024 Ultimate Guide]
- How to Use Mac to Format External Hard Drive, Everything You Should Know
- Mac Won't Turn on After macOS Sonoma Update [Why & How to Fix]
- [Tried & True] How to Download and Update USB Drivers in Windows 10
- Sorry, No Manipulations with Clipboard Allowed on Mac [with 5 Proven Fixes]
Are you facing Mac's frustrating 'Sorry, no manipulations with clipboard allowed' prompt? You'd be glad to know that we can help you with this. Here's how! - How to Split Your Screen on a Windows 10/11? [Step by Step]
This guide explains how to split screen on Windows using snap layouts and shortcuts.