Mac Won't Turn on After macOS Sonoma Update? How to Fix
What Causes Mac Won't Boot After macOS 14 Update
If you've encountered a Mac that won't turn on after the macOS Sonoma update, it can be difficult and prevent you from accessing your data. The update may have caused a problem that's preventing your Mac from booting up properly, which can be a major issue if you have important files or programs stored on the device. To resolve this issue, you may need to perform a system restore or reinstall macOS, or try other troubleshooting steps to get your Mac up and running again.
If your Mac won't turn on after upgrading to macOS Sonoma, don't worry! This article will guide you through the process of recovering data from an unbootable Mac and provide solutions for when your MacBook fails to launch. There are four main reasons why your MacBook might not be booting after the macOS 14 update: you can check if your Mac is having issues with the boot process, or if there's a problem with the power supply or charging port, or if the update has corrupted your system files, or if there's a hardware issue with your MacBook's logic board or other components.
🖥️Malfunctioning display. After the macOS Sonoma update, your MacBook's display may become extremely dim or unviewable, but adjusting the screen brightness might resolve the issue. However, if the problem persists, it could be due to corrupted hardware, which may require replacing or repairing the display.
❌Software glitches. Software errors on some third-party MacBook applications cause this black screen error. Others might cause your MacBook to be unresponsive. In that scenario, you must force quit the troublesome app.
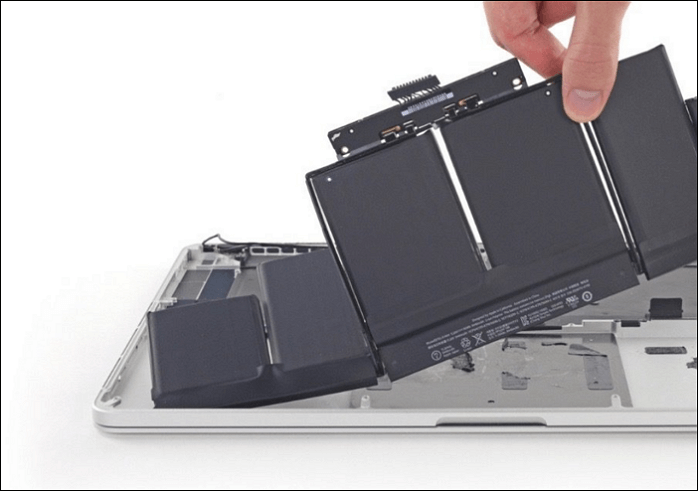
🔋Drained battery. After the macOS Sonoma update, your MacBook may not turn on due to a drained battery, which can happen if it hasn't been charged in days. To resolve this issue, simply plug in your MacBook to charge it. Once it's charged, it should turn on normally.
💻Startup processes. When you update your MacBook, some apps and processes are set to run automatically at startup. If there's an error with one of these startup items, it can prevent your MacBook from turning on. This issue can occur after a software update, and it's often due to a malfunctioning startup item that's trying to load.
Recover Data from Unbootable Mac [First Thing] 🏅
If your Mac won't turn on after the macOS Sonoma update, you can try recovering data from an unbootable Mac using professional data recovery software. This method can help you quickly retrieve crucial files.
Qiling Data Recovery Wizard for Mac Pro is a software that can recover data from an unbootable MacBook, fulfilling all data recovery needs. It is an excellent and useful tool for retrieving data.
The main highlights of this software are given below:
- To recover files from a Mac that won't boot, you can create Qiling data recovery wizard bootable media to retrieve files that are inaccessible due to the boot issue. This allows you to bypass the boot problem and access the files directly.
- Recover all your personal files from an unbootable Mac with the help of a reliable data recovery software that supports video recovery on Mac, photo recovery, document recovery, and more.
- If you're experiencing issues with updating your device, such as recovering missing photos after the macOS Sonoma update, you can recover your data.
Qiling is a powerful data retrieval software that can restore data after the macOS Sonoma upgrade fails, helping to recover data in case of Mac unbootable errors caused by a sudden upgrade stop.
Step 1. To recover data from a Mac that won't boot, install and run Qiling Data Recovery Wizard on another Mac, then select the "Unbootable Mac > Start" option.
Step 2. To create a bootable disc, select a prepared USB drive and click "Next" to begin the process.
- Warning
- The creator will prompt to erase the drive to reallocate the space, then write the bootable files to this drive. Please back up all USB files before processing "Eraser" to avoid data loss.
Step 3. The program creates a 2GB space on the USB drive and saves the boot files there, leaving the remaining space available for storage.
Step 4. Once it completes, follow the guide to boot the corrupted Mac from a bootable disc and start the recovery process, then restore the data to an external hard drive.
Step 5. After booting the Mac, launch Qiling Data Recovery Wizard for Mac. Select the disk location where you lost data and files, which can be an internal HDD/SSD or a removable storage device. The recovery tool will then automatically scan for the lost files.
Note: Before recovering data from a Mac, it's a good idea to create a backup of your computer to prevent further data loss. Once the backup is in place, the data recovery software can safely recover data from the backup, allowing your computer to write new data without risking further loss.

If you're looking for a reliable data recovery software for your macOS Sonoma device, this software can help you recover lost or deleted files, even if you've emptied the Trash or used other data recovery methods.
How to Fix Mac Won't Turn on After macOS Sonoma Update
Installing the macOS Sonoma can be a hassle, especially when it leaves your Mac unresponsive. If you're experiencing this issue, don't panic - you can try some solutions to fix the problem. Fortunately, there are ways to resolve the issue where your Mac won't turn on after the macOS Sonoma update. By staying calm and trying these nifty solutions, you can get your Mac up and running again.
- Fix 1. Check Mac Power Connection
- Fix 2. Force Restart Mac
- Fix 3. Reset NVRAM/PRAM on Mac
- Fix 4. Boot Mac into Safe Mode
- Fix 5. Repair Startup Disk in Recovery Mode
- Fix 6. Contact Apple Support
Fix 1. Check Mac Power Connection
If your MacBook Pro isn't turning on after an update, it's likely due to power issues caused by a power outage. Try turning it on and see if you can hear a startup chime or fan noises. If you can't, it's probably due to a power connection problem, so try the following fixes:
- ⭐To ensure the charger cable, wall outlet, and adapter work together smoothly, simply check that the cable is securely connected to both the adapter and the device, and that the adapter is properly plugged into a wall outlet. This will guarantee a stable and efficient charging experience.
- ⭐If you're using a MacBook, make sure to charge the battery for a while before using it to avoid a dead or low battery, which can cause inconvenience and potentially lead to data loss or other issues.
- ⭐Hit the power button again to restart your Mac.
If your MacBook starts up with the startup chime but doesn't boot, try a power cycle by unplugging it, waiting 30 seconds, and then plugging it back in to restart from the beginning. This process can resolve the issue.
To resolve the issue where your MacBook won't turn on after the macOS 14 update, perform a power cycle by unplugging the power cord, pressing and holding the power button for 10 seconds, and then plugging the power cord back in. This simple procedure can often resolve the issue by clearing any temporary software glitches that may have occurred during the update process.
Step 1. Hit the "power" button, and press down for 10 seconds.
Step 2. Restart your Mac.
Fix 2. Force Restart Mac
If your MacBook is experiencing an error, try force restarting it by following these steps: Press the power button and hold it down for 10 seconds, then release it and press the power button again to turn it back on. This can help resolve the issue.
Step 1. To shut down a Mac, press and hold the power button until the computer completely turns off. This should take about 5-10 seconds, depending on the model.
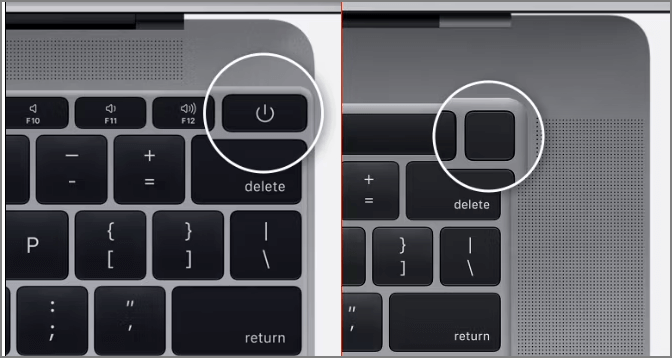
Step 2. Wait for some time, and let the Mac reboot.
If you like these fixes, be sure to share them with your friends on social media. (Note: I removed the "shortly" request as it's not a valid instruction)
Fix 3. Reset NVRAM/PRAM on Mac
To reset NVRAM/PRAM on your MacBook, simply turn it off, then press the power button while holding down the Command + Option + P + R keys. Hold these keys for 20 seconds, then release them. Your MacBook will automatically restart, and the NVRAM/PRAM will be reset. This process will restore your MacBook's default settings, including brightness and volume levels, and may resolve any update or boot errors.
Step 1. Turn your Mac off.
Step 2. To enable the Boot Camp Assistant on your Mac, press the keys "Command + Option + P + R" simultaneously. This will turn on your Mac.
Step 3. When you hear the restart chime, immediately press and hold down all the keys on the keyboard for at least 20 seconds. This will help to initiate the system recovery process.
Step 4. Now, your MacBook must start swiftly.
If the NVRAM reset is not working, you can try some alternative methods to clear the NVRAM. One option is to use the "nvram reset" command in the command line interface (CLI) of the device.
Fix NVRAM Reset Not Working on Mac
There are several ways to fix the "NVRAM reset not working" error. You can find detailed tutorials In this guide. Read more >>
Fix 4. Boot Mac into Safe Mode
If your Mac fails to start after a macOS 14 update, you can try booting it in Mac Safe Mode. This will only load essential programs during startup, allowing you to identify and remove any incompatible software that's causing the issue. To boot your Apple M1 MacBook Pro or Air into safe mode, follow these steps: 1. Press the power button to turn on your Mac.
Step 1. Turn your Mac off.
Step 2. To access the startup options and disks, press down the "Power" key until you see them on the screen.
Step 3. To boot your Mac in safe mode, press and hold the "Shift" button while booting up, then select "Continue in Safe Mode" from the boot menu. This will prevent any third-party kernel extensions from loading, allowing you to troubleshoot and identify issues with your system.
To boot a Mac into Safe Mode, you can hold the Shift key while turning it on. This will prevent any third-party kernel extensions from loading, and only the necessary system files will be loaded, allowing you to troubleshoot and isolate issues with your Mac.
Fix 5. Repair Startup Disk in Recovery Mode
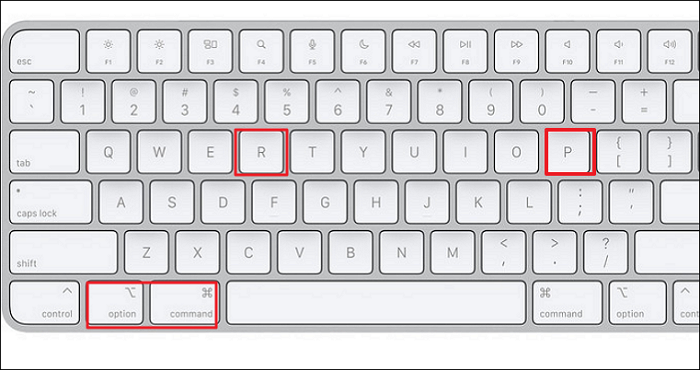
To boot your Mac into recovery mode, turn it off, then press the power button to turn it back on. Immediately hold down the Command (⌘) + R keys. Keep holding them down until the Apple logo appears and you see the Utilities window.
Step 1. To reset an Apple silicon Mac, press and hold the power button for 10 seconds until you see a startup options window.
Step 2. Opt for "Options" and hit the "Continue" button.
Once you're in the recovery window of macOS, you can use Disk Utility to repair your startup disk by selecting it and choosing "First Aid".
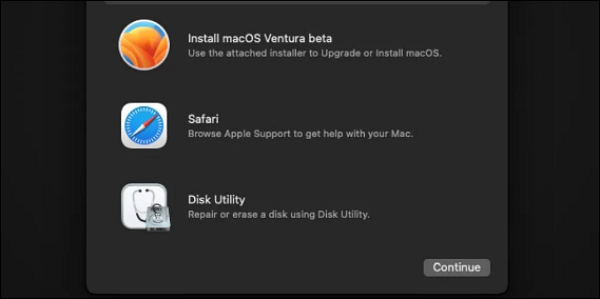
If you're willing to reinstall your macOS, you can opt to reinstall it in the macOS retrieval window. This process involves repairing the Mac disk, which can be done through the built-in Disk Utility app. To do this, restart your Mac and immediately hold down the Command (⌘) and R keys. This will boot your Mac into the macOS Utilities window.
How to Repair a Mac Disk with Disk Utility
This article discusses 5 free and simple ways to recover deleted files on Mac computers, whether the Trash can has been emptied or not, providing options for retrieval of lost data.
Fix 6. Contact Apple Support
If you've made it this far but are still unable to resolve the error, your MacBook may have some underlying hardware issues. It's recommended to contact Apple support for further assistance.

🔖Bonus Tip: How to Avoid macOS Sonoma Update Issues
You'll be prompted to upgrade your Mac each time the latest macOS Sonoma update becomes available, with an alert from the Software Update tab in System Preferences, asking if you want to install the updates immediately or schedule them for the next day.
To avoid potential issues when updating to macOS Sonoma directly from the Apple menu, it's advisable to take some precautions beforehand. This includes backing up your data, checking the system requirements for Sonoma, and ensuring your Mac is compatible with the new operating system. Additionally, it's a good idea to create a bootable clone or a Time Machine backup to ensure you can easily restore your system in case something goes wrong during the update process.
- Go through numerous reviews from techies. To get a heads up on potential issues with the new macOS version, it's helpful to read reviews from tech-savvy individuals who have already installed the update. This can give you an idea of any errors or problems that have arisen, allowing you to make an informed decision about whether or not to install the update yourself.
- Safe working of the Apple servers. To avoid macOS Sonoma update errors, ensure Apple's servers are functioning correctly by checking Apple's system status page.
- Ensure sufficient free disk space. To update your Mac to Sonoma, you'll need to ensure that your Mac has enough available disk space, whether it's an SSD or an HDD, to accommodate the update. This means having some free space on the drive to complete the installation.
If you're looking for ways to save money, consider implementing some of these tips. Start by reducing your energy consumption by turning off lights, electronics, and appliances when not in use.
To Wrap Up
If your Mac won't turn on after the macOS Sonoma update, try troubleshooting with these 6 methods, and don't forget to back up your data with Qiling Data Recovery Wizard to avoid losing it in case of software or hardware issues.
Back Up Your Mac and Never Lose Data
To back up and restore your MacBook or iMac without relying on Time Machine, iCloud, or external hard drives, you can use the built-in "Archive and Install" feature in macOS. This process creates a bootable backup of your Mac's startup disk, allowing you to restore your system to its current state in case of a problem.
Mac Won't Boot After Sonoma Update FAQs
Go through the FAQs below to understand the error more effectively:
1. What happens if my Mac dies during a macOS Sonoma update?
It's suggested to make an appointment at the Apple store as the problem may stem from corrupted key operation system files that were being updated when your Mac shut down.
2. How to recover lost files after macOS Sonoma update?
If you've lost data during the update to macOS Sonoma on your MacBook, you can recover the lost files with the help of Qiling Data Recovery Wizard for Mac.
3. What should I do if my MacBook is stuck on the loading screen after the macOS 14 update?
Press Command + Option + P + R keys to reset NVRAM/PRAM, which should resolve the Mac stuck on the loading screen error.
4. How to update macOS Sonoma correctly?
To update macOS Sonoma correctly, hit the Apple logo at the top of the screen, select system settings, go to General, and then software update. Alternatively, you can download macOS Sonoma from the App Store.
Related Articles
- How to Turn On/off Firmware Password on Mac [Fixed]
- How to Reinstall Failed/Cancled Updates in Windows 10
- How to Restore Missing Downloaded Files Steam
- [Fixed]Unable To Update Minecraft Native Launcher 2023
- Tape Backup VS NAS, Which One Is Better?
This page covers tape backup and NAS backup and elaborates on their pros and cons. It also tells when to use them. I hope it can help you make a suitable choice. - Tape Data Recovery Glossary
A comprehensive glossary of tape data recovery terms from A to Z, covering magnetic tape, recording, storage, and data retrieval concepts.