How to Fix "Disk 1 Removable No Media" Error [2023 Detailed Guide]
If your USB drive suddenly stops working when inserted into your PC, and you get an error message like "Disk 1 Removable No Media" when trying to access it, this post can help you resolve the issue.
This article explains what went wrong with a malfunctioning USB drive, how to retrieve data from it, and how to fix it, so it functions as it did before. The error causes are not specified, but a potential fix is described. Read on to find out more!
Why Does Disk 1 Removable No Media Appear
If Disk Management displays a USB drive as a "No Media" error, it means the PC can't normally connect with the drive, and you won't be able to access the stored data on the USB drive, which will appear empty to the PC. This issue can be caused by a faulty USB drive, a corrupted drive, or a driver issue, among other potential causes.
- If a bad sector exists on the USB drive, it will cause an error.
- A virus or malware infection on your USB drive can make it unusable, causing a "No Media" error, and potentially locking the drive.
- File system errors are fundamentally disk-related issues caused by damaged files, bad sectors, corrupted disk integrity, file execution policies, etc.
- Ensure that the USB drive is placed into the card reader if you use one or that the SD card is correctly inserted.
- A loose or bad connection to the USB port can cause the "No Media" error.
- If a USB drive is removed without being safely ejected, the files saved on it may become damaged.
- When USB ports are overloaded, such as when several USB drives are inserted, the USB may indicate 0 bytes and no media due to insufficient power supply.
So, these are the potential causes for the No Media error. Also, remember to format or wipe the hard drive before you reuse the old SSD or sell it. Let's move on to the fixes to solve the No Media error.
How to Fix Disk 1 Removable No Media Error
To resolve the "disk 1 removable no media error," try the following fixes: checking the drive bay for any obstructions, ensuring the drive is properly seated, and verifying the drive's power and data cables are securely connected. Additionally, check for any loose screws or missing screws on the drive and its mounting bracket. If the drive is removable, try removing and reinserting it. You can also try booting in safe mode or using a different drive to see if the issue persists.
- Fix 1. Check Bad Sectors and File System Error
- Fix 2. Enable/Reinstall USB in Device Manager
- Fix 3. Uninstall Disk Driver in Device Manager
- Fix 4. Run CHKDSK to Repair Errors
- Fix 5. Scan and Repair USB Errors in Windows Explorer
- Fix 6. Check the Power Source
- Fix 7. Check the USB Port
To check for bad sectors and file system errors, let's start with the first fix.
Fix 1. Check Bad Sectors and File System Error
Windows has limited capabilities when it comes to detecting and fixing bad sectors and file system errors, requiring a technical background to use the available tools. Fortunately, there are professional software options available that offer an easy-to-use interface, making it simpler to identify and resolve these issues.
Qiling Disk Master Professional is a partition management tool that allows users to perform various operations on their hard drive partitions, including checking for bad sectors and file system errors, and supports all Windows versions.
Now, let's use it to check bad sectors first.
Step 1. Open Qiling Disk Master, right-click the target disk, and select "Surface Test".
Step 2. The operation will be performed immediately, and all bad sectors will be marked red.
To fix file system errors using Qiling Disk Master, follow these steps: First, open Qiling Disk Master and select the drive you want to scan from the drop-down menu. Then, click on the "Scan" button to start the scanning process. Once the scan is complete, Qiling Disk Master will display a list of errors found on the drive.
Step 1. Right-click the target partition that has a problem.
Step 2. Choose "Advanced" > "Check File System".
Step 3. Confirm if you want to hide the partition or not.
Step 4. In the Check File System window, select the "Fix the error on the disk" option.
Step 5. Click "Proceed" to check errors on your partition.
Why Qiling Disk Master Tool
The reasons for choosing this tool are as follows:
- This feature checks the file system for errors and fixes any issues that are found, allowing for a clean and error-free file system.
- The surface test feature allows you to check the hard drive's surface for bad sectors, which can cause data loss and system crashes. This test scans the drive's surface to identify any bad sectors and can help prevent data loss and system crashes.
- This feature allows you to repair the file system if it becomes damaged or corrupted, making it functional again.
- Wipe partition: This feature securely deletes data on a hard drive or unallocated space, making it difficult or impossible to recover, ideal for securely wiping a hard drive before selling or other sensitive data disposal scenarios.
The Qiling Disk Master tool offers several key features. It allows users to check their disks for errors and fix issues such as the No Media error by checking for bad sectors and file system errors. This can help resolve problems and maintain the health of their disks.
Fix 2. Enable/Reinstall USB in Device Manager
To enable or reinstall USB in Device Manager, go to Device Manager, find the USB controllers, right-click on them, and select "Uninstall device". Then, restart your computer, and Windows will automatically reinstall the USB drivers. Alternatively, you can enable USB by right-clicking on the USB controllers, selecting "Enable device", and then restart your computer.
Step 1: To open the Device Manager window, go to the Windows Start search bar, type "Device Manager", and click on the result.
Step 2: To access the USB device, scroll down and click on the side arrow next to the option "Universal Serial Bus controllers", then select your USB device with the name "USB Mass Storage".
Step 3: Right-click on the USB Mass Storage device in the Device Manager and select Uninstall from the drop-down menu if there is an arrow or red mark next to it. If not, it's already enabled, so proceed with the uninstallation.
To install the USB driver, first, plug in the USB drive. Then, the system will automatically detect the USB drive and prompt to install the USB driver. Next, click on the "Install" button to confirm the installation.
Fix 3. Uninstall Disk Driver in Device Manager
To uninstall hidden devices from Device Manager, follow these steps: Open Device Manager, click on "View" in the top menu, and select "Show hidden devices." This will display devices that are not currently in use or are hidden.
Step 1: To view hidden devices in the Windows Device Manager, open the Device Manager, click on the View tab, and select the "Show hidden devices" option from the drop-down menu. This will display all devices, including those that are not currently in use or are disabled.
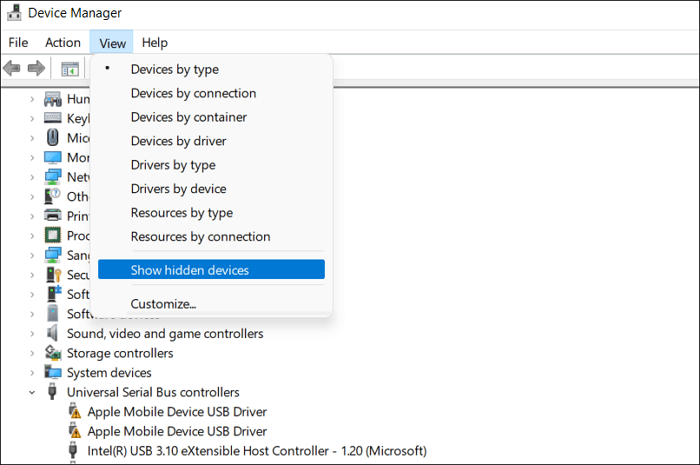
Step 2: To remove grayed-out disk drives, click the arrow next to Disk drives to expand it, then right-click on the grayed-out drives and select Uninstall device from the context menu.
Step 3: After uninstalling the devices, restart your PC, connect your USB, and check if the No Media error reappears.
Fix 4. Run CHKDSK to Repair Errors
The following method is to run the CHKDSK command via Command Prompt.
Step 1: To open Command Prompt as an administrator, type "Command Prompt" into the Windows Start menu, right-click on the searching result, and choose "Run as administrator".
Step 2: In the Command Prompt window, copy and paste the following commands and press Enter:
chkdsk M: /R (In place of M, type the drive letter of your USB drive.)
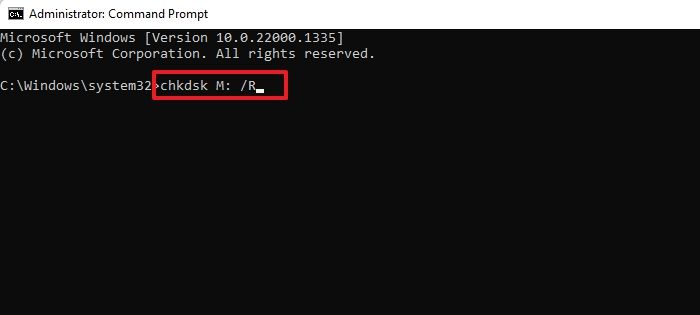
When the operation is complete, let it run and see if your PC detects it as a standard storage device.
Fix 5. Scan and Repair USB Errors in Windows Explorer
If you find out that your USB is infected by malware, perform the steps given below:
Step 1: To resolve the "No media" error on a USB drive in Windows Explorer, right-click on the USB drive and select Properties from the context menu. This will allow you to view and manage the drive's properties.
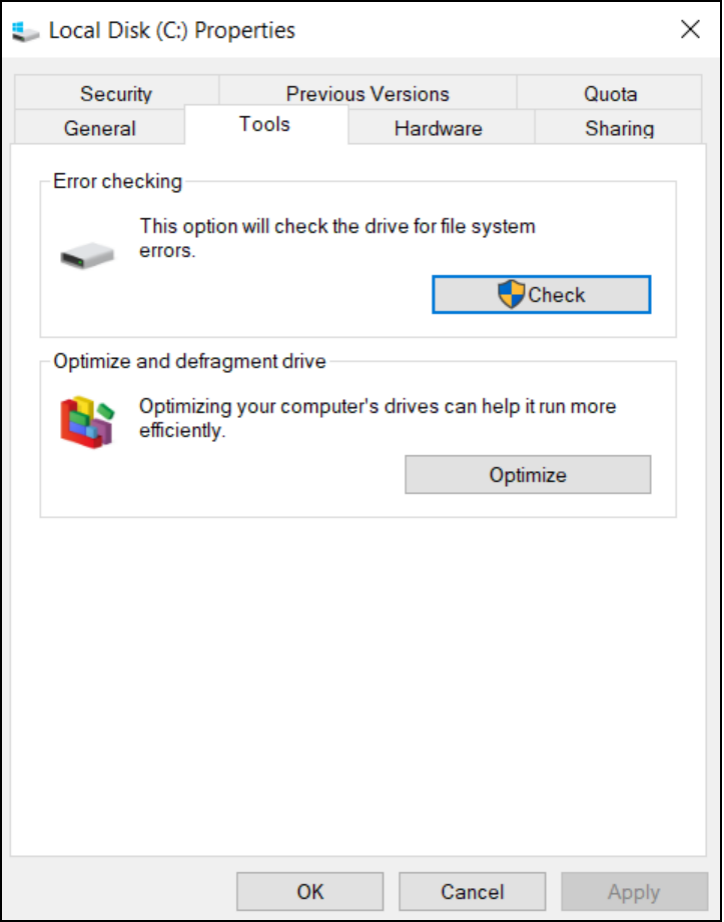
Step 2: To run a check on your document for errors, click on the Tools tab in the menu bar and then click the Check button located under the Error checking section.
Step 3: To get rid of malware from your USB drive, click on the "Scan and repair drive" option in the new window that appears.
After scanning, eject your USB drive, reconnect it, and check if the error reappears.
Fix 6. Check the Power Source
The Disk Management may indicate that a USB drive has no media if the USB connector is not providing enough power to the portable drive. This can be resolved by ensuring that only a few devices are plugged into the available USB ports, and also checking the USB cables for any power leaks.
Disconnect all other devices, reconnect the USB that had shown the error, and check if the issue is resolved.
Fix 7. Check the USB Port
To troubleshoot a USB drive that's not showing up, first, check if it's properly inserted and seated. Next, ensure the USB port the drive is connected to is in good condition by testing a different USB drive or connecting the device to a different USB port. If the issue persists, try using a USB drive with a different interface, such as a USB-C or USB-A, to rule out any compatibility issues.
Conclusion
If you're experiencing the Disk 1 Removable No Media error, try one of the following seven fixes. After performing one of these fixes, safely eject the drive, restart your PC, and reconnect it to see if the error has resolved.
This article provided a detailed explanation of the No Media error and its various causes, including issues with the DVD drive, incorrect DVD drive settings, and problems with the computer's BIOS. It also offered troubleshooting steps and solutions to resolve the issue, such as checking the DVD drive for physical damage, updating the BIOS, and adjusting the DVD drive settings. Users were encouraged to test these solutions and report back on their effectiveness.
You may also like:
Disk 1 Removable No Media FAQs
If you're experiencing the Disk 1 Removable No Media error, you might have questions about it. Here are some frequently asked questions and their answers to help you understand this issue better.
1. Why is my USB device not recognized?
The issue may be caused by a degraded or defective USB driver currently installed, or by a need to update your PC to resolve conflicts with Windows and a USB external hard drive, or by missing crucial updates due to hardware or software problems.
2. How do I fix disk 1 removable no media?
To fix the error, you can try using a different port for your USB, running checking tools to identify any errors, installing the latest media drivers, removing the device driver if it's not recognized, or changing the letter on your removable drive.
3. How do I find unrecognized USB drives?
To identify a problematic USB drive, open the Device Manager from the Windows Start menu, navigate to the Disk Manager window, and expand the Disk drives option. If the USB devices are listed as unrecognized, it indicates that you have found the problematic drive.
Related Articles
- How to Fix DXGI_ERROR_DEVICE_REMOVED on Windows 10/11 [Fixed]
- How to Increase Hard Drive Speed on Windows 10 [Step-by-Step Guide]
- [Solved] How to Fix Windows Update Error Code 0x8024402c
- How to Fix Installer Information on The Recovery Server Is Damaged?
- Xbox One Stuck on Green Screen? Causes & Quick Solustions!
Don't panic if your Xbox One gets stuck on a green screen - it's a common issue with a few simple fixes. The green screen of death can be caused by a variety of reasons, but usually, it's due to a software glitch or a hardware problem. To resolve the issue, try restarting your Xbox, checking for software updates, or performing a factory reset. - How to Fix 'It Looks Like You Don't Have Permission to Save Changes to This File' on Windows 11/10
If you're unable to save files and are getting an “It Looks Like You Don't Have Permission to Save Changes to This File” error, don't worry - it's an easy fix. Simply follow this guide to resolve the issue.