macOS Monterey Installation Failed? Here Are Trustworthy Fixes for You
If you're experiencing issues with macOS Monterey installation, don't worry! Check the table below for potential solutions to get your installation back on track.
| Workable Solutions | Step-by-step Troubleshooting |
|---|---|
| Fix 1. Make Sure Mac's Compatibility | The easiest solution to resolve the macOS Monterey installation failed issue is to check...Full steps |
| Fix 2. Restart and Reinstall Monterey | Sometimes, a simple restart might solve the macOS Monterey installation issue...Full steps |
| Fix 3. Stay in a Stable Network | Internet connection is essential for the download and installation of macOS Monterey...Full steps |
| Fix 4. Clean Up System Storage | There are several ways to clean system storage and make space for macOS Monterey installation...Full steps |
| More Fixes | The primary reason is that the Firewall might not be able to recognize the installation as safe...Full steps |
Why Did macOS Monterey Installation Fail
Users may experience a failed installation of macOS Monterey due to various reasons, including hardware incompatibility, software conflicts, or corrupted installation files. If the root cause is not identified, it may be challenging to apply the most effective solution, leading to further complexities.
Here are the reasons:
Reason 1. Low Storage Space
Apple requires at least 26 GB of storage space to install macOS Monterey, but only for systems with macOS Sierra or later. For older systems, you'll need 44 GB of space to ensure a smooth installation process.
Reason 2. Compatibility Issues
If your Mac is not compatible with macOS Monterey, you can't install it, so you'll need to check the models that do work with it, as older Macs can't support the current operating system.
Reason 3. Down Apple Servers
Sometimes, the installation problem might be due to the Apple servers. Go to the System Status page of Apple and see if the signal is green.
Reason 4. Bad Internet Connectivity
To download and install macOS Monterey, a strong internet connection is required, and the installation process will not proceed if the internet connectivity is poor.
How to Fix macOS Monterey Installation Failed
this guide has offered eight solutions for you to fix the macOS Monterey installation failed.
Fix 1. Make Sure Your Mac's Compatibility
The easiest solution to resolve the macOS Monterey installation failed issue is to check the compatibility, noting that older Macs are unlikely to be able to install the operating system as they may not support its features.
Check out the systems that show compatibility with macOS Monterey:
- Mac Pro (late 2013 and later)
- Mac Mini (late 2014 and later)
- iMac (late 2015 and later)
- MacBook Air (early 2015 and later)
- MacBook Pro (early 2015 and later)
- MacBook (early 2016 and later)
- iMac Pro (2017 and later)
Fix 2. Restart Mac and Try to Install Monterey Again
Sometimes, a simple restart might solve the macOS Monterey installation issue. You can try this for yourself.
To restart your Mac:
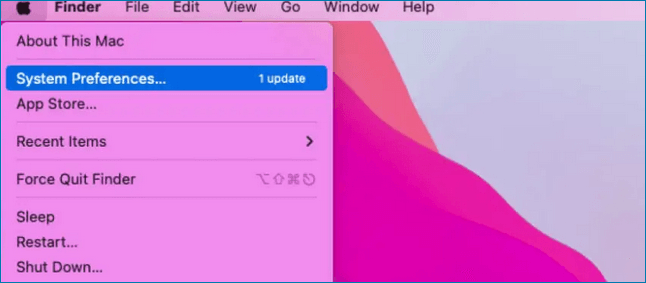
Step 1. Go to the "Apple menu".
Step 2. From the drop-down menu, select "Restart".
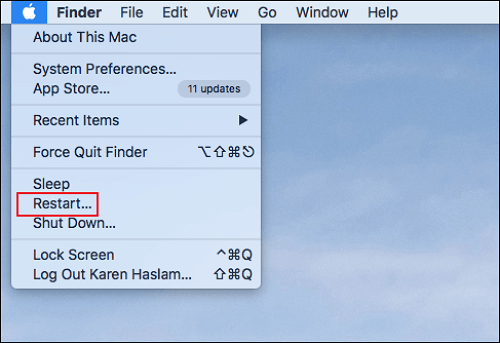
Step 3. Wait for the system to shut down and turn on.
To troubleshoot the issue, try installing macOS Monterey and see if the error still occurs. This will help determine if the problem is specific to your current operating system or if it's a more general issue.
- Notice:
- If your Mac isn't responding, you can force shut it down by pressing and holding the Power button until it turns off, then press the power button again to turn it back on.
Fix 3. Stay in a Stable Network Environment
A stable internet connection is necessary for downloading and installing macOS Monterey, so it's essential to check your network connectivity to resolve any installation issues.
If your internet connection is weak, try restarting it. If that doesn't work, contact your service provider. If you're using Wi-Fi, try switching to another network. If that doesn't help, consider other solutions.
Fix 4. Clean Up System Storage to Install macOS Monterey
To free up space for macOS Monterey installation, you can clean system storage in several ways. This includes deleting unnecessary files, uninstalling unused apps, and removing large files and documents that are no longer needed.
Take a look at these steps:
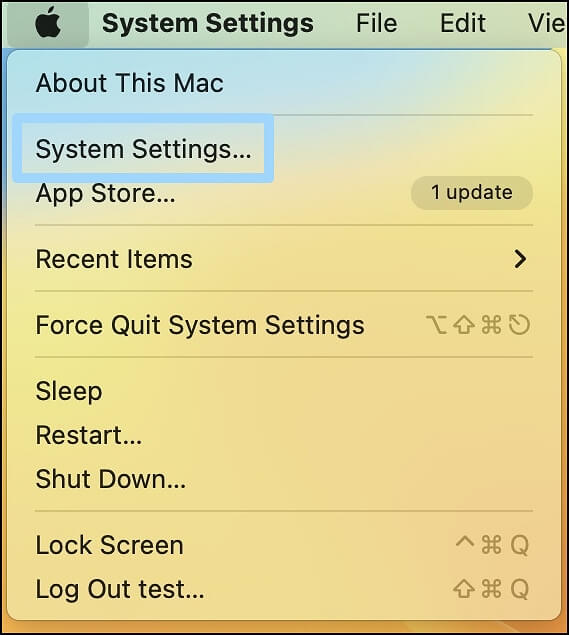
Step 1. Go to the "Apple Menu" and select "System Settings" from the drop-down menu.
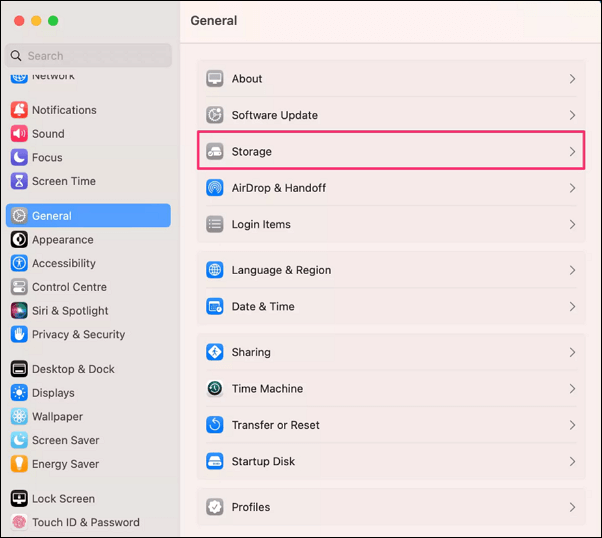
Step 2. You need to click "General" from the sidebar.
Step 3. On the right hand, click on the "Storage" option.
Step 4. Here, you will see all the storage-related information with recommendations to help you manage your storage. You can check your storage usage, free up space, and even upgrade your storage capacity if needed.
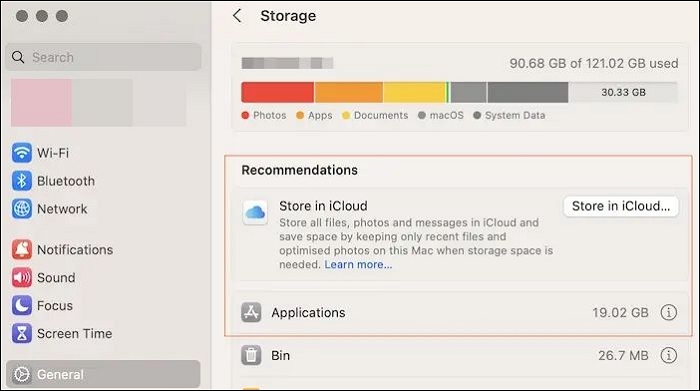
Apart from deleting files, there are other ways to free up space on your device. You can also uninstall unused applications, clear cache and temporary files, and automate the removal of items from the Trash after 30 days.
Fix 5. Adjust macOS Firewall Settings to Allow the Installation
Did you know your Firewall could block macOS Monterey installation? Surprised, right?
The Firewall may not recognize the installation as safe, which is the primary reason.
To adjust macOS Firewall settings, follow these steps:
Step 1. Go to the "Apple menu" and choose "System Settings".
Step 2. From the sidebar, click "Network".
Step 3. After that, choose "Firewall".
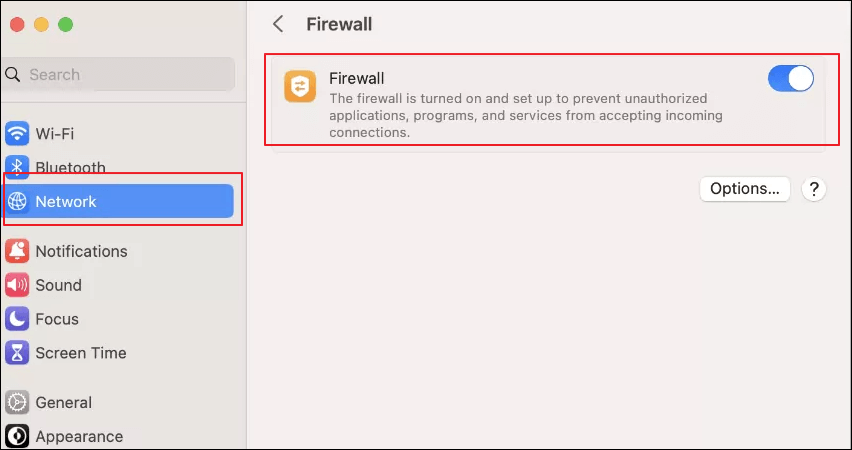
Step 4. Click on the "Options" button.
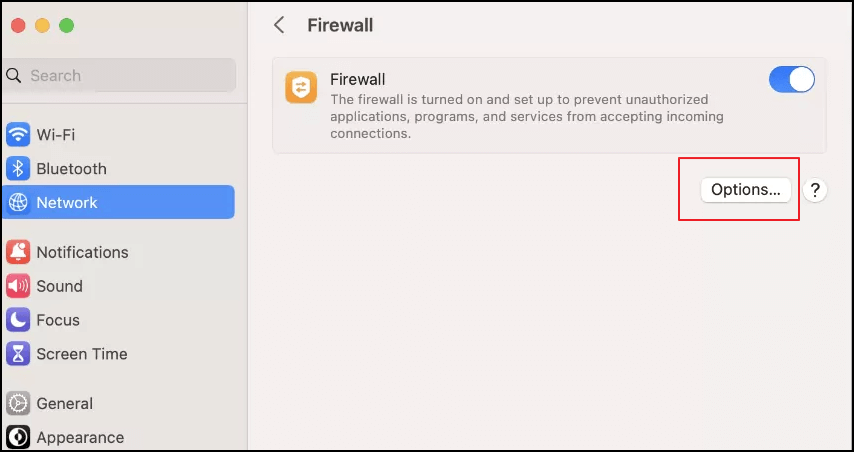
Step 5. Make sure to de-select "Block all incoming connections".
Step 6. Check the box that says "Automatically allow built-in software to receive incoming connections" and click "OK".

The issue with the computer not turning on may be resolved once the operating system is installed. This is because the operating system is responsible for booting up the computer and allowing it to function properly.
Fix 6. Install macOS Monterey in Safe Mode
To install macOS Monterey in Safe Mode, first, you need to boot your Mac in Safe Mode by restarting it and immediately holding down the Shift key. Then, follow the on-screen instructions to complete the installation. However, the exact steps may differ based on your Mac model, so it's essential to consult your user guide or Apple's official support resources for specific instructions.
For Intel-based Macs:
Step 1. Shut down the system, and then turn it on.
Step 2. At the same time, press the Shift key and hold it. The Shift key is usually located on the left side of the keyboard.
Step 3. When the login screen comes, release the Shift key.
You may need to log in more than once.
For Apple Silicon Macs:
Step 1. Shut down the system.
Step 2. Press the power button and hold it until the startup options appear.
Step 3. Select the "startup disk".
Step 4. Now, press the Shift key and hold it.
Step 5. Click "Continue in Safe Mode".
After the installation, go to the Apple menu, choose "System Preferences", click "Software Update", and install macOS Monterey.
Fix 7. Reset NVRAM/PRAM to Fix Issues
To fix the installation issue, you can try resetting the NVRAM/PRAM on your Mac. This can be done by pressing the power button, the Command (⌘) + Option (⌥) + P + R keys simultaneously and holding them for 20 seconds. This will reset the NVRAM/PRAM, which can sometimes resolve installation issues.
Step 1. Turn your system off.
Step 2. To turn on the Mac in recovery mode, press and hold the Option, C, P, and R keys simultaneously. This will allow you to access the recovery mode, where you can perform various tasks like reinstalling macOS, running disk utilities, or restoring from a Time Machine backup.
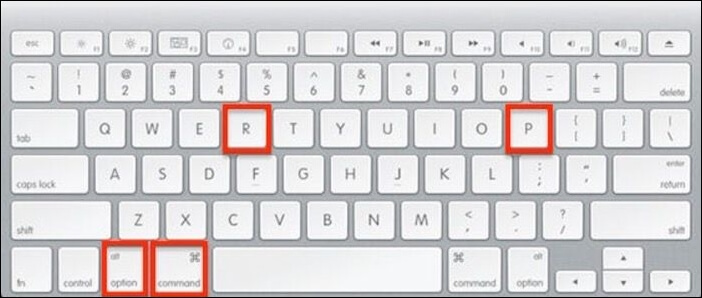
Step 3. Wait for the startup chime. When you hear it twice, release all the keys.
Now, try installing macOS Monterey.
Fix 8. Redownload and Install macOS Monterey
If you're experiencing issues with the downloaded version of an app, you can try deleting it and redownloading it from the Mac App Store. This may resolve the problem. To do this, simply delete the downloaded version and then go to the App Store, download the app again, and install it to see if the issue is resolved.
If you're experiencing issues, there are several solutions you can try. By applying these solutions, you may be able to resolve the problem. If this helps, consider sharing it with others so they can benefit from the solution as well.
Can I Recover Lost Data When Monterey Installation Failed
Mac updating can sometimes delete everything, and it's not uncommon for this to happen when trying to resolve issues. However, don't worry - your data can still be recovered even in these situations.
To recover lost data, consider using a powerful data recovery tool, such as Deep Data Recovery for Mac, which is efficient and user-friendly, even for first-time users, and offers a trial package to test its suitability.
Highlights:
- 💽Mac hard drive recovery software supports various Mac-based storage devices, including hard disk drives (HDD), solid-state drives (SSD), fusion drives, and more, to recover lost data from Mac devices.
- 📷It can recover lost or deleted files, such as helping you recover lost files after the macOS Monterey update.
- 🛠️Get remote IT support whenever you face any problem.
- 📂Recovering data is easy, and you can send it to cloud storage platforms like Google Drive or Dropbox with just a few clicks.
Qiling is easy to operate, allowing users to recover their data in just three steps.
Step 1. Select the drive to be scanned
In the main Deep Data Recovery window, select the drive you need to recover lost/deleted files from and click the "Search for lost files" button.
Note: Before attempting data recovery, create a backup of your Mac by clicking "Disk Backup" from the left sidebar to avoid further data loss. Once backed up, the software can recover data from the Mac backup, allowing your computer to write new data again.

Step 2. Select your lost data/files
Deep Data Recovery for Mac will immediately scan your selected disk volume and display the scanning results on the left pane, allowing you to sort and find specific files if needed.

Step 3. Recover lost/deleted data
Once you have located the desired files, preview them and then click "Recover" to initiate the recovery of your deleted or lost Mac files.

Summary
If you're experiencing issues with installing macOS Monterey, there are several potential causes and solutions. One possible fix is to reset NVRAM/PRAM, which can resolve problems related to hardware and software. Alternatively, you can try installing the OS in Safe Mode, which can help identify and address any issues that may be preventing a successful installation.
However, data loss can occur too, for which opting for professional data recovery software is an excellent idea. You can easily use Deep Data Recovery for Mac to restore data, and it is a practical, easy-to-use, and reliable data recovery tool.
If you haven't used Deep Data Recovery for Mac yet, download it now.
macOS Monterey Installation Failed FAQs
Here are the fixes for macOS Monterey Installation Failed in one paragraph:
1. How to fix the macOS Ventura installation failed?
To fix the macOS Ventura installation failure, try forcing a system restart, freeing up disk space, resetting PRAM/NVRAM, or applying other troubleshooting methods.
2. Why is the macOS 12 not installed?
macOS Monterey won't install due to various reasons such as low storage space, bad internet connection, or Apple servers being down.
3. How to clean up space for macOS Monterey installation?
To free up space for macOS Monterey installation, clear junk files, delete unnecessary files and apps, and optimize storage by using the Storage tab in System Preferences to see which files and apps are taking up the most space. This will help you identify what you can safely remove or move to a cloud storage service. You can also use the Optimise Storage button to automatically remove unused items. Additionally, consider upgrading to a larger storage drive if possible.
- Go to the Storage Management window,
- Check out the optimization recommendations.
- Store in iCloud, Optimize Storage, Empty Trash Automatically, and Reduce Clutter.
4. How to recover lost data when encountering Monterey installation issues?
A reliable data recovery tool like Deep Data Recovery for Mac can be essential when encountering Monterey installation issues, helping to recover lost data with ease. This efficient and user-friendly recovery tool aids users in retrieving data with simple steps, making it a valuable resource for those experiencing data loss.
Related Articles
- Best 8 Windows Temperature Monitor Software Free Download
- Tutorial on Diskpart Assign Drive Letter in Windows 11/10/8/7 [Detailed Guide]
- Macbook Pro Is not Charging? Find Your Solutions Here [2024 Updated]
- How to Fix Spotlight Search Not Working Ventura/Sonoma
How to fix Spotlight Search not working? Keep reading this article to know why a malfunctioned Spotlight Search option exists and the solutions below. Also, if you have lost data while implementing these fixes, there's a professional data recovery platform, Deep Data Recovery for Mac. - What Is A DLL File and Where Are DLL Files Located in Windows 10
A DLL file contains shared code that multiple applications can use to execute a specific action, and in Windows 10, these files are typically located in the System32 folder or the Program Files folder. - What Is a LAN (Local Area Network)? Definition, Types, & Benefits
A LAN (Local Area Network) connects devices within a limited area. Learn about LAN types, benefits, and how client-server and peer-to-peer LANs work.