What Is Volume Shadow Copy and How to Use It Correctly on Windows 11/10
Backups are essential for recovering from unfortunate events like accidentally deleting a file or losing an important document. To complement the Windows environment, Microsoft offers Shadow Copy, a feature that allows you to create backup copies on external or local volumes, providing a safety net for your data.
You can learn about all aspects of Volume Shadow Copy and how it works, enabling it easily and restoring any folders or files deleted by it.
Read on in detail about it to better cater to its issues.
What Is Volume Shadow Copy
The Volume Shadow Copy service, introduced by Windows in 2003, enables coordination among various components to create a backup of app-related data without taking it offline, and maintains consistency in creating a point-in-time copy.
How Does Volume Shadow Copy Work?
For a functioning Visual Source Safe (VSS), you need some essential components, including.
- The VSS Service ensures that other components communicate more effectively with each other and work together seamlessly.
- VSS Requester is software that assists in creating requests related to the actual development of VSS.
- VSS Writer is a component that ensures consistency in the data set for backing up.
- VSS Provider is another component that helps create and maintain shadow copies, using a copy-on-write function.
Functions
Volume Shadow Copy, often used for creating backups of data related to an app, has additional functions beyond backup. It can be used for other purposes.
- Restoration of LUNs, including their swapping and resynchronization.
- Mining of data by making use of shadow copies that are transportable.
- The process of restoring individual files that contain shadow copies related to shared folders involves a series of steps. Firstly, the user needs to access the shared folder and locate the specific file they wish to restore.
Advantages:
- It helps create access and copies of files while they are not in use, locked, or open.
- You can make changes to your shadow copies without disrupting your work, even when accessing or copying them.
Disadvantages:
- To create a Volume Shadow Copy, you must have some spare time before starting the file copying process. This is because the Volume Shadow Copy Service (VSS) needs to create a shadow copy of the volume, which can take some time to complete, depending on the size of the volume and the available system resources. Once the shadow copy is created, you can then proceed with the file copying process, which will be much faster since it will only be copying the data from the shadow copy, rather than the original volume.
Microsoft has Volume Shadow Copy (VSS) enabled by default, but if you're unsure if it's working or if it's been disabled, you can check and use it correctly in Windows 10.
How to Use Volume Shadow Copy in Windows 10 Correctly
You can enable Volume Shadow Copy by using the following methods.
- Method 1. Enable Volume Shadow Copy Using System Restore Points
- Method 2. Turn on Volume Shadow Copy Using Task Scheduler
Method 1. Enable Volume Shadow Copy Using System Restore Points
You can set Restore points for enabling volume shadow copy, such as daily, weekly, or monthly, depending on your preference.
Steps to Use:
Step 1. Locate the search box and type "Create a restore point". Make its selection. Then, choose "Choose a drive" from the System Properties and click on the "Configure" option.

Step 2. To enable System Protection, go to Settings, then click on System, and select "Storage" from the menu. Scroll down and click on the "System Protection" option, then toggle the switch to the "On" position. Click "Apply" to save the changes.
Step 3. To enable volume shadow copy using Windows 10, tap the "Create" option.
If the System Restore Points is not working, you can read the article below to solve the problem.
Windows 10/8/7 System Restore Points Not Working
When Windows System Restore isn't working, it often occurs after system updates, application installations, or malware/virus infections.
Method 2. Turn on Volume Shadow Copy Using Task Scheduler
To customize Windows 10 volume shadow copy by using a specific time, you can utilize Task Scheduler. You can start by enabling the shadow copy by following the given steps, which involve configuring the Task Scheduler to run a command to enable the shadow copy at a specific time.
Steps to Use:
Step 1. To open the Task Scheduler, start by tapping on "Start" and typing Task Scheduler, then select it from the list.
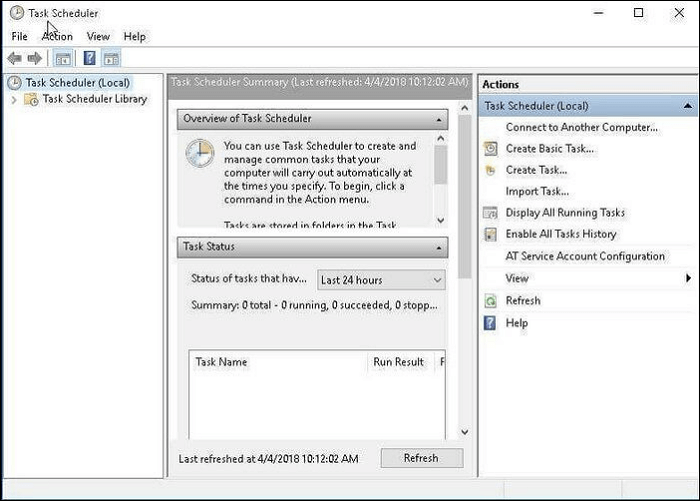
Step 2. To create a task, tap on the "Create Task" option and specify a name for the task.
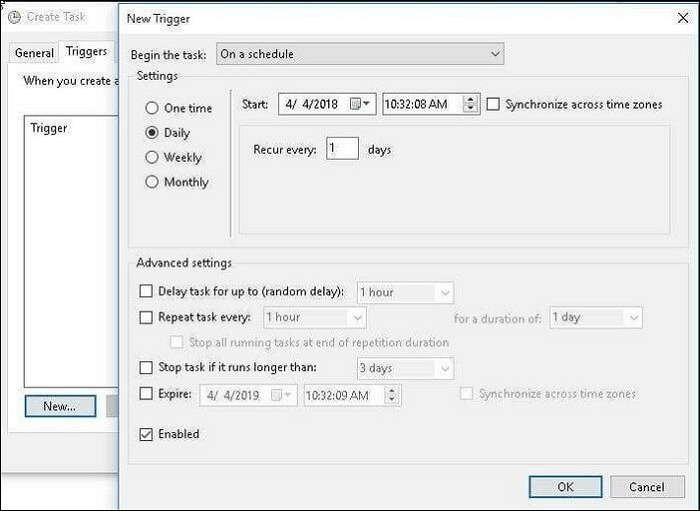
Step 3. To create a new trigger, navigate to the "Triggers" tab and tap on the "New" option from the lower section. Then, select the desired frequency for the trigger: one-time, daily, weekly, or monthly.
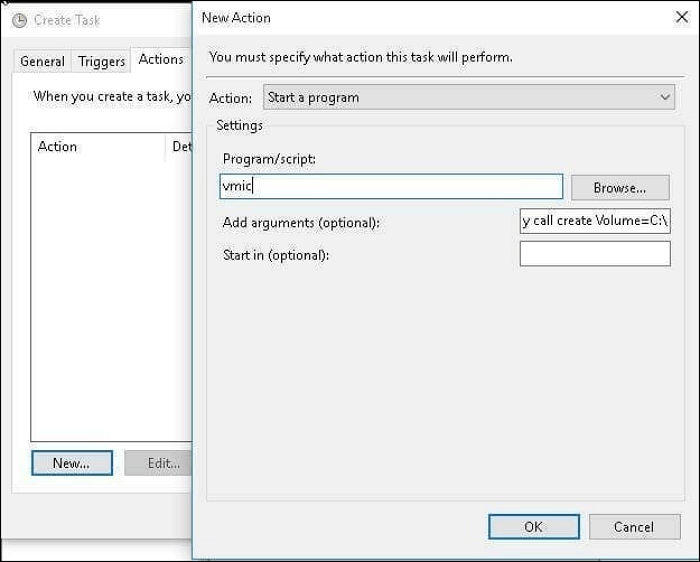
Step 4. To enable Shadow Copy, go to the "Actions" tab and select "New", then under "Script or Program", type "wmic" and the argument "shadow copy call create Volume=C:\" in the blank box on the right side.
How to Backup Files Using Volume Shadow Copy
To enable VSS, you can use the command "vssadmin list shadows" to check if VSS is enabled, and if not, you can use the command "vssadmin enable shadows" to enable it. Once enabled, you can use VSS to back up volumes or files, which is done by default. However, it's still worth checking if you need more clarification on the process.
Steps to Use:
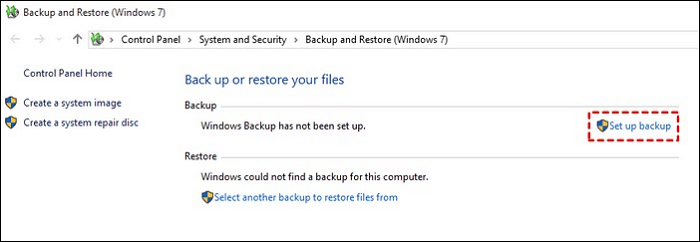
Step 1. To open the backup and restore option on Windows 10, tap on the "Proceed" button, then navigate to "Control Panel," click on "System and maintenance," and select "Backup and Restore."
Step 2. Then tap on the "Set up backup" option.
Step 3. Save your backup to a location of your choice, such as an external hard drive or cloud storage, and then select the "Next" option to proceed.
Step 4. Selecting the "Let Windows choose" or "Let me choose" option, then tapping "Next," will allow you to set up the system image as a default feature, unchecking the checkbox if necessary.

Step 5. You can also review your backup settings and confirm the same. Then tap on the option of "Save settings and run backup."
VSS may respond slowly at times, and it only assists with backing up files on the NTFS partition. Additionally, it lacks advanced features such as backing up files on multiple Windows PCs.
A Better Way of Backup: Qiling Disk Master
Qiling Disk Master helps you meet your needs by creating a centralized backup option if you do not wish to go for manual backups. The app offers various functionalities that also work as its advantages.
- It saves effort and time by creating a flawless system backup.
- The system offers a reduction in downtime for the protection of business data.
- It initiates an automated backup opportunity.
- The software helps in providing a quick configuration and deployment of Windows systems on your PC, making it easier to set up and manage your system.
- WinGet is a backup and restore software specifically designed for Windows 10. It provides a simple and efficient way to create backups of the operating system and restore it in case of a system failure or other issues.
- The software is suitable for home users, enterprises, Mac users, and service providers.
Here are the steps to use this wonderful program.
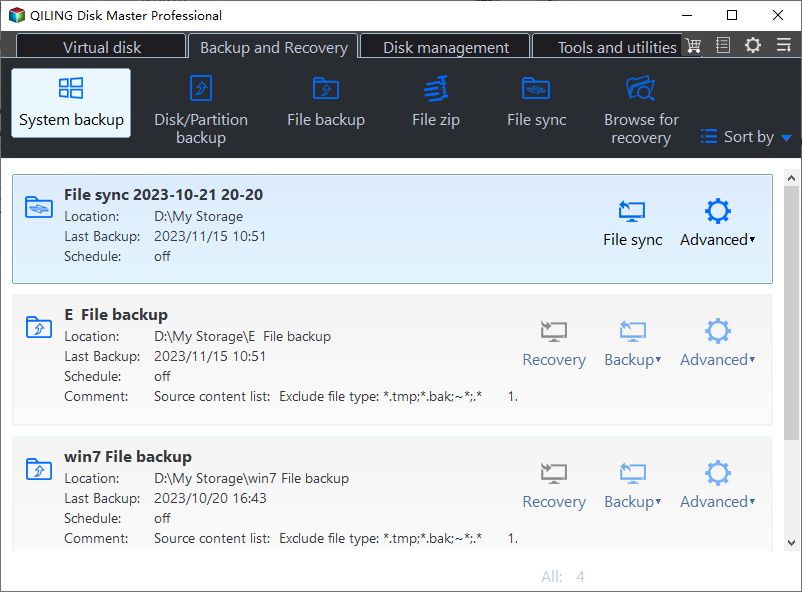
Step 1. Launch Qiling Disk Master and select the "Backup and recovery" tab page.

Step 2. Click on the "System backup" option to initiate the backup process.
Step 3. The system partition will be automatically selected, you only need to choose the location.

Step 4. You can save the backup file on your local drive, in the cloud, or on a network-attached storage (NAS) device, or even connect an external hard drive to store system backup files.

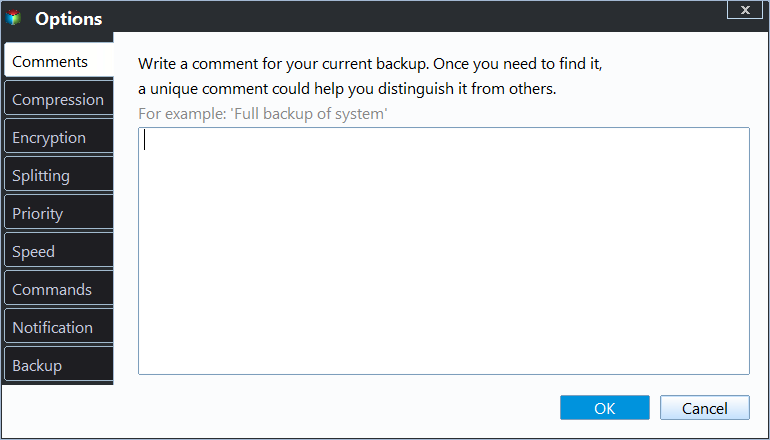
Step 5. You can customize settings in "Options" at the bottom left, then click "Proceed" to start the process.
After completing the backup process, you can monitor the backup status, restore, access, or remove the backup by right-clicking on the backup task listed on the left-hand side.
Final Verdict
In this write-We've helped you overcome the limitations of Volume Shadow Copy by providing manual methods to enable it. We've also offered an alternative solution, Qiling Disk Master, which can help with backing up files using VSS while addressing issues like high disk usage leading to deletion. This reliable tool is suitable for home users, businesses, and professionals to use on their devices.
Volume Shadow Copy FAQs
What's on your mind? I'm here to help!
1. Can I delete Volume Shadow Copies?
If Volume Shadow copies, also known as snapshots, are consuming a lot of space on your PC, you can delete them using either the System Properties or the Command Prompt.
2. Where is the volume shadow copy stored?
Shadow copies of files are stored alongside the file system data, taking up a significant portion of the system's storage capacity. These copies are also included in file system backups.
3. Is VSS enabled by default?
Yes, VSS is enabled by Microsoft by default.
Related Articles
- Clean C Drive without Formatting in Windows 10/8/7 [Tested & Worked]
- Tutorial for Tesla Format USB, Everything You Should Know in 2024
- How to Factory Reset Mac Without Keyboard? Keyboard Not Working
- How to Factory Reset Microsoft Surface with Every Possible Way
- Thunderbird Profile Missing? Solutions to Restore Quickly
Thunderbird, an open-source email client from Mozilla, is a widely used application for personal and professional use. However, users may encounter errors like a missing Thunderbird profile, which can be resolved by identifying the top reasons and implementing quick solutions. - Find / Change Thunderbird Storage Location (Step-by-Step Guide)
To change the Thunderbird storage location, follow these steps: locate the “Thunderbird” folder, right-click on it, and select “Properties” to change the location. Alternatively, you can also go to “Tools” > “Options” > “Advanced” > “Storage” to change the location. To keep your Thunderbird saves safe, consider backing up your data regularly, using a cloud storage service like Google Drive or Dropbox, and keeping your Thunderbird installation up-to-date with the latest security patches.