Working on Updates 100% Complete Don't Turn Off Your Computer [6 Fixes]
If you see the message "Working on updates 100% complete Don't turn off your computer" during a Windows update, don't worry - you're not alone! Many users have encountered this issue, and it's usually just a normal part of the updating process. Your computer is simply working on finalizing the updates, and it's not uncommon for it to take a bit longer than expected.
The good news is that there are several effective solutions to safely complete updates without having to shut down your computer prematurely. This article will explore six practical methods to tackle this common Windows update problem and ensure a smooth updating process. So, let's start!
Stuck at "Working on Updates 100% Complete Don't Turn Off Your Computer"
This error occurs when Windows Update gets stuck at 100% completion, causing users to worry if their system is genuinely updating or encountering a problem, despite appearing unresponsive or stuck.
The main causes of this error are:
• 🗃️Corrupted System Files: Corrupted system files can prevent the update process from completing successfully, disrupting the system.
• ⏱️If pending updates haven't been installed correctly, it can cause conflicts with new updates, resulting in a stuck update.
• 🖲️Outdated or incompatible drivers can cause problems during the system update process, potentially leaving it stuck.
• 🌐Connectivity issues, such as unstable internet connections or interruptions during the download and installation of updates, can cause problems, particularly when the Windows 10 update gets stuck at 100%.
Read Also: Windows 11 Update Stuck at 100%
How to Fix Windows Update Stuck at 100%
After identifying the potential causes of the error, we will now offer practical solutions with step-by-step instructions to resolve it. This will be complemented by a comprehensive instructional video that provides detailed guidance to support you better.
1. Remove the Update That Causes the Problem
To address the issue caused by a specific update, follow these straightforward steps:
Step 1. Press the Win + X keys at the same time, then select "Run" from the menu that appears, which will open the Run command window.
Step 2. Open the Run command window, type appwiz.cpl into the search box, and press "OK" to open the "Programs & Features" window.
Step 3. Now, select "View installed updates".
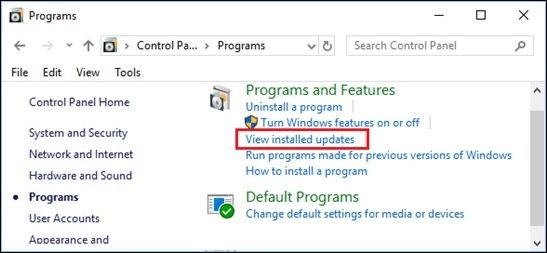
Step 4. To uninstall a problematic Windows 11 update, go to the "Uninstall an update" section, select the update, right-click, and choose "Uninstall," then restart your Windows 11 after the process is complete.
2. Restart the Windows Update Service
To restart the Windows Update Service, check these steps:
Step 1. Type cmd in the search box.
Step 2. Right-click on "Command Prompt" and choose "Run as administrator."
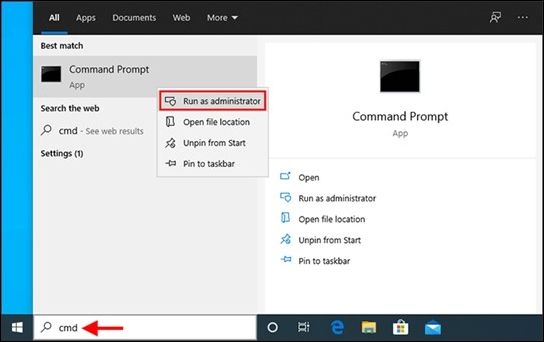
Step 3. Click "Yes" for User Account Control.
Step 4. In "Command Prompt", execute the following commands one by one, pressing Enter after each:
net stop wuauserv
regsvr32 %windir%\system32\wups2.dll
net start wuauserv
Step 5. After running the commands, verify if the Windows Update issue is resolved. If it still persists, restart other services that rely on Windows Update to see if that resolves the problem.
If you find one of the methods helpful in resolving the "Working on updates 100% complete don't turn off your computer" issue, please share it on social media platforms like Facebook, Twitter, Instagram, and others to help others who may be experiencing the same problem.
3. Rename the Softwaredistribution Folder
To rename the Softwaredistribution Folder, follow these steps:
Step 1. Access "CMD" by searching in the Windows search box.
Step 2. To run the Command Prompt as an administrator, right-click on the Command Prompt icon and select "Run as administrator" from the context menu. This will open a new Command Prompt window with elevated privileges, allowing you to run commands that require administrative access.
Step 3. In the Command Prompt (Admin) window, type net stop wuauserv and press "Enter" to stop the Windows Update service.

Step 4. To resolve the issue, open File Explorer and navigate to the "C:\Windows\SoftwareDistribution" folder. Delete all contents inside this folder, which will clear the cache and allow Windows to update successfully.
Step 5. To resolve the issue, go back to the Command Prompt and type "net start wuauserv" to restart the Windows Update service. Then, restart your PC and try running the update again. This should resolve the problem.
4. Run the Windows Update Troubleshooter
You can also run the Windows Update Troubleshooter to resolve this error. To do so, check the steps:
Step 1. To access the Windows Troubleshooting feature, type "troubleshooting" in the Windows Search bar and click on the "Troubleshooting" result. Then, in the left window pane, select the "View all" option to see a comprehensive list of available troubleshooting tools.
Step 2. Choose "Windows Update" from the list.
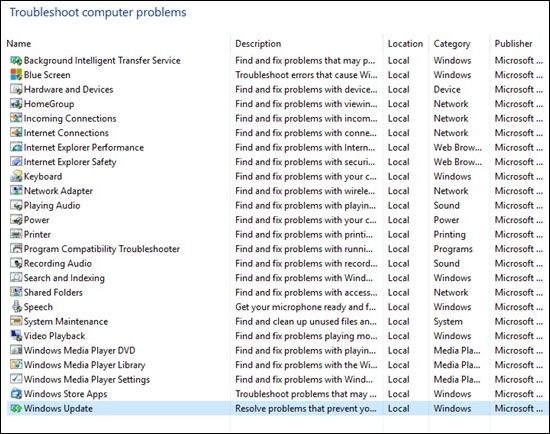
Step 3. The Windows Update Troubleshooter will automatically run and detect any issues with Windows Update, allowing you to resolve problems and ensure your system is up-to-date with the latest security patches and features.
Step 4. Once the troubleshooting process is complete, restart your PC to apply the changes.
5. Perform System Restore
For this solution, follow these steps:
Step 1. Go to system properties to select "System Restore".
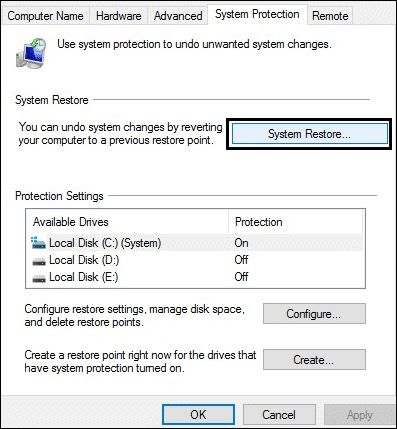
Step 2. To resolve the issue, select the restore point that matches the problematic app, driver, or update from the available options.
Step 3. Click "Next" and "Finish" to initiate the System Restore process, which will restore the computer to an earlier date and potentially resolve the issue.
6. Access Windows Clean Boot
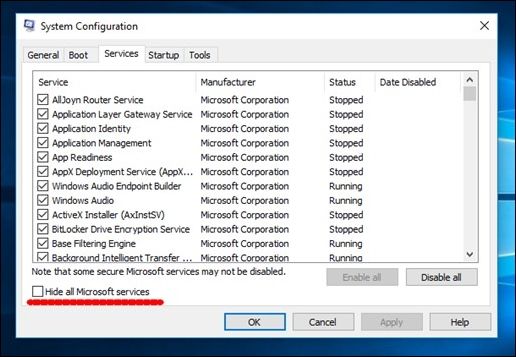
To perform a clean boot in Windows, start by opening the System Configuration utility, which can be accessed by typing 'msconfig' in the Run dialog box or by searching for it in the Start menu. In the System Configuration window, navigate to the Services tab and check the box next to 'Hide all Microsoft services.
Step 1. Pressing the Windows key + R opens the Run dialog box, where you can type "msconfig" and press "Enter" to open the System Configuration utility. This will allow you to access various system settings and tools.
Step 2. In System Configuration, go to the Services tab, check "Hide all Microsoft services," and click "Disable all" to disable all services.
Step 3. Click "Apply" to save changes.
Step 4. To disable startup programs, go to System Configuration, then the "Startup" tab, click "Open Task Manager", then in Task Manager, navigate to the "Startup" tab and disable each enabled app one by one.
Step 5. After closing all programs, shut down Task Manager and click "OK" in the System Configuration window. This will initiate a clean boot of Windows, minimizing the number of drivers and startup programs running. Finally, restart your computer to complete the process.
How to Recover Files When Windows Update Stucks
If a Windows update gets stuck and causes data loss, recovering files can be a frustrating experience. To assist in this situation, we recommend using Deep Data Recovery, a powerful and user-friendly data recovery software. With its intuitive interface, bootable media support, and compatibility with various storage devices, Deep Data Recovery makes it easy to recover lost files and documents, allowing you to preview files before recovery.
- This software is designed to recover lost photos, videos, music, and documents that have been accidentally deleted or lost due to a system crash.
- User-A user-friendly interface for easy recovery, even for non-tech-savvy users, can be achieved by implementing a simple and intuitive process that requires only a few clicks. This can be done by providing clear and concise instructions, using visual aids and minimal text, and offering a guided recovery process that adapts to the user's needs.
- Supports bootable media creation, allowing for hard drive recovery when a computer experiences booting issues due to Windows updates.
- The software offers wide device compatibility, allowing file recovery from various storage devices like hard drives, SSDs, USB flash drives, memory cards, and more.
The preview feature allows users to view recoverable files before the recovery process begins, saving time and ensuring they only restore the necessary data.
Step 1. To proceed, select the specific file location and then click the "Scan" button to continue.

Step 2. After the process, locate the deleted or lost files in the left panel using the "Path" or "Type" feature, or apply the "Filter" feature to find the deleted files.

Step 3. Click the "Recover" button, save the restored files to a different location than the original, and consider saving them to a cloud storage service like OneDrive or Google Drive. Then, click "OK" to finalize the recovery process.

To recover your valuable data, download Deep Data Recovery and initiate the recovery process to retrieve your data safely and effectively.
Bottom Line
Windows error codes can cause data loss, affecting critical files and documents, and having reliable data recovery software is essential to restore lost data effectively, often due to issues like Windows update problems, accidental deletions, formatting errors, or system crashes.
Data recovery software like Deep Data Recovery offers a comprehensive solution to retrieve various file types, including photos, videos, music, and documents, making it a user-friendly and efficient tool for data retrieval.
Working on Updates 100% Complete Don't Turn Off Your Computer FAQs
What happens when you click on "Working on 100% complete" don't turn off your computer? The computer is likely to be performing some background tasks, such as indexing files or updating system files, and may take a few minutes to complete. If you turn off the computer, you may lose unsaved work or encounter issues with system stability.
1. Why is my computer stuck working on updates 100 complete?
Your computer may get stuck at "Working on 100% complete" updates due to a failed or incomplete installation, possibly caused by software conflicts or corrupted update files.
2. How do I fix the Windows update stuck at 100%?
To fix the Windows update stuck at 100%, try restarting your computer first. If the issue persists, boot into Safe Mode, clear the update cache, or use the Windows Update Assistant to update manually.
3. How do I stop my computer from working on updates don't turn off?
To stop your computer from endlessly working on updates, force restart it by holding the power button for a few seconds, which may cause data loss or potential update problems, but can be a last resort if the update process seems stuck for an extended period.
4. How do I fix Windows 10 update stuck on working on updates?
To resolve a Windows 10 update that's stuck on "Working on updates," try restarting your PC, disconnecting any unnecessary peripherals, clearing the Windows Update cache, or using the Media Creation Tool to create installation media and perform a repair upgrade.
Related Articles
- How to Load Old Cyberpunk 2077 Saves on Xbox
- Windows Update Not Installing - Try These 6 Fixes
- 3 Ways to Factory Reset Samsung Laptop on Windows 10/8/7
Learn how to factory reset a Samsung laptop in Windows or recovery mode. Follow safe steps to reset the laptop and protect important files first. - How to Factory Reset Toshiba Laptop [Detailed Info]
Do you know how to factory reset Toshiba laptop? If you do not know about it, then this article can help you. After reading the article, you will learn what needs to be done before resetting your Toshiba laptop to factory settings. You will also get to know how to factory reset it. - How to Fix Galaxy S5 SD Card Corrupted? [Ultimate Guide]
If your Galaxy S5 SD card is corrupted, don't worry, this guide offers solutions to fix the issue on Windows, Mac, and Android. Whether you're trying to recover data or simply fix the corrupted SD card, the guide provides different methods to get your Galaxy S5 SD card up and running again. - How to Get Windows 10 for Free [Full Guide in 2022]
Windows 10 is a widely used operating system that is essential for both work and daily life. However, to use Windows, you first need to have a Windows system. In the following article, we will provide a guide on how to obtain Windows for free, which may be helpful to you.