How to Delete File PowerShell [with Precise Command Lines]
Delete File with PowerShell Overview
PowerShell is a free command automation tool offered by Windows, built on the .NET framework and featuring a wide array of commands that perform specific functions.
PowerShell allows you to have full control over your Windows operating system by utilizing a shell within a Command Prompt window. With its command-let or Cmdlets syntax, you can easily delete files using PowerShell, among other tasks.
These are the in-When you need to delete files in PowerShell, there are several built-in commands that can assist you in executing specific deletion tasks. These include various cmdlets that allow you to delete files based on different criteria, such as file name, extension, or location. By using these cmdlets, you can efficiently delete files that meet specific conditions, making it easier to manage your files and maintain a clean and organized file system.
Let's dive into the two detailed methods for deleting files using PowerShell. The first method involves using the `Remove-Item` cmdlet, which can be used to delete files and directories.
How to Delete a File in PowerShell Using Remove-Item cmdlet
To delete a file using PowerShell, you can use the Remove-Item cmdlet, which allows you to quickly delete single or multiple files or folders. This cmdlet eliminates one or more items from the list, making it a convenient method for file deletion.
The "Remove-Item" cmdlet can be used to delete various items, including folders, files, registry keys, variables, and aliases, by utilizing a file path for the removal process. This method allows for quick deletion of these items, and the cmdlet can be used in different ways to accomplish this.
How to Delete a Single File or Folder Using Remove-Item cmdlet
To delete a single file or folder using PowerShell, you can utilize the Remove-Item cmdlet. This is one of the most straightforward ways to delete files in PowerShell. The basic syntax for the Remove-Item cmdlet is straightforward, but the major syntaxes for this cmdlet are worth noting.
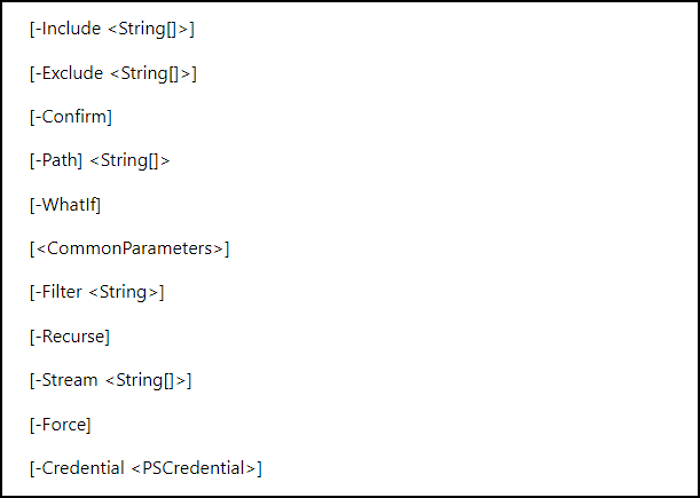
The descriptions of the parameters are shown below:
-Filter: This tool deletes files and folders that match a specified filter, and supports daily expressions and wildcards.
-Confirm: It prompts you to confirm the operation before executing the command.
-Include: The code has been used to add a string array, item, or even the items, which must be affected by the operation.
-Exclude: It's been used to exclude a string array and items from the entire operation.
-Force: You can add this parameter to exclude read-only or hidden files.
-WhatIf: This parameter is used to indicate what would occur if the cmdlet were to run without actually running it. In essence, it's a way to preview or inspect the outcome of the cmdlet's operation.
-Path: The goal of this process is to specify the location for the items to be eliminated.
-Recurse: Itemize all the child items in the specific locations.
-LiteralPath: Describe the location for the items to be eliminated.
-Stream: It eliminates substitute data, such as Zone.Identifier, from files and directories.
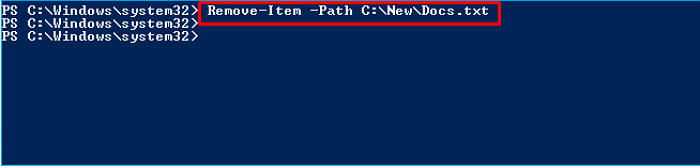
To delete a single file in PowerShell, use the Remove-Item cmdlet with the precise path of the file, specifying the "-path" parameter. This is the best example of how to delete a file using the Remove-Item cmdlet in PowerShell.
> Remove-Item -Path C:\New\Docs.txt
The provided line of code can quickly delete a single folder or file by using the `os` module and the `shutil` module to remove the specified item. This code is useful for deleting individual files or folders in a Python script.
How to Delete Files and Folders in Batch Using Remove-Item cmdlet
To delete all files and folders in PowerShell, you can use the Remove-Item cmdlet with the -Recurse parameter. This parameter tells PowerShell to delete all files and folders in the specified directory and its subdirectories. For example, to delete all files and folders in the C:\Users\username\Documents directory, you would use the command: Remove-Item -Path "C:\Users\username\Documents" -Recurse.
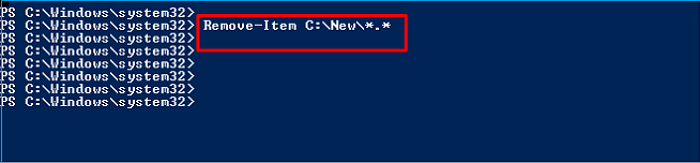
The Remove-The command will use the wildcard "*" to delete all folders and files in the specified folder. To do this, replace the file extension and name with "*" in the original command, and then run the command. This will delete all files and folders from the specified folder path.
The command is: > Remove-Item C:\New\*.*
How to Delete a File Path Using Remove-Item cmdlet
The Remove-The `Remove-Item` command of PowerShell also supports eliminating a file path, allowing you to delete a file with a specific path. For example, you can use the command to delete a file located at `C:\Users\username\Documents\file.txt`. This command can be used to delete files in various locations, making it a versatile tool for managing files in PowerShell.
ls C:\Users\powershell\Documents\test\
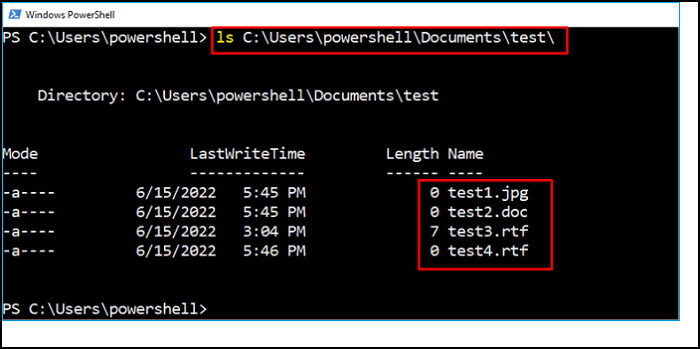
We have used the "ls" tool to list every item in the test folder. To eliminate files and folders with the .rtf extension from the destination path (e.g. C:\Users\powershell\Documents\test\), we can use the "Is" command to verify the deleted items.
Remove-Item C:\Users\powershell\Documents\test\*.rtf
ls C:\Users\powershell\Documents\test\

The files with the ".rtf" extension were deleted from the directory.
How to Delete File in PowerShell Using WMI Command
PowerShell supports WMI (Window Management Instrumentation) which allows WMI queries and methods to be directly called from PowerShell, making it accessible to users beyond just admins. Microsoft has incorporated WMI-specific CIM cmdlets, enabling the use of Invoke-CimMethod and Get-CimInstance to perform tasks such as deleting files.
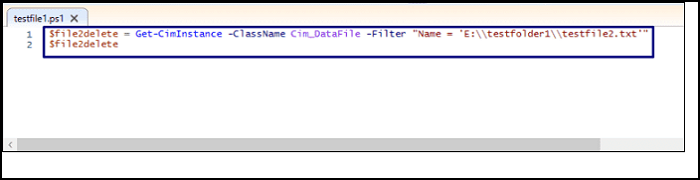
$file2delete = Get-CimInstance -ClassName Cim_DataFile -Filter "Name = 'E:\\testfolder1\\testfile2.txt'"
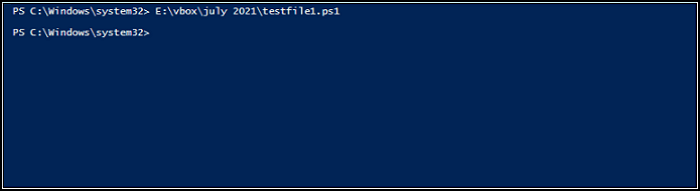
$file2delete
The Get_CimInstance cmdlet uses the Cim_DataFile class to extract details related to the file "E:\\testfolder1\\testfile2.txt".
The "$file2delete" variable is used to pass the object to the Invoke-CimMethod command, which deletes the file "E:\\testfolder1\\testfile2.txt". The Invoke-CimMethod command uses the "-Name" option to specify the method name, in this case, the method to delete the file.
The file was successfully deleted, as indicated by the output.
If some of your files are corrupted, and you don't know how to delete corrupted files, you can try using a file recovery software to scan your system for corrupted files and remove them. You can also use the built-in "Check Disk" feature in Windows to scan your hard drive for errors and fix them. Additionally, if you're using a Mac, you can use the "Disk Utility" feature to scan and repair your hard drive.
Recover Files and Folders Accidentally Deleted by PowerShell
If you've accidentally deleted files or folders using PowerShell and want to recover them, this step can help. With a 99.9% success rate, you can retrieve your data using a premium software called Deep Data Recovery. This tool is designed to recover data lost due to formatting, deleting, or virus attacks, among other reasons.
Deep Data Recovery is an all-in-one data retrieval software that can retrieve files and folders accidentally deleted by PowerShell. With its robust tech specification, it effectively recovers lost data, making it a reliable solution for users who need to recover deleted files.
- It supports Windows 11/10/8/7.
- The operating system uses Windows Server 2022, 2019, 2016, 2012, 2008, and 2003.
This reliable tool can help with various data recovery tasks, including recovering files from the recycle bin, recovering deleted files from a hard drive, and even recovering deleted files from an external hard drive. If you've lost important files, it can help you retrieve them. For home users, it can also help with recovering permanently deleted photos and videos from YouTube, providing a solution to common data loss problems.
Recovering files and folders accidentally deleted by PowerShell is a relatively simple process. To do this, follow the tutorial to restore your deleted files and folders.
Step 1. Launch Deep Data Recovery on your computer, select the file types you want to recover, and click "Next" to begin the recovery process.

Step 2. To proceed, select the exact file location you want to scan and click the "Scan" button.

Step 3. After the process, select the "Deleted Files" and "Other Lost Files" folders in the left panel. You can then use the "Filter" feature or click the "Search files or folders" button to find the deleted files.

Step 4. After clicking the "Recover" button, save the restored files in a location separate from the original one to avoid any potential data loss or corruption.
Summary
If you're struggling to delete files and folders that won't budge, don't worry - PowerShell has got you covered. With its various techniques and commands, you can easily eliminate unwanted files from your PC.
The article has shown methods for deleting single or multiple files using the Remove-Item cmdlet and WMI, helping to remove unwanted files from your system. If a necessary file was accidentally deleted, using a Deep Data Recovery tool can help recover it.
Delete File with PowerShell FAQs
When you want to delete a file with PowerShell, you can use the Remove-Item cmdlet. You can specify the path to the file you want to delete, and PowerShell will remove it. If you want to delete a file and its contents, you can use the -Recurse parameter.
Does RM work in PowerShell?
RM is aliased to Remove-In PowerShell, the Remove-Item command is used to delete items, but it doesn't accept the -rf parameter. Instead, it removes an item that is a specific parameter, which can't be found with the parameter name "rf". To avoid confirmation prompts, it's recommended to call Remove-Item without the -rf parameter, which will work without hassle. However, keep in mind that it will still demand confirmation.
How do I delete a file using the command prompt?
To delete a file using the command prompt, navigate to the directory where the file is located using the `cd` command, then type `del` followed by the name of the file you want to delete, and press Enter. For example, to delete a file named "example.
- Open the command prompt.
- Alter the directory path in cmd.
- Utilize the delete command.
- Eliminate the read-only files.
- Delete files in bulk.
- Delete several files, such as Del file1, file2, file3, and file4.
How do you recursively delete a file in PowerShell?
You can use the Get-ChildItem cmdlet with the -Recurse switch to delete files inside every subdirectory. For example: `Get-ChildItem -Path "C:\Source" -Recurse -Force -Include *.
How do I delete a directory in PowerShell?
You can delete a directory in PowerShell using the Delete () method, which is available on every object, including directories. Alternatively, you can use the Get-ChildItem cmdlet to delete files and folders by piping the output to the Delete () method.
Related Articles
- Full Guide: How to Fix HP Laptop Black Screen
- Task Manager Not Opening or Responding in Windows
- [Solved] System Image Recovery Not Showing
- How to Backup PS4 to External Hard Drive? [Full Guide 2022]
- Full Backup Advantages and Disadvantages [2023 Review]
If you want to know about full backup advantages and disadvantages, you're in the right place. This post will show you the newest review of the advantages and disadvantages of the full backup. After reading this post, you will have a better understanding of this type of backup. - Great Discover Virus | Here Is Everything You Should Know
Have you heard of the Great Discover Virus? Do you know what Great Discover Virus is? Do not worry if you do not. This article will tell you everything about Great Discover Virus. After reading, you can have an overall understanding of this virus.