How to Format Hard Drive for Mac [Full & Detailed Guide]
Formatting an internal hard drive for Mac can be a bit tricky, but it's essential to know how to do it properly. While external hard drives can be easily formatted using Mac's built-in Disk Utility, internal hard drives require a different approach. In this article, I will explain the process of formatting an internal hard drive for Mac and provide two methods to help you achieve this. So, let's dive in and learn how to format your internal hard drive for Mac.
To format a hard drive for a Mac without losing data, you can use the built-in Disk Utility tool. First, back up any important files to an external drive or cloud storage. Then, restart your Mac and hold down the Command (⌘) + R keys to access the Recovery Mode. From there, select Disk Utility and choose the hard drive you want to format. Click the "Erase" button and select "Quick Erase" to remove any data. Alternatively, you can use the "Security Options" to erase all data securely.
How to Format Hard Drive for Mac Without Erasing?
Formatting a hard drive for Mac without losing data is crucial to prevent data loss. To achieve this, there are two ways: one involves using a specialized tool or software that can clone the data to a new drive before formatting the original one, and the other involves creating a bootable clone of the Mac and then formatting the original drive, ensuring all data is safely transferred to the clone before the original drive is reformatted.
To format a hard drive for Mac using Disk Utility, start by opening the Disk Utility app on your Mac. Select the hard drive you want to format from the list on the left side of the window. Click on the "Erase" tab at the top of the window and select the format you want to use, such as "Mac OS Extended (Journaled)" or "APFS".
To format a hard drive for Mac using Terminal command, you can follow these steps: Open Terminal on your Mac, type `diskutil list` and press Enter to see a list of all available disks, including the one you want to format. Note the disk identifier (e.g.
Formatting a hard drive for Mac can be done using two effective methods. If you have important data, it's recommended to back it up using Time Machine before proceeding. For a step-by-step guide on using Time Machine, you can refer to the provided link.

Ultimate Guide to Mac Time Machine Backup
Time Machine is a built-in data backup tool on macOS that allows users to back up different versions of selected files and folders.
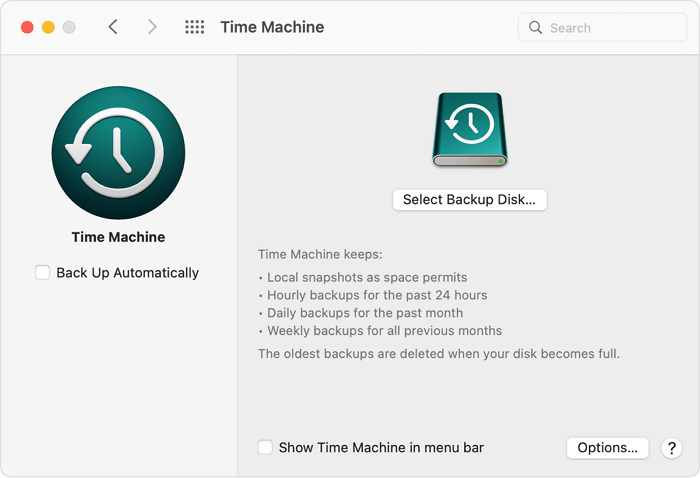
Now, let's see the two ways to format a hard drive for Mac in detailed steps.
Method 1. How to Format Hard Drive for Mac - Disk Utility
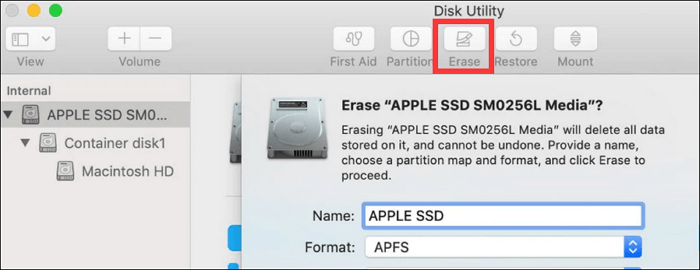
Disk Utility is a built-The Disk Utility in macOS is a system utility for formatting, backup, and compression. It's a Mac version of the Disk Management tool and is particularly useful for formatting. To format a hard drive for Mac using Disk Utility, you can follow the steps to do so.
Step 1. Launch the "Disk Utility" from "Applications".
Step 2. To format a drive, select the drive you want to format from the left panel, then click on the 'Format' button in the top toolbar. Alternatively, you can right-click on the drive in the left panel and select 'Format' from the context menu.
Step 3. Click on the Erase button, and a new window will appear.
Step 4. You need to determine the name and format of your drive.
Name: You can give whatever name you like to your drive.
Format: The recommended format for a Mac startup disk is APFS or Mac OS Extended (Journaled), but other formats may also be suitable depending on your needs.
Besides using "Disk Utility", you can also format hard drives on your Mac using another method, which will be covered in the next part.
Method 2. How to Format Hard Drive for Mac - Terminal Command
The Terminal Command has the same functions as Disk Utility and can also format hard drives, but it is more complicated and requires careful typing of syntax to avoid errors.
Step 1. Find the magnifying glass on Mac and type "Terminal".
Step 2. `fdisk -l | grep /dev/sd`
diskutil list
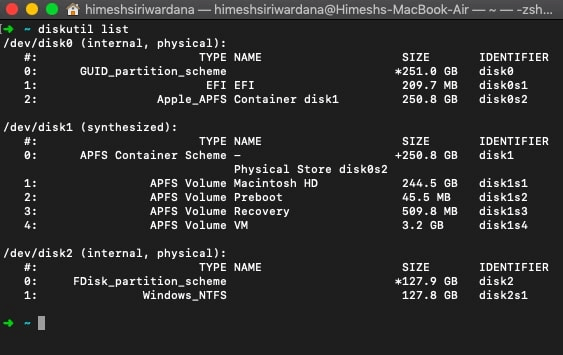
Step 3. Then, choose your hard drive and type the following command:
diskutil erasedisk FILE_SYSTEM DISK_NAME DISK_IDENTIFIER
File System: You can use HFS+, APFS, or other formats that are compatible with Mac.
Disk Name: You can give a new name to your hard drive.
Disk Identifier: It refers to the number of your targeted drive.
Formatting your Mac's hard drive to a specific file format is possible using the "Disk Utility" and "Terminal Command Line". However, the best file format for a Mac remains a topic of interest, and the answer is not a straightforward one.
Bonus Tip: What Is the Best Format for Mac?
There are various file system formats, including APFS, FAT32, and exFAT, each with its own compatibility. If you're unsure which one to choose for your Mac, don't worry - understanding their features can help. A table comparing these formats can provide a clear overview.
| Features | APFS | HFS+ | FAT32 | exFAT |
|---|---|---|---|---|
| Pros |
|
|
|
|
| Cons |
|
|
|
|
| System |
|
|
|
|
| File Size |
|
|
|
|
The table provides options for file formats, with APFS and HFS+ being suitable for Mac. To format a hard drive for Mac, follow either Method 1 or Method 2.
Conclusion
Formatting a hard drive for a Mac can be done in two ways. The choice of format depends on the intended use of the drive, with options including NTFS, APFS, FAT32, exFAT, and HFS+. A detailed comparison of these formats is provided to help users select the most suitable one for their needs and device.
If you have any questions about file formats, there are some helpful links available that can provide more information. These links can assist you in understanding various file formats, such as PDF, DOCX, MP3, and more.
FAQs About How to Format Hard Drive for Mac
After reading this page, do you have any other questions about formatting hard drives for Macs? This part lists three more questions to help.
1. What should I format my hard drive for Mac?
For a Mac, you can choose Mac OS Extended (Journaled) for most users, as it's compatible with all Macs. Alternatively, Apple File System is suitable for macOS 10.13 or later. If you need compatibility with both PC and Mac, consider FAT32 or exFAT.
2. Is exFAT ok for Mac?
exFAT has no file size limitation and is compatible with both Mac and Windows, making it the ideal format for those who frequently use both operating systems.
3. Should I use APFS or Mac OS Journaled?
Both are compatible with Mac, with Mac OS Journaled suitable for macOS 10.12 or earlier and APFS for macOS 10.13 or later, allowing users to choose a file format based on their device's version.
Related Articles
- Solutions for Disk Not Ejected Properly on Mac
- Solved: Getting Files Ready for Installation Stuck at 0%, 1%, 10%, 100%
- How to Fix MacBook Pro/Air/iMac Won't Turn on with Black Screen [6 Solutions]
- Reset Mac Password if You Forgot the Password [with Four Simple Methods]
- 2022 FIX: Excel Keeps Crashing Windows 10 - All Too Easy to Handle
If you're experiencing frequent Excel crashes on your Windows 10 system, there are simple solutions to resolve this issue. By following these 8 pieces of advice, you can troubleshoot and fix the Excel crashes problem with ease. - How to Export Kindle Highlights, Notes and Bookmarks
Learn how to export Kindle highlights, notes, and bookmarks using Kindle E-Reader, desktop app, mobile app, and third-party tools. Step-by-step guide for all devices.
Products
Articles & Tutorials
- Data Recovery
- Data Backup
- File Recovery
- File Backup
- System Backup and Restore
- Disk and Partition Clone
- Technical articles
- Mobile articles
- Disk Master Help
- Windows Data Recovery Tutorials
- Windows Secure Delete Tutorials
- Windows Partition Management Tutorials
- Windows File Backup and Restore Tutorials
- Windows System Backup and Restore Tutorials
- Windows Disk Backup and Restore Tutorials
- Windows Clone Tutorials