Hot Corners Mac: How to Enable on macOS Sonoma/Ventura
Where Are Hot Corners on MacBook Pro/Air
On macOS, a feature called "Hot Corners" allows users to assign different actions to the four corners of the screen. This feature enables users to customize their Mac experience by setting specific actions to occur when the cursor is placed in a particular corner.
To activate a Hot Corner action, simply move your mouse to the designated corner of the screen. For example, you can open Launchpad by moving the mouse to the top-right corner of the screen.
To locate Hot Corners on a Mac, click on "System Settings" and navigate to "Hot Corners," where you can customize the four corners with different actions. This article will discuss how to activate and deactivate them.
How to Enable Hot Corners Mac
To utilize the Hot Corners feature for enhanced productivity, navigate to System Preferences and enable it. Experiment with the available options to determine the most effective configuration for your needs.
To enable hot corners on your Mac, simply follow these steps:
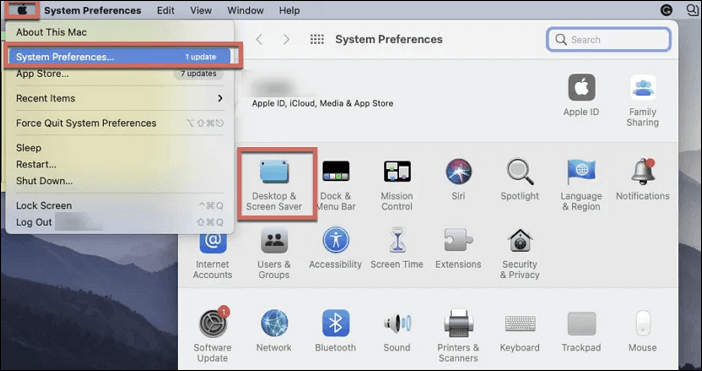
Step 1. Go to the Apple icon.
Step 2. Select "System Preferences".
Step 3. Click on "Desktop & Screen Saver".
Step 4. Go to the "Screen Saver" tab.
Step 5. Now, choose the "Hot Corners" button.
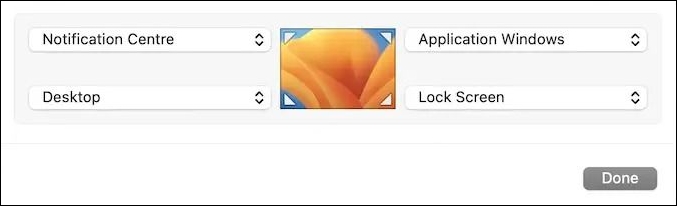
Step 6. Wait for the Active Screen Corners window to appear.
Step 7. You can set four actions for four corners and save changes by clicking "OK".
System Preferences Not Responding on Mac: Possible Causes and Solutions
If your System Preferences on Mac are not responding, don't worry, there are effective solutions to fix the issue. You can try restarting your Mac, which often resolves the problem. Alternatively, you can try quitting System Preferences by force-quitting the app or using the Activity Monitor to close the process.
How to Customize Hot Corners Mac
To customize Hot Corners on your Mac, go to System Preferences, then click on "Mission Control" and select the corner you want to customize. From there, you can choose an action to take when you move the cursor to the corner, such as "Show Desktop", "Launchpad", or "Notification Center".
While Hot Corners applies the same actions globally across all applications, you can use modifier keys to create different behaviors and prevent accidental triggering. This allows you to customize the experience for various workflows.
To set up Hot Corners, click the "Hot Corners" button, then wait for the Active Screen Corners window to appear.
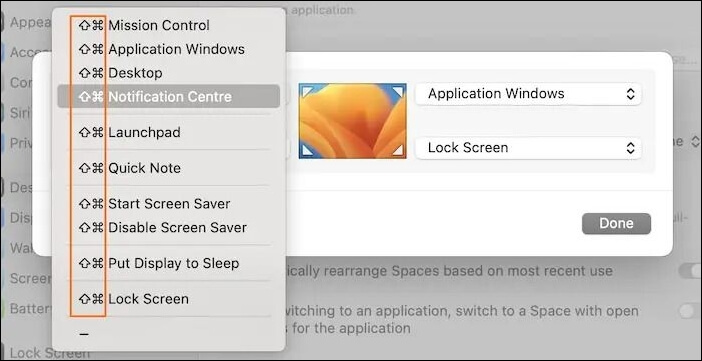
The Hot Corners feature allows you to assign actions to each corner of the screen by selecting a drop-down menu from a box. This can be done for all four corners, and modifier keys can also be assigned to prevent accidental triggering.
To enable the modifier keys, follow these steps:
Step 1. Go to the Apple Menu.
Step 2. Choose "System Preferences".
Step 3. Select "Mission Control".
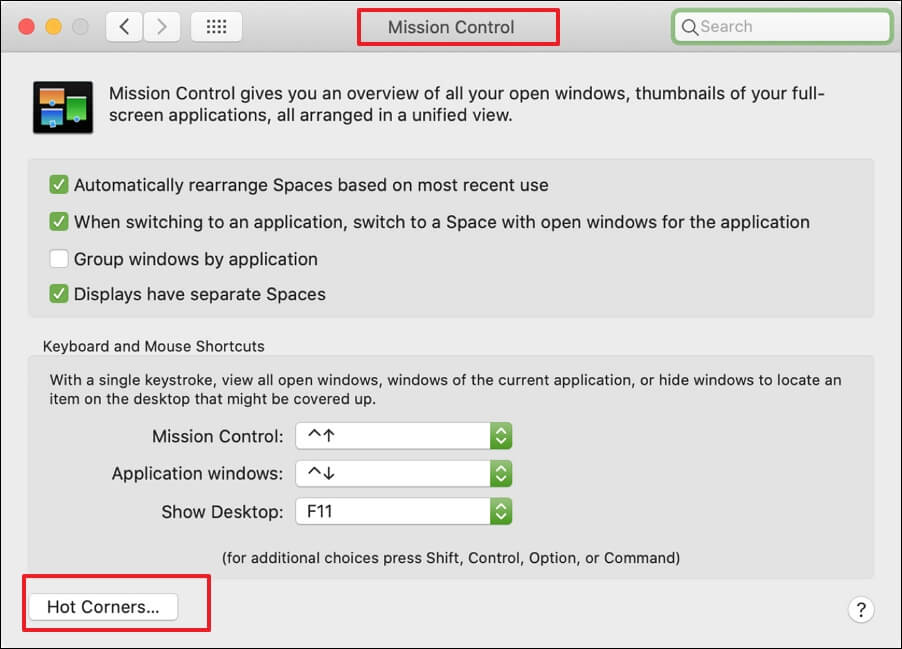
Step 4. Click on "Hot Corners" and select any corner.
Step 5. Wait for the drop-down menu to appear.
Step 6. To choose a modifier key, you need to hold down the "Command + Option + Control or Shift" keys.
Step 7. To save your changes, simply choose the action you want to take and click "OK".
Hot Corners is a feature on Mac computers that allows users to customize the behavior of their screen corners.
By accessing System Preferences > Mission Control, users can set up to four corners to trigger different actions, such as switching to a specific desktop, launching an app, or displaying the desktop.
How to Disable Hot Corners on macOS Ventura/Monterey
You can trigger Hot Corners accidentally, even with the utmost care, and that can become incredibly annoying when you're busy with important work.
You can disable Hot Corners on your system by following two main methods. While you can't completely remove Hot Corners, you can still deactivate them. This means you can still use them if you want to, but you can also choose to turn them off when not needed.
Disable Hot Corners from System Preferences
To turn off hot corners, go to System Preferences or System Settings, navigate to the Hot Corners window, and select an action for a blank space.
To disable Hot Corners, click on the Apple menu, select System Preferences, and go to the Desktops & Screen Saver preferences. Click on the Hot Corners button and select "None" from the menu. You will then need to repeat this process for all four corners. Once you have done this, Hot Corners will be disabled.
Disable Hot Corners with Terminal
To disable Hot Corners, open the Terminal and run the command `defaults write com.apple.dock wvous-corners -bool false && killall Dock`. This will turn off Hot Corners and restart the Dock.
Step 1. To open the Finder app using the Command Key and Spacebar, press the Command Key (⌘) and the Spacebar simultaneously. This will immediately open the Finder app on your Mac.
Step 2. Type Terminal and press the "Enter" key to open Terminal.
Step 3. Type the following commands one after the other. Make sure to press the "Return" key after you type one command.
defaults write com.apple.dock wvous-tl-corner -int 0
defaults write com.apple.dock wvous-tr-corner -int 0
defaults write com.apple.dock wvous-bl-corner -int 0
defaults write com.apple.dock wvous-br-corner -int 0
Step 4. To turn off all the hot corners, type "killall Dock" and press "Return".
How to Disable Hot Corners on macOS Ventura [2023 Update]
For those who want to disable hot corners on their Mac, there are a few quick solutions and effective methods to consider. One simple approach is to use the "Hot Corners" feature in System Preferences to disable the hot corners altogether. Alternatively, you can use a third-party app like Magnet or BetterSnapDock to customize the hot corners and disable them as needed.
Mac Terminal is a powerful tool that allows users to quickly change settings, locate files, and perform various tasks with a single line of command. However, some commands, like "rm", can be hazardous and permanently delete files if used incorrectly.
If you've accidentally deleted files due to Terminal commands like "undo rm -rf Mac", don't worry! Effective and powerful data recovery software like Deep Data Recovery for Mac can help you recover your files.
You can recover permanently deleted files on your MacBook using the Qiling Mac data recovery software. The software allows you to recover deleted files using the user-friendly steps provided.
Step 1. Select the drive to be scanned
In the main Deep Data Recovery window, select the drive you need to recover lost/deleted files from and click the "Search for lost files" button.
Note: Before attempting data recovery, it's recommended to click "Disk Backup" from the left sidebar to create a backup of your Mac, which will prevent further data loss. After backing up, the software can recover data from the Mac backup, allowing your computer to write new data again.

Step 2. Select your lost data/files
Deep Data Recovery for Mac scans the selected disk volume and displays the results, allowing users to sort and find specific files.

Step 3. Recover lost/deleted data
Once you've found the desired files, preview them and click "Recover" to initiate the recovery process of your deleted or lost Mac files.

Conclusion
The Hot Corners feature on Mac allows users to assign various actions to different screen corners, enabling them to quickly perform tasks by simply moving their cursor to that area.
This feature is easily activated and deactivated, and users are advised to explore its options before deciding to turn it off.
If data loss occurs when using Terminal commands, don't worry! Deep Data Recovery for Mac can quickly and safely help you recover lost and deleted data.
Hot Corners Mac FAQs
What is Hot Corners on Mac? Hot Corners is a feature on Mac that allows you to set custom actions to occur when you move your mouse to a specific corner of the screen. This feature can be accessed from System Preferences under the Desktop & Screen Saver or Mission Control section.
1. How do you get hot corners on a Mac?
To get hot corners on a Mac, go to System Preferences > Mission Control, then select the "Hot Corners" tab. From there, you can choose an action to occur when you move the cursor to the top left, top right, bottom left, or bottom right corner of the screen.
Step 1. Click the Apple Menu and select "System Settings".
Step 2. To access Hot Corners, go to System Preferences, then choose "Desktop & Dock" from the left sidebar, followed by Hot Corners.
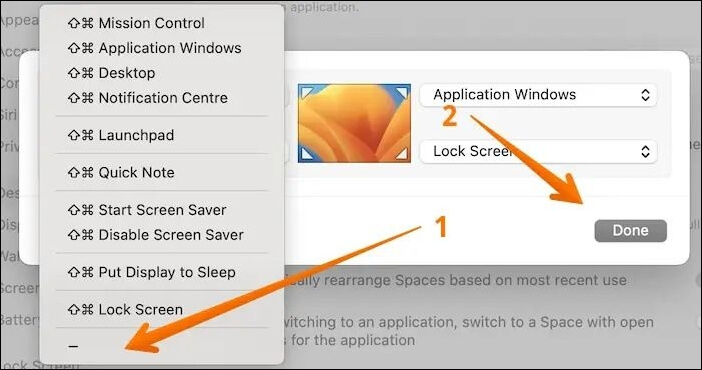
Step 3. Go to a corner and click on the pop-up menu, select an option, then click "Done" to save the changes.
Here, you can choose an option for each corner and assign modifier keys.
2. How do I get rid of hot corners on my MacBook?
To remove hot corners on your MacBook, follow these steps:
Step 1. Click on the Apple Menu and select "System Settings".
Step 2. Choose "Desktop & Dock" from the left sidebar.
Step 3. Select "Hot Corners". Wait for a window to appear.
Step 4. Scroll down and click on the no-action option. Click "Done".
3. What is a hot corner?
Hot Corners is a feature in macOS that allows users to set specific actions for the four corners of the screen, such as opening Launchpad by moving the mouse to the top-right corner.
4. Why are my hot corners not working?
The Hot Corners feature on a Mac may not work properly if one or more monitors are connected and set up as an Extended Display, which can interfere with its functioning.
Related Articles
- Delete Files Using rm Command on Windows, Linux, and Mac
- Complete Guide to Windows Internet Name Service (WINS)
- Windows 10 Stuck in Airplane Mode and How to Fix it
- B550 vs. X570 [Full & Detailed Comparison]
- How to Install Google Drive for Desktop on PC ☁️
You can easily install Google Drive on your system, whether you're using Windows or Mac, and take advantage of its cloud-based storage space to store and share files. - Learn How to Install on ReFS Partition Today | Windows 11 Installation Made Simple
Have you ever thought about installing your Windows 11 on ReFS partition? This article is going to give you a full guide on how to install Windows 11 on ReFS partition with a full tutorial.