Windows Boot Manager Not Showing in BIOS | Fixed
Key takeaways:
- The operating system may not boot due to the loss of the Windows Boot Manager, which prevents it from appearing in the BIOS.
- To ensure a smooth boot, configure your BIOS settings and restore the Windows Boot Manager's visibility. By doing so, your computer can boot normally with the Windows Boot Manager in the BIOS.
Users may encounter unexpected challenges, such as the "Windows Boot Manager not showing in BIOS," which can disrupt the boot process and cause frustration. Qiling will provide actionable steps to restore Windows Boot Manager visibility in BIOS settings, shedding light on the background of this issue and offering a guide to resolve it.
Read Also:

The Sony VAIO Boot Menu is a utility that allows users to boot their computer from a USB drive, CD/DVD, or other external devices. To get the Sony VAIO Boot from USB, you can follow these steps: Insert a USB drive with a valid bootable operating system, such as Windows or Linux, and restart your VAIO computer. While booting, press the F11 key repeatedly to access the Boot Menu. From there, select the USB drive as the boot device, and your VAIO computer should boot from the USB drive.
This guide will introduce the Sony VAIO boot menu and Sony BIOS key, allowing you to easily boot your Sony VAIO laptop from a USB drive.
How to Fix Windows Boot Manager Not Showing in BIOS?
If the Windows Boot Manager isn't appearing in your BIOS, don't worry - there are eight potential solutions to resolve this frustrating issue. You can try checking your BIOS settings to ensure the boot order is set to UEFI or Legacy BIOS mode, or disabling Secure Boot to see if that resolves the issue.
- Solution 1. Use the Windows Boot Repair Tool
- Solution 2. Delete External Devices
- Solution 3. Reboot the Power Cord
- Solution 4. Change Boot Order in BIOS
- Solution 5. Create a New Boot Sector
- Solution 6. Rebuild Windows BCD
- Solution 7. Replace A Hard Disk
- Solution 8. Enable the Boot Menu via CMD
Solution 1 is a comprehensive solution that addresses most startup issues. It's recommended to try it first if the cause is unknown. This solution should be tried first if the cause is unknown. It solves most startup problems.
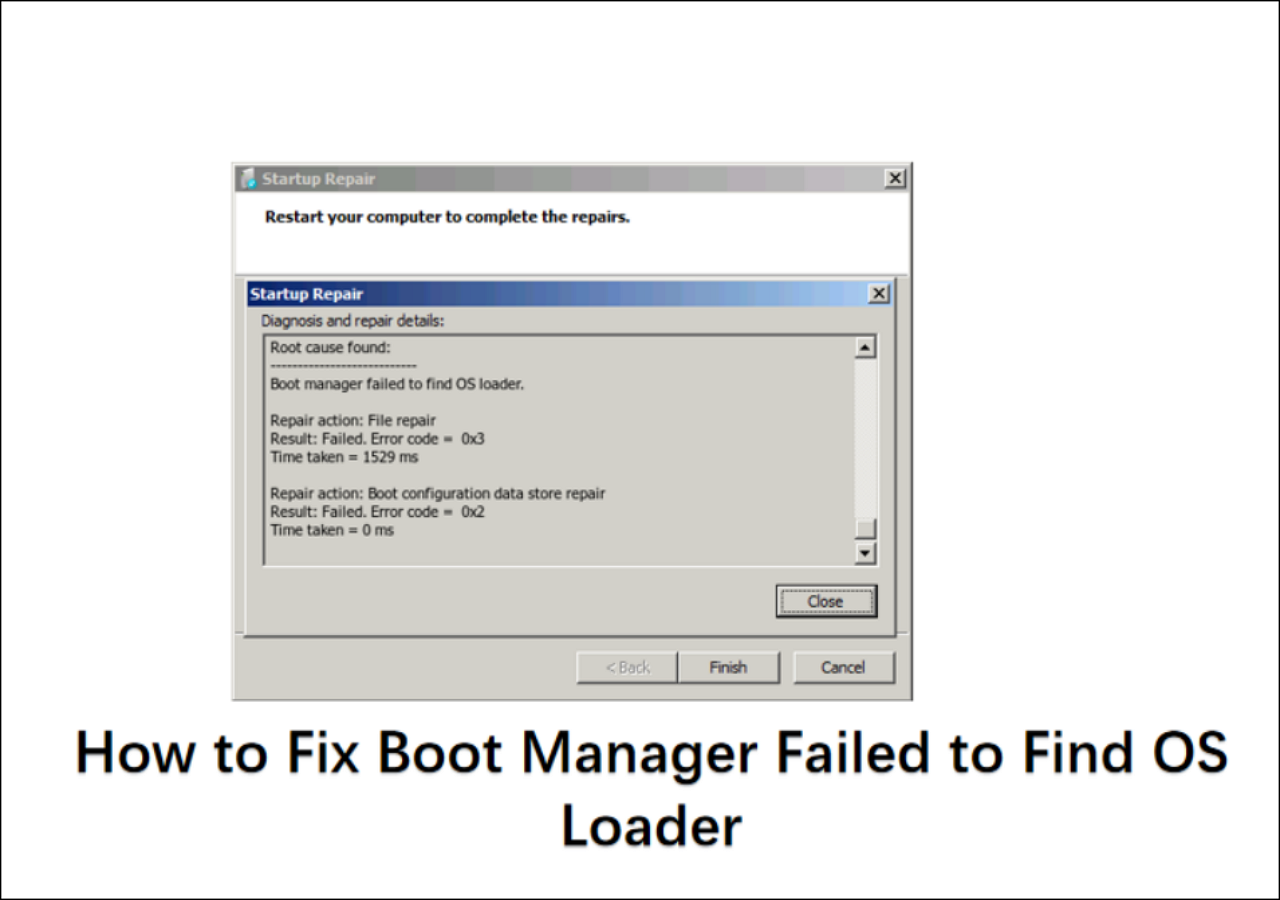
To fix the "Boot Manager Failed to Find OS Loader" error, try booting in safe mode, checking the boot order in BIOS settings, and ensuring the hard drive is properly connected. You can also try running a disk check and a System File Checker (SFC) scan to identify and repair any corrupted system files.
Resolve the "Boot Manager Failed to Find OS Loader" issue with ease by following expert-backed solutions. Start by booting in safe mode and checking for any problematic drivers. If that doesn't work, try using the System File Checker (SFC) to scan and replace corrupted system files.
Solution 1. Use the Windows Boot Repair Tool
Our first solution is Qiling Disk Master, a powerful utility that excels in managing and repairing various storage aspects of your computer. It shines particularly in boot-related issues, offering a range of critical features including boot repair.
- Repair Boot-Related Problems: Qiling Disk Master can assist in resolving blue screen errors or black screen issues during boot-up, helping to get the system back on track.
- Repair BCD Errors: It can fix Boot Configuration Data (BCD) errors, a common cause of boot problems, allowing the system to boot normally.
- Fix System Partition Errors: This tool is designed to fix errors or inconsistencies on the system partition, ensuring it is in a healthy state.
To quickly resolve the Windows Boot Manager not showing in BIOS issue, we recommend using the Qiling Disk Master tool to restore your BIOS settings to optimal functionality.
Step 1. After connecting the external drive/USB to your computer, start Qiling Disk Master and navigate to the "Tools and utilities" section, then click "Create bootable media" to proceed.

Step 2. To create a Windows installation media, select an available USB drive or CD/DVD and click "Create." Alternatively, you can burn the Windows ISO file to the chosen storage media.

Step 3. Connect a bootable drive to a new computer, reboot by holding F2/Del to enter the BIOS, set the bootable drive as the boot disk and exit.
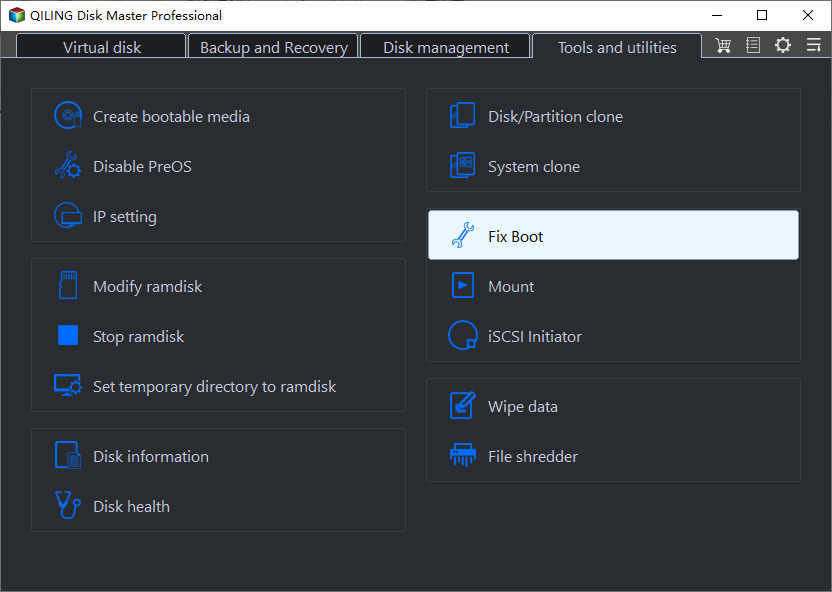
Step 4. Boot the computer again, enter the WinPE interface, and open Qiling Disk Master. Click "Fix Boot" under the "Tools and utilities" option.
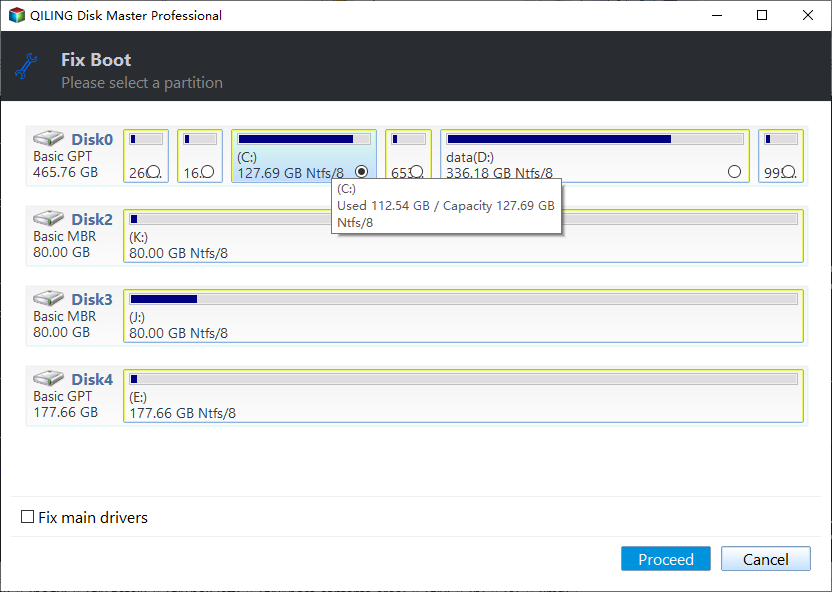
Step 5: Select the system you want to repair and click "Proceed".
Step 6. Wait a moment, and you will receive an alert that the system has been successfully repaired. Click "OK" to complete the boot repair process.
This powerful tool can fix the following problems seamlessly:
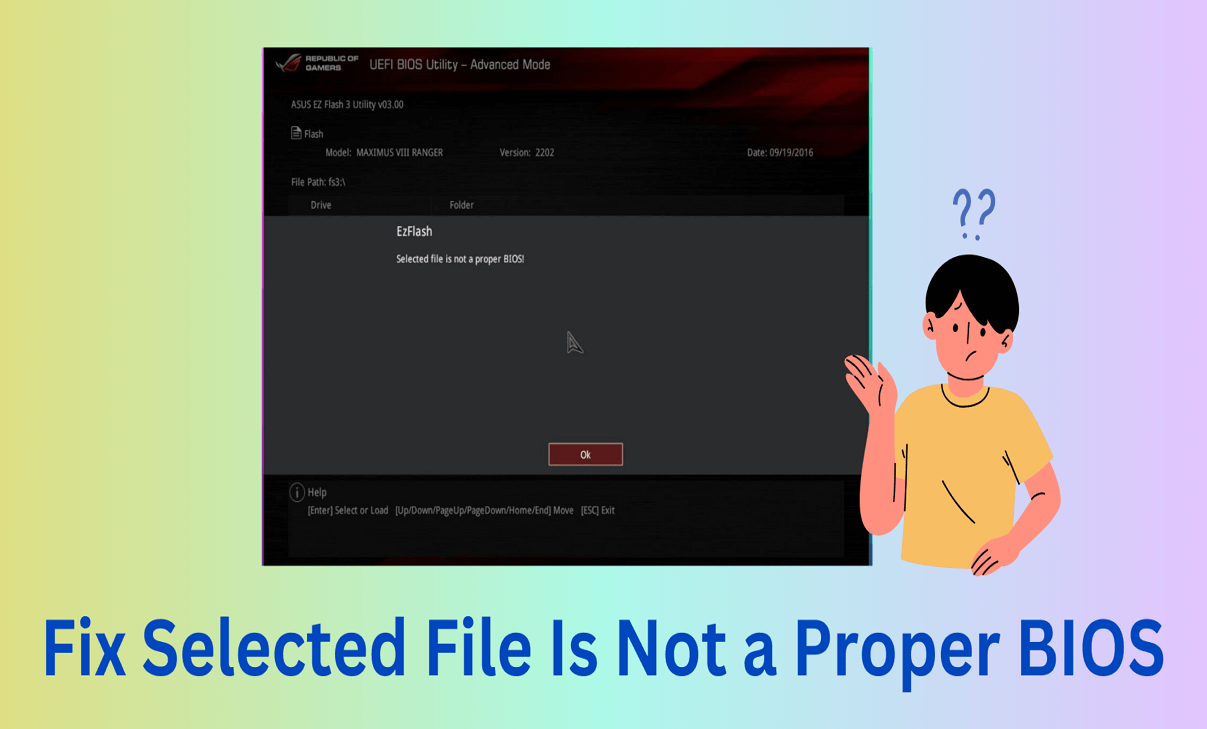
To fix the issue where a selected file is not a proper BIOS, try the following: update your BIOS to the latest version using the manufacturer's website or a software tool like BIOS update software, check for any corrupted or damaged files in the BIOS folder, use a bootable USB drive to boot into a different operating system and run a BIOS repair tool, or use a BIOS recovery tool like BIOS Recovery Tool or BIOS Update Tool to restore the BIOS to its default settings.
If your system shows the "selected file is not a proper BIOS" error message, refer to the full details in this guideline for instructions on how to proceed.
Solution 2. Delete External Devices
The issue of the Windows boot manager not showing in BIOS may be caused by external devices such as USB flash drives or external hard drives, which can be detected as bootable by the PC when it starts, so it's necessary to remove all external devices to resolve the issue.
Follow the steps:
Step 1. Detach/remove external hard drives and USB devices from your PC.
Step 2. Then, restart the PC and check if the problem is fixed.
If the error persists, try unplugging the main USB cables connected to the PC motherboard, which will disconnect the problematic USB device, or follow another method from this guide.
Further reading: Boot drive not showing up in BIOS
Solution 3. Reboot the Power Cord
When a hard drive is not detected, it can prevent the boot manager from being accessed, leading to a "missing boot manager" error. This issue may be caused by improperly connected power and data cables, which can prevent the computer from recognizing the hard drive.
Follow the steps to fix it:
Step 1. Carefully open your computer case to access its internal components.
Step 2. The hard drive is typically located in a designated bay within the computer case, and it's connected to the motherboard via a SATA cable. The power cable, on the other hand, is usually connected to the hard drive from the power supply unit (PSU) in the computer case.
Step 3. Restart the system by disconnecting and then reconnecting the power and data cables to resolve potential power or data connection issues.
Step 4. After adjusting the cables, turn on your computer and see if the issue is resolved.
Note: Be cautious when taking these actions as a small mistake can cause physical damage to your PC or laptop.
Solution 4. Change Boot Order in BIOS
Here are the steps to modify the boot sequence on a computer, in one paragraph:
Step 1. During startup, press the F2 or Delete key to access the BIOS menu. This allows you to configure basic settings for your computer.
Step 2. Locate the "Boot" or "Boot Sequence" settings inside the BIOS.
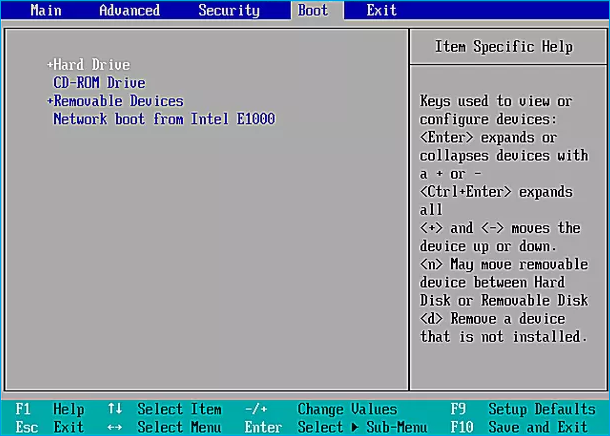
Step 3. You can find a list of bootable devices and their current order in these settings, where you can rearrange the sequence to match your desired method for Windows installation. For example, if you're using a flash drive, set it as the primary boot device.
Step 4. Save the changes and restart your computer.
These steps will resolve the issue and give you access to the Boot Manager as needed.
Other problems related to the boot error:
Solution 5. Create a New Boot Sector
A "missing boot manager" error can be caused by partition corruption or boot damage, often within the Windows partition, due to factors such as an old hard drive, virus infections, or malware attacks. To resolve this issue, you can try creating a new boot sector by following the suggested steps.
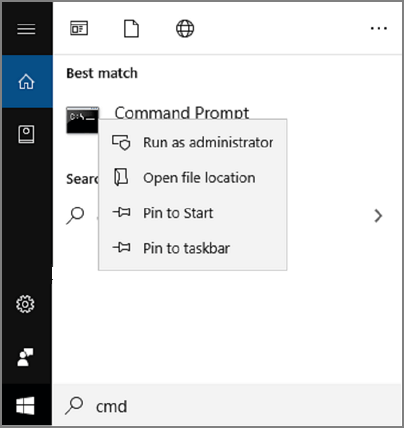
Step 1. Start by accessing the start menu and searching for "Command Prompt."
Step 2. To enable developer configurations, right-click the Command Prompt option and select "Run as administrator".
Step 3. Type "bootrec /fixboot" into the Command Prompt and hit Enter to execute it.
Step 4. The command was successfully executed, and a message indicating completion was displayed.
Step 5. Restart your PC by pressing the "Ctrl + Alt + Del" keys and selecting the restart option.
Note: Before restarting your system, please disconnect any removable devices like USB drives or external hard drives.
Solution 6. Rebuild Windows BCD
When your Boot Configuration Data (BCD) becomes corrupted or misconfigured, rebuilding it is necessary to resolve the "Windows boot manager is not showing in BIOS" error. The BCD serves as the gateway to accessing the boot manager, and without it, the manager's options and visibility are hidden.
Follow the steps:
Step 1. To change the Advanced Startup Options, search for "Change Advanced Startup Options" in the taskbar's search field, then click on it to open the settings after it shows in the search results.
Step 2. In the advanced startup option, click on "Restart now". This action will redirect you to the advanced options menu.
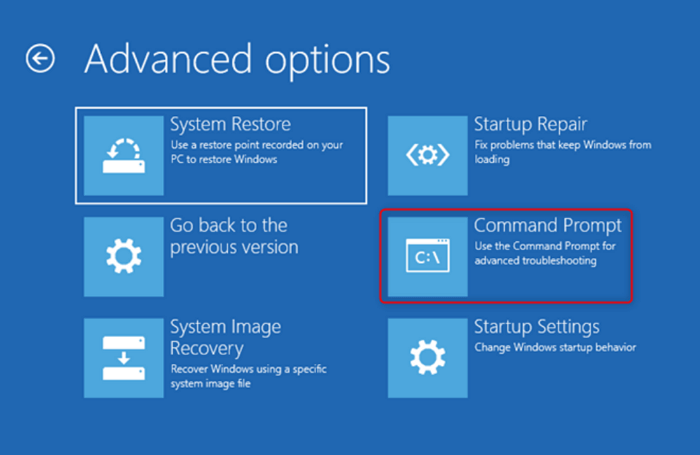
Step 3. Choose "Troubleshoot," and then choose "Advanced Options."
Step 4. Choose "Command prompt" from the subsequent menu and wait for the Command Prompt to open.
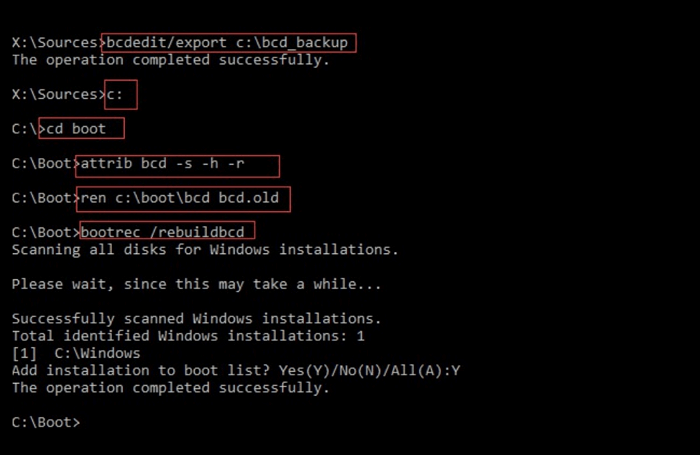
Step 5. In the Command Prompt, type "bootrec/rebuildbcd" and press the "Enter" button, then wait a few moments until you see a successful installation message, after which you must adjust the attribute files in the next step.
Step 6. In the same Command Prompt, type "attrib c:\boot\bcd -h -r -s" and press Enter to remove the read-only and hidden files from the Windows bcd. Then, enter the command "ren c:\boot\bcd bcd.old," to rename the stored bcd, giving you access to rebuild the BCD file.
Step 7. Run the command "bootrec /rebuildbcd" and press Enter. It will ask you to add a boot to the list, type "Y" and hit Enter. Wait a few moments for the "Operation successful" message to appear on the screen.
Step 8. To resolve the issue, restart your computer or laptop to see if the problem is resolved. This simple step can often resolve problems with your system.
You can try Qiling Disk Master for a quick and easy way to solve this issue, which also simplifies the process of rebuilding MBR.
Solution 7. Replace A Hard Disk
Old and outdated hard drives can cause issues with the Windows boot manager not appearing in BIOS, so it's recommended to replace them with a new one, which can be done by a computer technician due to the technical expertise required.
If you're using a Dell laptop, you can refer to this tutorial for assistance.

How to Replace Hard Drive in Dell Laptop [Step-by-Step]
This guide provides a step-by-step process for replacing a hard drive in a Dell laptop, along with recommendations for the best cloning solution to transfer your data.
Solution 8. Enable the Boot Menu via CMD
The boot menu is crucial for managing BIOS and other essential computer functions. On the other hand, the boot manager is usually hidden on the startup flash screen and is turned off by default. However, it can be easily activated using simple Command Prompt commands.
Follow these steps:
Step 1. To open the Command Prompt, search for "Command Prompt" in the search bar of the taskbar.
Step 2. To open the Command Prompt as an administrator, right-click on the Command Prompt icon or the "Command Prompt" entry in the Start menu, then select "Run as administrator" from the context menu. This will open the Command Prompt with administrative privileges, allowing you to run commands that require elevated access to the system.
Step 3. Type the following commands and hit enter in the Command Prompt.
- bcdedit /set {bootmgr} display bootmenu yes
- bcdedit /set {bootmgr} timeout 30.

Step 4. When the "Operation successful" message appears on the screen, it indicates that the command has been executed successfully.
Share this guide with others who might face the same issue to empower them to overcome similar challenges and enhance their computing experience.
Why Is Windows Boot Manager Not Showing in BIOS?
The "Windows Boot Manager not showing in BIOS" error can be caused by several reasons, and understanding these factors is crucial to finding the most suitable solution. By identifying and addressing the underlying causes, users can effectively resolve this issue and get their Windows Boot Manager to display in the BIOS settings.
Here are the common reasons:
- Outdated BIOS: An outdated BIOS can cause compatibility issues with modern operating systems, leading to problems with booting and functioning properly.
- Boot Configuration Error: Misconfigured boot settings can prevent the boot manager from displaying.
- Corrupted Boot Configuration Data: If the boot configuration data is corrupted, it can cause issues with the boot manager's ability to properly identify and load the operating system, leading to disruptions in the boot process.
- Damaged Hard Disk: Physical damage to a hard disk can lead to boot problems.
- Hard Disk Sector Corruption: Corruption in specific hard disk sectors can cause issues with the boot process.
- Hardware Connection Failure: Loose or faulty hardware connections can result in the boot manager not showing, making it difficult to access the system and potentially leading to data loss or corruption.
We recommend exploring the solutions in this guide to resolve the issue.
Conclusion
This tutorial has explored the reasons behind the "Windows Boot Manager is not showing in BIOS" error and provided practical solutions to resolve it, aiming to empower users to regain control over their computer's boot process.
For a comprehensive solution to boot-related problems, we highly recommend using Qiling Disk Master, a powerful tool with advanced features designed to manage and resolve boot issues, ensuring a smoother computing experience. By using Qiling Disk Master, you can restore your system's functionality and efficiency, and take action today to overcome boot issues and get back to work.
FAQs About Windows Boot Manager Not Showing in BIOS
If the Windows Boot Manager is not showing in the BIOS, what troubleshooting steps can be taken to resolve the issue?
1. Why is my bootable USB not showing in BIOS?
This issue can occur due to various reasons like incorrect BIOS settings, problems with the USB drive, or a bootable USB incompatible with the computer's BIOS.
2. How do I enable Boot Manager in BIOS?
To enable the Boot Manager in BIOS, first, ensure your device is turned off. Next, locate the BIOS settings by pressing the designated key (usually F2, F12, or Del) when booting up. Navigate to the Boot Sequence settings, where you'll find options for the boot order.
3. Is Windows Boot Manager the same as UEFI?
Windows Boot Manager is a component of UEFI firmware that specifically manages the booting of Windows operating systems, utilizing the UEFI interface to facilitate this process.
Related Articles
- How to Upgrade PS4 Hard Drive [Step-by-Step Tutorial]
- Best Solutions on How To Fix Adobe Acrobat Error 0 104
- How to Upgrade Xbox One X to SSD - Guide with Pictures
- How to Fix Virtual Disk Manager the System Cannot Find the File Specified in Windows 10/8/7
- Should I Select Disk Cleanup Compress Your OS Drive? Your Answer Is Here [2024 Full Guide]
Choosing 'Disk Cleanup Compress Your OS Drive' can help free up space on your drive, but it's essential to understand what happens when you compress your OS drive under disk cleanup. This article provides specific instructions and guidance on this process, so keep reading to learn more. - Does Deleting a Partition Erase All the Data? | Solid Way to Recover
Deleting a partition can indeed erase all the data stored on that partition, as it essentially removes the file system and formatting associated with it. However, the data itself is not immediately lost and can often be recovered using specialized software or techniques.