How to Format an External Hard Drive Without Losing Data
External hard drives have become essential for storing large amounts of data, including personal memories, work documents, and entertainment libraries. However, as technology advances, formatting an external hard drive may become necessary for various reasons, such as preparing it for new storage needs or troubleshooting issues.
Formatting an external hard drive can be a daunting task, especially when you're worried about losing your valuable data. However, with the right guidance, you can format your external hard drive without losing any data.
How to Format an External Hard Drive Without Losing Data - 4 Ways
This section will explore four effective methods to format an external hard drive without losing data. Each approach caters to different scenarios and user preferences, allowing you to select the most suitable method for your needs.
Formatting an external hard drive without losing data involves a three-phase process. First, you need to back up your data to prevent any loss during the formatting process. Next, you need to connect the external hard drive to your computer and use the built-in formatting tools or third-party software to erase all data on the drive.
Phase 1. Create a Backup of the External Hard Drive
To ensure the safety of your data, create a complete backup of your external hard drive before formatting it by backing it up to another external hard drive.
Phase 2. Format the External Hard Drive
You can format your external hard drive using various methods, ranging from Windows built-in tools to third-party software. Four methods are available, each with its own advantages. A comparison table can help you choose the method that best suits your needs.
| 🛠️Method | ⏰Duration(1 TB) | ☹️Difficulty Level | 🚀Effectiveness |
|---|---|---|---|
|
About 5 Minutes |
Easiest | Highest | |
| About 8 Minutes | Easy | Moderate | |
| About 8 Minutes | Moderate | Moderate | |
| About 8 Minutes | High | Low |
Way 1. Format an External Hard Drive via Qiling Disk Master
Qiling Disk Master is an all-in-one disk manager that allows users to easily control their hard drives and partitions, making it a valuable asset in the digital world. Unlike other methods of formatting an external hard drive, Qiling Disk Master offers several advantages, including an intuitive interface and step-by-step guidance that makes it accessible to users of all levels.
To format an external hard drive using Qiling Disk Master, you can follow these steps. First, launch Qiling Disk Master and select the external hard drive you want to format.
Step 1. Launch Qiling Disk Master, right-click the partition on your external hard drive/USB/SD card which you want to format and choose the "Format" option.
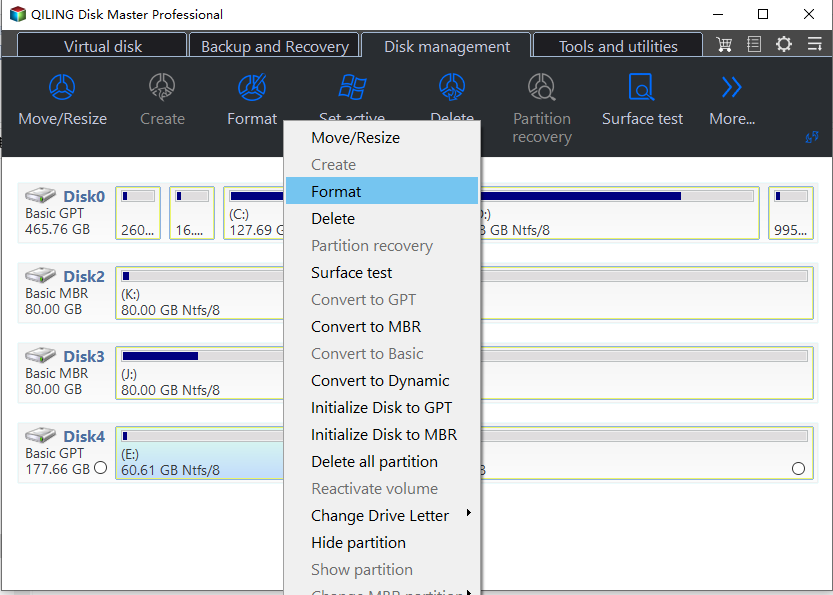
Step 2. Assign a new partition label, file system (NTFS, FAT32, EXT2, EXT3, EXT4, exFAT), and cluster size to the selected partition.
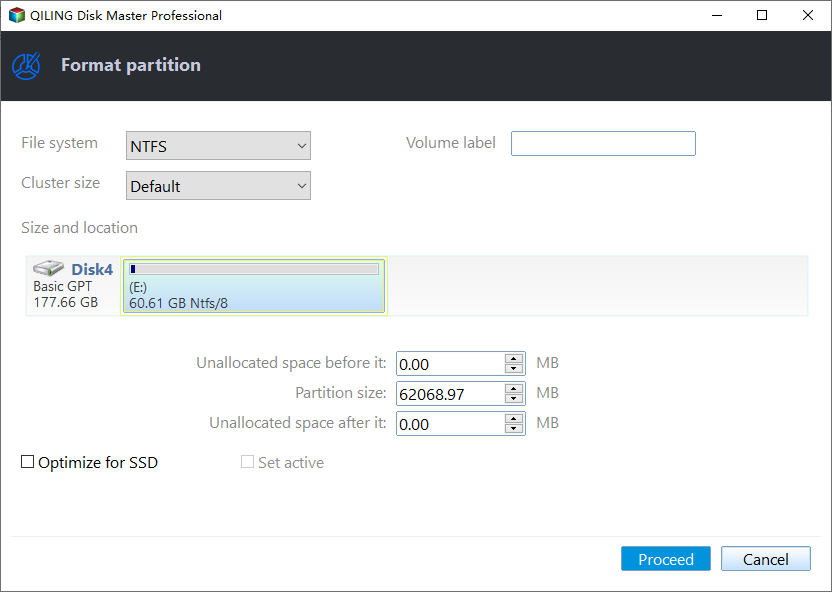
Step 3. To proceed, you'll need to select the drive you want to format, choose a file system, and optionally set a volume label. Be sure to back up any important data before formatting, as it will be deleted.
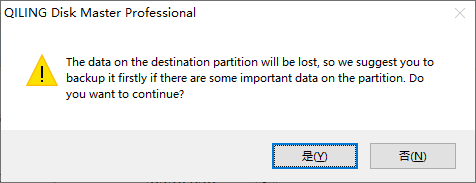
Step 4. In the Warning window, click "Yes" to continue.
Key Features of Qiling Disk Master
- Partition resizing allows you to easily adjust the size of your partitions without losing any data, giving you the flexibility to create more space for new data or resize partitions in Windows.
- Qiling Disk Master allows you to merge partitions without the risk of data loss, creating a new partition by combining multiple partitions.
- To convert NTFS to FAT32, you can change the file system of your hard drive without losing any data. This process involves formatting the drive, which will erase all files, or using a third-party software that can convert the file system without deleting any files.
- Drive Speed Test is a tool that allows you to test the speed of your external hard drive, providing accurate and detailed results.
Qiling Disk Master is a reliable and user-friendly solution for formatting external hard drives without risking data loss. It offers comprehensive backup options, an efficient formatting process, and additional disk management features, providing unmatched convenience and data protection.
Way 2. Format an External Hard Drive via File Explorer
To format an external hard drive via File Explorer, follow these steps: Open File Explorer, right-click on the external drive, and select "Format." Choose the file system you want to use, such as NTFS or exFAT, and select the allocation unit size. Finally, click "Start" to begin the formatting process. This method is quick, easy, and doesn't require any additional software, making it a convenient option for formatting your external hard drive.
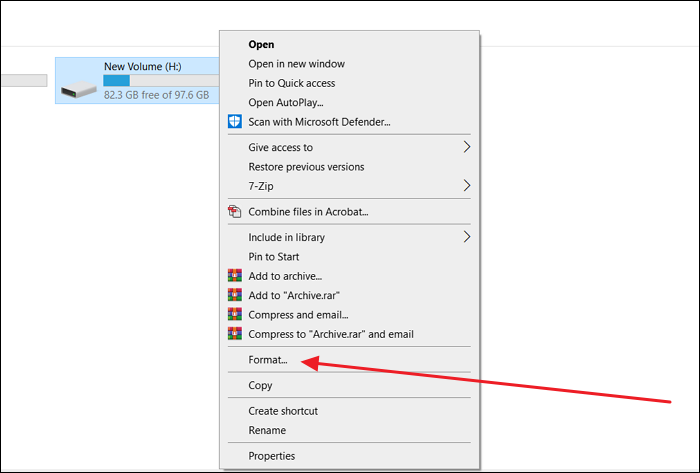
Step 1: Check if your drive is correctly connected to your computer and access File Explorer by pressing the "Windows + E" key. Your connected external hard drive should be listed under "This PC" or "Computer" in the left-hand navigation pane.
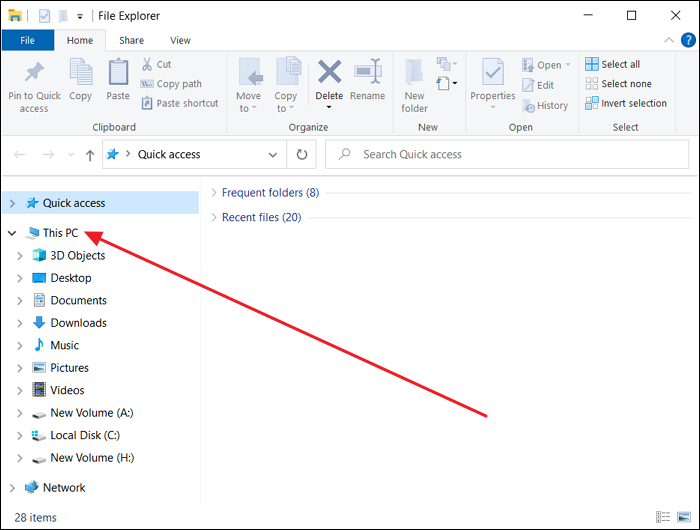
Step 2: Click the icon representing your external hard drive, right-click it, and select "Format" from the context menu. This will open a formatting window where you can choose the file system (NTFS, exFAT, or FAT32) and allocation unit size.
Step 3: You will be able to choose between a quick format and a full format for performing the task. Once you've made your selection, review your choices carefully. Once you're ready, click "Start" to begin the formatting process.
Step 4: A warning message will appear, informing you that all data on the external hard drive will be deleted. Confirming this action will start the format, which will take some time to complete.

Way 3. Format an External Hard Drive via Disk Management
To format an external hard drive using Disk Management, go to the Start menu, type "Disk Management" and select the result. In the Disk Management window, right-click on the external hard drive and select "Format." Choose the file system you want to use, such as NTFS or exFAT, and select the allocation unit size. Then, click "OK" to start the formatting process. This method provides more advanced options than the File Explorer method and is a native way to format external hard drives in Windows.
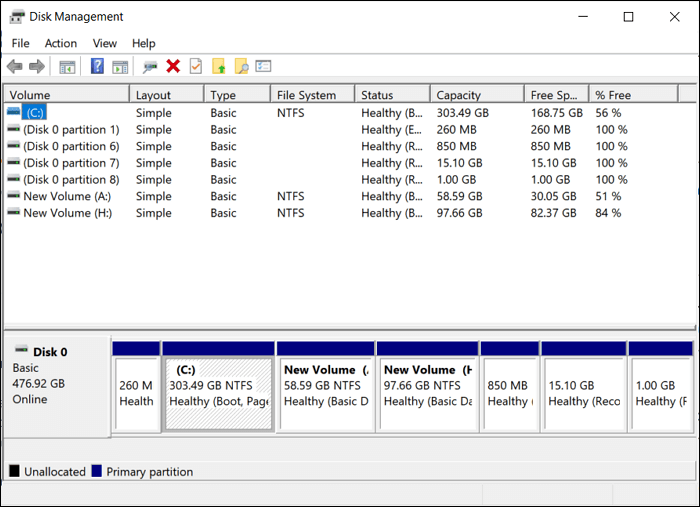
Step 1: To access your external hard drive on Windows, connect it to your computer and press the Windows key + X on your keyboard. This will open a menu where you can select "Disk Management". In Disk Management, you can see a list of all connected storage devices, including your external hard drive, which will be labeled with its drive letter and capacity.
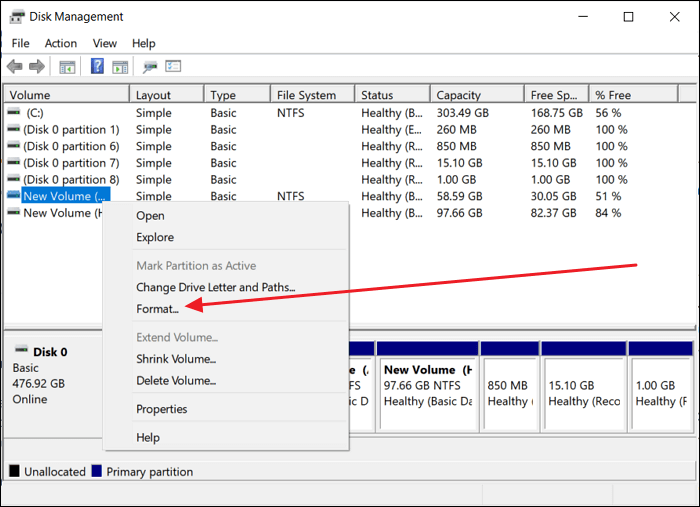
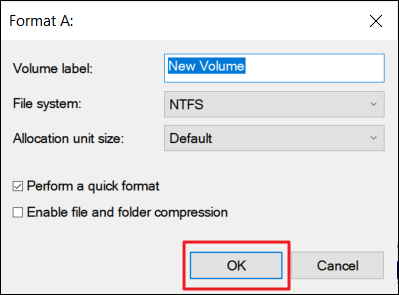
Step 2: To format an external hard drive, right-click on the partition representing the drive in Disk Management, select "Format" from the context menu, and specify the file system and allocation unit size in the Format dialog box. A quick format is performed by default, which is faster but less thorough.
Step 3: Uncheck the "Perform a quick format" option to ensure a complete data wipe, then click "OK" to start formatting and agree to a warning to format your external hard drive.
Share this incredible passage that contains effective ways of formatting external hard drives without losing data on your social media:
Way 4. Format an External Hard Drive via Command Prompt
Formatting an external hard drive can be done through Command Prompt, which offers advanced users a powerful and flexible method to format their storage devices. This approach provides more precise control over the format process and includes additional parameters not available through other methods, making it a suitable option for those who want a higher level of customization.
Be cautious when using Command Prompt as incorrect commands can lead to data loss. To use Command Prompt, follow these steps carefully:
Step 1: To access the Command Prompt with administrator privileges and connect an external hard drive, press the Windows key, type "Command Prompt" in the search bar, right-click on it in the results, and select "Run as administrator."
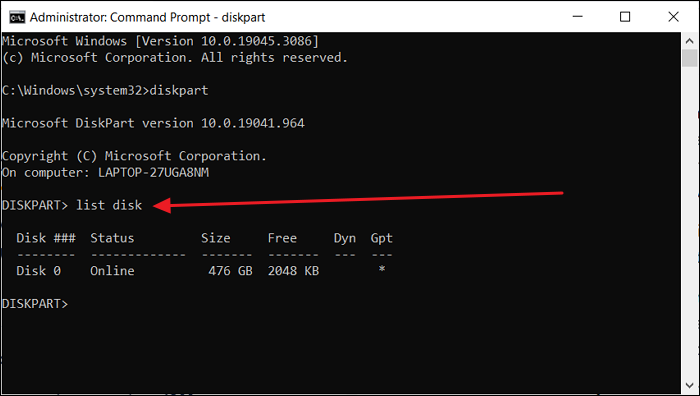
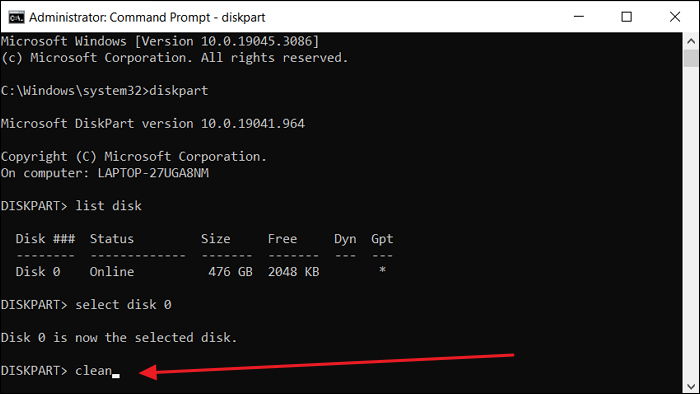
Step 2: To manage your external hard drive using diskpart, start by opening the Command Prompt window, then type the "diskpart" command and press Enter. Next, run the "list disk" command to view a list of all connected disks, including your external hard drive. Select the targeted disk using the "select disk X" command, where "X" is the disk number of your external hard drive.
Step 3: Use the command "clean" to wipe all partitions and data on the external hard drive. Then, create a new primary partition with the command "create partition primary". Finally, format the partition with the NTFS file system using the command "format fs=NTFS quick".
Step 4: If the partition is not automatically assigned a drive letter, use the command assign to assign a letter, such as E:, and then exit the DiskPart utility.
Phase 3. Recover the Data from the Backup
After successfully formatting your external hard drive without losing data using one of the four methods, the final step is to recover the data from the backup you created. This is a crucial phase to restore your files, documents, photos, and other valuable content to the external hard drive.
If you would like to take further in understanding the topic of formatting an external hard drive, the links below may meet your requirements:
What Are the Reasons for Formatting an External Hard Drive
Formatting an external hard drive may be necessary due to various reasons, including technical issues or the need to optimize storage. Users may find themselves in a situation where they need to format their external hard drive to resolve problems or to free up space for new data.
- When using an external hard drive on a different device, it may need to be formatted to a file system that is compatible with that device, as different operating systems and devices often require specific file systems to function correctly.
- External hard drives can be vulnerable to infections from viruses or malware, especially when used across multiple computers. If the drive becomes infected, formatting it can be necessary to remove the malicious software and prevent further contamination of other devices.
- External hard drives can malfunction due to technical issues or data corruption, but formatting the drive may resolve the problem and restore it to a usable state.
- If an external hard drive becomes "RAW", it means the file system is unrecognized or damaged. Formatting the drive can rebuild the file system and make it usable again.
Conclusion
Formatting an external hard drive requires careful consideration to avoid data loss. It's essential to back up your data before proceeding, as formatting will erase all existing files. Understanding the reasons behind formatting, such as addressing storage-related challenges or optimizing performance, is crucial. By employing the appropriate method, you can ensure compatibility with different systems and maintain the integrity of your valuable files.
For the best and most user-For a user-friendly experience, we recommend using Qiling Disk Master to format your external hard drive. This tool not only simplifies the format process but also provides a secure backup of your data before proceeding, ensuring a hassle-free experience. To discover the full potential of Qiling Disk Master, download it and explore its features for effectively managing your storage devices.
FAQs About How to Format an External Hard Drive Without Losing Data
If you still have questions or seek further information on how to format an external hard drive without losing data, we've compiled some common queries below to address your concerns.
1. How long does it take to format an external hard drive?
The time to format an external hard drive varies depending on the drive size, formatting method, and computer speed, with quick formats taking a few seconds to minutes and full formats taking several minutes to hours for larger drives.
2. Should I format the external hard drive to NTFS or exFAT?
The choice between formatting to NTFS or exFAT depends on your specific needs, with NTFS being more suitable for Windows computers and offering larger individual file sizes and enhanced security features.
exFAT is more compatible with a broader range of devices, including Windows, macOS, and some modern gaming consoles, making it a better option for those who need to transfer large files across multiple devices.
3. How to format a FAT32 to NTFS without losing data?
To avoid data loss when formatting a FAT32 partition to NTFS, you will need to use Qiling Disk Master. This tool allows you to convert the partition format without deleting the existing data, ensuring a safe and seamless transition. Simply download and install Qiling Disk Master, select the FAT32 partition you want to convert, and follow the on-screen instructions to complete the process.
Step 1: Launch Qiling Disk Master, select the targeted partition, right-click and choose "FAT32 to NTFS" from the "Advanced" options.
Step 2: To proceed, click "Proceed" on the pop-up box. Then, tap "Apply" to initiate the conversion process.
Related Articles
- How to Fix "File System Error (-805305975)" in Windows 10/11 [Step-by-Step Guide]
- 3 Ways to Fix Convert to Dynamic Disk Greyed Out
- How to Fix "Steam Not Enough Disk Space" Error [Updated]
- Your Easiest Guide for Running USB Flash Drive Speed Test Online
- How to Unlock HP Laptop Without Password | 2024 Guide🔥
If you're looking for a solution to unlock your HP laptop without a password, this guide can help. This article will guide you through the process, providing a step-by-step solution to regain access to your laptop. - Can I Unlock Windows Passwords? Yes [5 Beginners' Tools]
If you've forgotten your Windows account password, don't worry, there are five methods to help you unlock it. Make sure to check and be prepared with these options in case you need to reset your password for any user.