How to Upgrade Steam Deck SSD [Easiest Way]
Complex Level: Simple, Beginners
Duration: Around half an hour
Applies to: Upgrade 1TB, 2TB, 64GB Steam Deck SSDs
Goal: Update Steam Deck SSD Without Reinstalling OS
Upgrading your Steam Deck SSD might seem intimidating, but it doesn't have to be a cause for panic or a time-consuming process. You can find a detailed tutorial on this page that guides you through the process of upgrading your Steam Deck SSD.
- What You Need to Update Steam Deck SSD
- Stage 1: Remove the Original SSD
- Stage 2. Clone the Steam Deck Without Losing One Thing
- Stage 3. Put the New SSD into Steam Deck
What You Need to Update Steam Deck SSD
To upgrade your Steam Deck SSD, you'll need to purchase a compatible SSD drive, a screwdriver, and a USB-C cable. You'll then need to remove the existing SSD, attach the new one, and boot up your Steam Deck. After that, you'll need to follow the Steam Deck's built-in instructions to format the new SSD and reinstall the operating system. Finally, you'll need to reinstall your games and restore your settings. It's a bit of a process, but it's worth it to have more storage space and a smoother gaming experience.
Preparation:
- 👌A Steam Deck having a 25% charge or less remaining
- 👌A 2230 form factor NVMe SSD
- 👌A pair of tweezers and a plectrum
- 👌A PH1 or PH0 screwdriver
- 👌A Windows PC
- 👌A reliable cloning utility (Qiling Disk Master)
Cloning the used sectors is a quicker and easier method compared to reimaging, which can take several hours. In this tutorial, we use Qiling Disk Master to clone the SteamOS and other game data to the new SSD, as it is a faster and more convenient option. It is recommended to download this tool in advance to your Windows PC. Alternatively, you can also add storage to your Steam Deck in other ways; you can find more information by clicking the link below.
How to Add Storage to Steam Deck [2023 Full Guide]
You can expand your Steam Deck's storage by adding a micro SD card, USB drive, or larger SSD drive. This allows you to store more games and content on your device, and can be achieved through various methods, from simple to complex. We'll guide you through the process in detail below.
What's the plan for Stage 1?
Stage 1: Remove the Original SSD
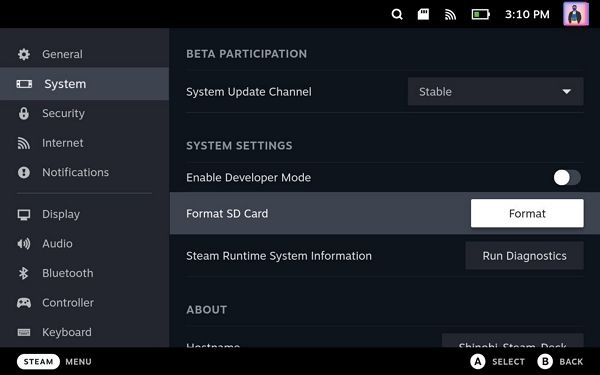
To safely modify your Steam Deck, it's essential to discharge its Li-Ion battery to below 25% and put it in battery storage mode to prevent accidental puncturing. This precautionary measure will ensure a safe and successful modding experience. Now, let's get started.
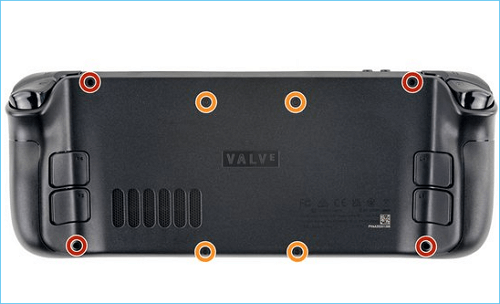
Step 1. Remove the back cover screws, unclip the back cover, and take it off.
Step 2. Uncover the hidden shield screw and remove the shield.
Step 3. Disconnect the battery.
Step 4. Remove the SSD screw, and then remove the SSD.
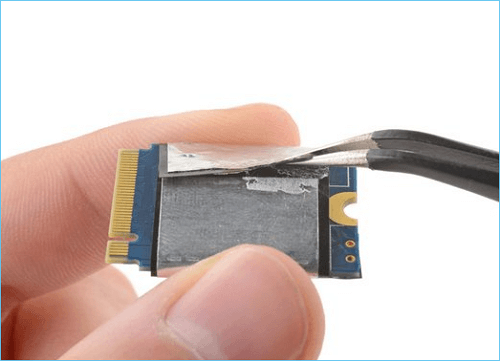
Step 5. Remove the SSD shielding and take out the original SSD.
Further Reading: Install Windows on Steam Deck
Stage 2. Clone the Steam Deck Without Losing One Thing
To proceed, place both the original SSD and the new SSD in a Windows PC, then clone and transfer all game data from the old SSD to the new SSD. If the new SSD has never been used, you may encounter an "SSD not initialized" error, requiring initialization before data transfer. Qiling Disk Master can initialize the new SSD and clone used sectors from the old SSD to the newly initialized one.
Guide 1. Initialize the New SSD
Step 1. Open Qiling Disk Master and got to Partition Manager.
Step 2. Right-click the target disk, whether it's an HDD or SSD, and select "Initialize to MBR" or "Initialize to GPT".
Step 3. Waiting to finish the operation.
Now that your new SSD is usable, you can clone the game data and SteamOS to it, and Qiling Disk Master can also help with managing your Steam Deck.
- Test Steam Deck SSD speed
- Run Steam Deck SD card speed test
- Install and format SD card for Steam Deck
- And more
To clone the old SSD to the new SSD, you can use the built-in disk cloning feature in the operating system or a third-party software like Qiling Backup. These tools create a sector-by-sector copy of the old SSD, including its data, settings, and operating system.
Guide 2. Clone the Steam Deck SSD to the New One
It is time-Since Qiling Disk Master can only clone used sectors, we need to save the original SSD of the Steam Deck to the new SSD by cloning it. This process involves using the Qiling Disk Master tool to create a clone of the original SSD.
Step 1. Select the source disk.
Choose the source disk and click "Next".
Step 2. Select the target disk.
Select the desired hard drive or solid-state drive as the destination and click "Next" to proceed.
Step 3. View the disk layout and edit the target disk partition size in one paragraph shortly
Then click "Continue" when the program warns it will wipe out all data on the target disk. (If you have valuable data on the target disk, back up it in advance.)
To customize your disk layout, you can choose from three options: Autofit the disk, Clone as the source, or Edit disk layout. If you want to leave more space for the C drive, select Edit disk layout.
Step 4. Click "Proceed" to start the disk cloning process.
Read Warning message and confirm "Yes" button.
As a Steam Deck user, you may also be interested in learning about the best games to play on the device, how to optimize performance, and troubleshoot common issues. Additionally, you may want to know about the Steam Deck's hardware and software features, such as its AMD APU, 16:9 display, and Steam OS operating system.
To put the new SSD with cloned data back into the Steam Deck, simply remove the old SSD from the device, insert the new one, and power on the Steam Deck to verify that it is working properly. Make sure to check that the device is booting up and running smoothly with the cloned data.
Stage 3. Put the New SSD into Steam Deck
In this part, we need to insert the new SSD into the Steam Deck and make it normally work as the old SSD. Here is how:
Step 1. Place the foil shielding from the old SSD onto the new SSD.
Step 2. Insert the new SSD and screw it into the slot.
Step 3. Reconnect the battery, then carefully push the fabric strip connector back into the battery port. The power light will flash white for a second, indicating a correct connection.
Step 4. Reconnect the shielding, aligning it with the screw holes underneath, then ensure the fan wires are above the shield.
Step 5. To reconnect and secure the back plate, place the backplate on top of the Steam Deck and screw it in. This will ensure a proper fit and secure the components inside.
You can check the video from Loaded0 on Youtube for a detailed guide.
Now that the SSD is installed and the operating system is ready, you can turn on your Steam Deck and see if it boots properly on the new SSD. This is the final step to verify that the upgrade was successful. Just plug in the power cord, press the power button, and see if the Steam Deck turns on and loads the operating system correctly.
You May Also Like:
If your Steam Deck won't start, it's likely due to something not being put back in place properly after disassembly. To resolve this, reassemble the device and ensure the battery connector and SSD are properly secured in their respective places, as these components are crucial for the Steam Deck's operation. This will help prevent damage to the device and get it up and running again.
To resolve boot issues, try removing any loose items from the computer, such as peripherals or expansion cards, and then reinsert them firmly. This should ensure they are properly plugged in, which may resolve the problem.
Conclusion
Upgrading the Steam Deck's SSD can be a complex process, but following the guide from scratch again can help ensure everything is done in the correct order. A tutorial is available that allows you to upgrade the SSD without using Rufus or creating bootable images, and cloning the old SSD to the new one can save time and hassle by preserving game data and settings. Qiling Disk Master can initialize the new SSD and clone the SteamOS and game data from the old SSD to the new one, making the process easier and more efficient.
Update Steam Deck SSD FAQs
If you're feeling nervous about updating your Steam Deck's SSD, don't be! The tutorial above is a helpful guide. If you have any other questions or need further assistance, here are some additional questions related to updating the SSD for the Steam Deck:
1. Can you update your Steam Deck SSD?
Updating the Steam Deck SSD is a relatively straightforward process. Simply remove the old SSD, clone the data from the old to the new one, and then replace the new SSD. However, if you only have a few games installed and have access to a stable internet connection, it might be more efficient to simply reimage your Steam Deck with the latest SteamOS, rather than cloning the SSD, which can save you the hassle of re-downloading games and navigating the complexities of the Linux-based operating system.
2. What are the best Steam Deck SSDs?
The best Steam Deck SSD is the Sabrent 2230 NVMe drive, considering budget and security, followed by other options like XPC Technologies 2TB, WD SN740 2TB, WD SN530 1TB, and Toshiba BG4 256GB.
3. How do I add SSD to 64GB Steam Deck?
Whatever the SSD capacity is, the tutorial is the same.
Step 1. Prepare your Steam Deck and remove the back cover screws.
Step 2. Remove the back cover and uncover the hidden shield screw.
Step 3. To replace the SSD, you'll need to remove the shield screws and take out the shield. Next, disconnect the battery and carefully take out the old SSD. This provides you access to the area where the new SSD will be installed.
Step 4. To prepare your 64GB SSD, first initialize it, then clone the data from your old SSD to the new one.
Step 5. Insert the new SSD into the Steam Deck, then reassemble the device by putting everything back together. This should complete the upgrade process.
Related Articles
- How to Move Unallocated Space to C Drive in Windows 10/11 [Step-by-Step Guide]
- SSD Slow Boot Windows 11 | Boot Windows 11 from SSD
- Clear/Reformat/Erase/Wipe SD Card & USB Flash Drive
- Partition Manager for Windows 11 Free Download in 2023 🏆
- Can You Convert Basic to Dynamic in Windows 11? Yes, Here Is The Guide
If you're wondering how to convert Basic to Dynamic in Windows 11, we have some excellent solutions. We'll guide you through the process, and you'll learn why it's necessary. Keep reading to discover the benefits and a bonus tip! - How Do I Convert Bootable Disk or Bootable USB to Normal in Windows 11
To turn a bootable USB back to normal, you can use the built-in Disk Management tool in Windows or the Terminal in macOS. In Windows, go to Settings > System > Storage > Disk Management, select the USB drive, and delete the volume.