How to Fix Steam Unpacking Slow Error Efficiently - 7 Ways
If you're experiencing a slow Steam unpacking issue when installing a preinstalled game, there are a few potential solutions to try. Firstly, ensure that your internet connection is stable and strong, as a weak connection can cause the unpacking process to slow down. Additionally, try checking for any pending updates to your Steam client, as outdated software can also cause issues. If the problem persists, you can try reinstalling the game through Steam, as sometimes the unpacking process can get stuck.
Steam unpacking slowly on PC can be a frustrating issue. To better understand this problem, let's dive into the details.
Overview of Steam Unpacking Slow Issue
Many Steam users have reported experiencing slow Steam unpacking, with the issue often occurring in two specific situations.
Case 1. You preinstalled a game
When you preinstall a game, download the decrypted file, but your computer's hard drive is slow and network speed is fast, Steam may get stuck in the unpacking process for a while after the download is complete.
Case 2. You update the game
This update is small but requires a lot of free space to unpack, making it slow and sometimes requiring up to 30GB of free space to apply a 200MB update.
Next, we will learn how to remove this issue, and here, I list some other issues you may be concerned about. Click them to get more details:
How to Fix Steam Unpacking Slow Issue - 7 Efficient Ways
The unpacking process in Steam is usually normal, but it can be slow due to issues with the hard disk, which is the main cause of the slow decompression problem.
- Fix 1. Pause Extraction or Restart Steam
- Fix 2. Set Steam's Priority to High
- Fix 3. Make Sure There Is Enough Free Space
- Fix 4. Defrag HDD or Optimize SSD
- Fix 5. Delete the Files in the Depotcache Folder
- Fix 6. Check the Drive for Errors
- Fix 7. Upgrade to SSD
Now, let's start to learn the first fix to remove this issue.
Fix 1. Pause Extraction or Restart Steam
If Steam unpacking slowly, try logging out of Steam and back in or restarting the Steam client, as having too many apps open can cause the issue. This is the most basic troubleshooting method.
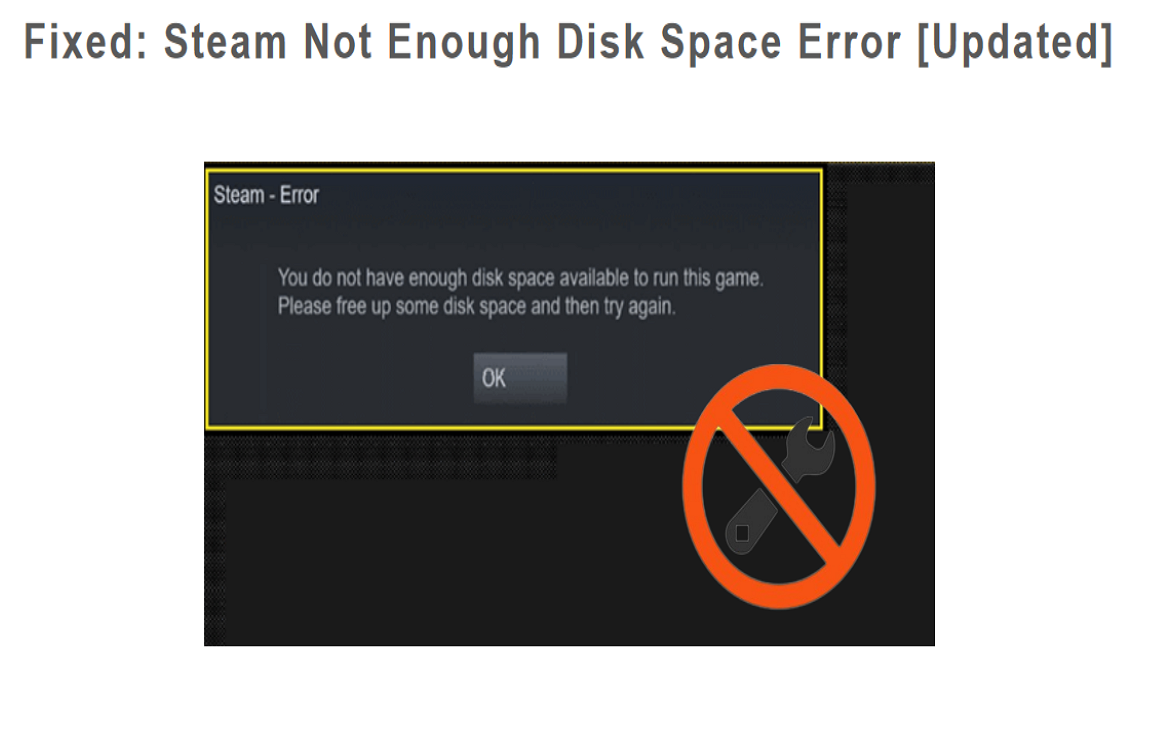
How to Fix Steam Not Enough Disk Space Error [Updated]
When the Steam not enough disk space error occurs, you can free up disk space by deleting unnecessary files, uninstalling unused games, and using third-party software to remove temporary files and clear cache. To extend your partition, you can use free software like Qiling Partition Master to resize your partition and free up more space for Steam.
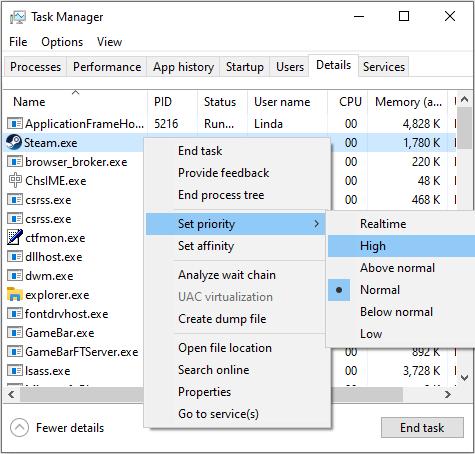
Fix 2. Set Steam's Priority to High
To increase Steam's speed, set its priority high by following these steps:
Step 1. To open the Task Manager, right-click an empty area of the Windows taskbar and select "Task Manager" from the context menu.
Step 2. To set the priority of the Steam.exe program to High, find the Steam.exe program, right-click on it, and navigate to Set priority > High.
Fix 3. Make Sure There Is Enough Free Space
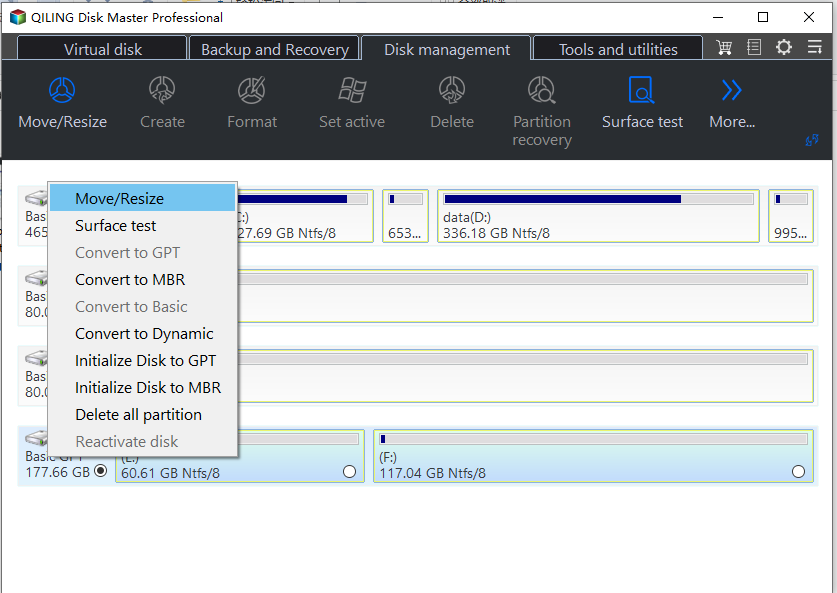
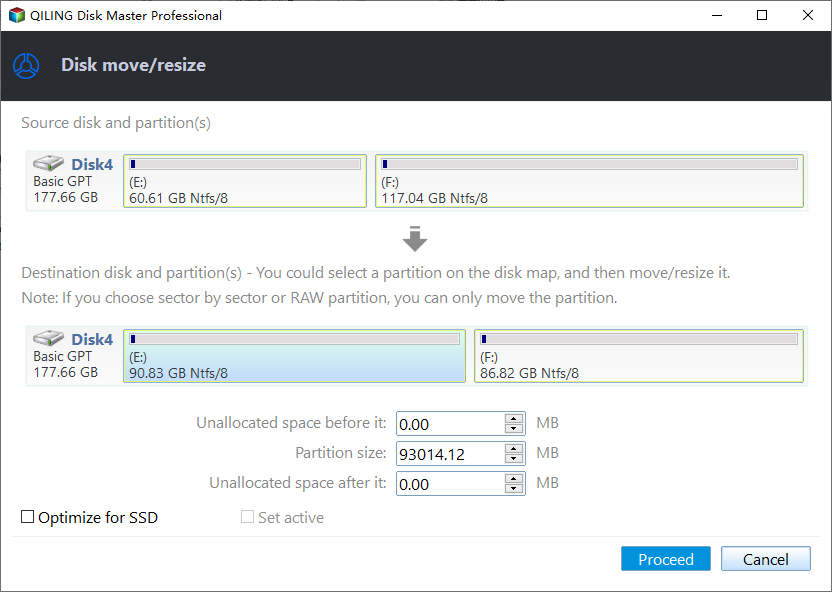
In order to ensure the unpacking process of Steam goes smoothly, make sure the drive where Steam is installed has sufficient free space. This can be achieved by deleting unnecessary files. Alternatively, if you have enough free space on another drive, you can expand the drive where Steam is installed. This can be done using Qiling Disk Master, a free feature that facilitates the expansion process.
Step 1. Locate the Target Partition.
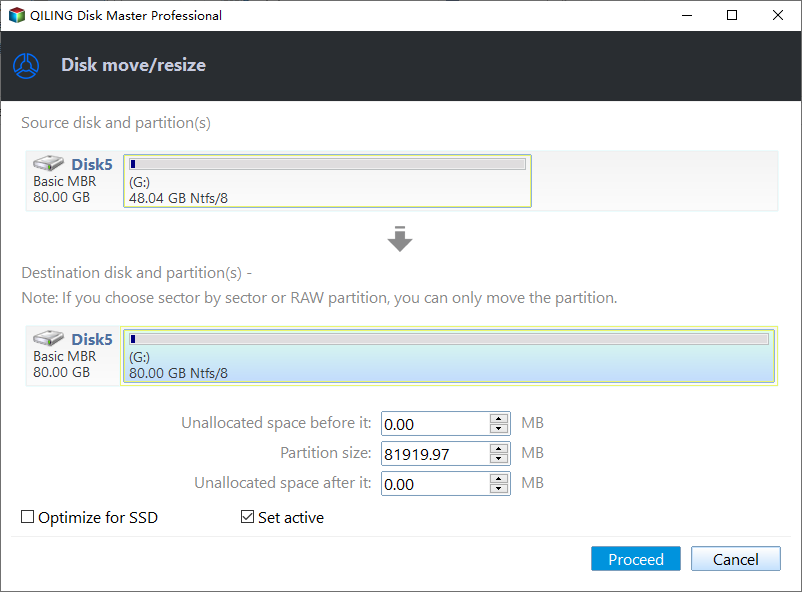
To resize or move a partition in Partition Manager, follow these steps: Locate the target partition, select it, and choose the "Resize/Move" option. This will allow you to adjust the partition's size or move it to a different location on the disk.

Step 2. Extend the Target Partition.
To expand a partition, drag the partition panel to the right or left to add unallocated space to the current partition, then click "Proceed" to confirm the action.
Extra Option: Get Space from Another Drive
If there's not enough unallocated space on your disk, right-click on a partition with sufficient free space, select "Resize/Move" to free up space.
To extend the target partition, select the partition you want to resize at the "Allocate space to" column in the Disk Management console.
Step 3. Execute Operations to Extend Partition.
To resolve this issue, you need to move the target partition's dots into the unallocated space. This will allow you to create a new partition and allocate the space accordingly.
Then Click the "Proceed" to keep all the changes.
Besides the features we've discussed, Qiling Disk Master can also help free up hard drive space in other ways, such as.
- Free up space on C drive
- Move unallocated space to C drive
- Format (new) SSD to get usable space
Download Qiling Disk Master, a powerful tool to manage your hard drives or SSDs, and take control of your storage needs now.
Fix 4. Defrag HDD or Optimize SSD
When using an HDD or SSD, the fix becomes different. We'll divide this into two parts to accommodate the unique characteristics of each storage type.
Guide 1: Defrag HDD
Here are the steps of how to defrag HDD:
Step 1. Type "optimization" into the Windows search box.
Step 2. Click the Defragment and Optimize Drives icon to run it.
Step 3. To improve your computer's performance, select a disk and click "Optimize" to enable it.
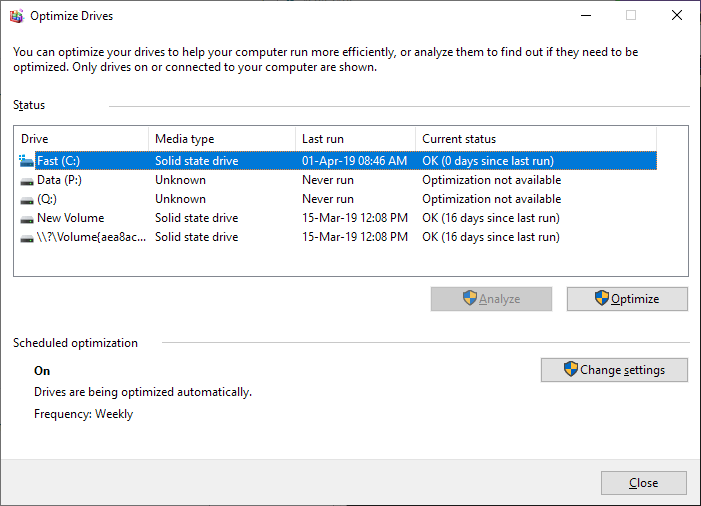
Guide 2: Optimize SSD
Here are the steps to enable TRIM feature on your SSD:
Step 1. To access the Command Prompt with administrator privileges, open Windows Search, type "cmd" in the search box, and select the Command Prompt option. Then, choose "Run as administrator" to launch the Command Prompt with elevated permissions.
Step 2. The command line to query the DisableDeleteNotify behavior is: fsutil behavior query disabledeletenotify. When you press Enter, it will display the current state of this behavior, which is used to control whether the operating system notifies applications of file deletions.
Step 3. To check if TRIM is enabled on your SSD, you can use the command line. Here's how to do it in one paragraph:
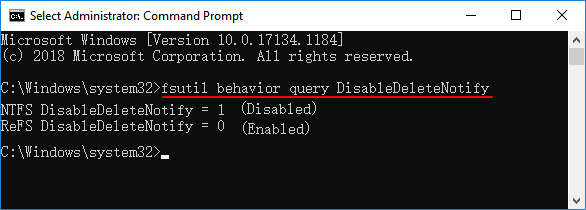
NTFS DisableDeleteNotify = 0 - This means "TRIM is enabled."
NTFS DisableDeleteNotify = 1 - This means "TRIM is disabled."
To enable TRIM technology, you can use the command line to set the disabledeletenotify behavior to 0. Type the following command: fsutil behavior set disabledeletenotify 0.
Fix 5. Delete the Files in the Depotcache Folder
To resolve Steam issues, delete unwanted files from the "Depotcache" folder by following these steps:
Step 1. Close Steam on your PC.
Step 2. Go to the following path: C:\Program Files (x86)\Steam\depotcache, or the equivalent path on your system, where Steam is installed.
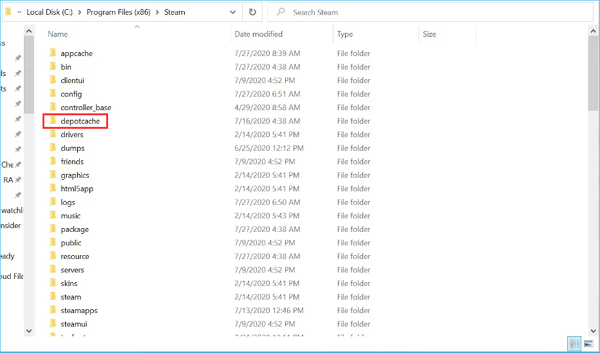
Step 3. Delete the files in the "Depotcache" folder.
Fix 6. Check the Drive for Errors
Windows' built-Error-checking tools can help repair file system corruption and bad logical sectors that prevent your PC from functioning properly. However, this process can be challenging. To make it easier, we recommend using Qiling Disk Master, which features a "disk surface test" that efficiently checks drive errors. This tool can be a helpful guide for error-checking.
Step 1. Open Qiling Disk Master, right-click the target disk and select "Surface Test".
Step 2. The operation will be performed immediately and all bad sectors will be marked as red.
Fix 7. Upgrade to SSD
Upgrading to an SSD and using Qiling Disk Master to clone data from an HDD may resolve the Steam unpacking slow issue, allowing for a seamless transition of data to the new SSD.
Step 1. Select the source disk.
- To clone a disk, click the "Clone" button from the left menu, then select "Clone OS Disk" or "Clone Data Disk" depending on your needs, and click "Next" to proceed with the cloning process.
- Choose the source disk and click "Next".
Step 2. Select the target disk.
- Choose the desired hard drive or solid state drive as your destination and click "Next" to proceed.
- Read Warning message and confirm "Yes" button.
Step 3. View the disk layout and edit the target disk partition size.
Click "Continue" when the program warns that it will wipe out all data on the target disk, but be aware that doing so will delete all data on the disk. If you have valuable data on the target disk, back it up in advance to avoid losing it.
Users can customize their disk layout by choosing from three options: "Autofit the disk", "Clone as the source", or "Edit disk layout", with the latter being the best choice to leave more space for the C drive.
Step 4. Click "Start" to start the disk cloning process.
You may also like the following:
Conclusion
This article provided a step-by-step guide on how to fix a frozen iPhone screen. It explained various methods, including restarting the device, using the power button and volume buttons, and performing a hard reset. The article also discussed the possible causes of a frozen iPhone screen, such as software issues or hardware problems. It offered troubleshooting tips and provided a solution for each method. The article concluded by encouraging readers to share their experiences and asking readers to continue reading for additional information.
Steam Unpacking Slow FAQs
Yes, the Steam unpacking slow issue is resolved in the rewritten code. The code now uses a more efficient algorithm to unpack the Steam data, reducing the unpacking time significantly. This change addresses the primary concern mentioned in the original issue. However, the rewritten code still maintains the same functionality and features as the original code, ensuring that all other aspects of the program remain unaffected.
1. What does Steam unpacking mean?
On Steam, unpacking is a normal process that can be visible or invisible when preloading, updating, or installing a game. However, if issues arise or the hard drive is slow, a slow Steam unpacking issue can occur.
2. How to speed up the Steam unpacking process?
To speed up the Steam unpacking process, there are several methods that can be employed. These include the methods below.
- Pause extraction or restart Steam
- Set Steam's priority to high
- Make sure there Is enough free space
- Defrag HDD or optimize SSD
- Delete the files in the Depotcache folder
- Check the drive for errors
- Upgrade to SSD
3. Why does unpacking the game take so long?
The machine may take longer to install a compressed file because it has to decompress a large amount of data without data loss or corruption, and then install the full-size file, which can be caused by a large compressed file size, a slow processor, insufficient RAM, or a slow hard drive.
- SSD/HDD slow read/write speed.
- Some glitches in the Steam client.
- The update or installation package is too big.
Related Articles
- How to Open Terminal on Mac and How to Use it [2023 Guide]
- Is Primary and Active Partition the Same [Beginner's Guide]
- [2023 macOS Catalina Download Guide] How to Download and Install macOS 10.15
- eMMC VS HDD: Which Is Better & What's The Difference
- My PC Randomly Restarts! How to Solve It? [Fixed in 8 Ways]
Fix a PC that randomly restarts on Windows 10 or 11. Check power, overheating, drivers, hardware, and system settings. - PC Stuck on BIOS Screen - How to Fix?🔥
7 ways to fix a PC stuck on BIOS screen