How to Add Storage to Steam Deck [2023 Full Guide]
Overview of how to add storage to Steam Deck:
| ⚙️Complex Level | Low, Beginners |
| ⏱️Duration | 3-5 minutes |
| 💻Applies to | Add storage to Steam Deck |
| ✏️Stages |
Way 1. Add Storage to Steam Deck - Micro SD Card |
| 🔨Tools | microSD card/USB drive/SSD; Steam Deck |
The Steam Deck offers various storage options, ranging from 64 GB to 512 GB, with the 64 GB variant featuring eMMC storage, which is slower than the SSD storage found in the 256 GB and 512 GB variants. This means that while these storage options should suffice for most users, installing large games will quickly fill up the storage, making it essential to consider the storage capacity when choosing a Steam Deck model.
You can expand your Steam Deck memory without major issues by adding a micro SD card, USB drive, or larger SSD drive. Qiling will guide you through the process, starting with simple methods and progressing to more complex ones. This article will provide a detailed step-by-step guide on how to operate and upgrade your Steam Deck storage.
Way 1. Add Storage to Steam Deck - Micro SD Card [Recomended]
Adding a microSD card as Steam Deck Expandable Storage is the easiest way to create more space for games on Steam Deck, but it requires purchasing a good quality microSD card and formatting it as EXT4.
Here is how:
Step 1. To insert the microSD card into the Steam Deck, locate the microSD card slot on the bottom right of the device, then insert the card into the slot until it clicks into place.
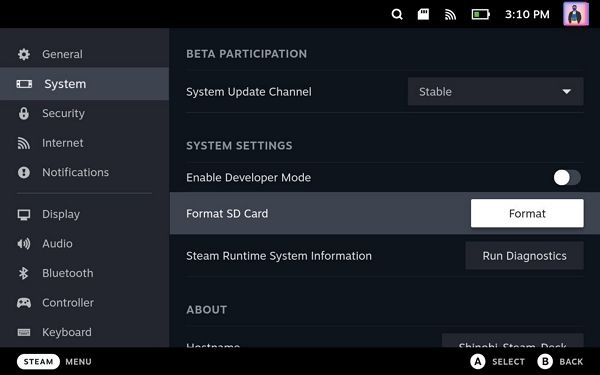
Step 2. To make your microSD card compatible with your Steam Deck, insert the card into the device and then go to Settings > System > Format SD Card to ext4. This will format the card to a format that is compatible with the Steam Deck, allowing you to use it to store games and other data.
Step 3. To move installed games to a microSD card, go to Settings > Storage, select the games you want to move, press Y, and choose the microSD card as the destination.
To expand your Steam Deck storage, you'll need to purchase a microSD card, which can be inserted into the device's microSD card slot. You can then format the microSD card as a Steam drive, which will allow you to store games and applications on it.
Way 2. Upgrade the SSD for Steam Deck
Upgrading the Steam Deck's SSD to a larger one is a viable option for increasing storage, but it requires careful handling to avoid potential issues.
Follow this guide to try:
Step 1. Buy a reliable larger SSD and initialize it. For non-pros, use Qiling Disk Master to make it easier.
To initialize your SSD using Qiling Disk Master, follow these steps: First, ensure your SSD is connected to your computer and the Qiling Disk Master software is installed. Next, launch the software and select the SSD you want to initialize.
- Connect the SSD to a Windows PC and launch the tool.
- In the Partition Manager section, right-click the new SSD, select "Initialize to GPT" or "Initialize to MBR" and wait for the task to complete.
Read Also: Top 5 SSDs for Steam Deck 2023
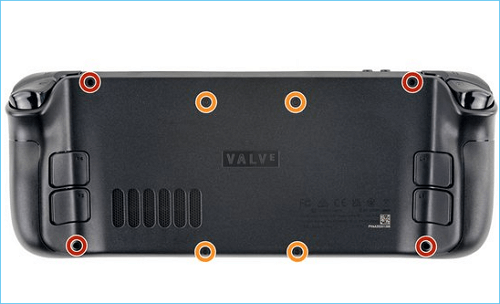
Step 2. To upgrade your Steam Deck's storage, start by removing the eight screws on the back of the device, then take out the battery and finally remove your current SSD.
Step 3. You can clone the game data from the old SSD to the new one, or you can download the SteamOS recovery image, which is a more complex option.
Step 4. Install the new SSD to your Steam Deck.
You can click the link below to learn more about the topic.
How to Upgrade Steam Deck SSD [Easiest Way]
Upgrading your Steam Deck SSD can be a straightforward process that doesn't have to be time-consuming or intimidating. By following a detailed tutorial, you can successfully swap out your Steam Deck's original SSD for a higher-capacity one, potentially increasing your gaming library's storage capacity.
Way 3. Use a USB Drive to Add Steam Deck Storage
You can also add extra storage to your Steam Deck by connecting a USB flash drive via the USB Type-C port. However, this method is a bit more complicated, requiring you to know the content beforehand.
- Important
-
1. To resolve the issue of needing to enter desktop mode every time a USB drive is connected, you can try the following: Ensure that the USB drive is properly ejected before disconnecting it. Also, check if the USB drive is being recognized by the system.
2. Connect a keyboard and mouse to your Steam Deck to enable keyboard and mouse input for games and other applications. This allows you to use a traditional computer interface on your handheld gaming device.
3. You cannot charge the Steam Deck while using an external hard drive.
4. Steam Deck's battery drains faster.
Well, here is how:
Step 1. Delete all partitions on the USB flash drive. Then connect it to your Steam Deck.
Step 2. To access the desktop, press the STEAM button to visit the main menu, and then navigate to POWER > ACCESS DESKTOP.
Step 3. Navigate to System > Konsole, enter your password, and set a password in the terminal.
Step 4. Go back to the system and select KDE Partition Manager. (may require entering your password)
Step 5. Right-click on your USB drive and select New.
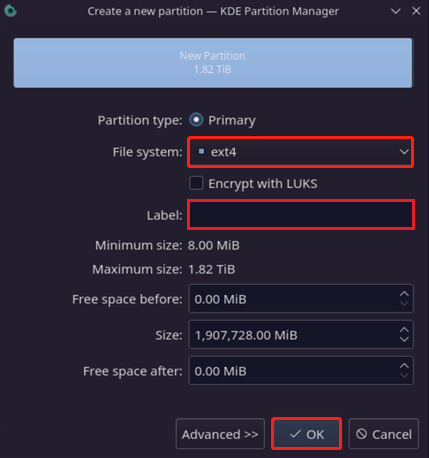
Step 6. In the prompt window, select ext4 as the target file system from the drop-down menu and assign a label for the partition, then click OK.
Step 7. After clicking Apply, the USB drive will appear in the taskbar, and then you can click Install and Open to proceed.
Step 8. Go to Konsole, type `sudo chown deck /run/media/deck/[drive label of your USB]`, then press Enter. This changes the USB drive's ownership from root to deck, allowing SteamOS to access it.
Step 9. To access Steam settings, you can open Steam again, click on the Steam button in the upper left corner, and select Settings from the dropdown menu.
Step 10. Navigate to the "Downloads" tab and click "STEAM Library Folder."
Step 11. To add a USB drive as Steam Deck external storage, click the "+" option next to your current storage device.
You may also like:
Conclusion
Adding more storage to your Steam Deck will allow you to download more games. To get more free space, you can try upgrading the SSD, connecting an external USB, or purchasing a microSD card - with the latter being highly recommended for newbies.
Now that you know how to expand your Steam Deck's memory with Qiling Disk Master, it's easier to have more games in your arsenal, and you can even use this tool to install Windows on Steam Deck, making it a helpful article to share with friends.
Add Storage to Steam Deck FAQs
1. What is the Steam Deck external hard drive format?
To use Steam Deck, you need to format an external hard drive as ext4, which is necessary for SteamOS to recognize it as a place to install games in game mode.
2. Will adding the storage of Steam Deck void its warranty?
The Steam Deck's MicroSD card slot does not void its warranty, but opening and replacing the internal SSD may void it.
3. What maximum extra storage can we use in a Steam Deck with MicroSD cards?
MicroSD cards with capacities up to 2 TB are compatible with the Steam Deck's microSD card slot.
Related Articles
- How to Upload Files to Google Drive Automatically
- Mac Clipboard History - How to View and Clear Clipboard History on Mac
- How to Factory Reset M1/M2 Mac in 2023 [for MacBook, iMac, Mac mini]
- How to Open Task Manager on Mac [Activity Monitor]
- How to Keep Hard Drive Cool [Step-by-Step Guide]
Learn how to keep a hard drive cool and prevent overheating. Use airflow, placement, monitoring tools, and maintenance tips to protect data. - What Laptop Hard Drive Size Should I Use [2023 Explanation]
Learn common laptop hard drive sizes, form factors, and capacity options so you can choose the right HDD or SSD upgrade.