How to Get, View, Remove Windows 10 Update? [2022 Latest Guide]
As of May 2022, Windows 10 has dominated the market with a 78% share among all Windows builds, according to a statistic company, and this number is expected to grow with the release of the new Windows 10 May Update 2022 and the upcoming Windows 10 Sun Valley Update.
If you're looking for ways to keep your Windows 10 computer updated, view its update history, or remove an installed update, this guide can help. This guide provides tips and tricks for managing Windows 10 updates, including keeping your computer up-to-date, viewing update history, and even removing installed updates if needed. Whether you're a tech-savvy user or just looking for a quick solution, this guide can help.
In this 2022 guide, we'll show you how to get, view, and remove Windows 10 updates on your computer. Let's get started!
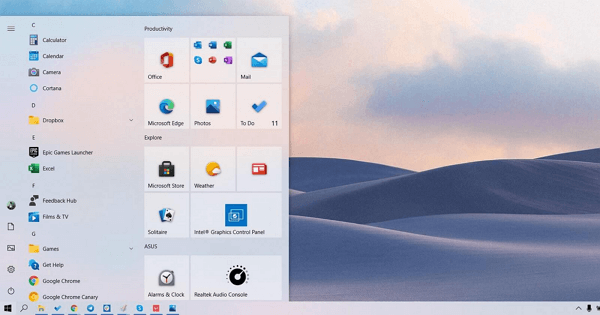
#1. How to Get Windows 10 Update? (Latest Windows 10 May Update Included)
In this part, you'll learn:
- What is the latest Windows 10 update
- When will the newest Windows 10 Sun Valley Update be ready
- How to get Windows 10 update
Latest Windows 10 2022 May Update - 21H1
Microsoft's latest Windows 10 update is the May 2022 Update, also known as Windows 10 21H1 Update, released on May 18th, 2022, with a support period of 18 months, ending on December 13th, 2022.
If you're about to get the latest official Windows 10 update, follow the guide below to download and install it on your computer.
Newest Windows 10 Sun Valley Update - 21H2
Microsoft is set to release the Windows 10 Sun Valley Update (Build 21H2) on June 24th, initially to preview builder users, with an official release in October 2022.
If you're looking for the latest Windows 10 21H2 update, you can try updating to a preview build version, or wait for the official release.
To get the Windows 10 update on your PC, follow these guidelines: ensure your PC is connected to the internet, go to Settings, then Update & Security, and click on Check for updates. If updates are available, Windows will automatically download and install them. Alternatively, you can also check for updates by going to the Start menu, typing "update" in the search bar, and selecting the option to check for updates.
1. Get the Latest Windows 10 May 2022 Update
Step 1. Click Windows 10 icon and select "Settings".
Step 2. Click "Update & Security" > "Windows Update".
Step 3. Click "Check for Update".
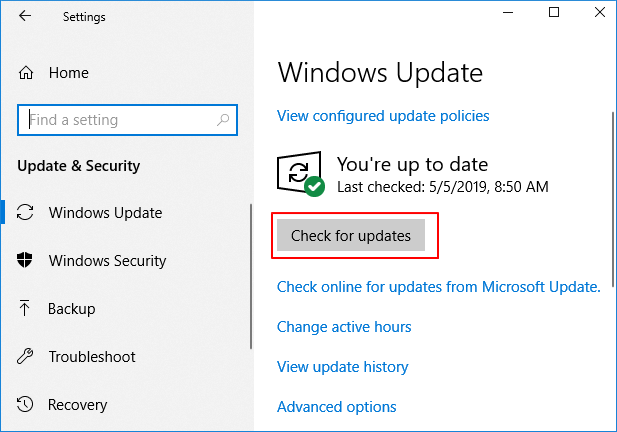
If Windows 10 update fails, you can manually get the update by going to Settings > Update & Security > Windows Update, and clicking on the "Check for updates" button. If the update is available, it will be downloaded and installed automatically. If it doesn't work, try the next step to troubleshoot the issue.
2. Manually Get Windows 10 Update
Step 1. Click the Windows icon and select "Settings".
Step 2. Click "Update & Security" > "Windows Update".
Step 3. Click "Check for Updates".
Step 4. Click "Download and install now" on the Windows Update page to get the feature update for your PC.
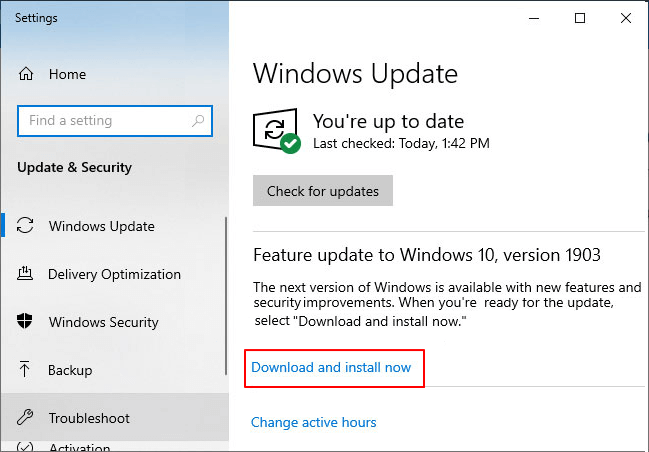
Then follow the on-screen guide to finish the Windows 10 update process.
If the featured update is not yet available for your current Windows operating system, you can try manually downloading and installing the Windows 10 update on your computer.
3. Manually Download and Install Windows 10 Update
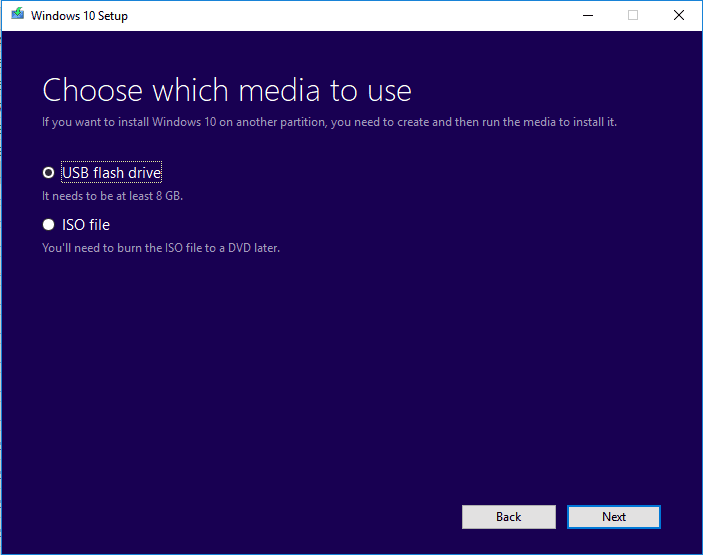
Step 1. Download and create Windows 10 installation media to an empty USB drive (8GB+).
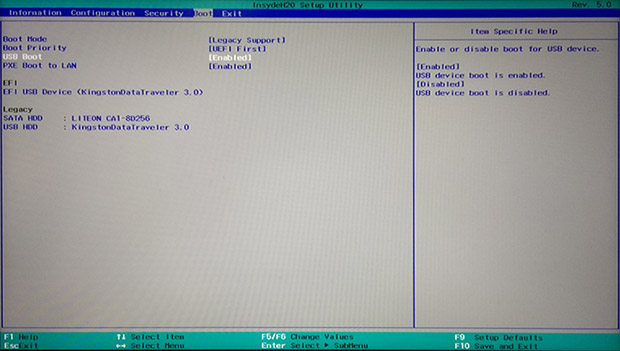
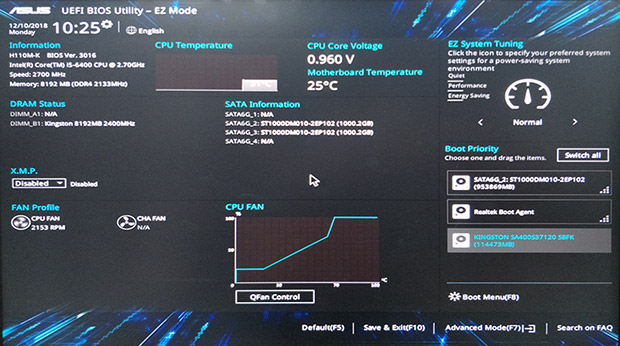
Step 2. Insert the installation media USB to the computer and enter BIOS, set the USB as the boot drive.
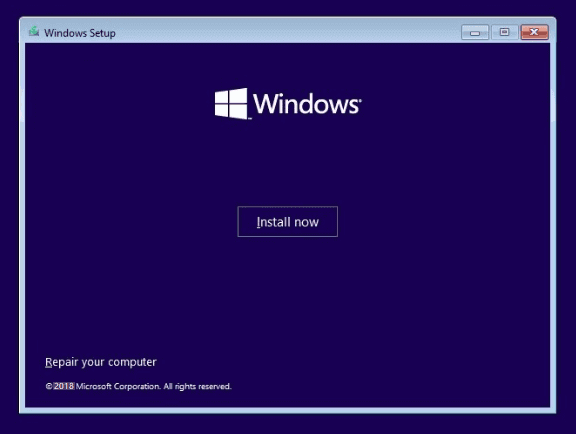
Step 3. When the computer boots up from bootable USB, select "Install now".
Step 4. To set up the computer and install the new Windows 10 update, select languages, settings, etc., and follow the on-screen guidelines provided.
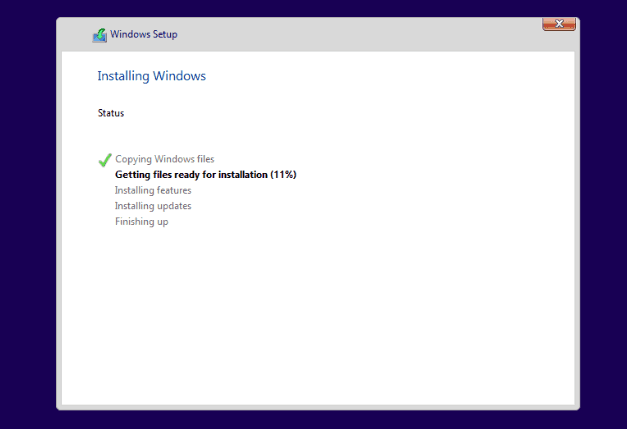
Step 5. When the installation completes, reboot the PC and enter BIOS, setting up the computer to boot from the OS drive.
To save the changes, restart your computer and enter BIOS to set the computer to boot from the OS drive. Your computer will then run from the new Windows 10 installation.
You May Also Be Interested In:
If you're experiencing issues with getting the Windows 10 update or if the update has failed, don't worry - you can fix the problem on your own by following the steps outlined in the link provided.
#2. How to View Windows 10 Update?
Can you tell when Windows 10 was last updated on your computer? How do I view installed Updates in Windows 10? If you are having a similar question in your mind, here comes the answer.
To check and view the Windows 10 update history on your computer, follow these steps: go to the Settings app, click on "Update & Security", then click on "Windows Update" and finally click on "Update history". This shows you a list of all the updates that have been installed on your computer, including the date and time they were installed.
1. View Windows 10 Update in Settings
Step 1. Click Windows 10 icon and select "Settings".
Step 2. Click "Update & Security" > "Windows Update" > "View update history".
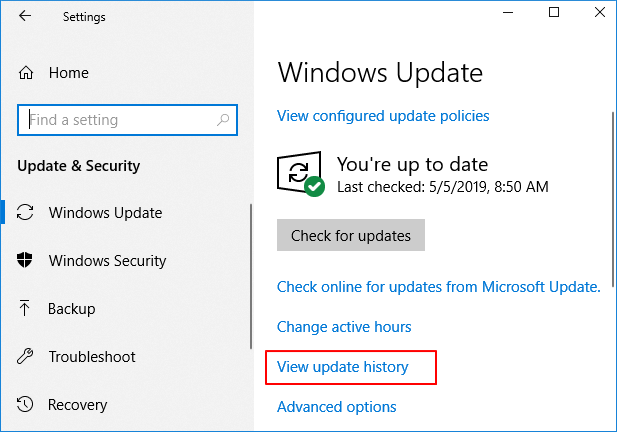
Step 3. Now, you can view and check the current installed Windows 10 update and previously used Windows 10 updates on your computer.
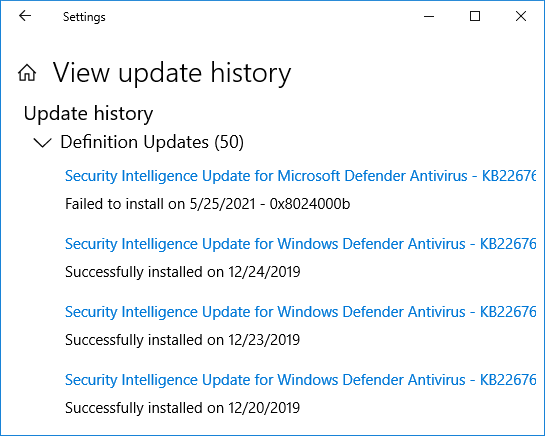
To see if your computer is installing the latest Windows 10 update, check the Windows 10 update history page.
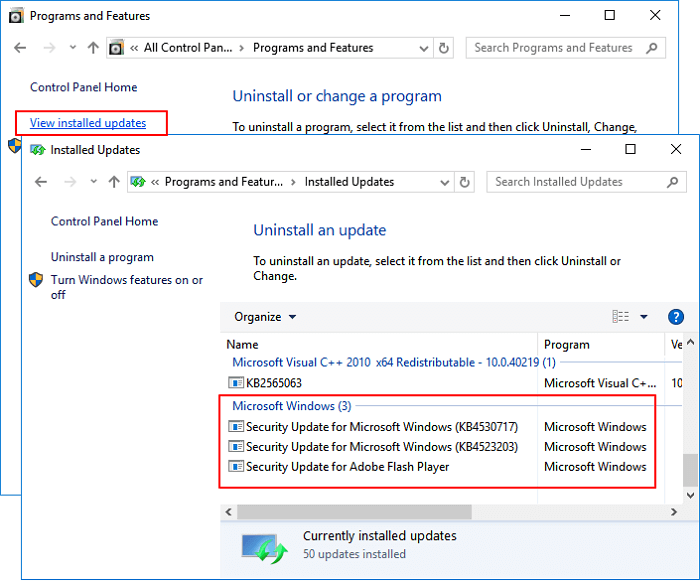
2. View Installed Windows 10 Update via Control Panel
Step 1. Press Windows + S keys, type control panel, and click to open it.
Step 2. Click "Programs" > "Programs and Features".
Step 3. Click "View Installed Update" to see the full list of all updates.
3. Check Windows 10 Update History Using CMD
Step 1. Press Windows + S keys, type cmd, right-click Command Prompt and select "Run as Administrator".
Step 2. Type wmic qfe list and hit Enter.
Step 3. You'll see a list of Windows update that you've installed on your computer.

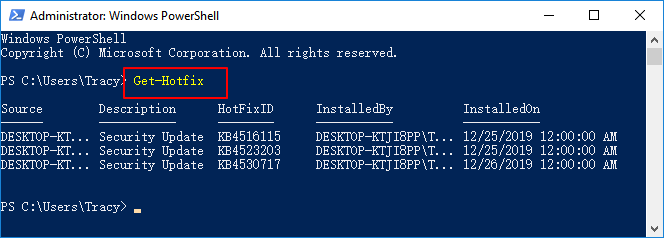
4. See Windows 10 Update History using PowerShell
Step 1. Click the Windows icon and select "Windows PowerShell (Admin)".
Step 2. Type Get-Hotfix and hit Enter.
You'll get a list of Windows updates that you've installed on your computer.
You May Also Be Interested In:
The Windows 10 update process can take anywhere from a few minutes to several hours, depending on the speed of your internet connection, the size of the update, and the performance of your device. If the update is taking forever, it could be due to a slow internet connection, a full hard drive, or other system issues. To speed up the process, try restarting your computer, checking for any system updates, and ensuring that your internet connection is stable and fast.
Windows 10 updates can take several hours to download and install, depending on your internet connection speed and the size of the update. This is because updates often include large files that need to be downloaded and installed, which can take a significant amount of time. Additionally, if you have a slow internet connection, the download process can be even longer.
#3. How to Remove/Uninstall Windows 10 Update?
Here are the steps to remove an installed Windows 10 update:
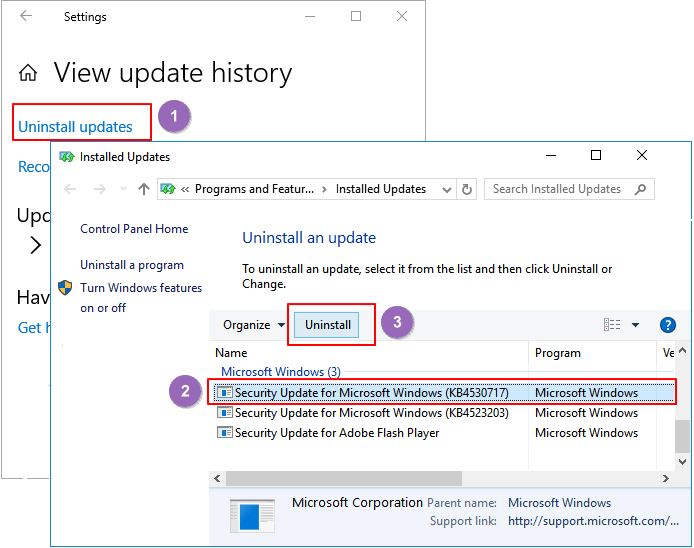
1. Remove Windows 10 Update from Settings
Step 1. Click Windows 10 icon, select "Settings".
Step 2. Click "Update & Security" > "Windows Update".
Step 3. Click "View update history" > "Uninstall updates".
Step 4. Select the update you want to remove and select "Uninstall".
2. Uninstall Windows 10 Update Using CMD or PowerShell
Step 1. Open Command Prompt or PowerShell
- To run the Command Prompt as an administrator, press the Windows key + S keys, type "cmd" in the search bar, and right-click on Command Prompt in the search results. From the context menu, select "Run as Administrator".
- Open the Windows PowerShell application as an administrator by clicking the Windows icon and selecting "Windows PowerShell (Admin)".
Step 2. Type wmic qfe list brief /format:table and hit Enter.
Step 3. Check and find the update that you want to uninstall.
Step 4. Type wusa /uninstall /kb:[id] and hit Enter.
For example: wusa /uninstall /kb:4530717.
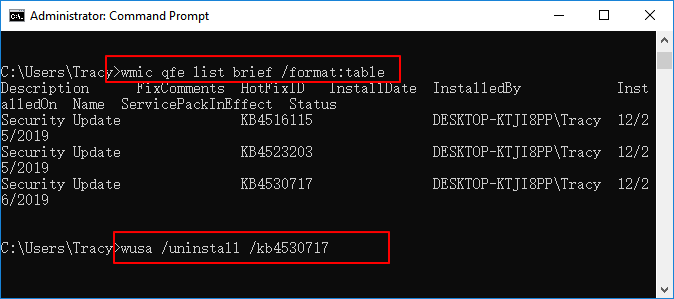
Step 5. Click "Yes" to confirm that you wish to uninstall the selected update.
You May Also Be Interested In:
#4. Bonus Tip: Your Best File Recovery Solution for Windows 10 Update
Updating Windows 10 on a computer can usually be a smooth process, but sometimes issues may arise during the installation of updates.
If you're experiencing file loss issues on your computer, don't worry, as Deep Data Recovery can help. The software can resolve problems caused by Windows 10 updates, such as file deletion, corruption, or loss due to various reasons like system crashes, power outages, or accidental formatting. With Deep Data Recovery, you can recover your lost files and get back to normal.
If you are having one of the issues, go and get this software for help now:
Step 1. To launch Deep Data Recovery in Windows 11/10/8/7, select the file types you want to recover and click "Next" to initiate the recovery process.

Step 2. Choose the place where you lost data. Then, click "Scan".

Step 3. After scanning, use the file format filter to locate the desired files, and then click the "Preview" button or double-click a file to view its content.

Step 4. To recover lost data, select the file you want to recover, check the box next to it, and click the "Recover" button to restore the file to a safe location.
Sum Up: New Windows 10 Update Is Coming Up, Go and Get New Windows Update Now
To get and view Windows 10 updates on your computer, follow the detailed guidelines provided on this page. If you don't like an installed update, you can also remove it using the tips above.
If you're experiencing issues after installing a Windows update, you may need to uninstall it. However, before doing so, try restarting your computer or checking for any available updates to resolve the problem. If the issue persists, you can try uninstalling the update through the Settings app or by using the System Restore feature to revert to a previous version of Windows.
- If you're using an old computer, it's a good idea to stick with the current compatible Windows edition.
- It's recommended to get the latest Windows 10 update to ensure a functioning computer, as an officially published edition is more reliable.
- To protect your files on Windows 10, back them up in advance, and if you don't, Qiling file recovery software can help.
Related Articles
- Can RAID 0 Be Recovered? Get Answers Here
- 11 Fixes for Toshiba External Hard Drive Not Working/Showing Up
- [Tried & True] How to Download and Update USB Drivers in Windows 10
- Disk Drill Review for Windows/Mac, Is It Any Good for Users
- 2 Ways to Complete Recycle Bin Recovery in Windows PC
Permanently deleted files from recycle bin or emptying recycle bin can be recovered using recycle bin recovery software, which can completely retrieve deleted files. - How to Repair/Recover Corrupted JPG/JPEG on Computer/SD Card/Online
Corrupted JPEG files can be frustrating, but they can often be repaired and recovered using the right techniques, typically due to issues with the file's metadata, such as incorrect EXIF data or a corrupted thumbnail.