How to Perform Windows 11 Incremental Backup [2 Ways]
Incremental backup is a method that only copies data that has been changed since the last backup activity, saving space and time by backing up changed data. This type of backup is often used when data is too voluminous, and is especially useful for restoring data quickly. Windows 11 does perform incremental backups, which can be found in the next part.
Does Windows 11 Do Incremental Backups?
In Windows 11, File History allows for incremental backups, which means each successive backup only contains changes made since the last one. This convenient and quick backup option can be enabled by setting up File History to back up frequently-used files, folders, and personal data like photos and videos, ensuring that only new or modified data is stored, making it a useful feature for users who want to save space and time.
Why Do We Need to Do Windows 11 Incremental Backup?
Data backup is crucial, and choosing the right method is equally important. There are three primary backup methods: full, differential, and incremental. Incremental backup is a popular choice as it only backs up newly added or changed items, making it fast and space-efficient. This method is particularly useful for Windows 11 users, as it allows for efficient and space-saving backups.
- It uses less medium and produces a smaller image file.
- Incremental backup is the fastest backup type because it only backs up the increments since the last full backup, making it the most efficient option for frequent backups.
- It saves storage space compared to other types of backup methods.
- Each backup increment can store a different version of a file or folder.
To perform an incremental backup in Windows 11, you can use the built-in Backup and Restore (Windows Backup) tool. Here's how: Go to Settings > Update & Security > Backup, then click on "Add a drive" to select a drive where you want to save your backups. Then, toggle the switch to "On" under "Back up using file history" to enable file history. Next, click on "Add a drive" to select a drive where you want to save your backups.
Incremental backup and differential backup are both types of backup strategies that save space and time by only storing changes since the last backup. The main difference between them is how they track changes. Incremental backup records only the changes made since the most recent backup of any type (full or incremental), making it the fastest and most storage-efficient method. Differential backup, on the other hand, records all changes made since the last full backup, which means each differential backup grows larger over time but is simpler to restore.
How to Perform Windows 11 Incremental Backup- 2 Ways
Are you trying to do Windows 11 incremental backup? Is it troublesome? Take it easy. This part will respectively introduce two ways to perform Windows 11 incremental backup.
Method 1. Windows 11 Incremental Backup Software - Qiling Backup Home
This backup tool enables users to create easy backup plans and makes Windows 11 automatic backup a breeze within a few steps. With its help, users cannot only back up their Windows 11 system but also clone it, as well as back up other important files. Now, let's see how to perform a Windows 11 incremental backup with Qiling Backup.
Step 1. Click the "File backup" button to start backup.

Step 2. Local and network files will be listed on the left, allowing for expansion of directories to select files for backup.

Step 3. Select the destination where you want to save the backup, following the on-screen guide.

Step 4. To encrypt the backup with a password, click on "Options" and select "Backup Options". This will allow you to customize the backup task and explore other available options.

To set the backup schedule, go to the "Backup Scheme" section and choose the frequency of backups, such as daily, weekly, or monthly. You can also specify the time of day or week to start the backup process.

Step 5. You can save your backups to three locations: your local drive, Qiling's cloud service, and your NAS (Network-Attached Storage).

Step 6. Qiling Backup allows users to back up their data to both third-party cloud storage services and its own cloud storage service.
To back up data to a third-party cloud drive, select Local Drive, then scroll down to add a Cloud Device, add and log in to your account.
Step 7. Click "Proceed" to start the backup process, and once it's completed, the task will be displayed as a card on the left panel, allowing you to manage it further.

Performing an incremental backup with Qiling Backup is a straightforward process. Users can easily finish an incremental backup by following the steps, and the software can also help with problems such as.
If you're interested in learning more about the detailed functions of Qiling Backup, keep reading to find out more.
What Else Can Windows 11 Users Do With Qiling Backup?
It is an easy-to-use yet powerful backup solution. Qiling Backup Home is a reliable backup software for Windows 11 that allows users to backup files, folders, or even entire hard drives to another hard drive. This user-friendly tool makes it easy to back up and restore files, and also enables stress-free incremental backups. Additionally, it offers advanced features such as creating disk images and cloning disks, making it a comprehensive backup solution for Windows 11 users.
- Provide 250GB of free cloud storage.
- Support system clone and disaster recovery.
- Back up and restore while keeping data safe.
- Users can create a system image and use it for system image recovery, allowing them to restore their computer to a previous state in case of a problem. This process typically involves backing up the current system configuration and files to an external drive or cloud storage.
- The system allows for disk backup and restore, system backup and restore, file backup and restore, and cloud backup, providing a comprehensive backup solution for users.
If you are trapped in various backup problems, just download it, and it will help you.
Method 2. Windows 11 Incremental Backup - File History
Windows 11 provides a reliable backup tool called File History, which offers various backup options and customization settings. As the default backup tool, File History also supports incremental backup, making it a convenient and efficient way to protect user data.
Note:
To perform an incremental backup, a full backup must first be made, which serves as the basis for the incremental backup.
Guide 1. Perform a Full Backup with File History
Now follow these steps to do a full backup with File History.
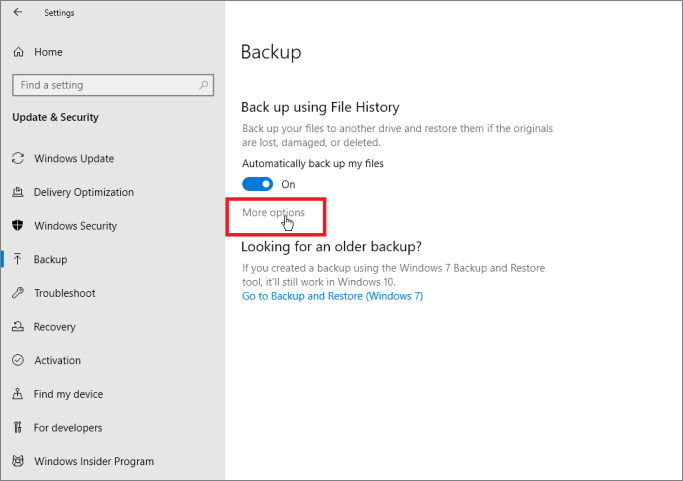
Step 1. To back up your Windows device using File History, go to Settings > Update & Security > Backup > Backup using File History.
Step 2. Users can select a backup destination from the available options, and if they want more choices, they can click on "More options" to expand their selection.
Step 3. Start backing up.
To complete a full backup, users can follow the steps above. Once the full backup is done, they can proceed to configure incremental backup settings.
Guide 2. Perform Windows 11 Incremental Backup with File History
After the full backup, follow these steps to perform an incremental backup.
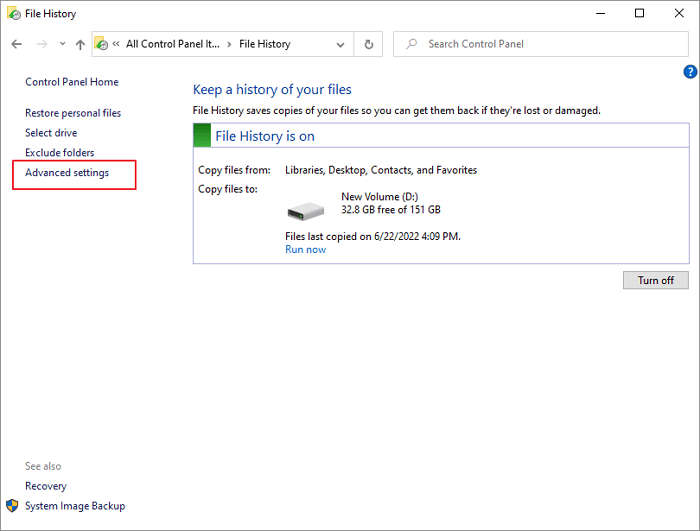
Step 1. Visit the Control Panel, then navigate to File History, and select the "Advanced settings".
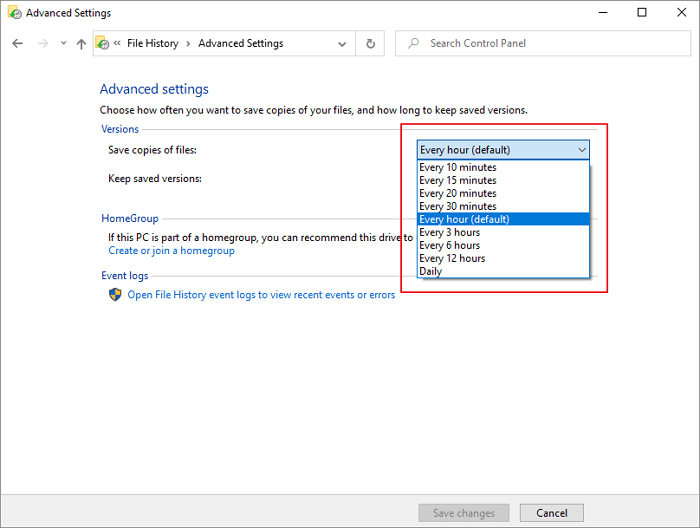
Step 2. File History, which is part of Windows Backup, backs up files every hour by default, but this frequency can be adjusted if needed. This means that if you set up File History to back up your files, you can expect your files to be backed up at least once every hour, depending on your system's capabilities and the size of your files.
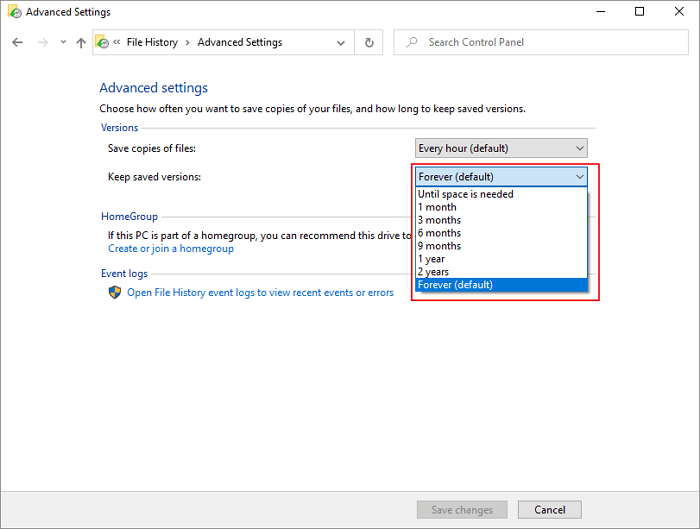
Step 3. Determine how long the computer keeps file backups.
File History can back up changed or newly added data since the last backup by following these steps: enabling File History, setting up a backup location, and scheduling backups, allowing users to recover specific files or folders from previous backups.
Conclusion
For users looking to perform Windows 11 incremental backup, two methods are available. While users have the freedom to choose either approach, those without extensive computer knowledge may find Qiling Backup a more suitable option, offering a convenient and comfortable digital experience.
FAQs About Windows 11 Incremental Backup
This part lists three questions you may be concerned about. If you are interested, continue to read.
What's the difference between incremental backup and differential Backup?
The two types of backup, incremental and differential, are both popular methods of data protection. The main difference between them lies in the way they approach the backup process. Incremental backup saves only the changes made since the last full backup, while differential backup saves all changes made since the last full backup, but not the full backup itself.
Speed: incremental backup is faster than differential backup.
Space occupied: incremental backup is smaller.
How do I automatically backup files to an external hard drive in Windows 11?
Step 1. Connect an external hard drive to your PC.
Step 2. Open the system, choose storage, and click "Advanced storage setting".
Step 3. Find the backup options and click "Add a drive".
Step 4. Click "on" under "Automatically back up my files".
Step 5. To back up files using File History, click on "Back up now" and your files will be automatically backed up to the external hard drive.
How do I back up my entire computer on Windows 11?
To back up your entire computer, start by deciding on a backup method, such as using an external hard drive, cloud storage, or a backup software. Next, select the files and data you want to back up, including documents, photos, videos, and other important files.
Step 1. To create a system image, go to the "Control Panel", select "Backup and Restore", and click on "Create a system image".
Step 2. Select the drives you want to back up and choose a backup destination.
Step 3. Then, click "Next" to start.
Related Articles
- How to Backup and Restore Windows 8/8.1 System [SOLVED]
- How to Automatically Backup Files to An External Hard Drive | 3 Ways
- [3 Effective Tips] How to Backup Firefox Bookmarks
- How to Create a Mirror Image of My Computer on Windows? Best Solutions
- How to Migrate Dropbox to OneDrive: Step-by-Step Guide
If you're looking to migrate your files from Dropbox to OneDrive, this blog post provides the best solutions to do it quickly and easily. We'll guide you through the process of transferring all your files from Dropbox to OneDrive, whether you've exceeded your free storage limit or simply want to switch cloud services. - 2 Safe Ways to Migrate QuickBooks to New Server
Migrating QuickBooks to a new server can be done using two safe and efficient methods, which are outlined in this post to help you complete data migration successfully.