Call of Duty Warzone File Location [All You Want to Know]
The release of Call of Duty: Warzone 2.0 on November 16, 2022, sparked a significant surge in interest, drawing in a large number of new players with its competitive multiplayer game mode and engaging gameplay settings.

Call of Duty (COD) is currently available on game consoles like PlayStation 4/5, Xbox One, and Xbox Series X/S, and also supports PC users running Windows, with a required download and play through Blizzard's game platform.
For novice players, finding or changing the Call of Duty Warzone file location can be a challenge due to the involvement of the game platform. However, this post aims to provide a solution, bringing together all the necessary information in one place.
Maybe you are interested in these posts:
Where is the File Location of COD: Warzone
When you download Call of Duty: Warzone, if you don't set a specific download destination, the game will be saved in the default path and named after the game, allowing you to find it easily in File Explorer by searching for the game name.
The method of finding the COD file location can be time-consuming. We suggest using the Blizzard platform's settings to locate the COD file directly, which can be done in just a few clicks. This is a more efficient way to access the file.
Step 1. Open the Blizzard platform(Battle.net app)
Step 2. Click the "Game Settings" button on the showing page of COD
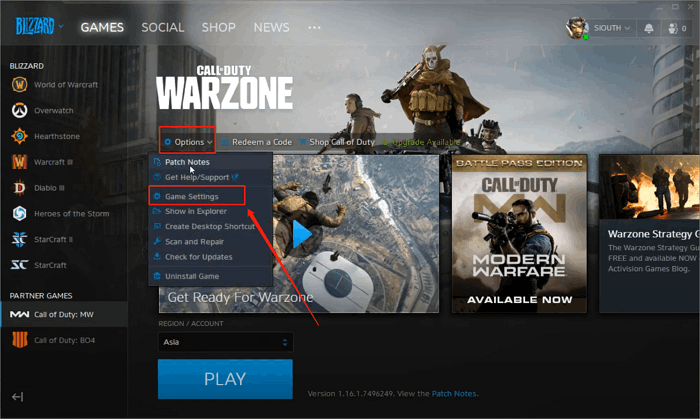
Step 3. Choose the "Game Install/Update" button
Step 4. Now you can see the default download address.

How to Change COD: Warzone File Location
Call of Duty: Warzone requires at least 175 GB of disk space, which can be a burden for users with poorly managed hard disk space. When updating the game, users may find that the original file location is too small to hold more data, prompting the need to move the COD file to a larger hard disk.
To change the file location of Call of Duty: Warzone, you'll need to navigate to the game's installation directory and locate the "User" folder. From there, you can move the "User" folder to a new location, such as an external hard drive or a different drive on your computer.
Step 1. Find the COD file location by following the method the post shows
Step 2. To copy a file using the command prompt, use the `copy` command followed by the source and destination file paths. For example, to copy a file named `example.
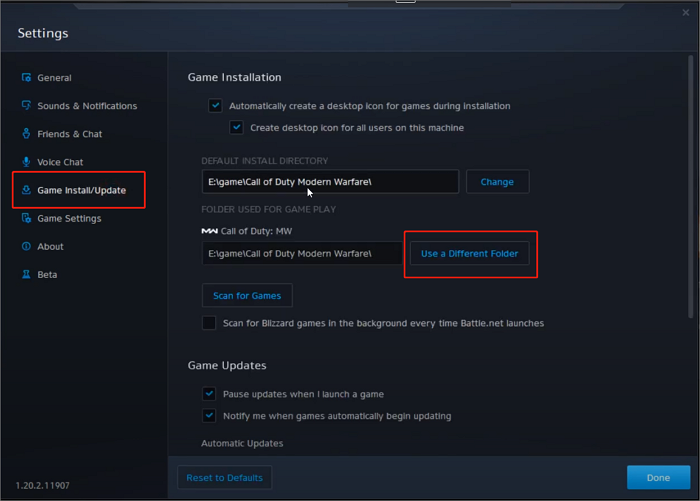
Step 3. To access the Game Settings of Call of Duty on the Blizzard platform (Battle.net app), simply open the app, navigate to the game's settings, and make any necessary adjustments to your preferences.

Step 4. To install or update a game, click the "Game Install/Update" button and select the "Use a Different Folder" option.
Step 5. To find the new file location, change the file path in the "Save as" field to the desired location and hit "Select" to confirm the new location. Now, find the file you just changed and hit "Select" to confirm the new location.
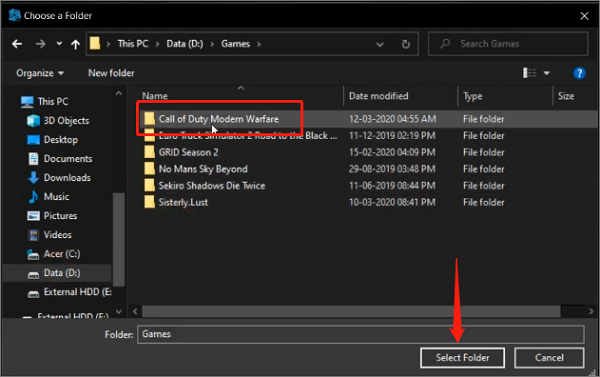
Now you've changed the Call of Duty: Warzone file location without affecting the normal operation of the game.
How to Backup COD: Warzone File
The COD file is crucial for the game's normal operation. To prevent data loss, it's essential to back up this file. Qiling Disk Master Pro is a reliable software for backing up the COD file, ensuring the game's stability and integrity.
Conclusion
Call of Duty: Warzone remains a top PC game. For new players, this article aims to help you master the process of finding and changing the game's file location. We also recommend using Qiling Disk Master Pro to back up your file data, which can further enhance the game's stability.
FAQs
What is the storage of Warzone on PC?
Warzone requires at least 175GB of hard disk storage space.
How to install Cod Warzone on PC?
To install COD: Warzone on your PC, follow these steps:
Step 1. Open Blizzard platform(Battle.net app)
Step 2. Find Call of Duty: Warzone and open its showing page
Step 3. Hit the install button to get it on your PC
Related Articles
- Google Chrome Sync Keeps Pausing? Find Fixes Here
- Windows 11 Is Getting ReFS Support for Enhanced Data Proteciton
- How to Fix Printer Driver is Unavailable Error on Windows 10/11 [Fixed Lately]
- How to Fix the Recovery Server Could Not Be Contacted on macOS Sonoma/Ventura
- How to Choose QNAP External Drive Format [2024 Detailed Tutorial]
Choosing the best QNAP external drive format for your drive can be a daunting task, but understanding the facts can help. To make an informed decision, you can consider the guide provided in this article, which outlines the steps to format your drive. By following this guide, you can select the most suitable format for your external drive and ensure it works seamlessly with your QNAP system. - QuickBooks Online Keeps Crashing [Troubleshoot with Comprehensive Guide]
Having trouble with QuickBooks Online crashing? Don't worry, this article has got you covered! It explains the reasons behind the crashes and provides solutions to fix the issue in just 5 minutes.