Clean Install macOS Sonoma: Latest Update Steps
Apple's latest Mac operating system, macOS Sonoma, offers various useful features, and users need the latest version to access bug fixes, security updates, and new features. However, some users may encounter the frustrating issue of a "Clean Install macOS Sonoma" problem during the installation process.
| Workable Solutions | Step-by-step Troubleshooting |
|---|---|
| 1. Download from General Settings | Go to the Apple Developer site and sign in with your Apple ID, or make a new account if you don't have one. Then, click on the "Certificates, IDs & Profiles" tab, and select "Certificates" from the dropdown menu. Next, click on the "Create a Certificate" button and follow the prompts to create a new certificate. You can choose to create a certificate for a specific purpose, such as development or distribution.Full steps |
| 2. Create the Bootable Installer | Insert a 16-To insert a USB flash drive into your Mac, find Disk Utility in the Applications/Utilities folder, select the drive, and click "Erase." Then, select the drive again and choose the format you prefer, such as MS-DOS (FAT) or exFAT. The drive will be reformatted and ready for use.Full steps |
| 3. From Bootable Installer | From the list of choices, choose the disk that may be used to install the software and hit...Full steps |
| 4. All Content and Settings | Restart your Mac by going to the Apple menu and selecting Restart...Full steps |
To ensure a smooth installation of macOS Sonoma, it's essential to have familiarity with its new capabilities and prerequisites. Some of Sonoma's highlights include a new user interface, improved multitasking, and enhanced privacy and security features.
For Mac users looking to take full advantage of the new features and improvements in macOS Sonoma, a clean installation may be the way to go. This process involves wiping the computer's hard drive and starting from scratch, which can be a bit daunting but ultimately provides a fresh start and ensures that all the latest updates and enhancements are installed correctly. To do this, users will need to back up their important files and data, then boot from the installation media, select the disk utility to erase the drive, and finally install Sonoma from the installation media, following the on-screen instructions to complete the process.
Download macOS 14 Sonoma Beta on Mac, MacBook
Apple's 2023 big macOS version for its attractive Mac models, macOS 14 Beta, is out now. Read more >>
Why a Clean Installation of macOS Sonoma Is Needed
When updating to macOS Sonoma, it's highly recommended to do a clean installation, which wipes out all remnants of the old OS and provides a fresh start. This approach has several persuasive arguments, including eliminating potential conflicts with the new OS, removing outdated system files, freeing up disk space, and ensuring a smooth and efficient installation process. By doing a clean install, users can start with a blank slate and build the new OS without any potential issues or clutter, making it a compelling choice for those updating to macOS Sonoma.
🚀Reason 1. Enjoying more stability and responsiveness
Reinstalling everything from scratch can resolve incompatibilities and conflicts, making the system more reliable and quick, allowing you to use macOS Sonoma to its fullest capacity without sluggishness.
🤝Reason 2. Better compatibility with applications
To ensure your apps run smoothly with macOS Sonoma, install the operating system from scratch. This approach helps maintain compatibility with legacy software and makes it easier to use various programs with the latest macOS version.
🗂️Reason 3. Removing unnecessary clutter and old system files
Collecting temporary files, caches, and obsolete system files can significantly slow down your Mac. To optimize your Mac's speed and free up hard drive space, consider performing a clean installation, which can help eliminate unnecessary files and get your computer running more efficiently.
⛑️Reason 4. Improving security and privacy
In macOS Sonoma, measures are taken to keep information and identity safe. A clean installation is recommended if you're concerned about potential security flaws in your existing setup, as it ensures they are included from the start.
How to Clean Install macOS Sonoma
To ensure a smooth installation of macOS Sonoma, it's crucial to back up your important information before proceeding. Make a copy of any irreplaceable data on an external drive or in the cloud to avoid any potential losses. Once your files are safely backed up, you can continue with the installation process using the provided solutions.
Method 1. Download Sonoma from General Settings
Step 1. To access the Apple Developer site, sign in with your Apple ID by visiting the Apple Developer website and entering your credentials, or create a new Apple ID if you don't already have one.
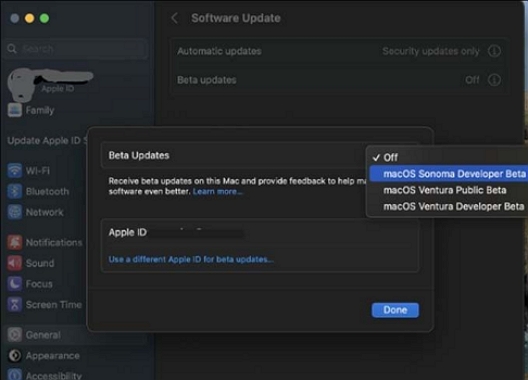
Step 2. Go to "Settings" and click on "General".
Step 3. Click "Software Update".
Step 4. To access the beta updates, click on the "i" button next to the "Beta updates" section.
Step 5. Select the "macOS Sonoma Developer Beta".
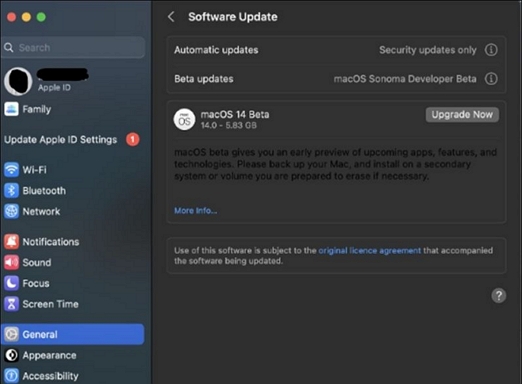
Step 6. Click "Upgrade Now" and then "Install Now" when the download process is complete.
Method 2. Create the Bootable Installer
Step 1. Insert a 16-GB USB flash drive into your Mac.
Step 2. Find "Disk Utility" in the Applications' Utilities subdirectory.
Step 3. Select your plugged-in USB drive from the list of storage devices.
Step 4. Rename and format the drive, then click "Erase." Set file format to "Mac OS Extended (Journaled)."
Step 5. Exit Disk Utility after deletion is complete.
Step 6. Launch Terminal from your Mac's Utilities folder under Applications.
Step 7. To create the installation media, type the following command in Terminal: `sudo /Applications/Install\ macOS\ Sonoma.app/Contents/Resources/createinstallmedia --volume /Volumes/[USB\ Flash\ Drive\ Name]`
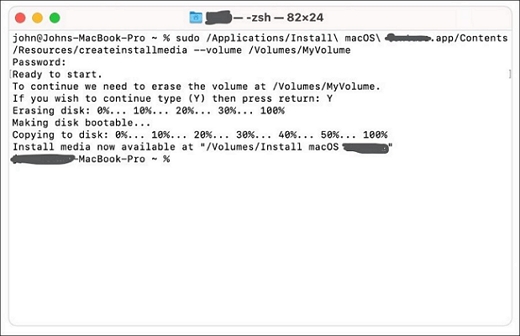
Step 8. When asked, type in your administrator password and press Enter.
Step 9. The installation media will be created.
Method 3. Install macOS from the Bootable Installer
Step 1. Start up your Mac while holding the Option key.
Step 2. When the "Startup Manager" screen opens, remove the Option key.
Step 3. The disk that may be used to install the software is the one that is listed as "Windows 10" or "Windows 11", depending on the version of the operating system you are trying to install. This is the disk that contains the installation media for the software, and it is the one that you should choose in order to proceed with the installation.
Step 4. To start the setup for macOS Sonoma, follow the on-screen instructions. This will guide you through the process of setting up your Mac, including selecting your language, country or region, and internet connection. You will also be prompted to create a user account and set up other preferences.
Step 5. Select the right target drive for installation.
Step 6. I'll wait until the installation is finished. Time may be required for this.
Step 7. When the update is finished, your Mac will restart and you'll see the macOS Sonoma setup screen.
Method 4. All Content and Settings
Step 1. To restart your Mac, go to the Apple menu, click on it, and select the "Restart" option from the drop-down menu. This will shut down your computer and then turn it back on, restarting the operating system and any applications you had open.
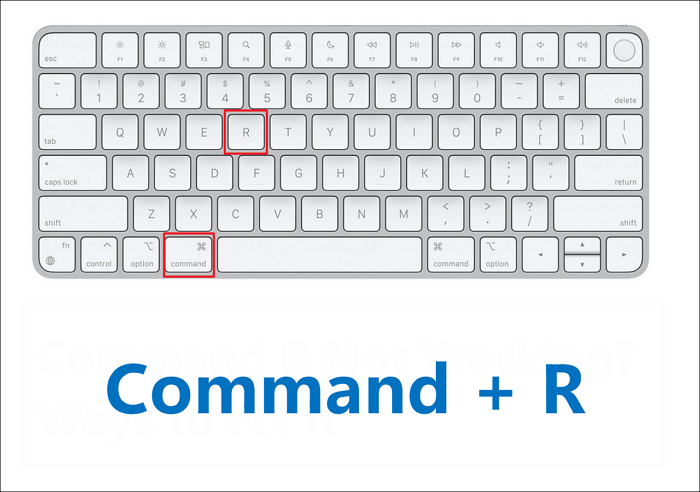
Step 2. While waiting for your device to restart, press the Command + R keys until the Apple or Globe sign shows.
Step 3. Stop holding down the keys when the macOS Utilities window appears.
Step 4. To reinstall macOS, go to the utility menu in macOS and select "Reinstall macOS," then click "Continue."
Step 5. To complete the reinstalling process, follow the on-screen instructions. This will erase all user data and install a fresh copy of macOS Sonoma.
If you're ready for a fresh start, you can install macOS Sonoma from scratch using these instructions. Whether you prefer a traditional or alternative installation method, you can get started and enjoy a new and improved macOS experience.
If you want a more consistent, compatible, and safe computing experience, downloading the macOS Sonoma update is the right way for you. This section provides detailed instructions for installing macOS Sonoma from scratch, facilitating a trouble-free upgrade. Share this post to get more people to know the clean installation of macOS 14.
How to Recover Data When macOS 14 Installation Failed
If you're worried about losing information while reinstalling macOS Sonoma, you can use data recovery software like Deep Data Recovery for Mac to protect your sensitive data.
Deep Data Recovery for Mac is a sophisticated data recovery application that can help you recover lost data, even for inexperienced users, with its intuitive design, allowing you to recover permanently deleted files Mac.
Deep Data Recovery for Mac's key features include the following:
- The program is capable of recovering various types of data, including documents, images, movies, audio files, emails, and more.
- This software offers a rapid and deep scan option, enabling users to search for deleted files on their Mac according to their preference.
- Thanks to selective recovery, you can now choose which files to restore instead of recovering everything, making the process more efficient and targeted.
To recover lost data using Qiling Data Recovery for Mac, follow these steps: First, download and install Qiling Data Recovery on your Mac. Next, launch the software and select the drive or location where your lost data was stored.
Step 1. Install and run Deep Data Recovery for Mac on another Mac computer, and select the "Unbootable Mac > Start" option.
Step 2. Insert a prepared USB drive, select it, and click "Next" to begin the bootable disk creation process.
- Warning
- The creator will prompt to erase the drive to reallocate the space, then write the bootable files to this drive. Please back up all USB files before processing "Eraser".
Step 3. The program begins by creating a 2GB space on the USB drive, where it saves the boot files. This leaves the remaining space on the USB free for storage purposes.
Step 4. Once you've completed the process, boot your Mac from the bootable disc and follow the guide to start the recovery. It's recommended to restore your data to an external hard drive.
Step 5. After booting the Mac, launch Deep Data Recovery for Mac. Select the disk location (an internal HDD/SSD or a removable storage device) where you lost data and files, and the recovery tool will automatically scan for lost files.
Note: Before attempting data recovery, it's recommended to create a backup of your Mac to prevent further data loss. Once backed up, the software can then recover data from the Mac backup, allowing your computer to write new data again.
Final Words
Upgrading to macOS Sonoma offers several benefits, including improved stability, program compatibility, speed, and a fresh start. Wiping the slate clean can lead to a more enjoyable user experience, but it's essential to prioritize data security throughout the setup process. If an installation error occurs, a backup and a reliable data recovery program like Deep Data Recovery for Mac can help restore lost or deleted files.
To get the most out of your Mac and keep it running smoothly, use the latest updates, use effective troubleshooting methods, and take advantage of system optimization tools. This includes looking at Mac repairs and other tricks to enhance your macOS Sonoma experience.
Data recovery programs are a crucial safety net in case important files are accidentally destroyed or lost during a clean installation. Deep Data Recovery for Mac has proven to be an effective and trustworthy program in such situations.
Clean Install macOS Sonoma FAQs
Here are 4 additional questions about clean installing macOS Sonoma. Check here for the answers.
1. Is it worth doing a clean install of macOS Sonoma?
A clean install of macOS Sonoma can be beneficial, as it provides a fresh start, improves system performance, and resolves any issues that may have arisen from previous installations.
2. Does factory resetting a Mac remove all the data?
Restoring a Mac to its default settings using the factory reset menu will delete all data, so it's essential to make copies of your data beforehand.
3. Does updating the Mac operating system delete everything?
Upgrading the Mac OS does not wipe all data, but it's still a good idea to back up your data before doing so to protect it.
4. How do I install the Sonoma beta on Mac?
You can install the beta version of macOS Sonoma on your Mac by enrolling in the Apple Beta Software Program, downloading the beta profile, and following Apple's installation instructions.
Related Articles
- 6 Ways to Fix Windows Update Not Working Windows 11/10
- Enable Macros in Excel 🎖️| Microsoft Excel
- How To Switch Monitors 1 and 2 On Windows 10 Computer
- 4 Ways to Fix Windows System Backup Failed in Preparing the Backup Image
- What Is System Restore Command and How to Use It on Windows 11/10
Struggling to find the answer what is a system command prompt? This guide has all the answers and steps you need to perform a system restore from the command prompt. - Fix System Was Unable to Find the Specified Registry Key or Value [Four Efficient Solutions!]
Fix the 'System was unable to find the specified registry key or value' error with our expert guide. We cover the most common causes and provide step-by-step solutions to fix them. Follow our instructions and get your system running smoothly again.