How to Boot From USB on Windows 11 [Full Guide]
Overview of How to Boot From USB on Windows 11:
| ⚙️Complex Level | Low, Beginners |
| ⏱️Duration | 5-10 minutes |
| 💻Applies to | Boot from USB on Windows 11/10/8/8.1/7 |
| ✏️Stages | |
| 🔨Tools | USB, Windows PC, Qiling Disk Master |
To prepare for the tutorial, you'll need a reliable USB drive and a formatting tool, specifically Qiling Disk Master, which offers a user-friendly interface and is suitable for beginners.
- ✅Prepare a USB - Buy a certificated USB with enough capacity.
- ✅Download the Qiling Disk Master tool in advance, which enables formatting a USB larger than 32 GB to FAT32, a feature not available in Windows built-in tools.
Now, let's start learning how to boot from a USB on Windows 11. In this process, we divide the whole process into three stages. First, make your USB well-prepared for the bootable USB by formatting it as FAT32 and installing a bootable USB creator like Rufus. Next, download the Windows 11 installation media and create a bootable USB drive using the downloaded file.
1️⃣Stage 1. Format USB as FAT32
To create a bootable USB drive, the USB flash drive must be set to FAT32 format first, but formatting a USB larger than 32 GB to FAT32 using Disk Management or CMD is not possible. A third-party format tool, such as Qiling Disk Master, is needed to format larger USB drives to FAT32, and our tests have verified its stability in formatting 64/128/256 GB USB drives. Downloading this tool and following the guide will allow you to successfully format your larger USB drive.
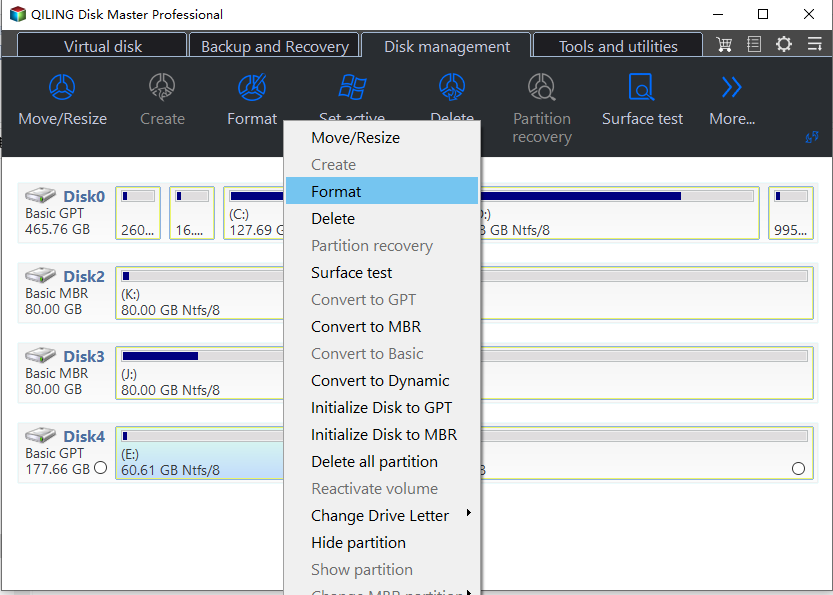
Step 1. Launch Qiling Disk Master, right-click the partition on your external hard drive/USB/SD card which you want to format and choose the "Format" option.
Step 2. Assign a new partition label, file system (NTFS, FAT32, EXT2, EXT3, EXT4, exFAT), and cluster size to the selected partition.
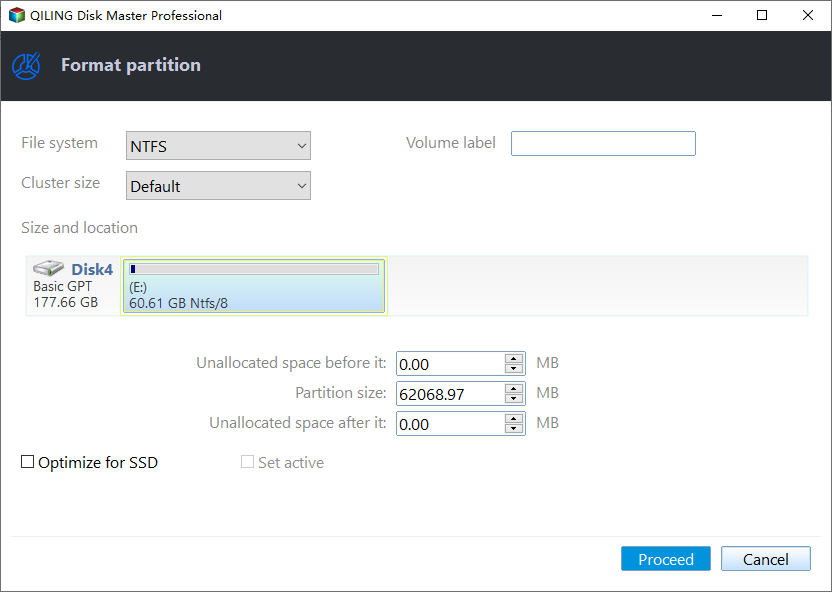
Step 3. Click the "Proceed" to start formatting your external hard drive/USB/SD card.
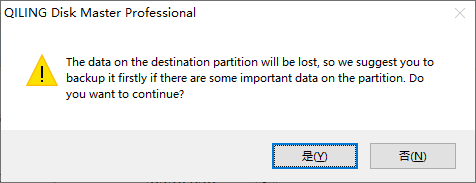
Step 4. In the Warning window, click "Yes" to continue.
FAT32 is the best USB format to boot Windows 11, and now it's time to move on to Stage 2, where we'll learn how to create a bootable USB.
2️⃣Stage 2. Create a Bootable USB
Creating a bootable USB can be a complex process, especially for those who are not tech-savvy. To simplify this task, it's recommended to use trustworthy third-party software. One such option is Qiling Disk Master, which can be used to create a bootable USB. The process can be learned by following the link provided, making it accessible to those who may not be familiar with the process.
🔎Read this article to get more information: How to Create a Bootable USB on Windows 10
3️⃣Stage 3. How to Boot From USB on Windows 11 - 2 Cases
When you need to boot from a USB on Windows 11, you can do so by accessing the startup disk settings from the Windows Settings app if your computer is working properly, or by accessing the boot menu and booting from USB in the BIOS if your computer is not functioning properly.
Case 1. PC Can Start Properly - From Settings
To boot Windows 11 from a USB while keeping your computer running smoothly, you can utilize the Windows Settings feature. By following the provided tutorial, you can start your Windows 11 installation from a USB drive, ensuring a seamless experience for your computer.
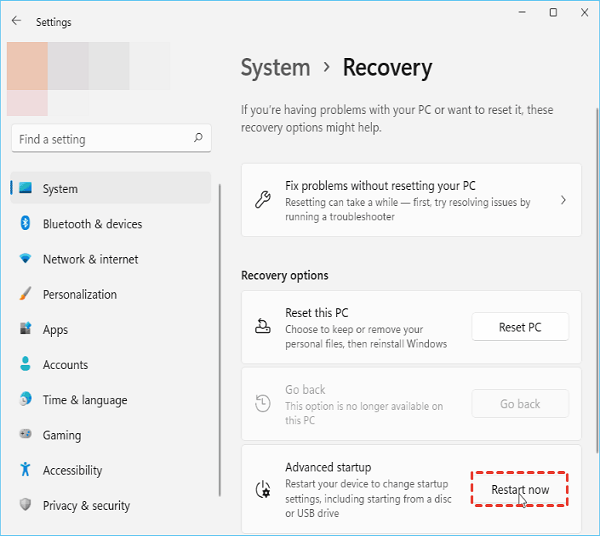
Step 1. Insert a bootable USB drive into your Windows 11 computer, then press Windows + I to open Settings and select System > Recovery.
Step 2. To restart Windows 11 in advanced startup mode, click the "Restart Now" button located to the right of the "Advanced Startup" option. This will prompt a popup window, warning you that your device will restart and that you should save your work before proceeding.
Step 3. After the PC restarts, it will load into the recovery environment. In the Choose an option window, select the "Use a device" option.
Step 4. Your PC will list the bootable devices your computer can use, including the USB drive you connected to your PC earlier. Click and select it.
To summarize, you can now reboot your computer and have it boot from the USB drive you created, allowing you to access the operating system and other features on the drive.
Case 2. PC Fails to Start - From Boot Menu
When your computer won't boot, you need to access the BIOS to install Windows 11 from a USB drive. Attach the USB drive to the PC, restart the PC while pressing the Shift key, and then select to boot from the USB drive in the Windows Recovery Environment.
Here's the step by step guide:
Step 1. To boot your laptop/PC from a USB drive, connect the bootable USB drive to the correct USB port, then press the Power button to start the device. As it begins to load, tap the Boot Menu key (which may be ESC, F2, F8, or F10, depending on the motherboard) to enter the BIOS setup, where you can configure the device to prioritize the USB drive over other boot options.
Step 2. To boot from a USB drive in the boot menu, look for the Boot order option and move the USB drive to the top of the list.
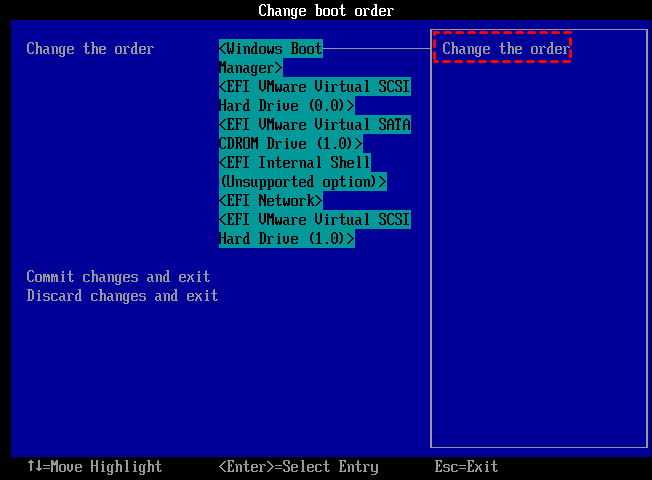
Step 3. When you confirm your changes/settings, press the F10 key to save and exit. This will cause your PC to automatically boot from the USB flash drive.
Conclusion
To start Windows 11/10 from a USB flash drive, prepare a qualified USB drive and format it to FAT32. Create a bootable USB and change the boot order to set the USB drive as the boot drive. If the computer isn't working properly, access the BIOS to boot from USB. This allows you to boot Windows 11 from the USB drive.
Click the buttons to share this detailed tutorial with others who might find it helpful.
How to Boot From USB on Windows 11 FAQs
Using a USB to boot Windows 11 on your computer can be useful in various situations, such as booting a new Windows system, troubleshooting, or enjoying the same configuration on multiple PCs. This method allows you to create a portable Windows installation that can be used on different devices, making it a convenient option for those who need to access Windows on multiple computers. Whether you're looking to set up a new Windows system, troubleshoot issues, or simply enjoy the same configuration on multiple PCs, using a USB to boot Windows 11 can be a helpful solution.
1. Why is Windows 11 not booting from USB?
Not all USB drives can be used as bootable devices, as regular USB drives are not bootable by default. As a result, Windows 11 may not be able to boot from a USB drive due to its non-bootable nature.
- USB drive is not a bootable device
- Bootable USB drive not showing up in BIOS
- USB drive is too old
- USB drive is damaged by mistake
- USB drive format does not support
- Wrong boot order
2. How to boot Windows 11 from USB in BIOS?
Attach the USB flash drive to the PC, restart it while holding the Shift key, and then boot from the USB drive in the Windows Recovery Environment.
3. When do we need to boot from a USB on Windows 11?
The reasons for booting a system from a USB drive include the need to install an operating system on a computer that does not have a working hard drive, or to troubleshoot and repair a system that is not functioning properly. Additionally, booting from a USB drive can also be used to create a portable version of an operating system that can be used on multiple computers, or to create a backup system that can be used in case the primary system fails.
- Boot the new Windows system. Boot the new system on a USB stick to prevent it from affecting the version you are currently running.
- To troubleshoot. If your computer operating system doesn't start properly, shows a blue screen on Windows 11, or keeps crashing due to viruses or malware, a bootable USB disk can help boot your computer properly.
- Booting the new computer from the USB A boot disk with the old system will allow you to enjoy the same computer configuration, including the same operating system, software, and settings, as your previous system, making the transition smoother and minimizing the disruption caused by a system change.
Related Articles
- How to Upgrade Xbox Series X/S Storage [Ultimate Guideline]
- How to Reset Windows Password When Locked Out🔥
- MBR2GPT Disk Layout Validation Failed | 3 Proven Fixes
- MMC Format Tool: SD Card Formatter Free and Available Download [2023 Full Guide]
- Best FAT32 Converter Free Download [Tried and Free]
Do you need to convert the existing partition to FAT32? Then here is an easy guide on some of the FAT32 Converters, which you can download and quickly convert. It is possible to convert a RAW format, NTFS, or any other format into FAT32. - Best Rufus Alternative For Windows Compatible with Windows 11/10
The best Rufus alternative for Windows is Qiling OS2Go, which is the most efficient replacement of Rufus when trying to run Windows from a bootable USB drive, offering similar features and excellent performance.
Products
Articles & Tutorials
- Data Recovery
- Data Backup
- File Recovery
- File Backup
- System Backup and Restore
- Disk and Partition Clone
- Technical articles
- Mobile articles
- Disk Master Help
- Windows Data Recovery Tutorials
- Windows Secure Delete Tutorials
- Windows Partition Management Tutorials
- Windows File Backup and Restore Tutorials
- Windows System Backup and Restore Tutorials
- Windows Disk Backup and Restore Tutorials
- Windows Clone Tutorials