How to Change Boot Drive Windows 11 [Beginner's Guide]
Changing the boot drive in Windows 11 can be a complex process, especially for those who are not tech-savvy. The boot drive is crucial as it contains the operating system, and sometimes, we need to change it when reinstalling Windows, setting up a dual boot, or fixing errors/issues. This can be a daunting task for many users, but it's a necessary step in certain situations.
To change your boot drive in Windows 11, follow this guide from Qiling and learn the details to do it yourself. There are 3 simple methods to learn from, which will be explained in the next section. Just follow the steps carefully and don't miss any to successfully change your boot drive.
Way 1. Change Boot Drive Without Entering UEFI/BIOS
If you want to change the boot drive without entering UEFI/BIOS, the easiest way is through a reliable disk partition manager like Qiling Disk Master Professional. This tool provides extreme convenience in changing the boot drive without entering UEFI/BIOS, simplifying the process with its powerful and automated features.
To change the boot drive in Windows 11 without entering UEFI/BIOS, you can use the built-in Boot Configuration Data (BCD) editor. First, press the Windows key + X and select Command Prompt (Admin) or PowerShell (Admin) to open the elevated command prompt.
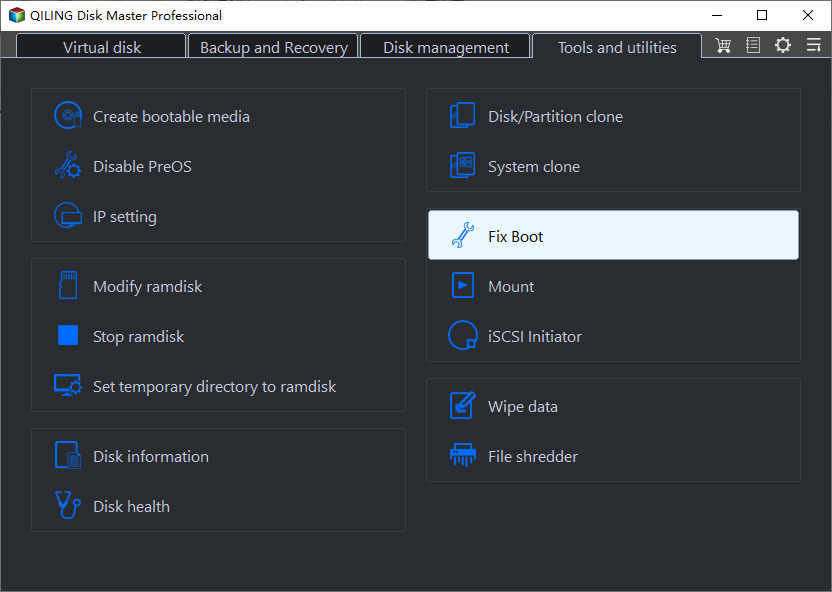
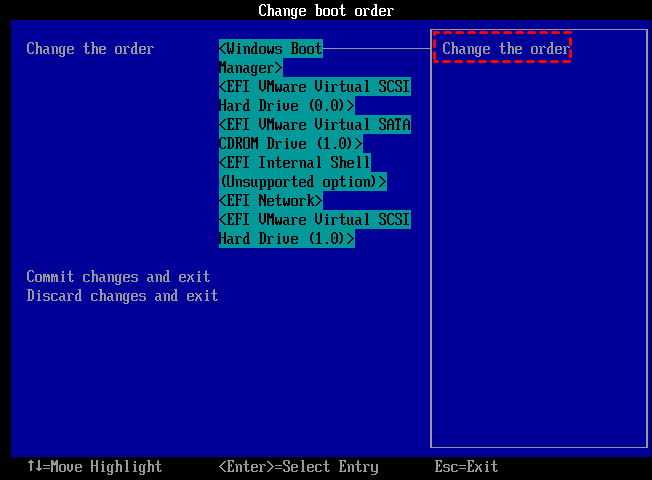
Step 1. Launch Qiling Disk Master on your computer and navigate to the "Fix Boot" section in the "Tools" tab page.
Step 2. Go to the "UEFI items" tab, and change the boot order by dragging the drive to the first position.
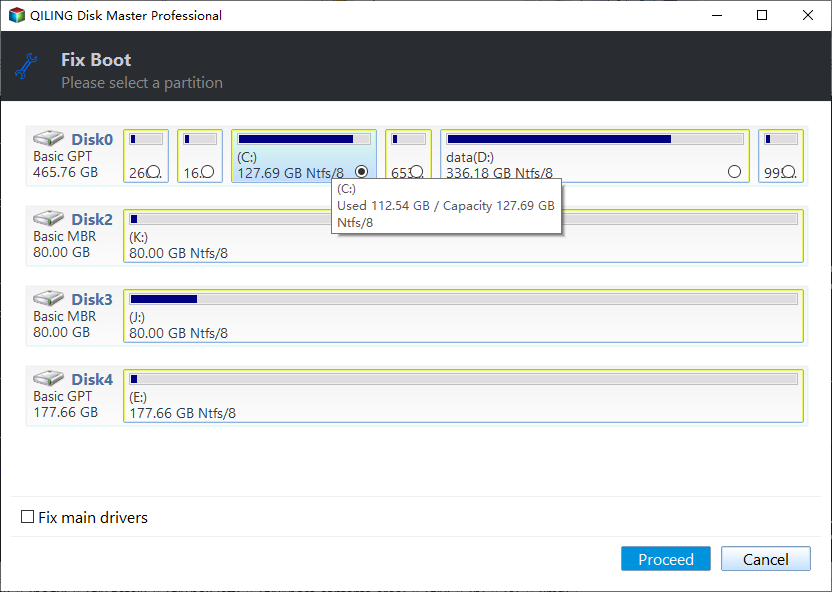
Step 3.To set your OS to boot from the new hard drive, click "Proceed" to apply the changes. This will set your operating system to boot from the new hard drive.
Note:If you press the "Reboot" button after the drive installation, the operating system can boot from this disk at the next startup.
⭐Advice and Help
If you're experiencing any challenges or have additional questions, don't hesitate to reach out to our support specialists for personalized help:
Qiling experts are available 24/7 to provide one-on-one manual services to help fix Windows boot errors, BSOD, and computer boot loops. They offer free evaluation services and use their expertise to diagnose and resolve system boot failures, Windows stop codes, and OS lagging issues.
- 1. If you're experiencing a Blue/Black Screen of Death (BSOD) error due to Windows updates or other reasons, you can try to fix it by restarting your computer in Safe Mode, running a System File Checker (SFC) scan, and checking for corrupted system files. You can also try running a DISM scan to repair any corrupted system files, and update your drivers to the latest version.
- 2. To resolve Windows boot errors like "no bootable device found" or BCD file corruption, start by booting from a Windows installation media, such as a USB drive or CD/DVD. From there, open the Command Prompt as administrator and run the command "bootrec /fixboot" to repair the boot sector.
- 3. To resolve Windows 0X000_error codes or OS boot loop issues, you can try running a System File Checker (SFC) scan, which scans and replaces corrupted system files. You can also run a DISM (Deployment Image Servicing and Management) scan to check and repair corrupted system components.
Way 2. Change Boot Drive in UEFI
UEFI is the latest firmware standard that allows faster boot times for Windows 11 systems, and its settings can be used to change the boot drive if needed.
- Notice:
- The UEFI interfaces vary significantly between computer manufacturers and firmware versions, so the steps and options might differ slightly from those presented here.
Follow the steps:
Step 1. Go to the Windows 11 "Settings," click "System," and then the "Recovery" tab.
Step 2. In the "Recovery" tab, click Restart now in the "Advanced startup" setting.
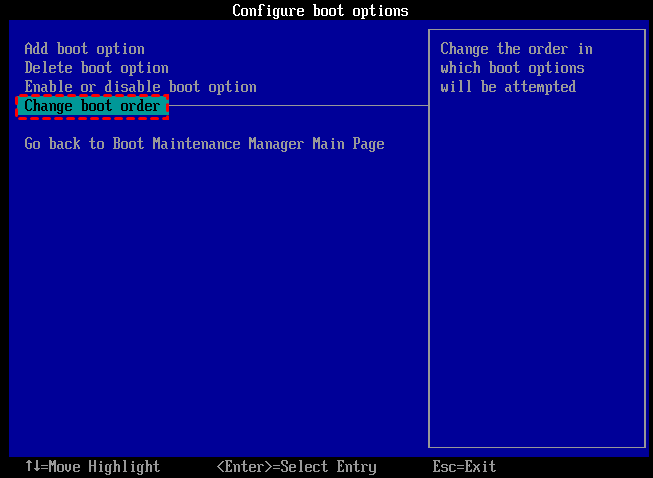
Step 3. Click "Restart now" and navigate to "Troubleshoot" > "Advanced options" > "UEFI Firmware Settings" in one paragraph shortly.
Step 4. Choose the "Restart" button.
Step 5. Go to the boot settings page from the UEFI (BIOS) interface.
Step 6. To boot Windows 11 from a USB drive, select the drive you want to boot from, such as a specific drive, network, or another media, from the boot menu. This allows you to choose where to start the Windows 11 installation process.
Step 7. Save the changes.
If you're unsure which firmware your system is using, you can check the manufacturer's documentation or contact their support team for assistance. They can provide you with the necessary information to determine the correct firmware version for your device.

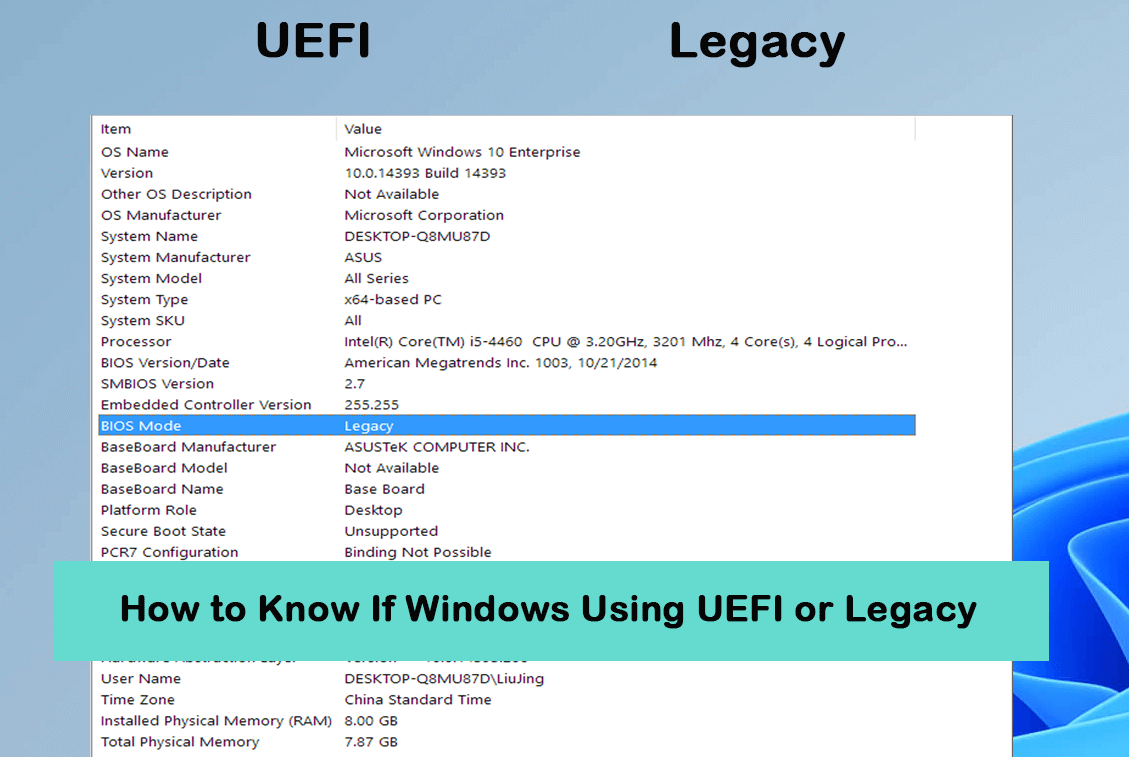
How to Know If Windows Using UEFI or Legacy (1min-Check)
If you're unsure whether your Windows is currently using UEFI or Legacy BIOS boot mode, you can check by following the instructions in the article mentioned, which will provide the answer.
Way 3. Change Boot Drive in BIOS
BIOS is essential firmware that enables communication between the operating system and hardware during startup, initializing and configuring hardware settings such as boot order to ensure smooth system operation. In cases where your computer relies on BIOS, you can change the boot drive by following the steps outlined in Way 3, which guides you through adjusting BIOS settings with clear pictures and detailed instructions.
Follow the steps:
Step 1. To access the BIOS, restart your PC and immediately press a specific key, which may vary depending on your computer's manufacturer. Commonly used keys include F2, F10, Delete, or Esc.
Step 2. The BIOS setup utility can be navigated using the arrow keys on your keyboard to locate the "Boot" or "Boot Order" section.
Step 3. The Boot section shows drives or devices, indicating the boot order, with the top drive showing the current boot status.
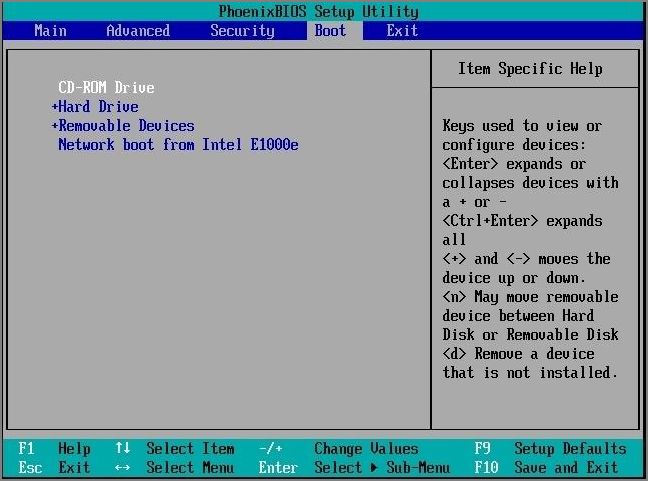
Step 4. To change the boot drive on your computer, you can select the desired drive and move it to the top of the order in the boot drive selection menu. This will set the chosen drive as the primary boot drive.
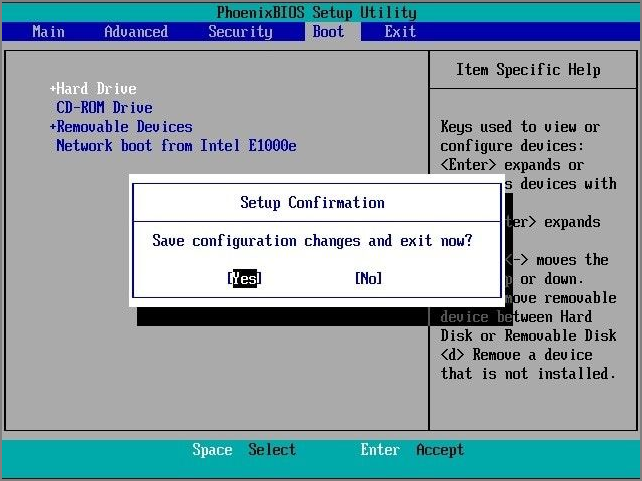
Step 5. Save the changes and exit the BIOS setup utility. Your PC will be restarted, and it should be booted from the selected drive, ensuring it contains a compatible operating system.
Now that you've learned how to change the boot drive in Windows 11, you can share your expertise with others by posting about it on your social media platforms, helping more users master this process.
Conclusion
Changing the boot drive in Windows 11 can be a daunting task, but it's a crucial step for various reasons such as reinstalling Windows, performing dual boot systems, or fixing errors. Fortunately, this guide provides three simple methods to change your boot drive, making it accessible even for tech beginners. By following these methods, you can overcome the technical hurdles and challenges associated with changing the boot drive in Windows 11.
You can easily change the boot drive on Windows 11 using Qiling Disk Master, which offers a user-friendly interface and advanced features that allow you to modify the boot order without entering UEFI/BIOS settings, making it a convenient option.
FAQs on Change Boot Drive Windows 11
You may find the right answers from these FAQs if you have more queries.
1. How do I change my UEFI boot drive?
Follow the steps to the UEFI boot drive:
- To access the recovery options in Windows 11, navigate to the Settings app, select the "System" option, and then click on the "Recovery" tab.
- To access the Recovery tab, click on the Start menu, then click on the "Power" button, and select "Restart" while holding the Shift key. This will open the Recovery tab.
- To resolve the issue, click "Restart now" and then go to "Troubleshoot" > "Advanced options" > "UEFI Firmware Settings".
- Choose the Restart button.
- To access the boot settings page from the UEFI (BIOS) interface, navigate to the UEFI (BIOS) interface and select the "Boot" or "Boot Options" tab. From there, you can configure various boot settings, such as the boot order, which determines the order in which the system boots from different devices like the hard drive, SSD, or USB drive.
- Select your preferred boot drive, like a USB, a specific drive, network, or another media, and save the changes.
2. Can I change my boot drive without reinstalling Windows?
You can change the boot drive without reinstalling Windows by modifying the boot order to check the chosen drive first. As long as it contains a compatible operating system, you can boot from it without reinstalling.
3. What is the difference between UEFI and BIOS Windows 11?
The key difference between UEFI and BIOS lies in their architecture and functionality. UEFI, used in Windows 11, offers faster boot times and more advanced features compared to traditional BIOS, providing greater flexibility and capabilities.
Related Articles
- How to Fix USB won't format to FAT32, Check Three Easy Ways
- How to Convert GPT to MBR Without Operating System
- How to Extend C Drive via Windows 8 Disk Management🔥
- How to Format Bootable Pendrive [4 Safe Solutions]
- How to Fix Windows 10 Won't Boot After Update 2016 [Effective]
If you've recently updated your Windows 10 to its 2016 version, you might be experiencing issues with it not booting properly. This guide provides a solution to help you fix the problem and get your Windows 10 up and running again. - Windows 10 Won't Boot After Update? Easy Fixes
Windows 10 won't boot after an update? Don't worry, this article is here to help. You can easily resolve this issue by following the steps provided. But first, have you ever wondered why Windows 10 won't boot after an update? Find out the answers on this page.