How to Install a Second SSD[Comprehensive Guide]
In today's fast-paced world, computer speed and efficiency are top priorities, with users craving lightning-fast data retrieval, seamless multitasking, and accelerated application launches. Fortunately, technology keeps pace with these demands, and installing a second SSD is a highly appealing solution for Windows users seeking to supercharge their system, offering numerous benefits and advantages that will be explored in this comprehensive guide.
How to Install Second SSD
Installing a second SSD on your Windows computer is not difficult as long as you are adequately prepared. To begin, ensure you have all the necessary tools and preparations, and then follow the step-by-step process: prepare the necessary tools, shut down your computer, ground yourself, remove the side panel, locate the drive bay, remove any existing drive, install the new SSD, reconnect any cables, and finally, restart your computer and set up the new drive.
A Comparison Table for Preparation and Overview:
| ⏱️Duration | About 10 Minutes |
| 💻Goal | Install a second ssd |
| 👩💻Suitable User | For all users: beginners and experienced users |
| 🧰Preparation |
✔️A new SSD ✔️Download Qiling Disk Master |
| 🛠️Stages |
Phase 1: Install Second SSD
Enhancing your storage computer's capacity and performance involves incorporating an additional SSD into your Windows setup. To start, you'll need to physically install the new SSD into your system, which requires following a series of steps and guidelines to ensure a successful installation. This process will be accompanied by explicit instructions and screenshots to help you navigate through the procedure.
Step 1: To upgrade your PC's storage, start by disconnecting it from the power source and opening the case to access the internals. Next, identify an available drive bay within your PC, which can vary in size and may include peripheral bays. This will provide a convenient location to install your new storage device. After selecting the drive bay, you can proceed with installing the new storage device, taking care to secure it properly to prevent any damage or malfunction.
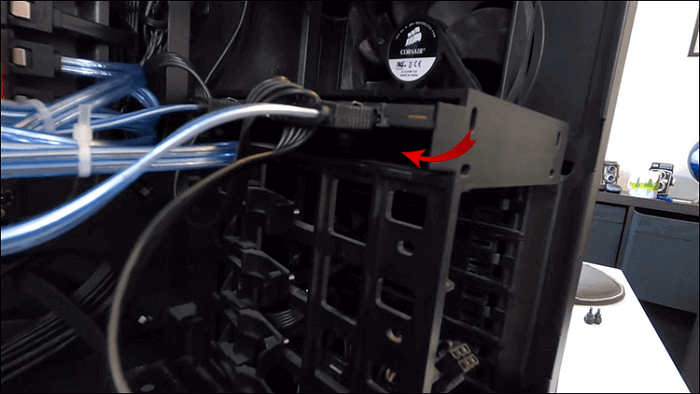
Step 2: If your PC case has drive caddies, take out the correct caddy and put your new SSD in it. If your case doesn't have caddies, you might need to put the SSD directly into the bay and secure it with screws. If you're having trouble, check your case's manual for instructions.

Step 3: Reinsert the caddy into the chosen drive bay once the SSD is securely positioned in the caddy. Depending on your case design, the caddy might automatically snap into place, or you might need to use a fastening mechanism.
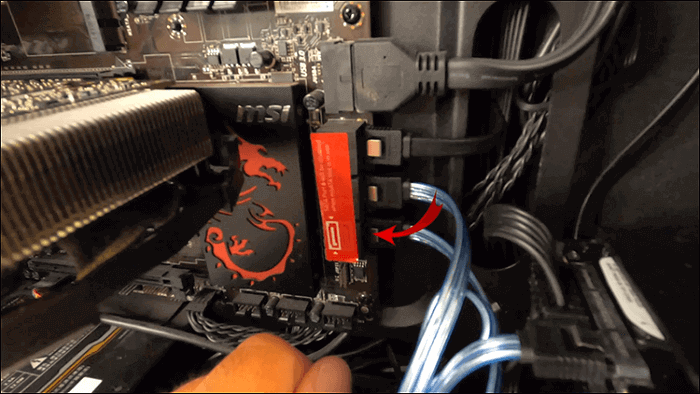
Step 4: Connect the SATA power and data connectors to your newly installed SSD, attaching a SATA data cable to the motherboard's available SATA data cable port and a SATA power connector to the PC's available SATA power connector.
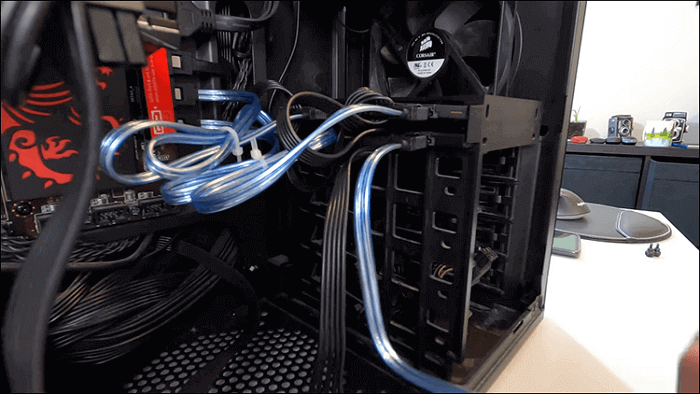
Step 5: Ensure all cables are securely connected, verify that none are loose or unplugged, and then close the PC case, reconnect everything, and turn on the computer.
Further Reading: Install Windows on Steam Deck
Phase 2. Initialize the Second SSD
With your second SSD physically installed, it's time to unlock its full potential by initializing it within your Windows environment. You can do this using either the user-friendly Qiling Disk Master software or the built-in Disk Management tool, both of which will guide you through the process to get your new SSD up and running.
With Qiling Disk Master - Simple and Effective
Qiling Disk Master is a reliable and user-friendly solution for managing disk partitions and optimizing storage. It comes with a free "Partition Manager" tool that allows you to initialize a second SSD, among other disk or partition management features, making it an excellent choice for Windows users seeking efficient disk management.
GParted is a free and open-source disk management tool that allows users to easily partition, resize, and optimize their hard drives, making it an essential tool for managing disk space and performing various disk-related tasks.
Here are the steps to initialize the second SSD with Qiling Disk Master in one paragraph:
Step 1. Open Qiling Disk Master and got to Partition Manager.
Step 2. To prepare a target disk for use, right-click on it and select the appropriate initialization option, either "Initialize to MBR" for Master Boot Record or "Initialize to GPT" for GUID Partition Table, depending on the disk type.
Additional Features of Qiling Disk Master
- Set SSD as the boot drive.
- Resize and merge SSD's partitions.
- To efficiently convert an MBR (Master Boot Record) to GPT (GUID Partition Table) without data loss, you can use the `gdisk` command-line utility. First, boot from a live Linux environment or a Windows installation media to ensure the system is not running from the disk you want to convert.
- Safely create partitions on SSD.
- Conversion between file systems (convert NTFS to FAT32).
For a streamlined and user-For a seamless experience, we suggest using Qiling Disk Master. Its robust features and user-friendly interface make the initialization process straightforward, allowing you to fully utilize your second SSD's capabilities.
With Disk Management - Maunally
Disk Management is a built-in Windows utility that enables users to manage their disk drives and storage devices efficiently.
This invaluable tool streamlines the processes of partitioning, formatting, and overall management of diverse storage devices, encompassing traditional hard drives, advanced solid-state drives (SSDs), and even external USB drives. Follow these steps to initialize the second SSD in the Windows computer with Disk Management:
Step 1: After successfully inserting the SSD into your PC, restart it and press the "Win + X" key. Then, from the context menu, locate and proceed with the "Disk Management" option.

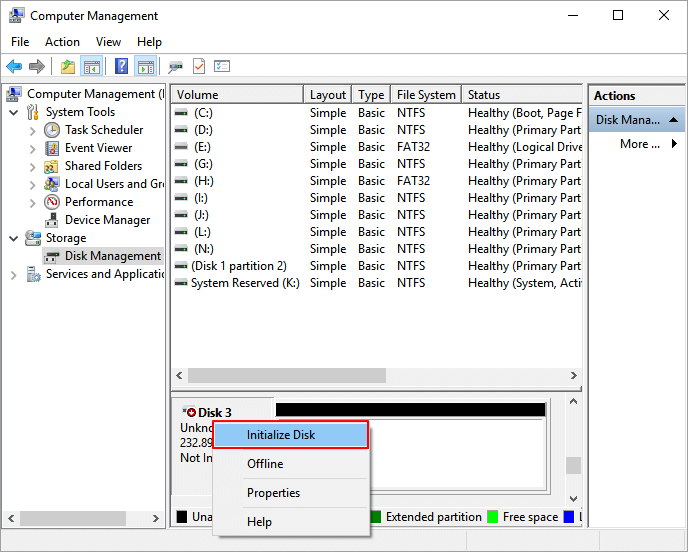
Step 2: In Disk Management, you'll find all connected disks, including your SSD, which will be labeled as "Not Initialized." To prepare it for use, right-click the SSD and select "Initialize Disk," then choose the partition style as GPT and press "OK."
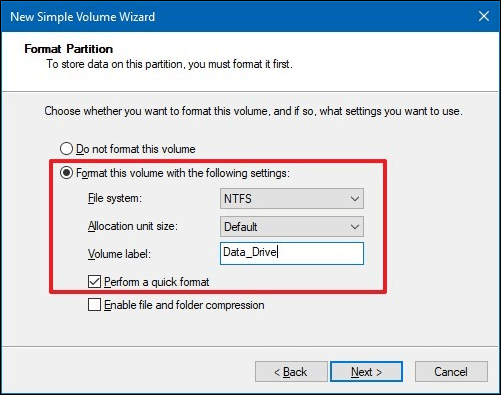
Step 3: To create a new simple volume on unallocated space, right-click it with the mouse and select "New Simple Volume." Then, click "Next" and decide whether to create multiple partitions, followed by clicking "Next" again and choosing a drive letter.
Step 4: To proceed, tap "Next" and choose the file system, preferably NTFS, then press "Next" and "Finish" to complete the setup.
After installing a second SSD on Windows, you can use it to install Windows or save data. To proceed, click the link below.
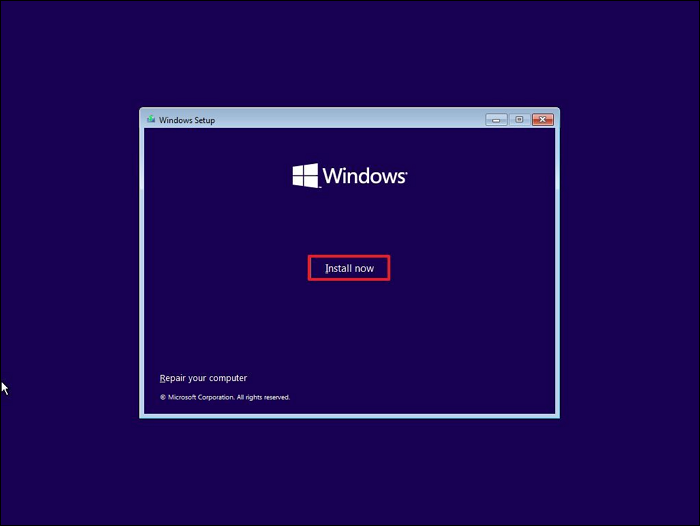
How to Install Windows 10 on Second Hard Drive
To install Windows 10 on a second hard drive or SSD, you can use a tool like Qiling Disk Master for a quick OS migration or create a Windows installation CD using the Windows Media Creation Tool. This will allow you to install Windows 10 on the second drive without affecting the existing operating system.
Why Should Install a Second SSD
Upgrading your Windows system with a second SSD is a worthwhile investment, offering several compelling reasons to take this step.
1. Ample Storage Space
Having a second SSD provides a significant boost in storage capacity, allowing you to store more files, applications, and multimedia content without running out of space.
2. Accelerated Speed and Performance
Adding a second SSD to your Windows system can significantly boost speed and performance by distributing the workload, reducing strain on individual drives, and resulting in faster data retrieval, quicker application launches, and smoother multitasking.
3. Extended Hard Drive Lifespan
With two SSDs, you can distribute data and tasks more strategically, reducing the workload on each drive and prolonging their lifespan. This helps to mitigate wear and tear, ultimately enhancing the overall longevity of your storage setup.
4. Enhanced Data Security
Having a second Solid-State Drive (SSD) provides an extra layer of protection for your data by allowing you to separate your operating system and applications from your essential data files. This setup creates a safeguard against potential system problems by keeping critical information on a separate drive, ensuring it remains safe and accessible even if your system encounters issues.
If this post meets your needs, you can share it on any social media platform via the following links.
Conclusion
Installing a second SSD is a crucial step in elevating your Windows experience, unlocking enhanced performance, efficiency, and storage capacity. By doing so, you can take your computing experience to new heights, and one tool that can help you streamline this process is Qiling Disk Master, making it the optimal solution for a seamless and efficient upgrade.
By integrating a second SSD with Qiling Disk Master, you can tap into a range of disk management features. The tool's user-friendly interface allows for easy navigation of tasks such as disk initialization, partition creation, and system optimization, making it simple to manage your disk storage.
FAQs About How to Install Second SSD
What are the steps to install a second SSD?
1. How can I get Windows to recognize my second SSD?
To ensure Windows recognizes your second SSD, follow these steps:
Step 1: To free up space on your second SSD, right-click the "Start" button and select "Disk Management." Then, identify the unallocated space on your second SSD and initialize the disk by right-clicking the unallocated space and choosing the "Initialize Disk" option.
Step 2: Initialize the SSD by choosing between MBR (Master Boot Record) and GPT (GUID Partition Table) formats, and if needed, create partitions on the newly initialized drive.
2. How to set up a second M.2 SSD in Windows?
Setting up a second M.2 SSD is similar to installing other SSDs. To do this, you'll need to access the motherboard's UEFI settings by pressing a specific key during boot-up, usually F2, F12, or Del.
Step 1: You begin by turning off the computer and opening the casing. Locate an available M.2 slot, which is typically found on the motherboard, and prepare the M.2 SSD for installation by removing any protective covering from the gold contacts.
Step 2: Insert the M.2 SSD into the slot, secure it with the screw(s), and initialize, format, and create partitions using Disk Management.
3. Can I have two SSDs with Windows installed?
You can have multiple SSDs with Windows installed, each with its own copy of the Windows operating system, allowing you to boot into different installations and choose which one to launch during startup.
Related Articles
- How to Clone Windows to NVMe [2024 Full Guide]
- 2024 Sony USB/Pen Drive Format Tool Is Online | Free Download
- Can I Unlock Windows Passwords? Yes [5 Beginners' Tools]
- How to Format An External Hard Drive That Is Not Visible [Efficient Ways]
- How to Upgrade Xbox 360 Hard Drive to SSD [Easy Tutorial]
Upgrading your Xbox 360 hard drive to an SSD is a relatively simple process that can be completed with a few easy steps. This article provides a step-by-step guide to help you make the transition from a traditional hard drive to a faster and more reliable solid-state drive. - How to Upgrade Xbox One Hard Drive [Guide with Pictures]
Learn how to upgrade your Xbox One hard drive. In this tutorial, we'll guide you through the entire process with different methods and easy-to-use tools. So, stay with us to learn efficiently.