Top 2 Ways to Create System Image Windows 11 on USB🔥
Windows 11 is the latest operating system from Microsoft, offering many new features and functions. With its release, many users have installed it, but some may not know how to create a system image on a USB drive. Fortunately, a guide is available to help users learn how to create a Windows 11 system image on a USB flash drive, making it easier to manage their computer setup.
| Method | Effectiveness | Backup Speed | Difficulty |
|
|
👍High-Automatically creating system image backup without trouble. |
Fast |
⭐ |
|
|
Medium-Sometimes, you cannot create a system image on external drives. |
Normal |
⭐⭐ |
🎀Related Reading: How to Backup Windows 11 to USB
Why Do You Create a System Image on a USB Flash Drive
The Windows 11 system image is a copy of every file on your computer's partition, including the operating system, applications, drivers, settings, etc. It's one of two options, along with the recovery partition, for restoring Windows to a normal state in case of a system failure.
Some users want to create Windows system images on external hard drives, such as a USB drive, so they can easily restore their system to a working state in case of a problem or crash. This can be especially useful for those who rely on their computer for work or other critical tasks, as it provides a quick and easy way to get back up and running.
- Free up space on your system hard drive and save more storage space by deleting unnecessary files, uninstalling unused programs, and transferring files to an external drive or cloud storage. This will help declutter your system and make it run more efficiently, giving you more room to store important files and programs.
- Emergency restore refers to the process of reverting a computer system to a previous stable state in the event of a malfunction or failure. This is typically done to recover the system from an unexpected error or crash, and restore normal functioning.
- USB drives are an affordable and convenient option for external storage, allowing for easy connection to a computer and often being more budget-friendly than other external drives like HDDs or SSDs.
- Creating a system image on a USB flash drive can help reinstall Windows and avoid data loss due to computer failure, such as the black screen of death, computer virus attack, or disk corruption.
- Creating a system image on external drives offers the most significant advantage of portability compared to a system restore point, as the system backup image can be saved on a local drive or an external storage device.
To create a system image on a USB flash drive, you can use the built-in Windows tool called Backup and Restore (Windows 7) or the Control Panel, and select the USB drive as the destination for the system image. This will allow you to create a backup of your current system configuration and restore it to the same or a different computer in case of a system failure or other issues.
2 Ways to Create Windows 11 System Image on USB Drive
Creating a Windows system image on a USB flash drive can be done using either professional system image backup software or Windows' built-in backup tool. However, before proceeding, it's essential to note the following:
- Important
- 1. USB drive. USB flash drives and external USB drives can be used to save system backup images, allowing for easy and portable storage of backup data.
2. USB space. To successfully clone a system to a USB drive, the target USB drive must be empty and have enough free space to accommodate the system image, which should be at least as large as the system partition's used space.
Way 1. Using Auto Backup Software
When creating a system image, the simplest method is to use a professional backup tool, such as Qiling Disk Master, which offers advanced features and fewer limitations. This tool can help you create a system image with ease.
Qiling Disk Master Pro is a backup and recovery program for Windows computers that allows easy automatic backups to external drives, systems, disks, and apps, storing backups in various locations such as local drives, external drives, USB drives, NAS, Security Zones, and Cloud.
Key Features of Qiling Disk Master Pro:
- One-click backup and restore feature
- Create full, incremental and differential backups
- Clone a hard drive and image a hard disk
- Transfer an operating system from one PC to another
- Compress backups to a reasonable size to save space
- 250G free Cloud storage to backup computer to the Cloud
Qiling Disk Master allows you to perform various tasks such as backup, cloning, imaging, and more, providing a safe and free way to keep your data secure.
To create a system image on a USB drive, first plug the drive into your computer. Then, use Qiling Disk Master to create a system image on the USB drive.
Step 1. Launch Qiling Disk Master on your computer, click "Create Backup" on the home screen, and then select the backup contents by clicking the big question mark.

Step 2. To back up your Windows operating system, click on the "System backup" option to initiate the backup process.
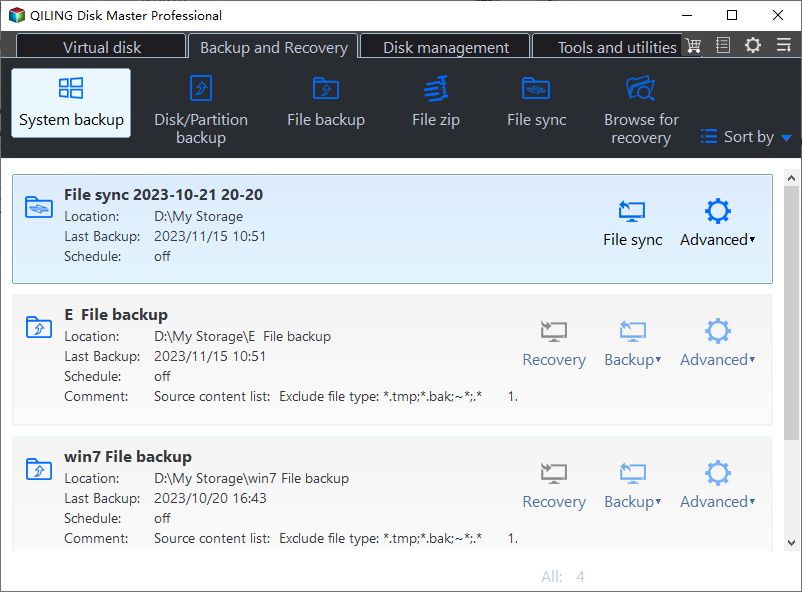
Step 3. In the next step, Windows will automatically select all system-related files and partitions, eliminating the need for manual selection. To proceed, simply click on the illustrated area to choose a location to save the system image backup.

Step 4. The backup location can be another local drive on your computer, an external hard drive, network, cloud, or NAS. We recommend using an external physical drive or cloud to preserve system backup files.
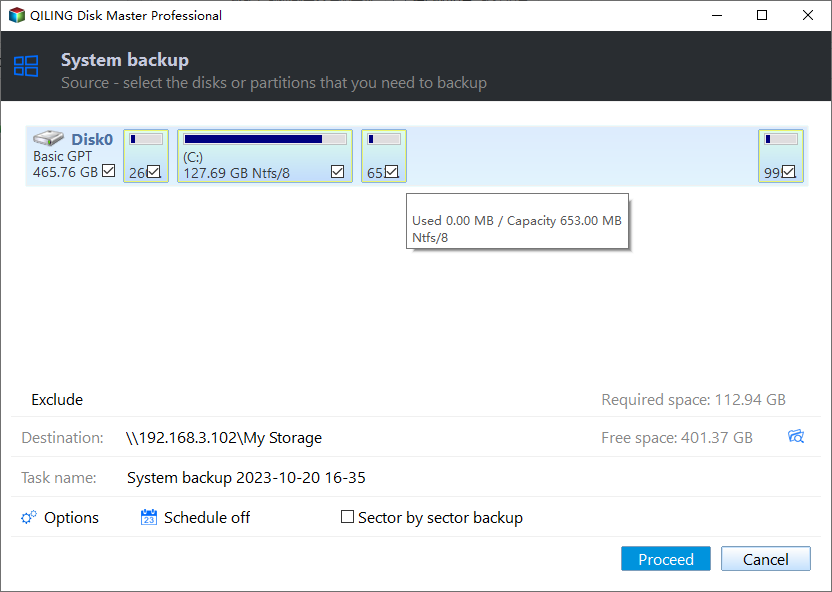
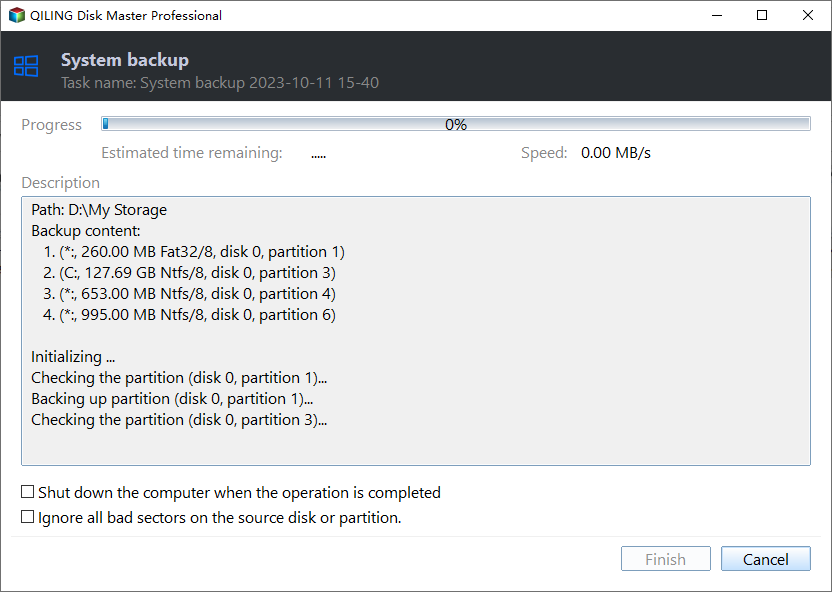
Step 5. Customization settings like enabling an automatic backup schedule in daily, weekly, monthly, or upon an event, and making a differential and incremental backup are available in the Options button. Clicking Proceed starts the Windows system backup process, which displays the completed backup task on the left side in a card style.
Windows 11 Backup to External Hard Drive [3-Minute Guide]
To secure your Windows 11 computer, you have three options for backing up to an external hard drive: Windows Backup and Restore, dependable backup software, and File History. These methods allow you to protect your important files and data, and can be continued reading to learn more about how to implement them.
Way 2. Using Backup and Restore (Windows 7)
Using Windows built-Backup and Restore (Windows 7) is a utility that allows users to create a Windows system image on a USB flash drive, as well as back up data on local and external hard drives and create a recovery drive.
When using the system image creation feature to create a system image on external USB drives, you may encounter an error stating that the drive is not a valid backup location, which can prevent you from performing a system image backup.
Here is how to use Backup and Restore to make a Windows 11 system image on a USB drive.
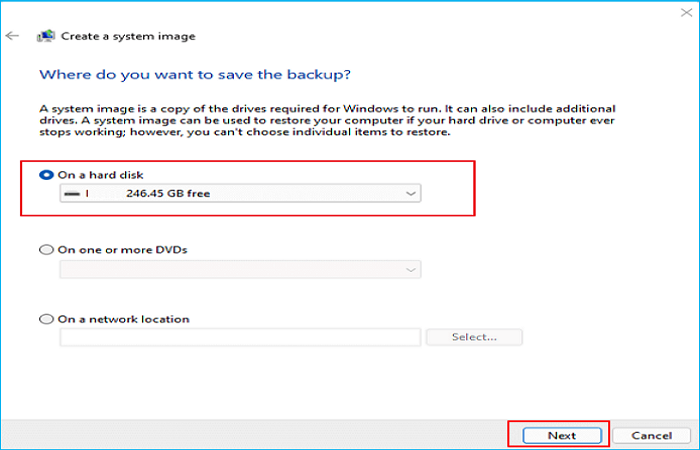
Step 1. Connect the USB drive to your computer.

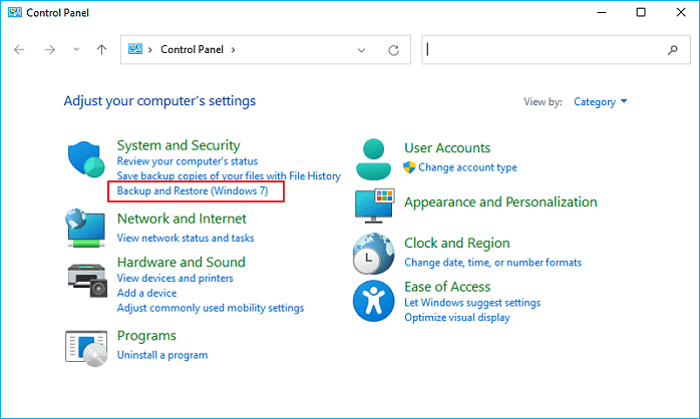
Step 2. Press the Windows key + R to open the Run dialogue. Type "control panel" and press OK.

Step 3. Click Backup and Restore (Windows 7).
Step 4. Click Create a system image.

Step 5. Select the external USB drive attached to your PC as the destination location to save the system image backup. Tap Next.
Step 6. Choose one hard drive you want to back up, which will be the system partition by default, and then hit Next.
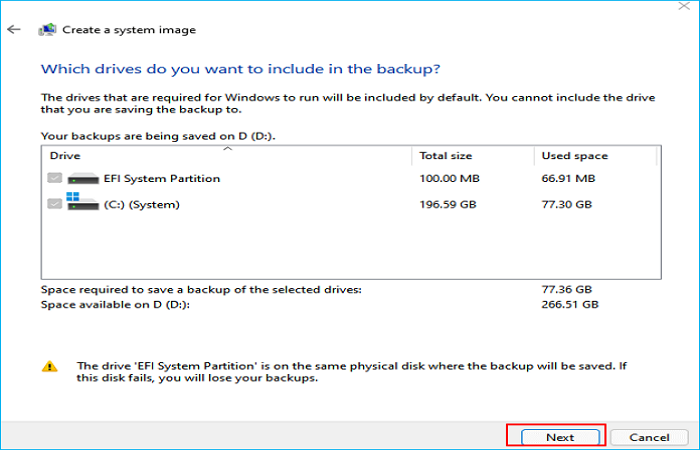
Step 7. Confirm the backup settings and if no issues exist, click Start backup to initiate the system image backup.

When the backup process is finished, your Windows 11 system image will be saved to the USB flash drive.
Troubleshoot: Why Can't I Create a System Image on a USB
If you're unable to create a Windows 11 system image on a USB flash drive or save the system image backup to your target USB, you can try the following method to resolve the issue. To do this, you'll need to use a different USB drive or a different method, such as using a network location or an external hard drive, to save the system image.
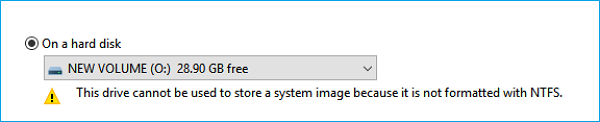
If Windows prompts the "This device cannot be used to save a system image because it is not formatted with NTFS" error, you can directly use Qiling Disk Master to perform a system image in Way 1. Otherwise, you need to format the USB drive to solve this error. To do this, you can use the built-in Disk Management tool in Windows to format the USB drive to NTFS. Alternatively, you can use a third-party tool like Qiling Disk Master to format the USB drive to NTFS.
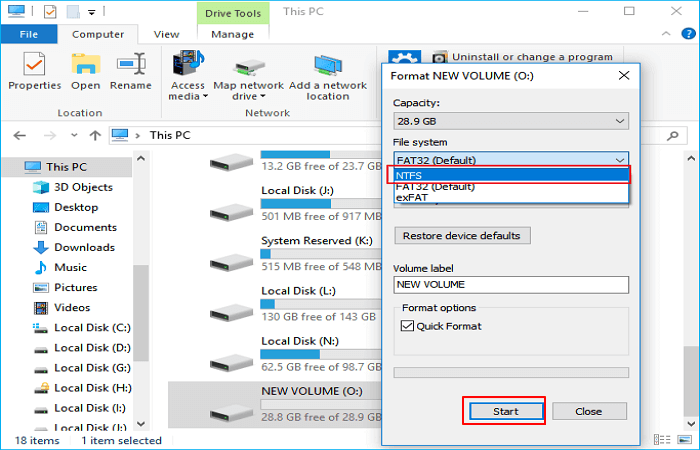
Step 1. Attach the USB to your computer and launch Windows Explorer.
Step 2. Locate the USB flash drive, right-click on it, select Format.
Step 3. Set the file system to NTFS and tap Start.
Once the formatting is complete, you can restart the manual process of creating a Windows system image on your USB drive by repeating Way 2.
To Wrap Things Up
To create a system image of Windows 11 on a USB drive, you can use the built-in Windows backup software, Qiling Disk Master, which offers a straightforward and effective way to achieve this. Alternatively, you can manually create a system image using the Windows built-in feature, but this method is more time-consuming and requires more technical expertise.
Qiling Disk Master is a software that can help you create a system image with ease, making it simple to back up and restore your system whenever needed, all in just a few clicks.
FAQs on Create System Image Windows 11 on USB
1. Can I create a system image on a flash drive?
You can create a Windows system image on a USB flash drive using Windows built-in backup tools, such as Backup and Restore (Windows 7), or a professional backup utility like Qiling Disk Master.
2. Is Windows system image bootable?
A system image backup created by third-party software is bootable because it contains partition metadata, making it possible to boot from the backup without needing to reinstall or use a recovery drive.
3. Why is Windows 11 not bootable from USB?
Ensure the USB drive is your first boot device. To do this, restart your computer, press a key (such as F2, F11, or ESC) to enter BIOS, locate Boot Options or a similar section, and set the USB drive as boot priority. If you can't see the USB boot option, your computer may not support it.
Related Articles
- Windows 7 Backup Fails with Error 0x80070003 [FIXED]
- [2023 Selected!] 200GB Free Cloud Storage Software
- How to Choose Suitable Digital Photo Storage Devices?
- Fix Windows 11 Update Error with Efficient Ways
- [Full Guide] Windows Defender Download Windows 11
- Surface Recovery Image: How to Download & Create & Use🔥
Using Surface Recovery Image can be a little complex, but we'll make it easy for you. To get started, follow the guide to download, create, and use the Surface Recovery Image effectively.