Speed Up AI Model Loading with a RAM Disk and SSD Cache
Nothing about loading a model is processor work. The weights sit on disk as files of several gigabytes, and every run has to pull them back into memory before inference or training begins. On a slow drive that wait is a minute of your day, repeated every time you start a session.
This guide explains why model loading is a storage problem, where caching genuinely helps, where it does not, and what the operating system is already doing on your behalf before you add anything.
PAGE CONTENT
- Why Model Loading Is Slow
- Where a Cache Helps and Where It Does Not
- Use a RAM Disk for What You Can Regenerate
- Cache the Drive Holding Your Models
- Practical Notes
- FAQs About Caching for AI Workloads
- Back Up Windows Before You Change Settings
Why Model Loading Is Slow
- Weight files are enormous. A single checkpoint is regularly several gigabytes, and downloading or loading it touches every byte once.
- Frameworks do not always read sequentially. Many use memory-mapped formats so the file is paged in on demand, which produces scattered reads rather than one clean stream.
- You load the same file again and again. Every new Python session, every notebook restart, and every experiment repeats the load.
- Datasets are many small files. Image folders, shards, and tokenizer vocabularies add up to thousands of scattered reads.
- Model caches grow large. A download cache for multiple models can pass a hundred gigabytes, and tools scan it to resolve names.
- Checkpoint saving is write-heavy. Training writes large files periodically, competing with everything else on the same drive.
On a mechanical drive the mmap-style access pattern is the painful one: scattered reads across a multi-gigabyte file, which is exactly what a spinning disk handles worst.
Where a Cache Helps and Where It Does Not
Where a cache helps:
- Repeated loads of the same weights. The second load of a model is read from fast storage instead of the platter.
- Many small dataset files. Tokenizers, shard indexes, and image folders reward a cache far more than one large file does.
- Cache directory scans. Resolving which model is present means reading metadata over the whole cache tree.
- Cross-session with an SSD tier, so the benefit survives a reboot; a RAM tier only helps within the session.
Where a cache does not help:
- The first download. That is network-bound. Nothing on your disk changes it.
- Inference and training. Once the weights are resident, the work is on the GPU or CPU.
- Anything already in memory. If your framework loads a model once and keeps it, later calls never touch the disk.
Worth knowing before you spend memory on this: Windows already caches file reads in free RAM. If the same model file is read twice within one session and your drive is idle otherwise, the second read may already be served from memory. A cache tool mainly helps across reboots, under memory pressure, and on scattered access patterns.
Use a RAM Disk for What You Can Regenerate
The rule is the same as in any other heavy workload: memory-backed storage is for data you can afford to lose.
Good candidates:
- Compiled kernels and JIT caches. Libraries rebuild these on first use, so losing them costs a recompile rather than data.
- Dataset shuffle and preprocessing buffers. Intermediate arrays written and read back during an epoch.
- Training logs, metrics, and profiler output. Regenerable, and you usually copy the interesting parts elsewhere anyway.
- Temporary checkpoint staging. If a process writes a checkpoint and then copies it to durable storage, the staging area can live in RAM.
Keep these on real storage:
- Fine-tuned weights and training checkpoints, which can represent hundreds of hours of compute and cannot be regenerated.
- Your only copy of a downloaded model, if re-downloading would take hours or you are on a metered connection.
- Datasets you assembled by hand rather than pulled from a public source.
To create the RAM disk, install Qiling Disk Master - the RAM disk feature is in the free edition.
Step 1. Open the Tools and Utilities page and click Create ramdisk.
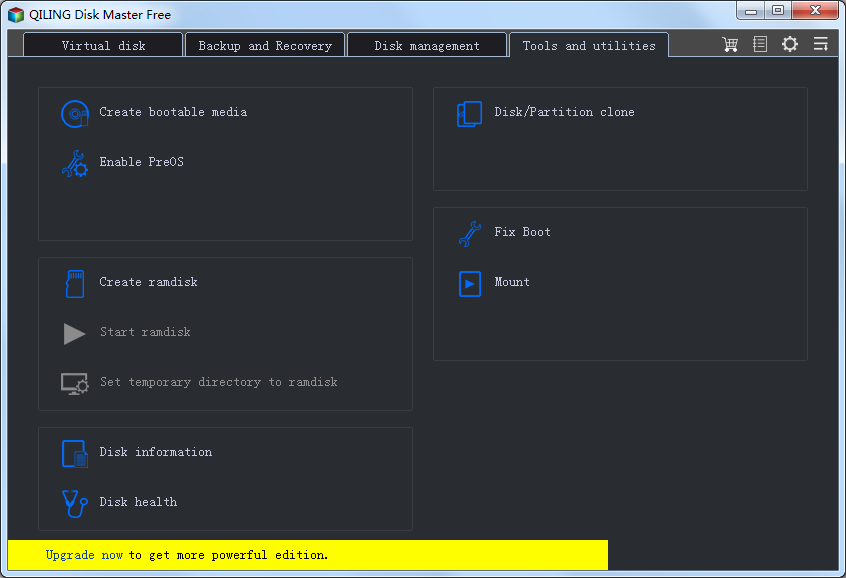
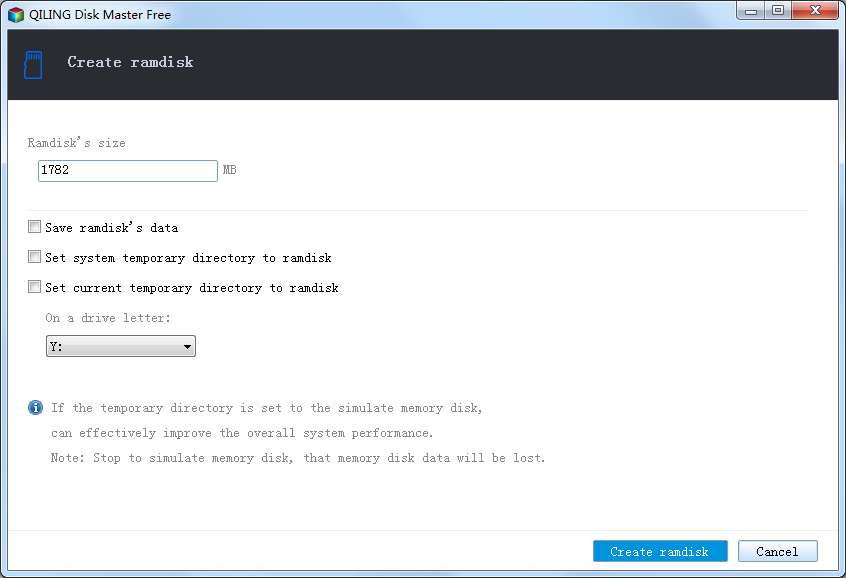
Step 2. Allocate no more than a quarter to a third of your free memory, choose a drive letter such as R:, select NTFS, and enable mounting at startup.
Step 3. Point only the disposable folders at R: and leave weights, checkpoints, and datasets where they are.
Cache the Drive Holding Your Models
For the files that must stay on disk, Qiling Fast Cache keeps copies of the most-read blocks on RAM or an SSD.
Step 1. Download, install, and open Qiling Fast Cache. On first run the task list is empty.

Step 2. Click the "+" button to create a cache task and select the drive that holds your model cache and datasets.
Step 3. Choose the medium and size. Keep the RAM tier modest, because the same memory is also serving as the page cache for your weight files.

Step 4. Create the task and compare load times over the next few sessions, once the cache has warmed.

Practical Notes
- Memory is the real currency. Every gigabyte you give the RAM disk is a gigabyte Windows cannot use for the page cache that was already accelerating your model file.
- Memory-mapped weights behave differently. Reads are driven by page faults, so the benefit depends on how much of the file you actually touch. Benchmark instead of assuming.
- Keep datasets on a fast drive. Data loading often bottlenecks before model loading does; that side is covered in the data analysis guide.
- Do not disable the page file. Training jobs allocate aggressively, and a machine with no page file fails instead of merely slowing down.
- Measure the right interval. Time from the load call to "model ready", not total script runtime, or the compute will drown out any difference.
- Watch the SSD tier during checkpoint writes. Large periodic saves compete with cache filling, so keep them away from peak use where you can.
FAQs About Caching for AI Workloads
Does a RAM disk speed up inference?
No. Once the weights are in memory, inference speed depends on the GPU or CPU. A RAM disk only shortens the loading step.
Is it safe to put model weights on a RAM disk?
Only if they can be re-downloaded cheaply. Fine-tuned checkpoints and hand-assembled datasets belong on real storage.
Will caching help if I am on a fast NVMe SSD?
Rarely for the weight files themselves. A cache pays off more for thousands of small dataset files, and for drives slower than NVMe.
Does Windows already cache my model files?
Yes, to a degree. Windows caches file reads in free RAM, so a repeated read within the same session may already be served from memory. A cache tool adds the most value across reboots and under memory pressure.
What should I measure?
The time from the load call to the model being ready, taken before and after the change. If that number barely moves, the disk was not your bottleneck.
Back Up Windows Before You Change Settings
A machine that holds training checkpoints is expensive to rebuild. Qiling Disk Master creates a full Windows image you can restore from if anything goes wrong.
Part 1: Create a Full System Backup
Step 1. Install and open Qiling Disk Master. On the home screen, open "Backup and Recovery" and choose "System Backup". This option automatically includes Windows and the hidden boot partitions, so you do not have to select them one by one.

Step 2. Check the source. The disk where Windows is installed and its system partitions are already ticked for you. If you only need your personal documents, run a separate "File Backup" task instead.

Step 3. Click the destination box and choose where the image should be saved. Use an external HDD or SSD, a NAS, or any drive other than the one Windows is installed on, and make sure it has enough free space.

Step 4. Review the task summary and click "Proceed". Wait until the progress bar reaches 100%. Do not unplug the drive or turn off the PC while the backup is running.

Part 2: Restore Windows from the Backup
Step 1. Open Qiling Disk Master again, go to "Backup and Recovery", and select the recovery option. Your backup images are listed, so pick the one you created before the changes began.

Step 2. Choose the target disk or partition. Normally you restore to the original system disk. If the drive was replaced, select the new disk instead, and the restore rebuilds Windows together with its boot partitions.

Step 3. Preview the restore plan, click "Proceed", and confirm the warning. The PC restarts to finish the job, and Windows comes back exactly as it was on the day the image was created, with your files and programs intact.

- Note
- Keep the backup image on a separate drive, and refresh it before changing storage cache settings.
Conclusion
Model loading is a storage problem, so it responds to faster storage - but only in the places where the disk is actually the limit. Weight files benefit when they are loaded repeatedly and memory is tight, small dataset files benefit almost always, and downloads never benefit at all. Put regenerable intermediate data such as compiled kernels, shuffled dataset buffers, and training logs on a RAM disk, keep the only copy of your weights and fine-tuned checkpoints on real storage, and cache the drive that holds your model cache directory. Measure the time from the first load call to the moment the model is ready, and let that number decide whether the change earned its memory.
Protect your PC with Qiling Backup—create a system image before your next round of settings changes.
For more Windows 11 performance guides, see Speed Up Data Analysis with a RAM Disk, Speed Up IDE Indexing with a RAM Disk, Speed Up Programming Builds with a RAM Disk, Speed Up Game Development, and Windows 11 Fast Cache.
Related Articles
- When a Disk Cache Does Not Help (and What to Do Instead)
How to tell a storage bottleneck from a processor one, including the case where Windows is already caching for you. - Speed Up Databases with a RAM Disk and Disk Cache
- Is a RAM Disk Worth It? An Honest Look at Speed and Risk
- How to Create a RAM Disk in Windows 11
- How Big Should Your Disk Cache Be? A Practical Sizing Guide
Products
Articles & Tutorials
- Data Recovery
- Data Backup
- File Recovery
- File Backup
- System Backup and Restore
- Disk and Partition Clone
- Technical articles
- Mobile articles
- Disk Master Help
- Windows Data Recovery Tutorials
- Windows Secure Delete Tutorials
- Windows Partition Management Tutorials
- Windows File Backup and Restore Tutorials
- Windows System Backup and Restore Tutorials
- Windows Disk Backup and Restore Tutorials
- Windows Clone Tutorials