Speed Up IDE Indexing with a RAM Disk and Disk Cache
"Indexing" is the message that greets you when you open a large project, and it is the one progress bar that no amount of CPU seems to shorten. That is because indexing is not primarily a processor task - it is the editor reading your entire source tree, writing a large structure for it, and then reading that structure back on every search.
This guide explains what indexing actually touches on disk, why it behaves so badly on a slow drive, and how a RAM disk and a disk cache each remove part of the wait.
PAGE CONTENT
- What IDE Indexing Does to Your Disk
- Why Indexing Is So Disk-Heavy
- RAM Disk vs Disk Cache for a Dev Machine
- Set Up a RAM Disk for Index Folders
- Cache the Drive Holding Your Source Tree
- FAQs About Caching for IDEs
- Back Up Windows Before You Change Settings
What IDE Indexing Does to Your Disk
When you open a project, the editor does far more than display files:
- It walks the whole project tree to discover source files, reading the directory structure rather than the file contents.
- It parses and stores symbols. Classes, functions, and references are written into an index folder - for JetBrains IDEs this lives in a per-project system directory, and other editors keep comparable workspace storage.
- It searches them constantly. Go-to-definition, autocomplete, and project-wide search all read the index, on every keystroke in the worst case.
- It watches for changes. A file watcher tracks saves and triggers re-indexing of what changed.
- It tracks version control. A background git status walks the working tree, sometimes with its own cache.
- It writes build output. Compiler intermediates and caches land in folders such as obj, bin, or a language-specific cache directory.
Most of that traffic is metadata over huge numbers of small files, plus repeated reads of one medium-sized index.
Why Indexing Is So Disk-Heavy
- Small files punish a mechanical drive. Reading a thousand 4 KB files costs a thousand seeks, which is the worst case for a spinning disk and merely busy work for an SSD.
- The index is written, then read. Indexing is not read-only, so the drive handles both directions.
- Indexes are rebuilt more often than you expect. Switching branches, pulling large changes, adding a dependency, or clearing a cache can all invalidate part of the index.
- Antivirus scanning compounds everything. Every file the editor reads and writes is also inspected, which can double the effective I/O.
- Project size grows. A repository with node_modules, a virtual environment, and generated code can contain more files than the source it was built from.
This is why a faster processor does not fix indexing, and why the same project feels dramatically different on an SSD.
RAM Disk vs Disk Cache for a Dev Machine
The split follows the usual rule: memory for what the editor can rebuild, cache for what it cannot.
- Index folders - a RAM disk. They are derived from your source, and losing them costs one re-index rather than code.
- Build intermediates and compiler caches - a RAM disk. obj, bin, and language-specific caches regenerate on the next build.
- Local editor caches - a RAM disk, if the path is configurable and the tool tolerates it.
- Source tree and version control working copy - a disk cache, never a RAM disk. Uncommitted changes are not rebuildable.
- Package and dependency caches - a disk cache. They are large, stable, and read repeatedly across projects.
Before you move any index directory, read your editor's documentation. Some tools treat an unusual index location as a reason to invalidate the index, which means you pay a full re-index at every start rather than saving time.
Set Up a RAM Disk for Index Folders
Install Qiling Disk Master - the RAM disk feature is included in the free edition.
Step 1. Open the Tools and Utilities page and click Create ramdisk.
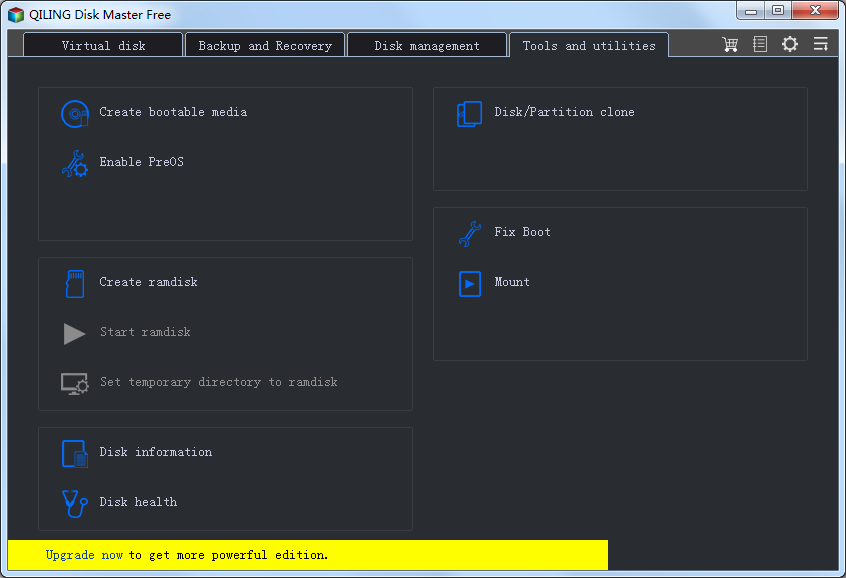
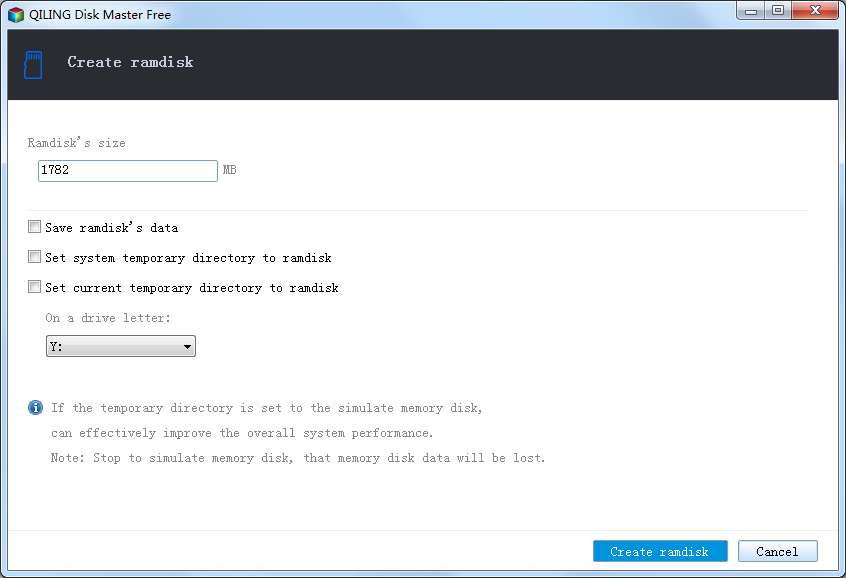
Step 2. Allocate a quarter to a third of your free memory, choose a drive letter such as R:, select NTFS, and enable mounting at startup.
Step 3. Redirect only the index and build folders your editor documents as regenerable. Leave the source tree, the repository, and your package caches where they are.
Step 4. Set a generous size. An index that runs out of space mid-build fails the operation, and a failed build wastes far more time than the memory you saved.
Cache the Drive Holding Your Source Tree
For everything that stays on disk, Qiling Fast Cache keeps the most-read blocks on RAM or an SSD, which is what project-wide search and repeated status scans benefit from.
Step 1. Download, install, and open Qiling Fast Cache. On first run the task list is empty.

Step 2. Click the "+" button to create a cache task and select the drive holding your repositories and dependency caches.
Step 3. Choose the medium and size. An SSD tier is often the better choice here, because indexes and dependency caches should survive a reboot.

Step 4. Create the task and open a large project a few times to let the cache learn which files the editor reads most.

FAQs About Caching for IDEs
Will a RAM disk make indexing instant?
No. It makes the disk side much faster, but parsing and symbol resolution are still processor work, so a large project stays slow the first time.
Should I move my whole project to a RAM disk?
No. Projects are too large, and unsaved work would be lost at every reboot. Move only index folders and build output.
Does a RAM disk lose the index on every restart?
Yes, unless the tool can persist it elsewhere, so the project re-indexes after each boot. If that bothers you, cache the index drive instead so it survives.
Will caching help if my code is on an NVMe SSD?
Marginally for the code itself, but it can still help with a separate build or dependency drive that is slower.
Why does indexing feel slower than the CPU suggests?
Because it is dominated by reading and writing huge numbers of small files rather than by computation. That is why storage changes feel so dramatic for this workload.
Back Up Windows Before You Change Settings
Redirecting index folders and build output can break a toolchain in ways that are annoying to untangle. Qiling Disk Master creates a full Windows image you can restore from if anything goes wrong.
Part 1: Create a Full System Backup
Step 1. Install and open Qiling Disk Master. On the home screen, open "Backup and Recovery" and choose "System Backup". This option automatically includes Windows and the hidden boot partitions, so you do not have to select them one by one.

Step 2. Check the source. The disk where Windows is installed and its system partitions are already ticked for you. If you only need your personal documents, run a separate "File Backup" task instead.

Step 3. Click the destination box and choose where the image should be saved. Use an external HDD or SSD, a NAS, or any drive other than the one Windows is installed on, and make sure it has enough free space.

Step 4. Review the task summary and click "Proceed". Wait until the progress bar reaches 100%. Do not unplug the drive or turn off the PC while the backup is running.

Part 2: Restore Windows from the Backup
Step 1. Open Qiling Disk Master again, go to "Backup and Recovery", and select the recovery option. Your backup images are listed, so pick the one you created before the changes began.

Step 2. Choose the target disk or partition. Normally you restore to the original system disk. If the drive was replaced, select the new disk instead, and the restore rebuilds Windows together with its boot partitions.

Step 3. Preview the restore plan, click "Proceed", and confirm the warning. The PC restarts to finish the job, and Windows comes back exactly as it was on the day the image was created, with your files and programs intact.

- Note
- Keep the backup image on a separate drive, and refresh it before changing storage cache settings.
Conclusion
IDE indexing is a read-heavy, metadata-heavy workload over an enormous number of small files, plus an index that is written once and then read on every search. That combination responds very well to fast storage. Put index folders and build intermediates - both of which the editor can regenerate - on a RAM disk if you have memory to spare, and cache the drive that holds your source tree so repeated scans and searches are served from RAM or an SSD. Never put the working copy itself on a RAM disk, and check your editor's documentation before moving its index directory, because some tools treat an unusual location as a reason to rebuild from scratch.
Protect your PC with Qiling Backup—create a system image before your next round of settings changes.
For more Windows 11 performance guides, see Speed Up Programming Builds with a RAM Disk, Speed Up AI Model Loading, Speed Up Data Analysis, Dev Drive vs Disk Cache, and Windows 11 Fast Cache.
Related Articles
- When a Disk Cache Does Not Help (and What to Do Instead)
Which development phases are disk-bound and which are bound by the processor instead. - How to Move the Windows TEMP Folder to a RAM Disk
- Is a RAM Disk Worth It? An Honest Look at Speed and Risk
- Docker and WSL2 Performance: RAM Disk and Disk Cache Tips
- Does Caching Help Remote Desktop and Remote Work?
- Does a Disk Cache Speed Up Windows Search?
Products
Articles & Tutorials
- Data Recovery
- Data Backup
- File Recovery
- File Backup
- System Backup and Restore
- Disk and Partition Clone
- Technical articles
- Mobile articles
- Disk Master Help
- Windows Data Recovery Tutorials
- Windows Secure Delete Tutorials
- Windows Partition Management Tutorials
- Windows File Backup and Restore Tutorials
- Windows System Backup and Restore Tutorials
- Windows Disk Backup and Restore Tutorials
- Windows Clone Tutorials