Speed Up Data Analysis with a RAM Disk and Disk Cache
Analysts spend a surprising share of the day waiting on storage: re-reading the same CSV, re-running a notebook from the top, and writing shuffle files that get deleted minutes later. Some of that wait responds to a cache, and some of it does not respond to anything except more memory.
This guide starts with the question that decides everything else, then covers where a RAM disk and a disk cache each fit into a data workflow.
PAGE CONTENT
- Where Analysis Time Actually Goes
- The First Question: Does It Fit in Memory?
- RAM Disk vs Disk Cache for Data Work
- Set Up a RAM Disk for Intermediates
- Cache the Drive Holding Your Datasets
- FAQs About Caching for Data Analysis
- Back Up Windows Before You Change Settings
Where Analysis Time Actually Goes
- Reading the source file. For a CSV, most of the cost is parsing text rather than moving bytes, so a faster disk barely helps. For a compressed columnar format, reading is I/O plus decompression, and the newer the format the more it matters.
- Re-reading the same file. Every notebook restart, every new script run, and every experiment pulls the same dataset from disk again.
- Writing intermediate files. Shuffles, joins, and exports produce large temporary files that are read once and discarded.
- Many small files. Image folders, JSON shards, and partitioned datasets are dominated by metadata reads.
- Feature and model artifacts. Saved arrays and trained objects are loaded repeatedly during iteration.
The key observation: Windows already caches file reads in free RAM. If a dataset fits comfortably in available memory, the second read in the same session is often already served from memory, and an additional cache layer adds little.
The First Question: Does It Fit in Memory?
Answer this before spending any memory on caching.
- If the working set fits in RAM: the fastest fix is to stop re-reading it. Load the data once per session, use a columnar format instead of text, and read only the columns you need. A RAM disk or cache on top of that is usually redundant, because the operating system is already doing the same job.
- If the working set does not fit: this is where caching earns its place. Once the hot portion of a larger-than-memory dataset is on fast storage, repeated passes stop touching the platter.
- If the bottleneck is parsing rather than reading: neither a RAM disk nor a cache will help much. The processor is busy converting text into numbers, and only a better format changes that.
RAM Disk vs Disk Cache for Data Work
- Intermediate shuffles, joins, and exports - a RAM disk. They are written for one operation and deleted afterwards.
- Extracted column subsets - a RAM disk. If you keep pulling three columns out of a wider dataset, the extract can be regenerated in seconds.
- Notebook scratch output - a RAM disk, sized generously so a failed write does not stop a long job.
- Raw datasets and columnar files - a disk cache. They are permanent, often larger than memory, and read in every session.
- Feature sets and trained artifacts - a disk cache. Losing one can cost hours of processing.
Never put the only copy of a dataset on a RAM disk. If a source file cannot be re-downloaded or re-created, it belongs on durable storage.
Set Up a RAM Disk for Intermediates
Install Qiling Disk Master - the RAM disk feature is included in the free edition.
Step 1. Open the Tools and Utilities page and click Create ramdisk.
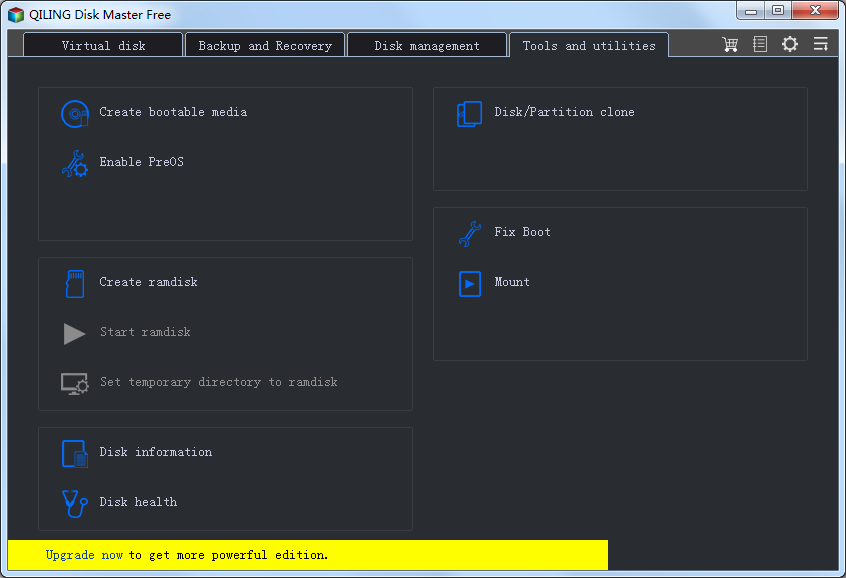
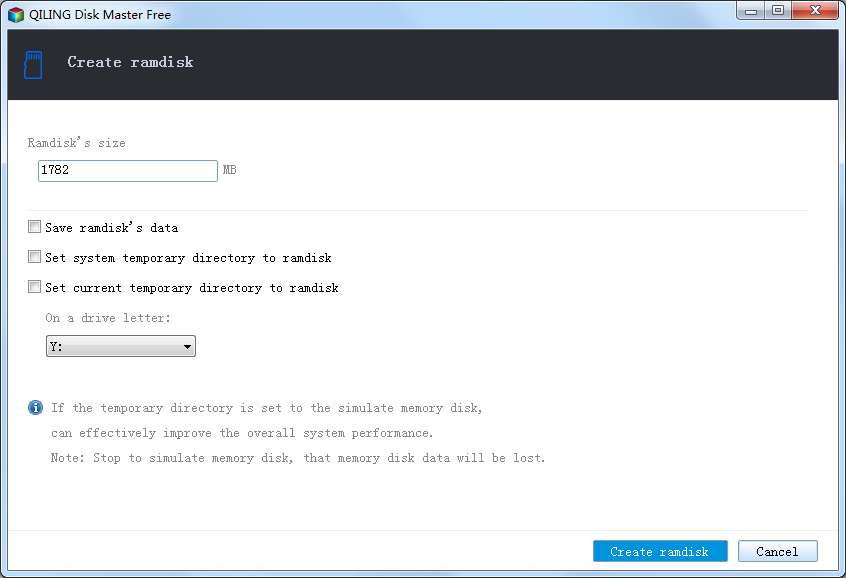
Step 2. Allocate a quarter to a third of your free memory, choose a drive letter such as R:, select NTFS, and enable mounting at startup.
Step 3. Point only the intermediate locations at R: - shuffle, temp, and export directories - and leave your source datasets where they are.
Step 4. Size it for the largest intermediate step you expect. Running out of space mid-job fails the operation, and a failed long-running job costs far more than the memory saved.
Cache the Drive Holding Your Datasets
For the files that stay on disk, Qiling Fast Cache keeps the most-read blocks on RAM or an SSD, which is what repeated passes over a larger-than-memory dataset need.
Step 1. Download, install, and open Qiling Fast Cache. On first run the task list is empty.

Step 2. Click the "+" button to create a cache task and select the drive holding your datasets and feature artifacts.
Step 3. Choose the medium and size. A modest RAM tier helps the hottest files, while an SSD tier covers a working set larger than memory.

Step 4. Create the task and compare load times across a few sessions once the cache has warmed.

FAQs About Caching for Data Analysis
Will a RAM disk speed up reading a CSV?
Only the file read, and parsing usually dominates. Converting the file to a columnar format reduces the cost far more than faster storage does.
Is caching useful if my dataset fits in memory?
Rarely. Load it once per session instead. Windows already caches file reads in free RAM, so a second cache layer adds little.
What about datasets larger than memory?
This is the case where caching helps, because the hot portion stays on fast storage and repeated passes stop hitting the platter.
Should I put a columnar dataset on a RAM disk?
Only if you can regenerate it. If it took hours to produce, or came from a source you cannot easily re-download, keep it on real storage.
How do I know whether storage is my bottleneck?
Watch Task Manager while a load runs. If the processor sits near 100% during a CSV read, parsing is the limit. If the disk is saturated and the processor is not, storage is.
Back Up Windows Before You Change Settings
A machine holding datasets and trained artifacts is expensive to rebuild. Qiling Disk Master creates a full Windows image you can restore from if anything goes wrong.
Part 1: Create a Full System Backup
Step 1. Install and open Qiling Disk Master. On the home screen, open "Backup and Recovery" and choose "System Backup". This option automatically includes Windows and the hidden boot partitions, so you do not have to select them one by one.

Step 2. Check the source. The disk where Windows is installed and its system partitions are already ticked for you. If you only need your personal documents, run a separate "File Backup" task instead.

Step 3. Click the destination box and choose where the image should be saved. Use an external HDD or SSD, a NAS, or any drive other than the one Windows is installed on, and make sure it has enough free space.

Step 4. Review the task summary and click "Proceed". Wait until the progress bar reaches 100%. Do not unplug the drive or turn off the PC while the backup is running.

Part 2: Restore Windows from the Backup
Step 1. Open Qiling Disk Master again, go to "Backup and Recovery", and select the recovery option. Your backup images are listed, so pick the one you created before the changes began.

Step 2. Choose the target disk or partition. Normally you restore to the original system disk. If the drive was replaced, select the new disk instead, and the restore rebuilds Windows together with its boot partitions.

Step 3. Preview the restore plan, click "Proceed", and confirm the warning. The PC restarts to finish the job, and Windows comes back exactly as it was on the day the image was created, with your files and programs intact.

- Note
- Keep the backup image on a separate drive, and refresh it before changing storage cache settings.
Conclusion
Data analysis responds to fast storage in specific places, and the deciding question is whether your working set fits in memory. If it does, load it once and skip the cache entirely. If it does not, put the hot portion on fast storage with a disk cache, and use a RAM disk for the intermediate files that are written once and thrown away - shuffles, extracts, and exports. Converting text files to a columnar format often does more for load times than any storage upgrade, because parsing is processor work. Never put the only copy of a dataset on volatile storage, and measure load time rather than total runtime so the compute does not hide the difference.
Protect your PC with Qiling Backup—create a system image before your next round of settings changes.
For more Windows 11 performance guides, see Speed Up AI Model Loading, Speed Up Programming Builds with a RAM Disk, How Big Should Your Disk Cache Be?, Windows 11 Fast Cache, and Speed Up Databases with a RAM Disk and Disk Cache.
Related Articles
- When a Disk Cache Does Not Help (and What to Do Instead)
How to recognise a parsing bottleneck that no amount of faster storage will fix. - Speed Up IDE Indexing with a RAM Disk and Disk Cache
- Is a RAM Disk Worth It? An Honest Look at Speed and Risk
- Should You Put the Page File on a RAM Disk? (Short Answer: No)
- Cache vs Buffer: What's the Difference and Why It Matters
- Does a Disk Cache Help Outlook and Email Clients?
Products
Articles & Tutorials
- Data Recovery
- Data Backup
- File Recovery
- File Backup
- System Backup and Restore
- Disk and Partition Clone
- Technical articles
- Mobile articles
- Disk Master Help
- Windows Data Recovery Tutorials
- Windows Secure Delete Tutorials
- Windows Partition Management Tutorials
- Windows File Backup and Restore Tutorials
- Windows System Backup and Restore Tutorials
- Windows Disk Backup and Restore Tutorials
- Windows Clone Tutorials