Couldn't Unmount Disk 69888 on Mac | Top 6 Methods
If you're trying to partition, reformat, or delete a disk on your MacBook Pro/Air and encounter the error "couldn't unmount disk 69888", it means the OS is preventing the operation due to an issue with unmounting the disk. This error usually occurs when you're trying to modify a disk that's in use or has an issue. To resolve this, you can try restarting your MacBook in Recovery Mode, then attempt the operation again.
The "Recently used" error on a disk can be frustrating, but it's often caused by the disk being recently utilized by other apps or hardware failure, making it temporarily unavailable. This article will delve into the reasons behind this error and provide solutions to resolve the issue.
| Workable Solutions | Step-by-step Troubleshooting |
|---|---|
| Fix 1. Exclude the Drive from Spotlight Indexing | Go to the Apple menu, followed by System Preferences and Spotlight, and hit the privacy tab...Full steps |
| Fix 2. Remove Drive from Time Machine on Mac | Open system preferences to eliminate the drive from Time Machine; select Time Machine...Full steps |
| Fix 3. Force Unmount Disk with Terminal on Mac | Open Terminal > Utilities folder, and type the command: diskutil list to get the disk identifier...Full steps |
| Fix 4. Boot into macOS Recovery to Fix Error 69888 | Enter macOS Recovery on the latest Macs having a recovery partition, opt for Disk Utility...Full steps |
| Other Practical Fixes | Delete the internal volume in Safe Mode and unmount each volume to unmount the disk...Full steps |
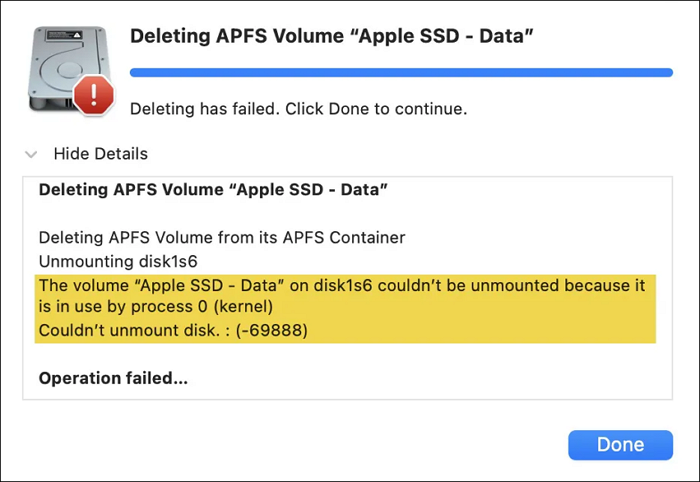
The process of unmounting disk information on Mac can be frustrating when you're unable to erase, delete, or partition an external or internal volume or disk, including an HDD or SSD, Time Machine backup disk, USB flash drive, and an internal fusion drive. This incompetence can lead to several errors, with one of the most significant being the "error 69888: Couldn't unmount disk" error.
Why Couldn't Unmount Disk 69888 Error Occurs on Mac
The issue of being unable to unmount a disk on macOS, specifically disk 69888, is often resolved by identifying and closing any processes or applications that are currently using the drive. This can be done by checking the Activity Monitor or using the "Force Quit" option to terminate any active processes. Once the drive is no longer in use, the unmounting process can be attempted again.
You may not reformat, partition, or delete the disk you've recently booted from, but you can try booting from a different drive to avoid error 69888.
How to Fix Couldn't Unmount Disk 69888
There are numerous fixes for the error message on macOS.
Note that In the below-The fixes and solutions mentioned earlier can be applied to either an external disk connected to a Mac or an internal disk within the Mac. Solutions 1-3 are specifically tailored for external disks, while solutions 4-6 address issues with internal disks.
Fix 1. Exclude the Drive from Spotlight Indexing
If you're trying to format a drive that Spotlight is currently indexing, you may encounter the "Couldn't unmount disk 69888" error. To resolve this issue, you can unmount the drive by following these steps.
Step 1. Go to the Apple menu, then click on System Preferences and select Spotlight.
Step 2. Hit the "Privacy" tab.
Step 3. Click the "+" button to pick the external drive's folder.
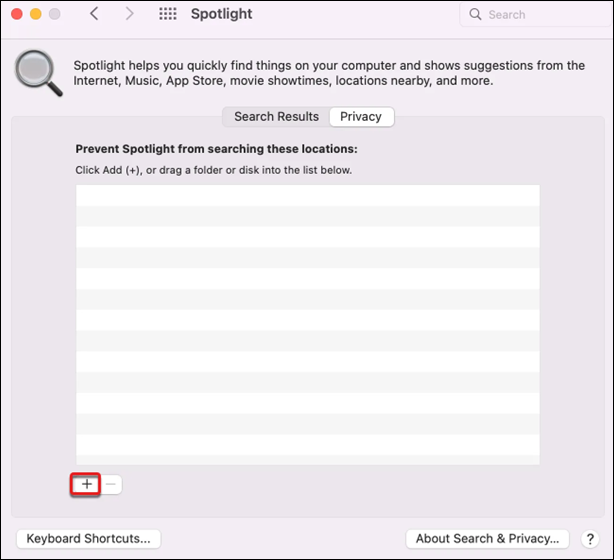
Step 4. Select "Choose".
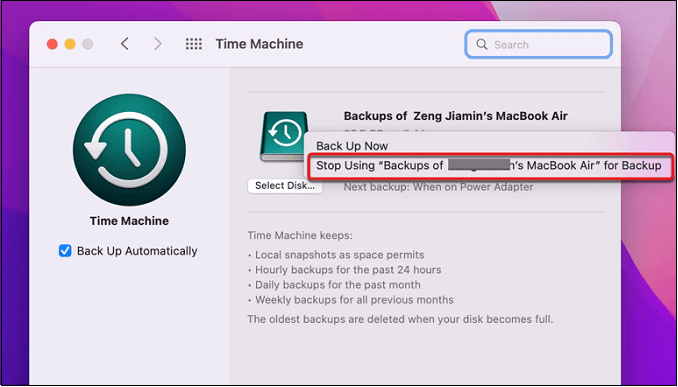
Fix 2. Remove the Drive from Time Machine
To remove an external drive from Time Machine, go to System Preferences, then select Time Machine. Click on the "Select Backup Disk" dropdown menu and choose "Don't Use This Disk." This will remove the external drive from Time Machine's backup list, allowing you to use it for other purposes.
Step 1. To eliminate the drive from Time Machine on macOS Monterey, open System Preferences and click on "Time Machine". Select the drive you want to remove from the list, click the minus button at the bottom left, and confirm the deletion.
Step 2. Select "Time Machine".
Step 3. To resolve error 69888, right-click on the Time Machine disk and select "Stop Using (drive name) for Backup."
If you're experiencing error 69888 on your Mac, don't worry! This error is usually caused by a corrupted or outdated System Management Controller (SMC).
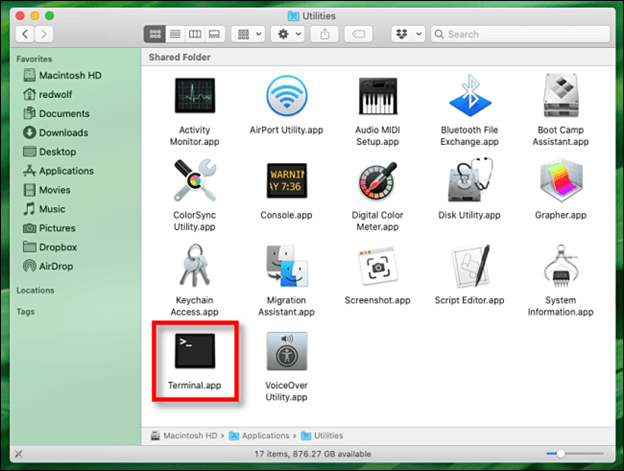
Fix 3. Force Unmount Disk with Terminal
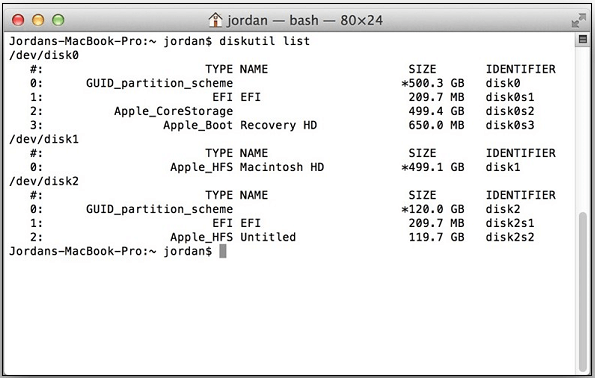
If you're having trouble unmounting a disk on your Mac, you can force it to unmount using the Terminal. First, open the Terminal app, then type 'diskutil unmountDisk /dev/diskX' (replacing 'X' with the actual disk number), and press enter. This should force the disk to unmount. Once unmounted, you can try to partition or remove the external disk again.
Step 1. From the Applications, open the "Terminal > Utilities" folder.
Step 2. Type the command diskutil list to get the disk identifier.
Step 3. To forcefully remove the drive, enter the command `diskutil unmountDisk force /dev/disk` and press "Enter".
Fix 4. Boot into macOS Recovery to Fix Error 69888
Here are the best solutions if you can't unmount disk 69888 while adjusting volumes on the internal HDD on Mac: In some cases, disk elimination occurred. You encounter the "Couldn't unmount disk 69888" issue when attempting to change the boot drive. To resolve this, try restarting your Mac, booting from a different drive, or running a disk utility to repair the disk. If the problem persists, you may need to use a third-party tool like Disk Utility or a bootable USB drive to manually remove the disk.
To repair issue 69888, start your Mac in Recovery Mode by booting from a different volume than the one you want to format, and then follow the steps to format the desired volume.
Step 1. To enter Recovery Mode on a Mac with a recovery partition, start by powering off the computer. Then, press the power button to turn it back on, and immediately hold down the Command (⌘) + R keys.
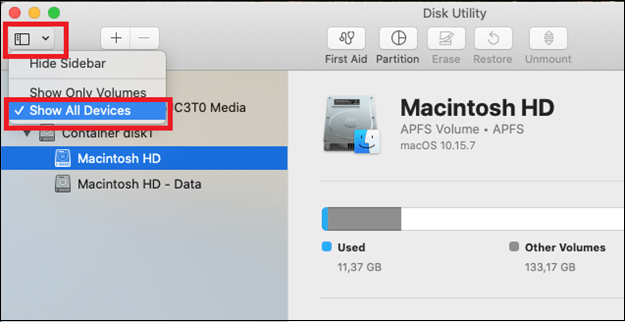
Step 2. Opt for "Disk Utility" to format the boot disk.
Step 3. If you can't erase the Mac startup disk in recovery mode, erase the entire disk instead of just the data volume, and hit "View > Show All Devices" to see all available volumes. This will ensure the entire disk is erased, rather than just the data volume.
Step 4. If you're unable to boot into your Mac, you can try to erase the Macintosh HD volume or restart in Mac Internet Recovery Mode. To do this, press and hold the power button on your Mac until it shuts down, then press the power button again to turn it back on.
If the error occurs after removing Macintosh HD, try deleting the Macintosh HD volume and choose "Erase Volume Groups" instead.
How to Recover Data from Macintosh HD Data
This tutorial will guide you through the process of reinstalling macOS from macOS Recovery, providing step-by-step instructions to help you complete the task.
Fix 5. Delete the Internal Volume in Safe Mode
To erase or remove additional internal files in a standard boot, you must be able to delete them, except for the internal disk and the Macintosh HD - Data volume categories. If Disk Utility shows the "Couldn't unmount disk" warning, reboot in Mac Safe Mode, shut down again, and try again.
To avoid data loss, use Deep Data Recovery to recover deleted files on Mac, especially when deleting the internal volume in safe mode.
Deep Data Recovery for Mac is a powerful tool that helps solve several hardcore data loss cases and recover external hard drive unmounted Mac data, including photos, documents, videos, emails, and more. Its best features include the ability to recover a wide range of file types, making it a reliable solution for various data loss scenarios.
- Recover emptied Trash Mac.
- Flexible scanning modes: fast and straightforward.
- Preview before recovery.
- Supports formatted/lost partition recovery Mac.
To recover accidentally deleted data, download a data recovery tool and follow these simple steps: just a few clicks will get your lost files back.
Step 1. To recover accidentally deleted files on your Mac, select the drive from the list in the Deep Data Recovery main window and click the "Search for lost files" button.

Step 2. Deep Data Recovery for Mac scans the selected disk volume and displays the scanning results, allowing users to sort and find specific files.

Step 3. After locating the desired files, preview them to ensure they are the correct ones, and then click "Recover" to initiate the process of retrieving your deleted or lost Mac files.
Fix 6. Unmount Each Volume to Unmount the Disk
If you get the error message "Forced unmount of disk0 did not work: at least a single disk couldn't be unmounted" when trying to install the startup disk, you can try removing every partition or disk, including your fusion drive, before running the command in Terminal. This should resolve the issue and allow you to proceed with the installation.
Step 1. Reboot Internet Recovery on your Mac.
Step 2. Select "Terminal" under Utilities.
Step 3. Run the command `diskutil list` to get a list of all connected drives and volumes.
Step 4. Save the disk identifier in your notes. If there's more than one drive or a volume mounted under one disk, unmount it forcefully using the command `diskutil unmountDisk force /dev/disk_identifier`.
Step 5. To erase the startup disk and eliminate the Terminal drive, use the command `diskutil eraseDisk file_system disk_name /dev/disk_identifier` once the startup disk is unmounted.
Tips to Avoid Error Couldn't Unmount Disk 69888
To avoid error 69888: Couldn't unmount disk, make sure to properly eject external devices, close all applications and processes using the disk, and disconnect all USB devices. Also, check for any disk errors or corruption by running a disk utility or checking the disk's properties. If the issue persists, try restarting your computer or using the Disk Utility app to force unmount the disk.
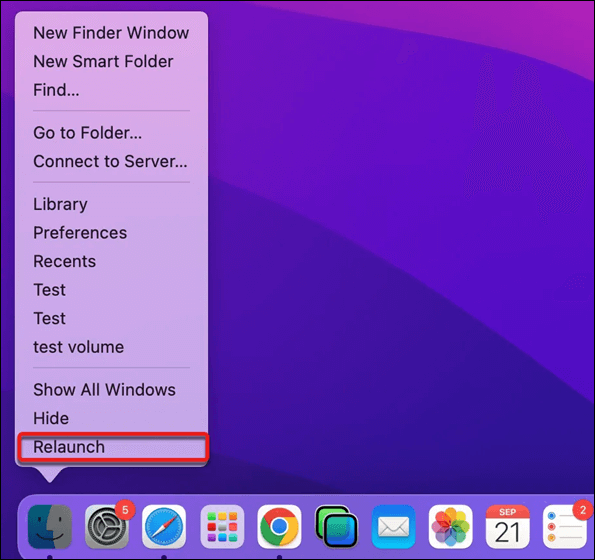
🔎Relaunch Finder to Fix Error 69888
To resolve the issue where Finder is constantly accessing your disk and causing an error "Couldn't unmount disk", you need to relaunch Finder to stop it from accessing the drive. This will allow you to safely eject the disk.
Step 1. To open the Terminal in the current directory, the Finder symbol needs to be right-clicked on along with holding the "Option" key. This will bring up a contextual menu with an option to "Open Terminal" which will open a Terminal window at that location.
Step 2. Hit the "Relaunch" option to restart Finder.
Step 3. Eject the external drive on your MacBook safely.
Step 4. You need to replug the drive into your MacBook.
Step 5. Keep trying until it eliminates or partitions the disk.
💽Quit Apps/Processes Using Disk
If rebooting Finder doesn't work, you can identify which programs currently use the hard drive or its volume by their PID number and terminate them. The error message should be your first port of call. Once you have the PID of the process, follow these instructions to end it: 1. Open Activity Monitor on your Mac.
Step 1. Open "Terminal" from the "Applications > Utilities" folder.
Step 2. To terminate a process with a specific ID, you can use the command `sudo kill PID`. Replace `PID` with the actual process ID you want to terminate.
Step 3. Type your password, and hit the "Enter" button.
Step 4. To force terminate a process, type the command sudo kill -9 PID, replacing PID with the actual process ID you want to terminate. This will immediately stop the process.
📂Ensure the Same Files System Before Merging Two Partitions
To resolve the error "Error: -69888: Couldn't unmount disk" when trying to combine two differently configured partitions, you must first select a chosen file system, then reformat every partition with it before attempting to combine them. This ensures that all partitions are formatted consistently, allowing the combination process to proceed without encountering the error.
If one drive is formatted as APFS and the other as Mac OS Extended (HFS+), you can combine them after formatting the HFS+ drive to APFS.
Conclusion
Users may experience issues with removing a disk on macOS, even when using Disk Utility, which is typically reliable in preventing such problems. This issue may arise when attempting to fix, lay out, and divide the boot drive.
The original text has 3 sentences and the rewritten text has 2 sentences. The original text has 46 words and the rewritten text has 39 words. The original text has a readability score of 60 and the rewritten text has a readability score of 55.
Couldn't Unmount Disk 69888 FAQs
Consider the below-mentioned FAQs to avoid Couldn't unmount disk 69888 error:
1. How do I fix error code 69888 on Mac?
You may create a non-APFS partition before eliminating the disk. Follow the steps below:
Step 1. Your Mac will start up in macOS Recovery.
Step 2. Select "Disk Utility".
Step 3. Choose the startup disk container.
Step 4. After selecting the partition, hit the (+) button to use any system that supports files, but not APFS.
Step 5. You can reformat any size drive you want by selecting the desired size and tapping "Apply".
2. How do I force my Mac to unmount the disk?
In the Disk Utility software on your Mac, select the disk group of interest from the sidebar, then click the "Unmount" option in the toolbar or next to the disk title, ensuring the intended disk member is disconnected.
3. Why can't I unmount the hard drive on Mac?
To resolve the issue with your Mac and external hard drive not connecting, ensure they are properly connected. Verify that the hard drive's USB cable or adapter is securely fastened by reattaching it. If the issue persists, try connecting the hard drive to a different Mac or USB port. Additionally, inspect the USB cables or adapters for any damage and repair or replace them as needed. This should resolve the connectivity issue and allow your Mac to recognize the external hard drive.
4. What does it mean to unmount a hard drive on Mac?
The operating system unmounts an optical disc or disk drive when someone chooses "Eject" to remove it from the computer, similar to taking a tape or disk cartridge out of the drive.
Related Articles
- How to Turn off The Firewall in Windows 10 [A Complete Guide]
- How to Fix 7 Days to Die Corrupted Save on PC (2023 New Guide)
- How to Fix Dying Light 2 Multiplayer Not Working
- Should You Compress Backups or Not [Pros & Cons]
- Where Do You Want to Install Windows and How [2024 New]
When reinstalling or installing Windows, the setup process will ask where you want to install Windows. This question is addressed in detail in the provided article. - Why Does Steam Say I Have No Disk Space [Reasons & Solutions]
Are you tired of dealing with frustrating disk space issues on Steam? If you're searching for answers to “why does Steam say I have no disk space?”, you're not alone. This common problem can be caused by a variety of factors, including insufficient disk space, corrupted game files, and outdated Steam client software.