How to Fix Mac Runs Slow After macOS Ventura Upgrade [8 Ways to Speed Up]
To fix Mac running slow after the macOS Ventura update, check the following: 1) Ensure the system is updated to the latest version, 2) Clear cache and logs, 3) Disable animations, 4) Close unnecessary apps, 5) Restart the Mac, 6) Run a disk cleanup, 7) Check for malware, 8) Check for software updates, 9) Reinstall macOS, or 10) Reset the Mac. If you're still experiencing issues, consider seeking professional help.
| Workable Solutions | Step-by-step Troubleshooting |
|---|---|
| Fix 1. Quit Apps or Processes | Open "Utilities" in the "Applications" folder. Run "Activity-Monitor". Go to the "CPU" tab to see all...Full steps |
| Fix 2. Restart Your Mac | Click on the "Apple" button. Restart your system by clicking on the" Restart" button...Full steps |
| Fix 3. Check the Spotlight | Go to" System Preferences" and select "Siri & Spotlight". Under "Search Results" in the Spotlight...Full steps |
| Fix 4. Update the Application | Open that app's settings menu and then on "Software Update". Click on the "Check for...Full steps |
| Other Solutions | Enabling Motion effects and Transparency in your Mac can slow down your system...Full steps |
Why Is macOS Ventura Running Slow on Mac
macOS Ventura has revolutionized the way people work with its fantastic productivity tools, making it undeniably more effective and swifter than ever.
Upgrading to macOS Ventura may result in a slow Mac due to bugs and errors in the new operating system, which can cause system slowdowns.
- 📈After upgrading to macOS Ventura, your Mac's disk space and memory have been reduced.
- 🚫Your Mac device may encounter bugs or random errors that could prompt you to downgrade from macOS Ventura to Monterey, which is a more stable version.
- 📱The app causing the system to lag may require a more powerful processor or graphics card to run smoothly.
- 🔖Even with the latest macOS Ventura update, older Macs still run slower due to their outdated technology.
- 🖥️The desktop is overburdened with multiple files and apps.
Before diving into how to speed up macOS Ventura, it's essential to know how to recover data lost due to updates or downgraded macOS versions, given the possible causes of system slow performance after installing the macOS Ventura update.
Recover Lost Data Caused by Downgrading/Upgrading macOS 13
Before downgrading your macOS Ventura, create a backup to avoid losing your data, as it can be deleted during the process, and also be prepared for potential upgrade failures.
If you don't have a backup and want to recover your data, Deep Data Recovery for Mac is your best option.
Data recovery software can be a lifesaver when you accidentally delete important files, experience a hard drive failure, or encounter a virus that corrupts your data. It can help you recover lost files, photos, and documents from various storage devices, including computers, laptops, external hard drives, and even smartphones.
- ❌To recover lost data after macOS 13 Ventura installation failed.
- 🛠️To perform corrupted SD card recovery on Mac.
- 💽To extract data from a malfunctioning storage disk.
- 🗑️To recover Trash Mac and get back accidentally deleted files.
The app helps in resolving various challenging data loss situations, including retrieving files from HDD, SSD, Fusion drives, Time Machine backup drives, SD cards, memory cards, USB drives, cameras, and emails. To get back your lost data, follow the instructions provided.
Note: To create a backup, click on "Disk Backup" on the left. This allows you to restore data from a backup image in case the disk is damaged, or data is accidentally deleted or lost.
Step 1. Select the location
After updating to macOS Sonoma/Ventura/Monterey/Big Sur, select the disk where you lost data, then click "Search for lost files".

Step 2. Find lost data after the scan
Deep Data Recovery for Mac scans the selected disk volume, displaying the results on the left pane, allowing users to find specific data using file type and file path.

Step 3. Recover data after macOS update
Select the target files that were unknowingly lost during or after the update and click the "Recover" button to recover them.

Fix Mac Runs Slow After macOS Ventura Update [8 Ways]
Downloading macOS Ventura on your Mac can be a thrilling experience, but it's often followed by a frustrating reality: your Mac becomes slower after the upgrade.
If your Mac is running slow after the macOS Ventura update, don't worry, you can try downgrading to a lower version, but keep in mind that's not the best or only solution. Instead, consider exploring the eight fantastic ways to speed up your Mac, which can be found below, and share this guide with others to help them fix the issue.
Fix 1. Quit Apps or Processes with Activity Monitor on macOS Ventura
Many programs on your computer run in the background, consuming a significant amount of RAM and CPU, which can cause your Mac to lag, especially if it's an older model.
Activity monitoring is a suitable solution to prevent apps or processes from running in the background and speed up your Mac. This feature allows you to track and manage the activities of various apps and processes, helping you identify and stop any unnecessary ones that might be consuming system resources. By monitoring and controlling these activities, you can free up system resources and improve your Mac's overall performance.
Step 1. Open "Utilities" in the "Applications" folder.
Step 2. Run "Activity-Monitor".
Step 3. To see all the background running apps, go to the "CPU" tab.
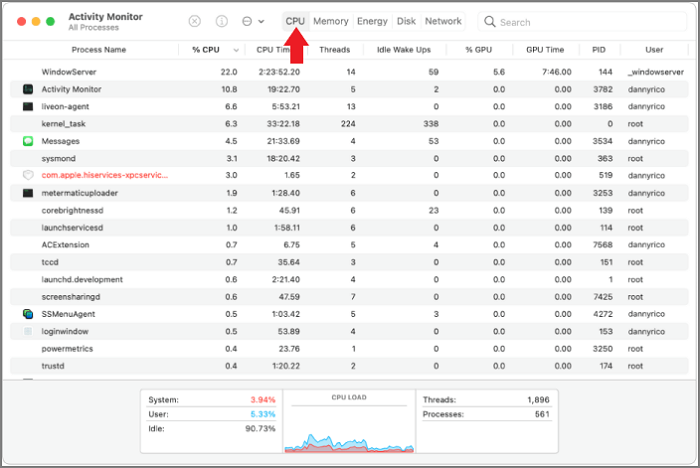
Step 4. To improve your Mac's performance, select the app and end its background operation by clicking on the "X" in the top left corner of the app window, or by using the Activity Monitor to force quit the app. This will close the app and free up system resources, potentially improving your Mac's overall performance.
Note: Spotlight on a Mac allows users to quickly access various system tools and features, including the Activity Monitor. To access Activity Monitor, users can press Command + Space to open Spotlight, type "Activity Monitor" and press Return. This allows users to view the CPU and memory usage of running applications, and terminate any apps that may be consuming excessive resources, thereby improving system performance.
Fix 2. Restart Your Mac After macOS Ventura Updates
Restarting your Mac is the quickest way to boost performance after a macOS Ventura update. By restarting, you can clear out random data that's clogging up your memory and interfering with background processes, freeing up your computer to run more smoothly.
To restart your Mac and fix any issues caused by the macOS Ventura update, follow these steps: ensure the Mac is turned off completely, then press the power button to turn it back on, and finally, let it boot up normally. This simple process can help resolve any underlying problems created by the update.
Step 1. Click on the "Apple" button.
Step 2. Restart your system by clicking on the" Restart" button.
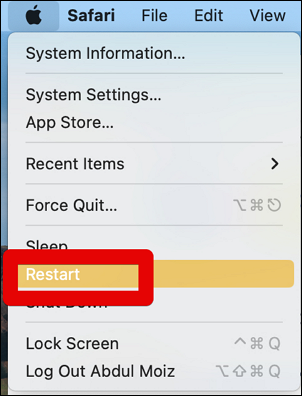
Note: You can also hard restart your system or force shut down Mac by holding the power button for a few seconds.
Fix 3. Check the Spotlight to See Whether Your Mac Is Reindexing
Spotlight's search functionality may periodically require a reindex of your Mac's drive, potentially causing a slowdown, particularly after installing macOS Ventura.
If the reindexing process takes too long, you can abort it by following these steps. After the process is complete, your Mac should be working fine again.
Step 1. Go to" System Preferences" and select "Siri & Spotlight".
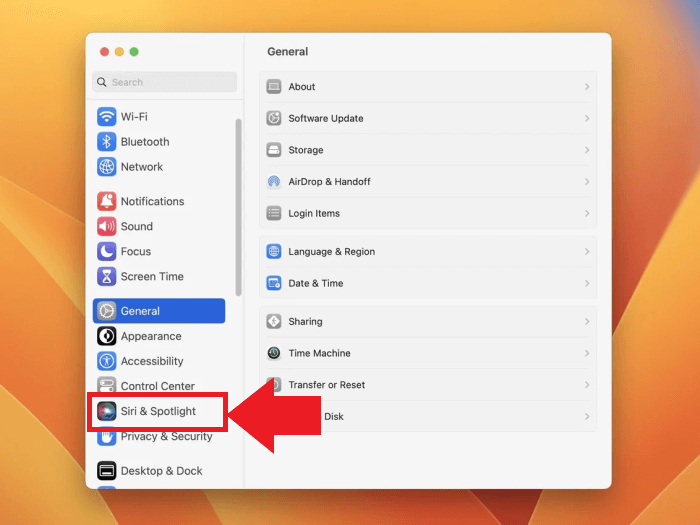
Step 2. To remove search results from the Spotlight search results, you need to uncheck the box next to each option under "Search Results" in the Spotlight settings.
To resolve the slow-running Mac issue, you can try stopping the reindexing process by running the command `killall -9 mds` in the Terminal. This will immediately stop the reindexing process and should help fix the slow-running issue.
Fix 4. Update the Application to the Latest Version on Mac
Sometimes the problem may not be with your macOS Ventura, but with the application you're using, and updating all your apps to the latest version can resolve the issue. This is because some apps may be incompatible with the newer operating system, causing your Mac to lag. Updating your apps can help take full advantage of macOS Ventura's features.
If you downloaded the app from the App Store, you will find the updates automatically. However, if you downloaded it from a developer, you can follow the steps below to get the updates.
Step 1. Open that app's settings menu and then on "Software Update".
Step 2. Click on the "Check for updates" option, and find the latest version of that app.

Step 3: Your system is now fully updated with the latest version of macOS and the apps in it.
Note: The App Store offers a convenient way to update all apps at once, while also ensuring the safety of your Mac through Apple's verification process.
Fix 5. Reduce Transparency and Motion on macOS Ventura
Enabling Motion effects and Transparency on a Mac can slow it down, as these features consume system resources, which could be used to boost performance.
To improve your Mac's performance, you can disable certain features that consume system resources. These include Bluetooth, Wi-Fi, and Location Services. Disabling these features can help your Mac run more smoothly and efficiently.
Step 1. Open "System Preferences" and select "Accessibility."
Step 2. Click on "Display."
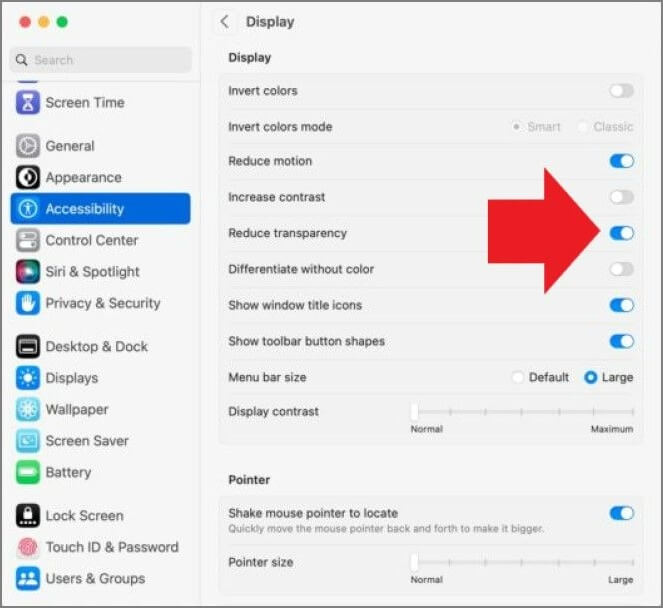
Step 3. To disable motion and transparency effects on your Mac, go to System Preferences, then Display, and uncheck the boxes next to "Reduce motion" and "Reduce transparency". This will allow you to see the full motion and transparency of your screen.
Fix 6. Free Up the Storage Space of Your Mac/MacBook and Speed Up macOS Ventura
When you update a Mac to a new version of macOS, such as Ventura, the updated system typically takes up more storage space due to the added features, leading to potential errors and lag, making the system slow.
Check your Mac's storage space and remove unnecessary files to free up space for a smooth macOS Ventura experience.
Follow the steps below to check your Mac's storage:
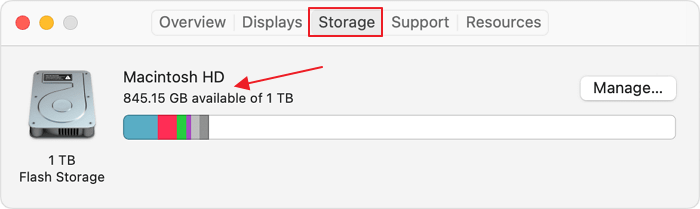
Step 1. Click on the "Apple Menu" and select "About this Mac."
Step 2. To view the storage information of your Mac, navigate to the "Storage" tab.
If you're running low on storage space, clearing out junk files can help. To do this, follow these steps.
Step 1. Click the "Manage" button.
Step 2. There is no option on a Mac to delete all junk files with one click. The "Optimized Storage" feature on a Mac helps to free up space on your hard drive by removing unnecessary files, but it doesn't delete all junk files.
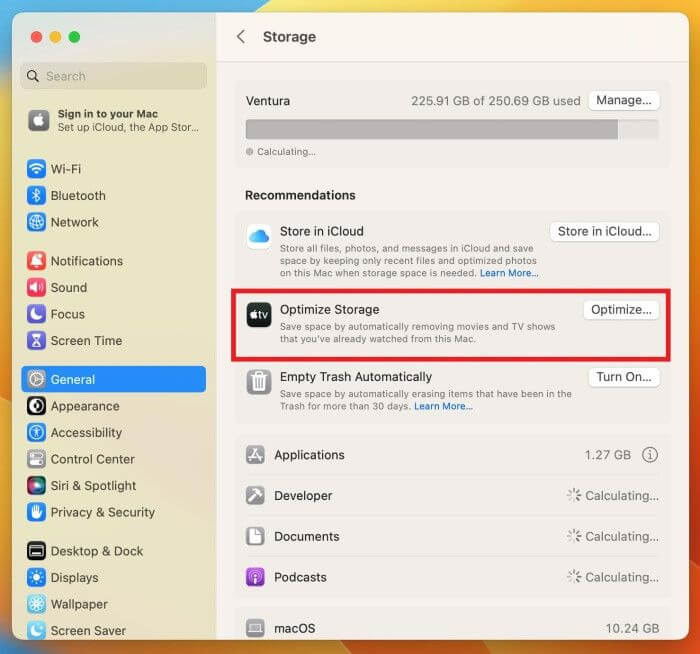
To clean your Mac of junk files, you can use the built-in Storage tab in the About This Mac section, which provides a detailed breakdown of your Mac's storage usage. This includes identifying large files and folders, as well as system and app caches, which can be safely deleted to free up space.
Fix 7. Remove Unnecessary Startup Applications to Speed Up macOS Ventura
When you launch your Mac, many apps automatically start running in the background, which can slow down the startup process and overall experience, especially when those apps need to be updated.
To boost the speed of your macOS Ventura, we'll tackle the unnecessary apps that are slowing it down. Follow these steps to remove them:
Step 1. Open "System Preferences" and select "General."
Step 2. Select the "Login Items" option.
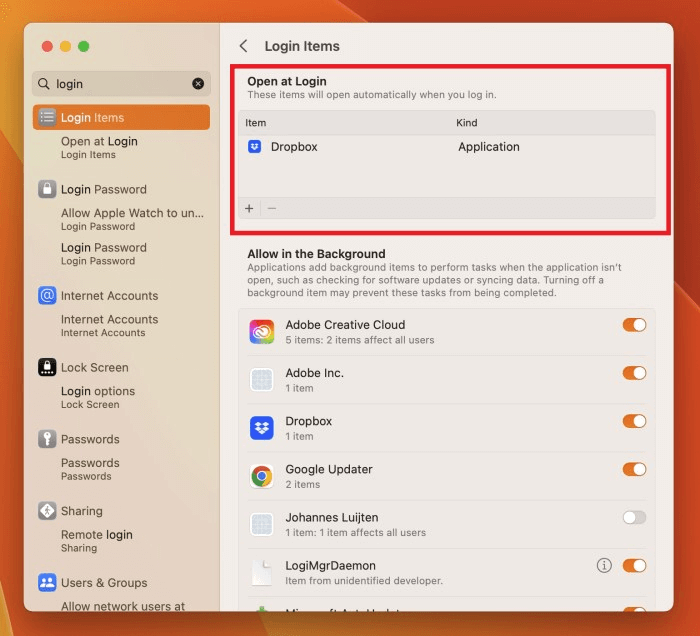
Step 3. To disable apps from opening at startup, go to System Preferences, then Login Items, and toggle off the switch next to the app you don't want to open at startup.
You've successfully removed the unnecessary startup load from your Mac, making your macOS Ventura run faster.
Fix 8. Reset SMC/NVRAM/PRAM on Mac
Non-Volatile RAM, also known as NVRAM, is a crucial part of a Mac that stores essential information, and the System Management Controller (SMC) manages the Mac's overall functioning.
If you're struggling to speed up your macOS Ventura, be cautious when attempting this fix. However, if previous solutions have not worked for you, we recommend trying this alternative approach.
Resetting the SMC, NVRAM, and PRAM on your Mac can help resolve issues caused by the new Ventura update, such as bugs and errors, and improve overall system performance by clearing any cache or corrupted data.
Here are the steps to reset SMC for iMac, Mac Pro, or Mac Mini:
Step 1. Unplug the charging cord from the Mac, if it is attached, and turn off the Mac.
Step 2. After unplugging the power cord, wait for at least 15 to 20 seconds before plugging it back in. This brief pause allows any residual electrical charge to dissipate, helping to prevent damage to the device.
Step 3. Now turn on your Mac after 5 to 10 seconds.
For SMC reset in MacBook, MacBook Pro, or MacBook Air:
Step 1. Unplug the charging cord and turn off your Mac.
Step 2. Unplug the power cord from the wall outlet for 15 to 20 seconds, then plug it back in. This is called a "power reset" and can sometimes help resolve issues with the device.
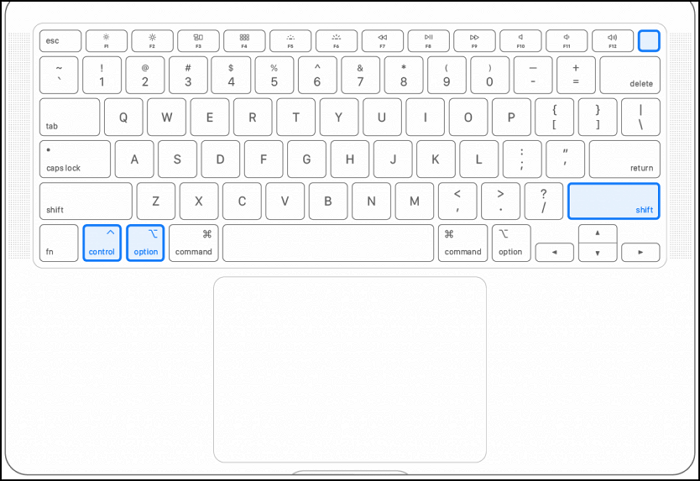
Step 3. To turn on your MacBook, hold the Shift+Option+Control and Power keys together for at least 10 seconds, then release them once it's turned on.
To reset NVRAM and PRAM:
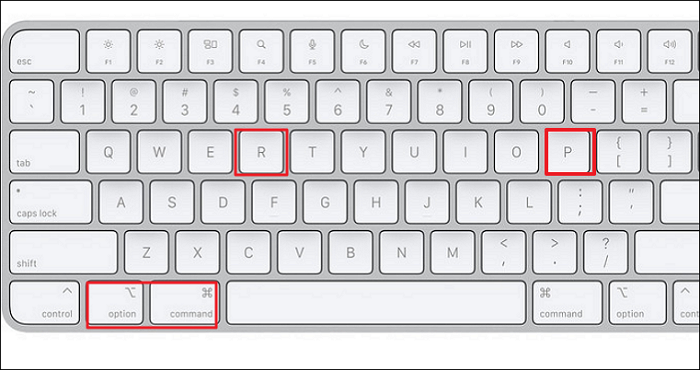
Step 1. Power off your MacBook.
Step 2. Hold the Option, Command, and P keys together, then immediately hold the R key for 30 to 50 seconds, until the Mac restarts.
Warning: Be cautious when troubleshooting your Mac, as incorrect steps can lead to booting into recovery mode. Follow the instructions carefully to avoid any issues.
We hope that the above-Since the fixes have helped improve the macOS Ventura's performance after an update, you may not need to downgrade. However, if you're still experiencing issues, you can refer to the bonus tip for guidance on downgrading to an older version.
Bonus Tip: How to Downgrade macOS Ventura to an Older Version
After trying all the possible fixes, the last resort is to revert to an older macOS version, specifically Ventura.
Reverting your OS can cause your data to be lost forever, but don't worry, we have a solution. To downgrade macOS Ventura, follow the steps below.
Note: Make a Time Machine backup before proceeding with the steps below.
For Intel-based Macs:
Step 1. To reset your Mac, turn it off, then immediately hold down the Shift+Option+Command+R keys while powering it back on. This will boot your Mac into the Recovery mode, allowing you to access various system utilities and reset your computer.
Step 2. Select the startup disk labeled "Macintosh HD," enter your password and select "Continue."
Step 3. To erase and format your drive, go to Recovery, select Disk Utility, choose your drive, and then click on "Erase." Next, select the GUID Partition Map and format as APFS.
Step 4. Return to "Recovery" and then "reinstall macOS."
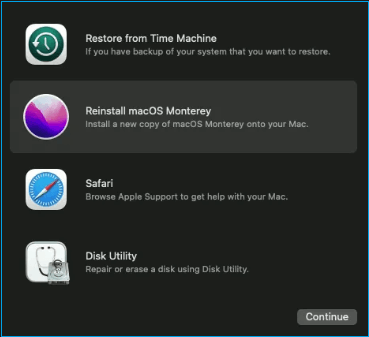
For Apple Silicon Macs:
Step 1. Immediately power off your Mac and hold the power button until the "Loading startup options" screen appears. This screen will allow you to select the startup disk and boot mode.
Step 2. Go to the "Options" menu and select "Continue". Then, enter the administrator account password.
Step 3. Select the Macintosh HD drive and hit the "Erase" button under the "Recovery" tab.
Step 4. Select the "Reinstall macOS Monterey" option, then click "Continue" and follow the on-screen instructions.
To downgrade macOS, you'll need to wait a few minutes as the process takes some time. Once completed, your operating system will function as it did before the upgrade.
Summary
If you've recently installed macOS Ventura and found your system to be extremely slow with the upgraded version, don't worry - this article is here to help. We've outlined eight simple ways to speed up your Mac OS Ventura, and for those who want to take it a step further, we've also provided a step-by-step guide on how to downgrade to a previous version.
With the aid of the effective data recovery tool Deep Data Recovery for Mac, you can also manage to keep your data from being lost permanently.
Mac Runs Slow After macOS Ventura Update FAQs
If you still have questions about Fix Mac Running Slow After macOS Ventura Update, please see the FAQs listed below.
How do I downgrade macOS Ventura to Monterey on Mac?
Downgrading your macOS Ventura can be a high-risk operation, as it may result in data loss. However, you can recover lost data using the Qiling Data Recovery tool, which can help minimize the impact of the downgrade.
To downgrade macOS Ventura to Monterey:
- 1. Restart your Mac.
- 2. Hold the Shit+ Option+ Command+ R keys.
- 3. Enter the Password and hit "Continue".
- 4. Press "Next" and reinstall macOS.
Why is my Mac so slow all of a sudden in 2023?
Here are some reasons why your Mac may be operating slowly in one paragraph:
- 1. The app you're using requires more disk space and memory than is available on your device, resulting in a lack of storage capacity and insufficient RAM. This can cause the app to malfunction or crash, as it cannot access the necessary resources to function properly.
- 2. Your Mac may be outdated and unable to handle the demanding resource requirements of the software, which could lead to performance issues or even crashes.
- 3. Too many background tasks clogging up your system
- 4. High-intensity visuals take up extra system memory and processing power
- 5. Outdated apps might cause errors
- 6. macOS might have some underlying bugs or system errors
What should I do if macOS Ventura is running slow on my MacBook Pro?
Here are a few simple and quick tips to improve the performance of macOS Ventura on your MacBook Pro:
- 1. End background processes and apps with Activity Monitor.
- 2. Disable startup programs.
- 3. Turn off the Stage Manager.
- 4. Install the most recent build of macOS.
- 5. Clear the clutter from your home screen.
- 6. Remove motion effects and Transparency.
How do I find out what is slowing down my Mac?
If your Mac is running slowly, there are several things you can check to identify the cause. Some common culprits include outdated software, a cluttered hard drive, and resource-intensive apps or processes running in the background. You can also try checking for malware or viruses, as these can also slow down your Mac.
- 1. Insufficient disk space.
- 2. Lots of background apps.
- 3. Use of demanding motion effects and Transparency.
- 4. High CPU and Memory usage.
- 5. Slow internet connection
- 6. Pending apps and system updates.
- 7. Junk files clog up the system.
Related Articles
- Break Windows 10 Roll Back Limit - Roll Back to Windows 7/8 after 30 Days
- (4 Solutions) How to Fix Windows 7 Startup Repair Not Working
- Clean C Drive without Formatting in Windows 10/8/7 [Tested & Worked]
- Change Directory in Terminal Mac | Get All Information Here
- What Is RSAT? How to Install Remote Server Administration Tool on Windows? [All You Should Know]
Learn what RSAT is and how to install, uninstall, enable, and disable Remote Server Administration Tools on Windows 10. A complete guide to managing RSAT Windows 10 tools. - Rufus vs. Win32 Disk Imager: Similarities and Differences
In true sense, Win32 Disk Imager is a Rufus alternative because the performance is exceptionally great and the flashing speed is in its own league. Learn all about the Rufus and win32 disk imager similarities and differences. Go through the rufus vs win32 disk imager in details.