System Preferences Not Responding on Mac: Possible Causes and Solutions
System Preferences is an option in the Apple menu available on all Mac models, where you can customize various system settings, such as Apple ID, network, passwords, users, and security and privacy settings.
Mac users reported that the System Preferences not responding error occurs on their MacBook Pro/Air.
Users are experiencing issues with System Preferences becoming unresponsive after launching, resulting in a message stating "No services in this location. Click Add (+) to set up a service".
If your Mac is experiencing the issue of System Preferences not responding, don't worry! This article will guide you through 4 practical ways to resolve the problem, providing a solution to get your Mac back to normal functionality.
| Workable Solutions | Step-by-step Troubleshooting |
|---|---|
| Fix 1. Force Quit System Preferences | Go to the Apple icon, and select Force Quit. Or press the Command + Option + Escape...Full steps |
| Fix 2. Delete PLIST File | Select Finder, and choose Go. Click on Go to Folder. Enter ~/Library/Preferences...Full steps |
| Fix 3. Restart Mac in Safe Mode | Press the power button and Shift key. Release the keys when you see the login window...Full steps |
| Fix 4. Reinstall macOS | Enter the Recovery Mode. Wait for the macOS Utilities to appear, and select Reinstall macOS...Full steps |
If your Mac's System Preferences is not responding, don't worry, it's a common issue that can be solved. To resolve the problem, try restarting your Mac, as this often resolves the issue.
Possible Causes of System Preferences Not Responding on Mac
Users may experience various issues with System Preferences on Mac, such as the program being unresponsive, failing to load specific preference panes like Sound, Displays, Security & Privacy, Apple ID, Users & Groups, or encountering other errors.
Various causes can lead to System Preferences not responding on Mac, including software glitches, corrupted preferences files, outdated operating system, incorrect permissions, and hardware issues.
😰Plist files corrupted: A corrupted PLIST file can cause the error, which is a text file containing data in the Property List format, storing settings and critical data in an XML-based, key-value format.
💾Errors in the hard disk: Temporary glitches or errors within the hard disk can cause System Preferences to malfunction, and repairing the disk may resolve the issue.
📂Modification of essential files: Certain files on a Mac, such as System Preferences, require consistency to function properly. Any changes or formatting to these files can result in the System Preferences not responding error.
🎭Malware: Virus attacks can cause system-wide problems, including the System Preference not responding issue.
🍎Out-of-date macOS version: Keeping macOS up-to-date is crucial to prevent issues like System Preferences not responding, ensuring a smooth and stable user experience.
How to Fix System Preferences Not Responding
If you're experiencing issues with System Preferences not responding, don't worry, it's a common problem that can be resolved. To fix this, try restarting your Mac, as this often resolves the issue.
There are multiple solutions you can apply to fix the error. Let's take a look:
Fix 1. Force Quit System Preferences
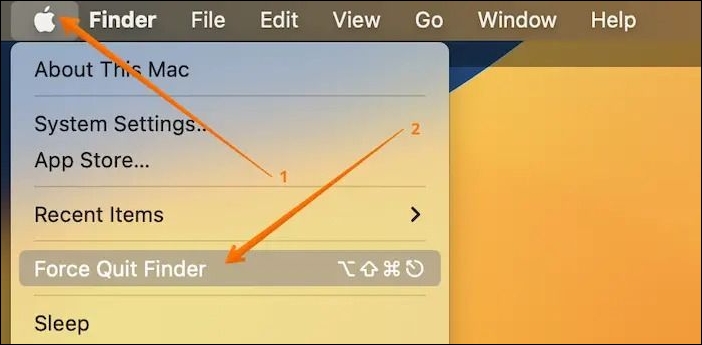
To fix the System Preferences not responding error, try forcing quitting the app on your Mac. You can do this by going to the Apple menu, selecting Force Quit, and then clicking on System Preferences to quit it. This simple solution can often resolve the issue and get your System Preferences running smoothly again.
Step 1. Go to the Apple icon.
Step 2. To force quit an application on a Mac, you can select the "Force Quit" option or press the "Command + Option + Escape" shortcut.
Step 3. When the force quit applications window opens, choose "System Preferences".
Step 4. Clicking on it will say that it is not responding.
Step 5. Wait for another pop-up window to appear.
Step 6. To force quit an app on a Mac, click the Apple logo in the top left corner, select "Force Quit," and choose the app you want to close from the list. Alternatively, you can press Command (⌘) + Option (⌥) + Esc, which will open the Force Quit Applications window, allowing you to select the app to close. This will terminate the app immediately, without saving any unsaved work.
To force quit System Preferences on a Mac, press Command + Option + Esc, then click on System Preferences in the Force Quit window. Alternatively, you can press Command + Option + Esc and type System Preferences in the search bar, then click on it to quit.
Fix 2. Delete com.apple.systempreferences.plist File
Deleting the com.apple.systempreferences.plist file is a simple solution to reset System Preferences, which can resolve the error. This action will not cause any harm, but it will reset the app to its default settings. This can be a useful troubleshooting step for resolving issues related to System Preferences.
To delete com.apple.systempreferences.plist files, here are the steps to follow:
Step 1. Select "Finder", and choose the "Go" option.
Step 2. Click on "Go to Folder".
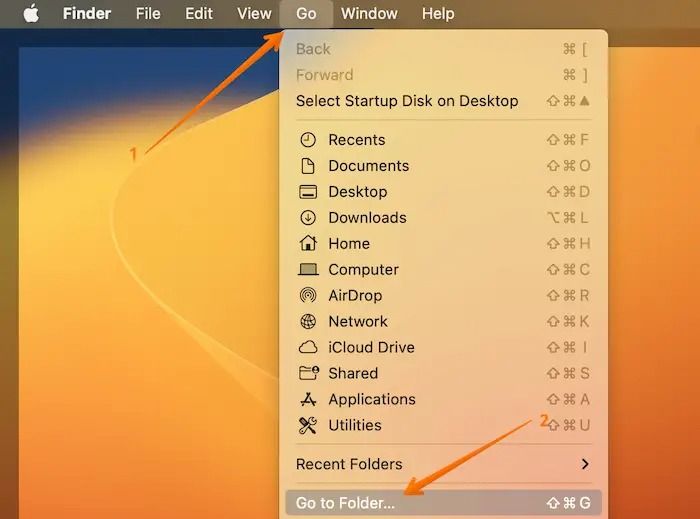
Step 3. Enter ~/Library/Preferences.

Step 4. Find the com.apple.systempreferences.plist file.
Step 5. Move it to Mac Trash.
Step 6. Restart the system, and then click the "Empty Trash" option.
Now see if the error is resolved or not. Note that if you accidentally deleted essential files in the process, you can read the article below to get them back.
Fix 3. Restart Your Mac in Safe Mode
To resolve the issue of System Preferences not responding in Mac Safe Mode, restart your device and immediately hold down the Shift key. This will boot your Mac in Safe Mode, where only the necessary system processes are running, and you can troubleshoot the issue without any third-party applications interfering.
Here are the steps you need to follow for Intel-based Macs:
Step 1. Turn off the device.
Step 2. Press the power button and "Shift" key and hold them.
Step 3. When you come across the login window, release the keys.
For Apple silicon Macs, take a look at these steps:
Step 1. Turn off the device.
Step 2. Press the power button and hold it.
Step 3. Release it when you see the startup options window.
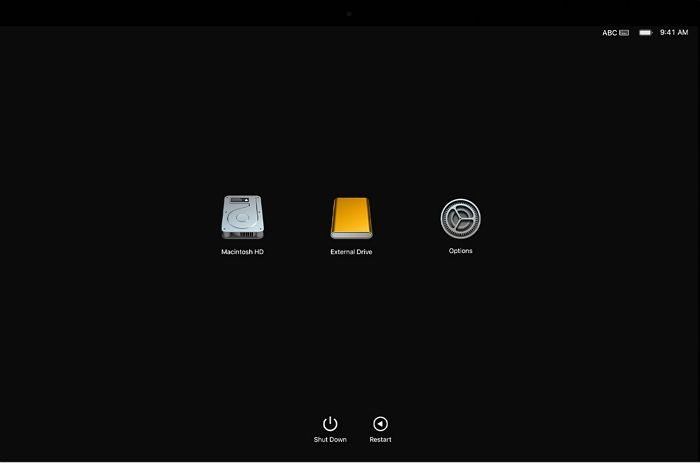
Step 4. Choose the Mac startup disk (Macintosh HD).
Step 5. Press the "Shift" key.
Step 6. Choose "Continue in Safe Mode".
Step 7. Release the key.
To resolve the issue, check if System Preferences works in Safe Mode. If it does, restart the system and start using it.
Fix 4. Reinstall macOS
If you're experiencing issues with your Mac, you can try reinstalling macOS to see if it resolves the problem. To do this, follow these steps: 1) Back up your data, 2) Erase your startup disk, 3) Reinstall macOS, and 4) Restore your data from the backup. Alternatively, you can also try booting in safe mode, resetting the System Management Controller (SMC), or resetting the Parameter RAM (PRAM).
Step 1. Enter the macOS Recovery Mode.
Step 2. Wait for the macOS Utilities window to appear.
Step 3. Select "Reinstall macOS".
Step 4. Follow the on-screen instructions.
Reinstalling macOS can lead to data loss, so it's crucial to use professional data recovery software to regain that data, such as Deep Data Recovery for Mac.
The Qiling data recovery Mac is a reliable tool that supports data recovery after a macOS update, such as recovering lost files after the Monterey update.
Mac Data Recovery software supports recovering files after a factory reset on Mac, including audio, video, emails, documents, and more. Its user-friendly interface makes it a popular choice.
Here are the steps to recover lost/deleted data:
Step 1. After updating to macOS Sonoma/Ventura/Monterey, select the disk where your lost data is located, then click "Search for lost files" to initiate the recovery process.

Step 2. Deep Data Recovery for Mac will immediately scan your selected disk volume and display the scanning results on the left pane, allowing you to find wanted data using the file type and file path.

Step 3. Identify the target files that were lost during or after the update and click the "Recover" button to restore them.
Prevention Tips of System Preferences Not Responding
Here are some general tips to help you avoid the System Preferences not responding issue:
- Keep your macOS up to date.
- Restart your Mac occasionally.
- Close unnecessary applications.
- Check for software compatibility before installing any software.
- Remove unnecessary third-party preference panes.
Conclusion
The System Preferences not responding error on Mac can be easily fixed with multiple solutions. You can try restarting your Mac in Safe Mode or reinstalling macOS, which may resolve the issue. Alternatively, you can delete the com.apple.systempreferences.plist file or force quit System Preferences to get it working again. These simple steps can help resolve the problem without requiring extensive technical expertise.
If you're considering using a third-party app to recover data from a corrupted or damaged Mac, Deep Data Recovery for Mac is a top choice. This user-friendly software can help you restore various types of data with ease, but keep in mind that data loss is still a possibility.
System Preferences Not Responding FAQs
System Preferences not responding error can occur due to various reasons, including corrupted system files, incompatible software, or issues with the Apple Menu. To resolve this issue, users can try restarting their Mac, checking for software updates, or using the Force Quit feature to close the System Preferences application.
1. Why does my Mac say System Settings and not System Preferences?
Mac's System Settings has been renamed to System Preferences in macOS Ventura.
2. How to force quit System Preferences on Mac?
Here are the steps to force quit System Preferences on Mac in one paragraph:
Step 1. To force quit an application on a Mac, go to the Apple icon and select the "Force Quit" option, or press the "Command + Option + Escape" keys.
Step 2. When the Force Quit Applications window opens, choose "System Preferences" and click on it, even though it says it's not responding. This will allow you to access the System Preferences.
Step 3. To force quit an application, click on the Apple menu and select "Force Quit". Then, in the Force Quit Applications window, select the application you want to quit and click on the "Force Quit" button. You can also use the keyboard shortcut Command + Option + Esc to open the Force Quit Applications window. If you're prompted to confirm, click on the "Force Quit" option.
3. How do I reset System Preferences on Mac?
To reset System Preferences on a Mac, go to the Apple menu and select System Preferences, then click on the "Erase All Content and Settings" option.
4. Why are System Preferences not working on Mac?
System Preferences on Mac may not work due to various reasons, including damaged PLIST files, outdated operating systems, and malware attacks. Other possible causes include disk errors, changes to essential files, and more.
Related Articles
- What Is the Best exFAT Allocation Unit Size [Guide on How to Set]
- How to Fix Computer Turns on But No Display - Solutions Are Here!
- Fix 'Windows Can't Find A System Image on This Computer' Error
- How to Fix "Disk 1 Removable No Media" Error [2023 Detailed Guide]
- Efficient Ways To Fix PS4 Disc Drive Not Working! Error Reading!
Are you facing a disc drive reading error on your PS4 or is it just not working? This is an easy-to-fix issue. Continue reading this article to learn exactly how to fix the issue and what you can do to prevent it from happening again. - [Fixed] PS4 External Hard Drive Not Working/Recognized [Step-by-Step]
If your PS4 external hard drive is not working, this article provides a comprehensive guide to troubleshoot and fix the issue. It covers two cases to resolve problems where the PS4 does not recognize or work with the external hard drive, offering a step-by-step solution to get your PS4 and external hard drive up and running again.