How to Clone a Nintendo Switch SD Card
A Switch microSD card is more than a box of game files. It carries the Album, update data and the small index files that tell the console which titles are installed, and a partial copy usually ends with a console that asks you to download everything again.
This guide shows how to read the card's real contents, choose a card that the console will accept, and clone the whole card so the new one behaves exactly like the old one.
PAGE CONTENT
- What Lives on a Switch microSD Card
- Size the New Card Against the Real Data
- Clone the Card, Not the Games
- Clone the Card with Qiling Disk Master
- Check the New Card in the Console
- FAQs About Switch Card Copies
- Keep a Second Copy Before You Swap
What Lives on a Switch microSD Card
- The Nintendo folder. Downloaded games, updates, screenshots and videos sit inside a single Nintendo directory, split into Contents, Album and related subfolders.
- Save data lives elsewhere. Most save files stay in the console's internal memory, while the card holds the software and the Album you would lose in a format.
- Small files matter. Index and metadata files sit outside the visible game folders, and a manual drag-and-drop copy can leave them behind.
- One card at a time. The console reads one microSD slot, so the old card and the new card can never be mounted inside the Switch together.
- Never pull a live card. Remove the card only after a full power-off, or a half-written directory table can make the card unreadable.
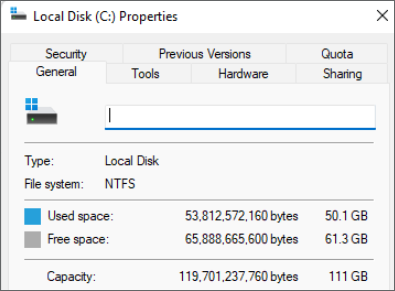
Open Settings, then Data Management, to see how space is split between software and the Album. That figure is the number you need before you buy a replacement card.
Size the New Card Against the Real Data
- Add both figures. The console reports software and Album usage separately, so add them before you decide on capacity.
- Match or exceed the source. A whole-card clone needs a destination at least as large as the old card, even when most of the old card is empty.
- SDXC needs current firmware. Cards of 64GB and above follow the SDXC standard and use exFAT, which the console reads only on a recent system version.
- Speed ratings matter. A UHS-I card rated U3 and A2 keeps load times close to internal storage; UHS-II cards fall back to UHS-I speed in the console.
- Skip counterfeit stock. Bargain cards often report a huge capacity and fail as soon as you pass the real limit, which corrupts game data.
On an OLED model a 1TB or 2TB card is within the supported range. Early consoles have shown trouble with very large cards, so test with the games you actually own before you depend on one.
Clone the Card, Not the Games
- Many cards have no partition table. A microSD card is often formatted as one superfloppy volume, so clone the disk rather than a single partition.
- Use two readers. Plug the old and new cards into separate USB readers on a Windows PC, and keep the console switched off during the copy.
- Copy the file system too. An intelligent clone moves the file system, its allocation table and hidden index files, not only the visible game folders.
- The new card is erased. Confirm the destination twice, because Windows often swaps drive letters when two card readers are attached.
- Do not reformat afterwards. Formatting on a PC can change the cluster size and break the folder layout the console expects.
A file-level copy is fine for moving a few screenshots, but installed games consist of thousands of small indexed files. Cloning the whole card avoids a full re-download and keeps play records attached to the right titles.
Clone the Card with Qiling Disk Master
Card readers make the job simple: Windows sees each microSD as a normal disk, and a disk clone copies the volume together with the files that a file explorer hides.
Watch the video tutorial below to clone the drive step by step with Qiling Disk Master.
Step 1. Open Qiling Disk Master, choose Clone, and then select Disk Clone.

Step 2. Insert both cards into USB readers and select the old microSD as the source; a card without a partition table still appears as a disk.

Step 3. Select the new microSD as the destination and compare its reported capacity with the old card before you continue.

Step 4. Leave the intelligent mode in place so the card's single volume is copied with its metadata and hidden files intact.

Step 5. Click Proceed, wait for the finish message, then close the tool and eject both readers safely.

Check the New Card in the Console
- Power off completely. Hold the power button until the screen goes dark, then remove the old card and insert the new one.
- Open Data Management. The menu lists the software stored on the card and the free space the console reports for it.
- Count the Album. Screenshots and videos should appear with the same dates and in the same order as before the swap.
- Launch two or three games. Start one large title and one small one; a prompt to re-download points to a missing folder or index file.
- Keep the old card. Leave it untouched for a week so you can drop back if a game misbehaves on the new card.
If the console calls the card unreadable, re-seat it with the power off and check the system version. The console needs current firmware to mount large exFAT cards, and an update is cheaper than another card.
FAQs About Switch Card Copies
Does cloning the SD card copy my game saves?
Most save data is kept in the console's internal memory, so the clone protects games, updates and the Album. Cloud saves cover the titles that support them.
Can I use a new card without cloning?
You can insert an empty card and re-download your games, but the Album and any card-based data are gone. Cloning is the only way to keep them.
What file system should the new card use?
Leave whatever the clone wrote. The console uses FAT32 on SDHC cards and exFAT on SDXC cards, and it expects that layout to stay unchanged.
Why is a 1TB card slower than the old 128GB card?
Cheap high-capacity cards often have weak random write performance. Choose a U3 and A2 card from a known brand to keep load times short.
Is it safe to clone a card that already shows errors?
No. Copy the readable contents to a PC first, then clone to a fresh card and verify the Nintendo folder before you trust it with your library.
Keep a Second Copy Before You Swap
While the clone runs, the old card is your only fallback. Copy its Nintendo folder to a folder on your PC first, and treat that folder as read-only until the new card has started several games.
Watch the video tutorial below to back up Windows and restore it if the clone fails.
Step 1. On the PC that runs the card readers, open Qiling Disk Master and choose System Backup to protect the machine doing the copy.

Step 2. Save the image to a drive that is neither of the two cards, so a faulty reader cannot damage the backup as well.

Step 3. Click Proceed and let the backup finish; use the shut-down option if the PC would otherwise idle through the night.

Step 4. If the new card is rejected, restore the PC, then copy the archive back to the old card before trying a different card model.

Conclusion
A Switch card upgrade succeeds when the whole card moves, not just the game folders. Read the console's used space, buy a genuine card of equal or larger capacity, clone the disk rather than a partition, and verify the Album and a few games before you retire the old card.
For more on cloning removable media, see How to Clone a PS4 Hard Drive to an SSD, How to Clone a Steam Deck SSD to a Larger SSD, How to Clone an External Hard Drive to an Internal SSD, and How to Clone a Data Drive Without an Operating System.
Related Articles
- How to Clone an SD Card for Raspberry Pi
Image a small card and keep its boot layout. - How to Clone a USB Drive to an ISO or Image File
Store a card as a file before you write it again. - How to Clone a Navigation SD Card
Copy map data without breaking the device index. - How to Clone a Bootable USB Drive to Another USB
Move a bootable stick with its hidden boot area. - How to Clone Hard Drive to SanDisk SSD
Match a new flash drive to an older source disk.
Products
Articles & Tutorials
- Data Recovery
- Data Backup
- File Recovery
- File Backup
- System Backup and Restore
- Disk and Partition Clone
- Technical articles
- Mobile articles
- Disk Master Help
- Windows Data Recovery Tutorials
- Windows Secure Delete Tutorials
- Windows Partition Management Tutorials
- Windows File Backup and Restore Tutorials
- Windows System Backup and Restore Tutorials
- Windows Disk Backup and Restore Tutorials
- Windows Clone Tutorials